Categories:
Stages in use cases development over Aura NLP
Guidelines that describe the orderly steps required for the development of a use case over Aura NLP, with the objective of making Aura understand the users’ utterances.
Introduction
These steps correspond to 3 main overall stages:
- Build the understanding model and train it, that is, teach Aura to understand
- Test the model through an ongoing and cyclical process until the accuracy in terms of intents and entities recognition is good enough
- Certify the model and publish it
Prerequisites
Firstly, check that all the prerequisites are fulfilled:
- Technical resources are available
- Aura NLP Virtual Machine is installed and working
- NLP data repository local branch is generated
1. Build up the NLP dynamic pipeline
For the development of a new use case, you must design a dynamic pipeline (pipeline.json file) through the most appropriate combination of stages and connectors for the recognition of intents and entities in the use case.
For this purpose, follow the guidelines in the succeeding sections.
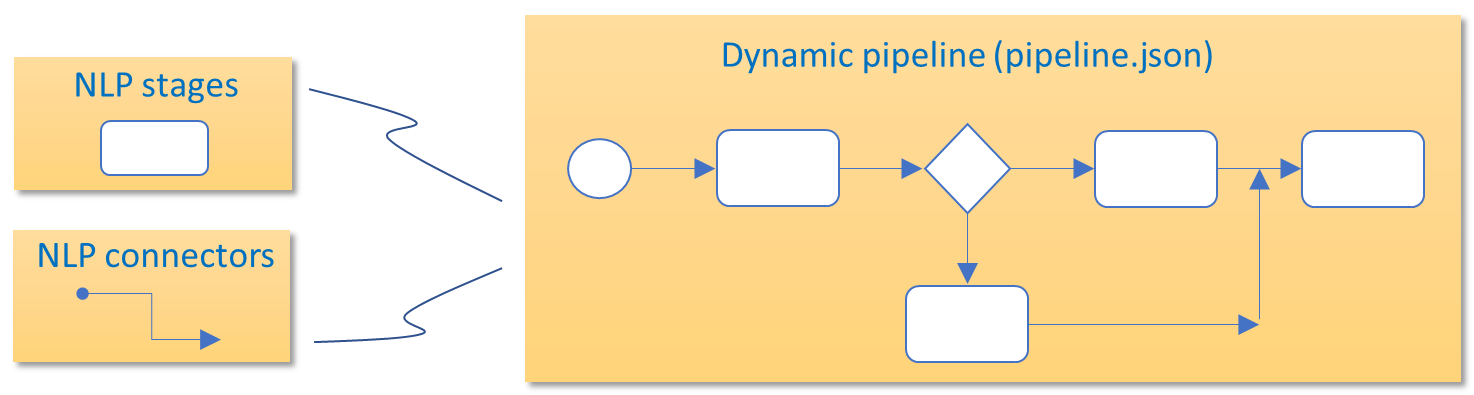
1.1. Select the elements composing your NLP pipeline
Select the elements composing the pipeline (stages, connectors, normalization pipelines) depending on the recognition process required for the use case and its associated channel, and combine them for the design of the NLP pipeline.
Catalog of components for NLP pipelines
1.2. Generate the pipeline.json file
The base file for the dynamic pipeline is pipeline.json, that must be generated in the following path from the NLP repository:
aura-nlpdata-[country_code]/data/[language]/[channel]/pipeline.json
Edit this file including the required fields from all your selected stages and connectors and indicating the hierarchy between them:
-
name: Unique string that identifies the pipeline. -
initial_node_id: Key of the element where the pipeline starts. It must appear as the first one also in the fieldselementsandlinks. -
elements: Include in this field each element composing the pipeline (stages and connectors) and characterize them with two attributes:type: Two feasible values:stage: pipeline stage.joint: connector between pipeline stages.
classpath: Class path of the specific element, that is, Python class reference from the root directory that must be included in order to use this stage.
To obtain theclasspathof each element of your pipeline:- Access to the NLP catalog of components
- Look for your specific stage, connector or normalization pipeline
- Copy the classpath in the corresponding Path section. Take into account:
- The name of the element is free, but it should be auto-descriptive of its content.
- The first element must be the one specified in
initial_node_id. - The elements must be ordered: after a parent, its children must be included.
-
args: This field is only required for the configuration of three NLP components: Length Adapter; Domain Selector connector; Disambiguation connector -
links: This field includes the hierarchy of the pipeline and connections between its elements.- Each link item contains the connectors (as keys) and their children are the stages or other connectors they deal with.
- Each key in links must be of joint type.
See below a practical examples of the pipeline.json file:
Example 1. Garua pipeline.json file
The pipeline hierarchy can be seen in the boxes that contain other elements (PygrapeCanlaonPipeline and AcotangoNothresholdPipeline). Diamond boxes represent joint stages in the pipeline.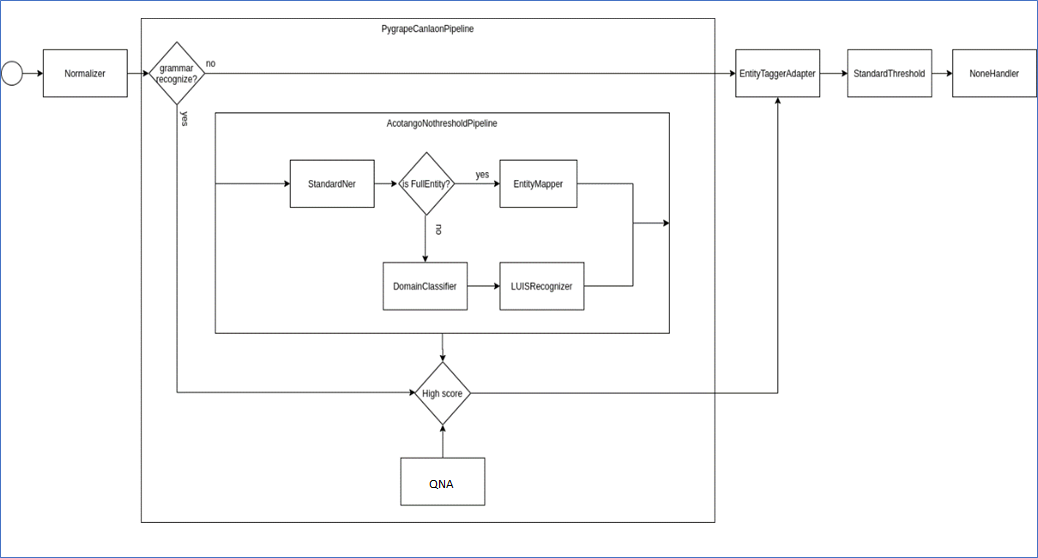
{
  "name": "Garua",
  "initial_node_id": "GaruaPipeline",
  "elements": {
    "GaruaPipeline": {
      "type": "joint",
      "classpath": "auracog_pipelines.pipelines.base.BasePipeline"
    },
    "FromConfigNormalizerWrapper": {
      "type": "stage",
      "classpath": "auracog_pipelines.stage_wrappers.normalizer_wrapper.from_config_normalizer_wrapper.FromConfigNormalizerWrapper"
    },
    "PygrapeGrammarWrapper": {
      "type": "stage",
      "classpath": "auracog_pipelines.stage_wrappers.grammar_wrapper.pygrape_grammar_wrapper.PygrapeGrammarWrapper"
    },
    "AcotangoNoThresholdPipeline": {
      "type": "joint",
      "classpath": "auracog_pipelines.pipelines.base.BasePipeline"
    },
    "StandardNerWrapper": {
      "type": "stage",
      "classpath": "auracog_pipelines.stage_wrappers.ner_wrapper.standard_ner_wrapper.StandardNerWrapper"
    },
    "FullEntityORDCCLUPipeline": {
      "type": "joint",
      "classpath": "auracog_pipelines.pipelines.joint.conditionals.OrPipeline"
    },
    "FullEntityRecognizerWrapper": {
      "type": "stage",
      "classpath": "auracog_pipelines.stage_wrappers.recognizer_wrapper.full_entity_recognizer_wrapper.FullEntityRecognizerWrapper"
    },
    "DCCLUPipeline": {
      "type": "joint",
      "classpath": "auracog_pipelines.pipelines.base.BasePipeline"
    },
    "DomainClassifierWrapper": {
      "type": "stage",
      "classpath": "auracog_pipelines.stage_wrappers.domain_classifier_wrapper.domain_classifier_wrapper.DomainClassifierWrapper"
    },
    "CluRecognizerWrapper": {
      "type": "stage",
      "classpath": "auracog_pipelines.stage_wrappers.recognizer_wrapper.clu_recognizer_wrapper.CluRecognizerWrapper"
    },
    "EntityTaggerAdapterWrapper": {
      "type": "stage",
      "classpath": "auracog_pipelines.stage_wrappers.adapter_wrapper.entity_tagger_adapter_wrapper.EntityTaggerAdapterWrapper"
    },
    "StandardThresholdWrapper": {
      "type": "stage",
      "classpath": "auracog_pipelines.stage_wrappers.adapter_wrapper.standard_threshold_wrapper.StandardThresholdWrapper"
    },
    "NoneHandlerWrapper": {
      "type": "stage",
      "classpath": "auracog_pipelines.stage_wrappers.adapter_wrapper.none_handler_wrapper.NoneHandlerWrapper"
    },
    "ExactMatchOrRestStages": {
      "type": "joint",
      "classpath": "auracog_pipelines.pipelines.joint.conditionals.OrPipeline"
    },
    "ExactMatchRecognizerWrapper": {
      "type": "stage",
      "classpath": "auracog_pipelines.stage_wrappers.recognizer_wrapper.exact_match_recognizer_wrapper.ExactMatchRecognizerWrapper"
    }
  },
  "links": {
    "GaruaPipeline": [
      "FromConfigNormalizerWrapper",
      "ExactMatchOrRestStages",
      "EntityTaggerAdapterWrapper",
      "StandardThresholdWrapper",
      "NoneHandlerWrapper"
    ],
    "ExactMatchOrRestStages": [
      "ExactMatchRecognizerWrapper",
      "PygrapeGrammarWrapper",
      "AcotangoNoThresholdPipeline"
    ],
    "AcotangoNoThresholdPipeline": [
      "StandardNerWrapper",
      "FullEntityORDCCLUPipeline"
    ],
    "FullEntityORDCCLUPipeline": [
      "FullEntityRecognizerWrapper",
      "DCCLUPipeline"
    ],
    "DCCLUPipeline": [
      "DomainClassifierWrapper",
      "CluRecognizerWrapper"
    ]
  }
}
Example 2. Configuration for the stage Length Adapter
See below an example of how to integrate this stage in a pipeline:
{
  "name": "Example",
  "initial_node_id": "ExamplePipeline",
  "elements": {
    "ExamplePipeline": {
      "type": "joint",
      "classpath": "auracog_pipelines.pipelines.base.BasePipeline"
    },
    "LengthAdapterThreshold": {
      "type": "stage",
      "classpath": "auracog_pipelines.stage_wrappers.adapter_wrapper.length_adapter_wrapper.LengthAdapterWrapper",
      "args": {
         "max": 50,
         "min": 1,
         "intent_template": "intent.example"
      }
    }
  },
  "links": {
    "ExamplePipeline": [
      "LengthAdapterThreshold"
    ]
  }
}
The following snippet shows how to configure more than one stage of the Length Adapter to return different intents for max or min length characters.
  "name": "Example",
  "initial_node_id": "ExamplePipeline",
  "elements": {
    "ExamplePipeline": {
      "type": "joint",
      "classpath": "auracog_pipelines.pipelines.base.BasePipeline"
    },
    "LengthAdapterMaxThreshold": {
      "type": "stage",
      "classpath": "auracog_pipelines.stage_wrappers.adapter_wrapper.length_adapter_wrapper.LengthAdapterWrapper",
      "args": {
        "max": 50,
        "intent_template": "intent.max.example"
      }
    },
    "LengthAdapterMinThreshold": {
      "type": "stage",
      "classpath": "auracog_pipelines.stage_wrappers.adapter_wrapper.length_adapter_wrapper.LengthAdapterWrapper",
      "args": {
        "length_threshold_map": {
          "min": 1,
          "intent_template": "intent.min.example"
        }
      }
    }
  },
  "links": {
    "ExamplePipeline": [
      "LengthAdapterMaxThreshold",
      "LengthAdapterMinThreshold"
    ]
  }
}
1.3. Validate your pipeline.json file
At this stage, it is recommended to validate the generated pipeline.json file in order to assure that it is consistent and that all stages and joint operations are correctly related.
For this purpose, the following verifications are recommended:
- Each item of
linksincludes dicts, where the key is a name and the values are lists of class names. - Each item of
elementshastypeandclasspath. initial_node_idis a key inlinks.- Each key in
linksis a joint stage (by havingtypeequals tojointinelements). - Each
classbelonging to the values of alinksitem is present inelements.
Different examples of invalid pipeline.json files
Invalid pipeline as WrongPipeline key does not have a list of class names in links section:
{
   "name": "WrongPipelineExample",
   "initial_node_id": "WrongPipeline",
   "elements": {
     ...
   },
   "links": {
     "WrongPipeline":"DCCLUPipeline",
     "DCCLUPipeline": [
       "DomainClassifierWrapper",
       "CluRecognizerWrapper"
     ]
   }
 }
Pipeline contains an element without type:
{
  "name": "WrongPipelineExample",
  "initial_node_id": "WrongPipeline",
  "elements": {
    "WrongPipeline": {
      "type": "joint",
      "classpath": "auracog_pipelines.pipelines.base.BasePipeline"
    },
   "DCCLUPipeline": {
      "classpath": "auracog_pipelines.pipelines.base.BasePipeline"
    },
...
Pipeline MissingPipeline is not included as a key in the field links:
{
   "name": "WrongPipelineExample",
   "initial_node_id": "MissingPipeline",
   "elements": {
     ...
   },
   "links": {
     "WrongPipeline": [
      "DCCLUPipeline",
      "EntityTaggerAdapterWrapper",
       "StandardThresholdWrapper",
       "NoneHandlerWrapper"
     ],
     "DCCLUPipeline": [
       "DomainClassifierWrapper",
       "CluRecognizerWrapper"
     ]
   }
 }
Pipeline with a stage (DomainClassifierWrapper) as key in links and not a joint:
{
   "name": "WrongPipelineExample",
   "initial_node_id": "WrongPipeline",
   "elements": {
     "WrongPipeline": {
       "type": "joint",
       "classpath": "auracog_pipelines.pipelines.base.BasePipeline"
     },
    "DCCLUPipeline": {
       "type": "joint",
       "classpath": "auracog_pipelines.pipelines.base.BasePipeline"
     },
    "DomainClassifierWrapper": {
       "type": "stage",
       "classpath": "auracog_pipelines.stage_wrappers.domain_classifier_wrapper.domain_classifier_wrapper.DomainClassifierWrapper"
     },
     "CluRecognizerWrapper": {
       "type": "stage",
       "classpath": "auracog_pipelines.stage_wrappers.recognizer_wrapper.clu_recognizer_wrapper.CluRecognizerWrapper"
     },
     "EntityTaggerAdapterWrapper": {
       "type": "stage",
       "classpath": "auracog_pipelines.stage_wrappers.adapter_wrapper.entity_tagger_adapter_wrapper.EntityTaggerAdapterWrapper"
     },
     "StandardThresholdWrapper": {
       "type": "stage",
       "classpath": "auracog_pipelines.stage_wrappers.adapter_wrapper.standard_threshold_wrapper.StandardThresholdWrapper"
     },
     "NoneHandlerWrapper": {
       "type": "stage",
       "classpath": "auracog_pipelines.stage_wrappers.adapter_wrapper.none_handler_wrapper.NoneHandlerWrapper"
     }
   },
   "links": {
     "WrongPipeline": [
      "DCCLUPipeline",
      "EntityTaggerAdapterWrapper",
       "StandardThresholdWrapper",
       "NoneHandlerWrapper"
     ],
     "DCCLUPipeline": [
       "DomainClassifierWrapper",
       "CluRecognizerWrapper"
     ],
    "DomainClassifierWrapper": [
       "CluRecognizerWrapper"
     ]
  }
 }
2. Configure your NLP model
It is required to configure every element composing the NLP pipeline:
-
All NLP stages (excepting Length Adapter) and normalization pipelines are configured in the file
nlp.jsonfile for each language and channel placed in the [NLP repository]:
aura-nlpdata-[country_code]/config/etc/nlp_config/nlp.json -
As an exception, Length Adapter stage, Domain Selector connector and Disambiguation connector need a specific configuration in the file
pipeline.json(argsfield) placed in the [NLP repository]:
aura-nlpdata-[country_code]/data/[language]/[channel]/pipeline.jsonTo obtain the configuration of each element of your pipeline:
- Access to the NLP catalog of components
- Look for your specific stage, connector or normalization pipeline
- Copy the classpath in the corresponding Configuration section.
-
If dictionaries are included in the NLP model, they must be also configured:
3. Define your data resources
Every NLP stage needs particular resources for its training and testing that must be generated through the edition of a specific file for each of them.
3.1. Generate the files for each NLP stage
-
Generate the specific file for each stage composing your NLP pipeline and for each language and channel.
- Access to the NLP catalog of components
- Look for your specific stage
- Find in the Files section the specific files required for this stage
- Edit them
-
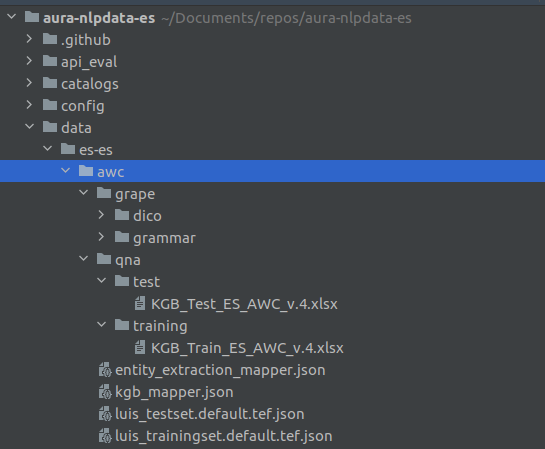
Place these files in:
aura-nlpdata-[country_code]/data/[language]/[channel], where:- language corresponds to the culture code of all the languages supported by Aura (e.g.,
es-es,en-gb,de-de,pt-br). - The channel variable in the pattern is the channel code used to identify the specific channel (for example,
mh(Movistar Home),mp(Movistar Plus)).
- language corresponds to the culture code of all the languages supported by Aura (e.g.,
3.2. Generate dictionaries
If your NLP pipeline contains entities recognition stages (Entity Tagger Adapter; Standard NER and Gazetteer NER), it is needed to use the dictionaries sdict_items.json and sdict_aliases.json which are automatically generated from two sources: manual catalogs and/or URM data.
Learn how to do it in generation of Aura NLP dictionaries.
4. Define your end-to-end tests
E2E test files perform the evaluation of accuracy in the recognition of domains, intents and entities, with two approaches:
- Measurement of the overall accuracy of the pipeline (mandatory)
- Measurement of the accuracy of the different stages of the pipeline (optional)
Once generated, when running the corresponding pipeline with the user’s utterance as the pipeline input, the system will compare the result provided by the pipeline with the expected values declared in the file (intent, entities and domain) to calculate the pipeline accuracy.
4.1. Define E2E test set files
You must define a file for the end-to-end evaluation of the system as well as regression tests: testset.json and regression.json. They both are dictionaries with the same structure:
phrase: Statement (sentence, phrase or isolated word) to be tested.domain: Inferred domain for the user’s utterance. Possible values:- <
domain_name>: name of the identified domain. null: when domain is not of application.default: in case there is only one domain or in case the grammar engine recognizes the whole utterance.
⚠️ The value for the fielddomainmust be included using quotation marks for every value excepting for null.
- <
intent: Expected intent.options: List of .json containing certain packages of intents and entities to disambiguate (optional field).entities: Expected entities. It is a list of json with the following fields:value: entity value to be recognized.e_type: entity type expected.start_index: Initial position of the entity in the filled phrase.end_index: final position of the entity in the filled phrase.canon: expected canon for a given entity. If canon is deactivated or the entity recognizer does not work with canon, this field must be completed with the same value of the fieldvaluebut normalized (e.g., “Film”, value: Film; canon: film).- This field is currently used in Spain for those use cases related to TV content searches (e.g., “search for films”) in which there are specific codes (labels) for searching particular content types that the API needs to find in the corresponding catalogs to resolve the petition.
- For instance, in the utterance “I want to watch an action movie”, “movie” is the value of the entity whereas “movies” may be its canon and “MV” the label the API needs to find this type of content in the catalogs. The same could be applied to the genre “action”.
label: expected label. It can have the valuenull. The same use ascanonis currently applied.
4.1.1. testset.json
At this stage, you should define the testset.json file in:
pipeline_eval/ob/[country_code]/resources/[language]/[channel]/testset.json
It must include the testing statements for the E2E evaluation of the system’s accuracy (sentences or isolated words) and in order to identify potential problems (e.g., unmatching, low confidence/score).
You can generate different testset.json files for different purposes, for instance, for evaluation of metrics or to carry out regression tests at a later stage. To calculate the metrics, all the different files are considered as a unique one.
Example of testset.json file:
[
  {
    "phrase": "put the film Coco",
    "domain": "default",
    "intent": "intent.tv.search",
    "entities": [
      {
        "value": "Coco",
        "e_type": "ent.audiovisual_film_title",
        "start_index": 13,
        "end_index": 17,
        "canon": "coco",
        "label": null
      }
    ],
   "options": []
  },
  {
    "phrase": "show me my bill",
    "domain": "default",
    "intent": "intent.billing.check",
    "entities": [
      {
        "value": "bill",
        "e_type": "ent.bill",
        "start_index": 12,
        "end_index": 15,
        "canon": "bill",
        "label": null
      }
    ],
    "options": []
  }
]
4.1.2. regression.json
Define your regression.json file in the path:
pipeline_eval/ob/[country_code]/resources/[language]/[channel]/regression.json
It may include crucial functionalities that must work in the system or other key checks that are not included in testset.json. The purpose is to verify that modifications do not impact in existing features and to prevent the system from bugs.
Previously executed test cases are re-executed in order to verify the impact of a change.
4.2. Define stage-specific E2E test set files
ℹ️ This is an optional step if you want to include specific E2E tests for the evaluation of an isolated stage in the testing batch.
You can create specific E2E testsets files for the evaluation of an isolated stage. It is done adding phrases that must be solved by this specific stage in order to ensure that the end-to-end evaluation is representative for that stage and avoid tests that do not evaluate it.
Currently, this is only available for the OpenAI embeddings recognizer stage.
For the definition of specific E2E tests for this stage, follow these instructions:
- Define specific phrases to be resolved by the OpenAI embeddings recognizer stage.
- Execute the script
build_local_testset.shin:
aura-nlpdata-[country_code]/tools/build_local_testset.sh - Once executed, it creates a stage-specific
testset.jsonfile in the path: tmp_testsets/[country_code]/resources/[language]/[channel]/
Although the name of the file can never be modified, it is possible to modify its content, as long as its structure is respected, adding new test sentences or eliminating them. - To be able to use these E2E test, copy it in the following path for it to be packaged with the general
testset.jsonfile: pipeline_eval/ob/[country_code]/resources/[language]/[channel]/
4.3. Best practices for the definition of E2E test set files
- All intents should be represented within all the existing test
testset.jsonfiles. - Firstly, generate a battery of statements for the use case, taking into account its semantic complexity. After that, divide all the generated statements into three groups in the way that statements in the training set are not included in the test sets and vice versa:
- Training set
- Specific NLP stage test set
- E2E test set
- Follow this pre-established ratio between training and testing statements: each intent must satisfy that the number of test statements is, at least, 20% of the total statements (training and test statements).
- Depending on the specific NLP stages, the number of recommended testing statements must be representative. In general terms, and only as a guidance, the number of testing statements can be as follows:
- Only CLU: 20% of statements in CLU training
- CLU + Grammar: 20% of statements in CLU training
- Only Grammar: 3 statements
- More than 1 use case on an intent: 30 statements per use case.
- The testing statements provided by the Product Team and/or UX Team must be included, as prototypical of a given use case.
- The statements must include different variations (for example, with/without entities, etc.).
- Keys of the
testset.jsonfile should be ordered from generic to specific ones:
        {
            "phrase": "Search the film Frozen",
            "domain": "domain.tv",
            "intent": "intent.tv.search",
            "entities": [],
            "options": []
        },
- The end-to-end test set is specific for each of the potential channels, as some use cases can be implemented in certain channels but not in others.
- The field
optionsis optional and only included when disambiguation is considered. - In case that, due to non-satisfactory results during the evaluation process, a re-training is required, linguists should check that all the modifications are included in the E2E tests.
- In case roles are defined in entities for their recognition through the Grammar stage, they do not affect to the E2E tests (See more information regarding roles in Grammars in recognition of utterances with several entities in Grammars.
5. Train your understanding model
Once all the resources for each stage of the pipeline have been generated, you have to launch the training process in order to compare the testing batch against the training model.
For this purpose, the aura-nlpdata-[country_code]/tools folder of the NLP repository includes bash scripts, described in the following sections.
It is important to mention that the NLP system can be locally trained in an intelligent way, meaning that only the stages that have been modified (from a last training) are trained again, thus making the process much more efficient.
5.1. Set up configuration properties
-
Go the the path: aura-nlpdata-[country_code]/tools/build_local_variables.sh.tpl
-
This file is a template used for configuration purposes, specifically for defining CLU connection parameters. To setup these properties, copy this file to a new one named
build_local_variables.sh, removing the.tplextension. -
Fill in the config variables included in this file with the local credentials, as explained below.
-
This file is automatically ignored by git because it has been included in the
.gitignorefile, thus it must not be included manually.
The parameters to fill in the build_local_variables.sh script are shown below:
#!/usr/bin/env bash

# BUILD_LOCAL AND RUN_WEB_TRAININGS
export AZURE_NLP_MODELS_URL=""
export OAI_ID_SUBSCRIPTION=""
export OAI_RESOURCE_GROUP=""
export OAI_ACCOUNT_NAME=""
export OAI_AZURE_TOKEN_CLIENT_ID=""
export OAI_AZURE_TOKEN_CLIENT_SECRET=""
export OAI_AZURE_TOKEN_TENANT=""
export OAI_USER=""
export RESOURCE_NAME_OPENAI=""
export QDRANT_URL=""
export QDRANT_API_KEY=""
export CLU_SUBSCRIPTION_KEYS=""
export CLU_RESOURCE_NAME=""
export CLU_USER=""
export CLU_STORAGE_SUBSCRIPTION_KEYS=""
export CLU_STORAGE_RESOURCE_NAME=""

# RUN_WEB_TRAININGS
export GITHUB_TOKEN=""
export GITHUB_USER=""
export REPO_OWNER=""
export TRAINING_WEB_AZURE_BASE_URL=""
export TRAINING_WEB_AZURE_SAS_TOKEN=""

# BUILD_CATALOGS
export LANGUAGE=""
export CHANNEL_LIST=""
export AZURE_CATALOGS_ACCOUNT_NAME=""
export AZURE_CATALOGS_TOKEN=""

export AWS_CATALOGS_ACCESS_KEY=""
export AWS_CATALOGS_SECRET_KEY=""
export CATALOGS_RESOURCES_CONTAINER=""
export CATALOGS_RESOURCES_PROVIDER=""
The required variables are described below:
AZURE_NLP_MODELS_URL: URL for the Azure NLP models container.GITHUB_TOKEN: Variable only required for ABACUS. Personal token provided by GitHub for secure authentication.GITHUB_USER: Variable only required for ABACUS. Name of Github user.REPO_OWNER: Variable only required for ABACUS. Name of the owner of the repository. Value:Telefonica.TRAINING_WEB_AZURE_BASE_URL: Variable only required for ABACUS. URL base to get web package. It is provided by APE Team.TRAINING_WEB_AZURE_SAS_TOKEN: Variable only required for ABACUS. SAS token with the required permission granted. It is provided by APE Team.OAI_ID_SUBSCRIPTION: Azure OpenAI subscription ID. It can be obtained from the subscription website.OAI_RESOURCE_GROUP: Name of resource group in Azure where the OpenAI applications are created.OAI_ACCOUNT_NAME: Name of OpenAI resource to be used.OAI_AZURE_TOKEN_CLIENT_ID: Client ID of Azure Portal – App registration page assigned to your app.OAI_AZURE_TOKEN_CLIENT_SECRET: Application secret created in the app registration portal.OAI_AZURE_TOKEN_TENANT: Value that indicates who can sign into the application.OAI_USER: Parameter to identify the user of OpenAI application. It is unique for each developer in order not to overlap the OpenAI trainings. This value is used to create database collections.RESOURCE_NAME_OPENAI: Name of resource to be used.QDRANT_URL: URL of Qdrant service. In the virtual machine, it ishttp://localhost:6333.QDRANT_API_KEY: APIkey of Qdrant service. In the virtual machine, it isvoid.CLU_SUBSCRIPTION_KEYS: Parameter provided by CLU to create applications.CLU_RESOURCE_NAME: Name of resource to be used.CLU_USER: Parameter to identify the user of CLU application. It is unique for each developer in order not to overlap the CLU trainings.CLU_STORAGE_RESOURCE_NAME: Name of shared resource to be used as library of applications.CLU_STORAGE_SUBSCRIPTION_KEYS: Parameter provided by CLU to import and copy applications in CLU shared resources.
📄 For detailed information regarding how to obtain Azure credentials for CLU, please check the section Complementary processes.
📄 Information regarding how to get ABACUS variables in ABACUS documentation.
📄 If dictionaries are included in the NLP model, additional variables are required. check them in Set up specific configuration variables for dictionaries.
5.2. Execute the training script
From this point on, linguists or NLP experts have two options to continue with the process:
| OPTION A | OPTION B |
|---|---|
| Use our web tool ABACUS 1.0.0. following the guidelines in ABACUS documentation. (*) After using ABACUS, continue with the process for the NLP model deployment in section Certify NLP model accuracy |
Execute the training script, following the guidelines below |
-
Execute the training script: aura-nlpdata-[country_code]/tools/build_local.sh
-
The script automatically creates a Python virtual environment to ensure the training and evaluation processes are being carried out in an isolated and encapsulated way.
-
All dependencies included in
requirements.txtare installed in the virtual environment. -
This script also validates the format of the involved files to ensure they match the specifications.
-
Once this script is executed, a
tmpfolder is created in the root repository. In this folder, you can find some temporary files corresponding to the resources, as well as the results and metrics obtained from the training process.
This directory is ignored by the git version control system because it has been included in the.gitignorefile and it must not be included manually.
Intelligent training
The NLP system is trained in an intelligent way, so that the training of certain stages can be skipped, if they were previously trained, making the process more agile and efficient. This feature is based on the verification of an internal hash table and hash index generated after training.
The default behavior of the intelligent training is:
- On one hand, only the stages that have been modified from a previous retraining in a specific channel are trained again. For this purpose, the system keeps a hash table in the tmp/ folder to detect changes.
- On the other hand, if the configuration and the model generated to train a stage are the same as those of a previous stage but of a different channel, the last do not need to be trained and it will use the model trained before, making the process much more efficient. To achieve this, an internal hash index is generated in the tmp/trained_models folder. It is important that the training files in every channel are exactly the same, with similar name and similar content.
However, the hash table and hash index can be managed manually in order to modify this behavior:
Management of the hash index to force the training of a stage in a specific channel
The hash table is included in the tmp/ folder after training. This folder must not be deleted when tests are executed, unless all the stages are to be re-trained again.
If you want to force the training of a specific stage, its corresponding file can be deleted in the specific channel.
For instance, if there are no modifications on a stage within the mh channel, but you want to force its retraining, then go to the tmp/ folder and delete the file saved_training_hashes.json in the path:
tmp/recognizer/ob/ES/es-es/mh/resources/saved_training_hashes.json
Management of the hash index to force the training of a stage in different channels
The hash index identifies similar training files from stages of the same type that belong to different channels. It is included in the following folder: tmp/trained_models/[stage]/[hash]/
[stage]: name of a stage.[hash]: it is resulting from the content of the training files used for that stage and its specific configuration.
Each sub-tree contains the necessary files that were used during the training phase for that specific stage.
By default, if the same stage with the same training files exists in different channels, only the first one found is retrained.
If you want to force the training for a specific stage, in addition to eliminating the hash tables seen in the previous section, delete the tmp/trained_models/[stage] for this stage.
5.3. Generation of results from the training process
When the training process is finished, certain temporary files are created in the tmp/ directory in the root repository.
This folder contains the resources of the NLP model and results and metrics from the training process obtained from launching the testing batch against the training model.
Files generated in the tmp/ directory are organized as shown in the following tables:
Input resources for the NLP model
The input resources for the NLP training are placed on:
| Input resources | tmp/ folder |
|---|---|
| Training and test set files in data/ | tmp/[stage]/ob/[country_code]/[language]/[channel]/ |
| E2E test files | tmp/pipeline_eval/ob/[country_code]/resources/[language]/[channel]/ |
bootstrap.cfg config file |
tmp/pipeline_eval/ob/[country_code]/etc/ |
Results from the NLP training
| Results from the NLP training | tmp/ folder |
|---|---|
| Result files from each NLP stage training | tmp/results/[stages]/[country_code]/[language]/[channel]/ |
| Result files from the overall pipeline training | tmp/results/pipeline_eval/[country_code]/ |
| Result files from the overall pipeline training: regression tests | tmp/results/pipeline_eval/[country_code]/regression/ |
Testset files
If you have defined stage-specific E2E testset files, then after the execution of the script build_local_testset.sh, some temporary files are created in the tmp_testsets/ folder:
| Testset files | tmp/ folder |
|---|---|
| Stage-specific E2E testset files | tmp_testsets/[platform]/resources/[language]/[channel]/ |
Each channel folder contains the end-to-end test files for each stage (currently, only for OpenAI embeddings recognizer). These files are used for the evaluation of the pipeline in future trainings and can be extended with as many tests as desired.
Intelligent training behavior
| Intelligent training behavior | tmp/ folder |
|---|---|
| Hash table including the modified training files | tmp/recognizer/ob/ES/es-es/mh/resources/saved_training_hashes.json |
| Hash index including the modified training and test set files for a specific stage | tmp/trained_models/[stage]/[hash]/ |
6. Evaluate E2E accuracy locally
With all the results from the training process, saved in the tmp/results/ folders as explained before, now these results must be analyzed in order to evaluate if the NLP process is accurate enough for the recognition of intents and entities.
✅ If the local analysis of results is satisfactory at this stage, linguists can proceed to create the Pull Request.
⛔ If the analysis shows that the metrics are not good enough, meaning that the recognition is less accurate than required, then linguists must work again on the resources data to increase the performance and repeat the training process to re-calculate the metrics.
The analysis of results can be carried out from two different points of view, as explained in the following sections:
- Focusing on each stage composing the pipeline
- Or treating the pipeline as a single component to measure the end-to-end performance.
6.1. Evaluate NLP stages accuracy
For this purpose, analyze the following file, generated after training in the tmp/results/ folder:
tmp/results/[stages]/[country_code]/[language]/[channel]/test_results.txt
This file is generated per each pipeline stage, country, language and channel in the above-mentioned path and contains the metrics of the stage performance:
- Precision: reflects false positives (false statements recognition)
- Recall: reflects false negatives (missed items)
- F1-score: combines precision and recall
- Generation of average values
However, these metrics depend on the specific stages of the pipeline as, for example, the normalizer stage requires no evaluation and others such as Domain Classifier, NER or the intent recognizers can use all or some specific metrics among the four previously defined.
Moreover, depending on the stage, it is possible to find other files such as:
cv_results.txtthat includes metrics regarding cross-validationfitted-params.txtwith information about the algorithm and parameters used to train the model.
Below, an example of test_results.txt file is shown, that corresponds to the Domain Classifier stage evaluation. The values for precision, recall, f1-score and support for each domain classified are calculated, as well as the total average.
| precision | recall | f1-score | support | |
|---|---|---|---|---|
| None | 0.40 | 0.84 | 0.54 | 32 |
| intent.tv.search | 0.97 | 0.89 | 0.93 | 122 |
| intent.common.greetings | 0.99 | 0.99 | 0.99 | 715 |
| intent.billing.check | 1.00 | 1.00 | 1.00 | 53 |
| avg / total | 0.84 | 0.93 | 0.86 | 922 |
6.2. Evaluate the overall pipeline accuracy
For the evaluation of the accuracy of the complete pipeline, you should analyze the files generated in the tmp/results/ folder after training:
tmp/results/pipeline_eval/[country_code]/
tmp/results/pipeline_eval/[country_code]/regression/
In both folders, the files are shown below, both generated from launching the testset files testset.json and regression.json:
- results.json
- details_[language]_[channel].csv
- test_results_by_intent_[language]_[channel].json
- test_results_by_intent_[language]_[channel].txt
- test_results_by_entity_[language]_[channel].json
- test_results_by_entity_[language]_[channel].txt
At this point, you are expected to analyse the results of the metrics included in these files in terms of accuracy and precision of intents and entities recognition. The files provide a detailed description about the testing statements that have obtained an unexpected result, as well as useful information for debugging purposes.
⚠️ If you use ABACUS, take into account that, currently, the tool only shows two test files:
results.json and details_[language]_[channel].csv
results.json
General file that includes the results of the overall pipeline performance through statistics regarding the number of entries misclassified in the test set and their relative scores.
The metrics that contain this file are defined below:
Accuracy intent: Percentage of successful intents.Accuracy overall: Percentage of successful inputs.Accuracy perfect in options: Percentage of successful inputs included when the first option is right.Entity error: Number of inputs in which entity recognition has failed.Intent error: Number of inputs in which intent recognition has failed.Option error: Number of inputs in which options recognition has failed.Missing entities overall: Ratio of training statements (sentences, phrases or isolated words) in which entity recognition is failed to the total number of statements.Missing entities right intent: Ratio of training statements in which entity recognition is failed but intent recognition is successful to the total number of statements with the intent recognized.Missing options overall: Ratio of training statements in which options recognition is failed to the total number of statements.Missing options right intent: Ratio of training statements in which options recognition is failed but intent recognition is successful to the total number of statements with option recognized.Perfect: Total number of inputs without errors.Perfect in options: Total number of inputs without errors where the first option is right.Test size: Total number of inputs in test set file.
Additionally, each time a Pull Request (PR) is generated, a comment appears automatically in the results.json content in the GitHub repository to ease the reviewing task.
An example of the results.json file is included below:
{
    "date": "2021-08-30T09:27:03Z",
    "language": {
        "es-es": {
            "mp": {
                "accuracy_intent": 0.9681528662420382,
                "accuracy_overall": 0.9585987261146497,
                "accuracy_perfect_in_options": 0,
                "entity_error": 3,
                "intent_error": 10,
                "missing_entities_overall": 0.009554140127388535,
                "missing_entities_right_intent": 0.009868421052631578,
                "missing_options_overall": 0,
                "missing_options_right_intent": 0,
                "option_error": 0,
                "perfect": 301,
                "perfect_in_options": 0,
                "test_size": 314
           }
        }
    },
    "ob": "ES"
}
details_[language]_[channel].csv
One file is generated per each pair language/channel, containing the original training statement, the expected values versus the obtained values for intents, entities and domains after the pipeline execution as well as an additional column with a tag summarizing the error type, with five possible values:
- D: error when recognizing the domain.
- I: error when recognizing the intent.
- E: error when recognizing the entity.
- O: error when recognizing the options.
- W: special tag used when result expected is the first option in recognized result.
This additional column is able to have more than one of these values.
In detail, fields contained in the .csv file are:
phrase: Original statement (sentence, phrase, or isolated word) evaluated.different: Summary of errors. It could have from one to three letters depending on the errors found. Suitable letters are D (domain), E (entities), and I (intent).intent_obtained: Intent obtained by the pipeline.intent_expected: Intent expected as defined in the test set.entities_obtained: Entities obtained by the pipeline.entities_expected: Entities expected as defined in the test set.options_obtained: Options obtained by the pipeline.options_expected: Options expected as defined in the test set.domain_obtained: Domain obtained by the pipeline.domain_expected: Domain expected as defined in the test set.
An example is shown below:
| phrase | different | intent_obtained | intent_expected | entities_obtained | entities_expected | domain_obtained | domain_expected | options_obtained | options_expected |
|---|
test_results by intent and by channel
They are both .txt and .json files containing the results of the pipeline performance per each pair language/channel and per intent, with the following format:
test_results_by_intent_[language]_[channel].json
The metrics that contain this file are defined below:
n: Number of successful statements.total: Total number of statements by intent.overall: Total accuracy by intent.intent: Accuracy of intents by intent.entities: Accuracy of entities by intent.options: Accuracy of options by intent.domain: Accuracy of domains by intent.perfect_in_options: Number of successful statements recognized in the first option by intent.
Example of test_results_by_intent_[language]_[channel].json:
  "intent.common.greetings": {
    "n": 2,
    "total": 2,
    "overall": 1.0,
    "intent": 1.0,
    "entities": 1.0,
    "options": 1.0,
    "domain": 1.0,
    "perfect_in_options": 0.0
  }
}
test_results_by_intent_[language]_[channel].txt
Same fields as the JSON file but written in legible mode.
Example of test_results_by_intent_[language]_[channel].txt:
PIPELINE RESULTS:
      intent.common.greetings: n:2, Total: 2, Accuracy (Overall): 1.000000, Accuracy (Intent): 1.000000, Accuracy (Entities): 1.000000, Accuracy (Options): 1.000000, Accuracy (Domain): 1.000000, Accuracy (Perfect in options): 0.000000
------------------------------

      Test Size: 4
test_results by entity and by channel
They are both .txt and .json files containing the results of the pipeline performance per each pair language/channel and per entity, with the following format:
test_results_by_entity_[language]_[channel].json
The metrics that contain this file are defined below:
n: Number of successful statements.total: Total number of statements by entity.overall: Total accuracy by entity.intent: Accuracy of intents by entity.entities: Accuracy of entities by entity.options: Accuracy of options by entity.domain: Accuracy of domains by entity.perfect_in_options: Number of successful statements recognized in the first option by entity.
An example is shown below:
{
  "ent.audiovisual_film_title": {
    "n": 4,
    "total": 4,
    "overall": 1.0,
    "intent": 1.0,
    "entities": 1.0,
    "options": 1.0,
    "domain": 1.0
  }
}
test_results_by_entity_[language]_[channel].txt
Same fields as the .json file but written in legible mode.
Example:
PIPELINE RESULTS BY ENTITIES:
------------------------------
           ent.audiovisual_film_title: n:4, Total: 4, Accuracy (Overall): 1.000000, Accuracy (Intent): 1.000000, Accuracy (Entities): 1.000000, Accuracy (Options): 1.000000, Accuracy (Domain): 1.000000
------------------------------

      Total uniques Entities: 1

      Total Entities: 4
6.3. Analyze compatibility between global grammars and local grammars
⚠️ The current section only applies if both global and local grammars are implemented in the NLP recognition process.
As explained in Grammars management the two types of grammars defined in Aura NLP recognition process, global and local, must be aligned. For checking the compatibility between both grammars, you must generate two test set files:
- data/[language]/[channel]/test_grammar/commons/testset.json
Test set with statements that must be recognized by both grammars (with identical results). - data/[language]/[channel]/test_grammar/disjoints/testset.json
Test set with statements that must be only recognized by the global grammar (as the local grammar is a subset of the global grammar).
Both tests are JSON files including a list of test phrases, as shown in the example:
[
  "push play again",
  "turn on the light"
]
These tests run through an automatic process and, if some error is detected, it is reported. In this scenario, linguists must check the errors and fix them:
Errors in disjoints testset
-
Local grammar recognizes a global phrase
This error occurs when a disjoint testset statement is recognized by the local grammar. An example of this error message for the languagees-es, channelmhand the statement “push play again”:Local grammar recognized a global phrase "push play again" for language es-es and channel mhTo resolve this problem, carry out the required modifications over the local grammar in order not to recognize the statement.
-
Global grammar does not recognize a test statement
This error occurs when a disjoint test set statement is not recognized by the global grammar.Error recognizing phrase: " push play again " by pipeline grammar for language es-es and channel mhTo resolve this problem, carry out the required modifications over the global grammar in order to recognize the statement.
Errors in the commons testset
-
Local grammar does not recognize the statement but global grammar does. The program logs the following error message:
Error recognizing phrase: "turn on the light" by local grammar for language es-es and channel mhIn order to fix this error, improve the local grammar.
-
Global and local grammars recognize different intents The program logs the following error message:
Recognized phrase "turn on the" by both grammar with different intents.
Pipeline intent: intent.domotics.light_off,
Local grammar intent: intent.domotics.light_on
In order to fix this error, improve both grammars to make them recognize the same intents.
-
Global grammar does not recognize the statement but local grammar does The program logs the following error message:
Error recognizing phrase: "turn on the light" by pipeline grammar for language es-es and channel mhIn order to fix this error, improve the global grammar.
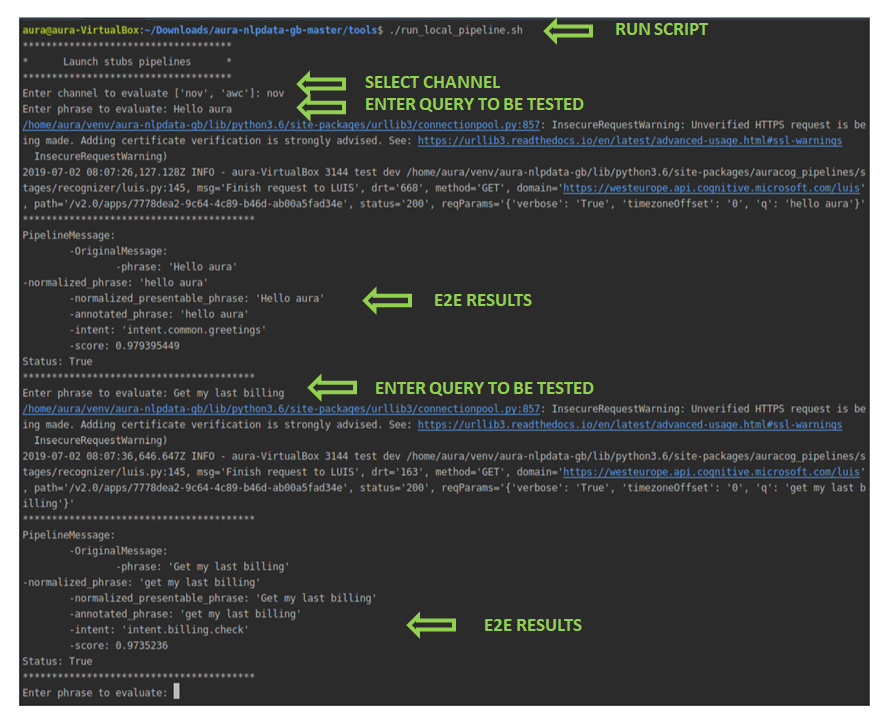
6.4. Launch and test your pipeline locally (live mode)
Another useful functionality for a quick a real-time evaluation of the accuracy of the NLP model is running the pipeline in live mode in local environment.
To use this interactive execution approach:
- Execute the script:
aura-nlpdata-[country_code]/tools/run_local_pipeline.sh - Once the script is run, select manually both channel and language.
- After that, insert testing statements representing potential users’ utterances through the command line in a responsive way.
- Evaluate the response in real time to the input statement: the associated intents, entities and score provided by the system.
⚠️ It is important to run this script after the build_local.sh (that is, after training the model) to ensure the system has been trained and all the resources have been generated.
This script neither generates temporary files nor directories and it can be run from the IDE or the OS terminal.
7. Pull Request to release branch
All the steps in previous sections are developed in a local branch, cloning the NLP master branch.
Once the NLP model is validated locally, now you must create a Pull Request (PR) to your release branch in order to upload your files and apply for validation to the NLP Global Team.
Follow the steps explained hereunder to create a Pull Request in the GitHub web application:
- Verify current working branch and files to be included in the Pull Request:
git status
If, when executing this command, there are files that should not be uploaded, remove them usinggit checkoutand the path of the corresponding file that appears in status. - Add the local files:
git add <file_name>
- Use
git add -Ato upload all files in your local branch. - Use
git rm <file1> <file2> <file3>if you need to remove certain modified files.
- Commit changes with the command
git commit -a "[[<feat>]] change description" - Execute the command
git pullas an optional step to check if, during the execution of these commands, there are modifications in the same path that can produce further errors. - Push local branch:
git push origin <branch_name> - Create a Pull Request to release branch:
Access to the corresponding directory:
aura-nlpdata-[country_code]/
And create a Pull Request from this branch to master or to the current release branch.
The title of the PR should start with[[feat]],[[fix]], or[[release]]and contain a representative description of the modifications.
Access our best practices for the creation of a Pull Request.
8. Certify NLP model accuracy
| ⚠️ REMEMBER… If you have used the tool ABACUS for the local training, testing and publication of your NLP model, now you must continue here with the process for its deployment. |
|---|
When the Pull Request is launched, a validation process starts for the evaluation of the NLP recognition process: the so-named Continuous Integration (CI), defined as a process for the integration of code into a shared repository and its validation.
The validation comprises the execution of the training script build_local.sh by the NLP Global Team, that launches two processes:
- An automatic validation process.
- A manual review of results by the NLP Global Team.
Automatic generation of the NLP metrics
The system automatically generates certain metrics files for checking:
- Accuracy of the whole pipeline
- Accuracy of specific intents
- Ratio of test set
- Valid format of files
- Modification without permission or by mistake of certain tasks
- Compatibility between local and global grammars
These metrics will be included in the PR conversation using the E2E files testest.json and regression.json in order to provide a summary of the NLP system quality.
Review by the NLP Global Team
Complementary, the NLP Global Team carries out a review of results and report the existing problems.
The setting of an adequate threshold for the NLP system accuracy depends on the use case. Therefore, for a specific use case, the minimum accuracy should be agreed by L-CDO and the NLP Global Team.
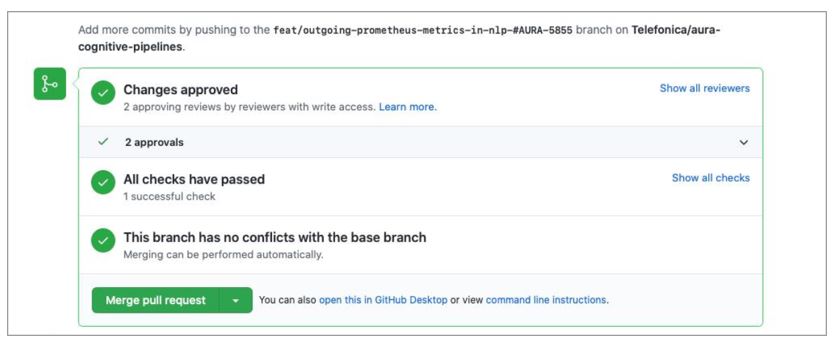
After the Pull Request approval by Aura Global Team, the modifications are ready to be merged.
It can be very useful for Local Teams to know the process and criteria used by the NLP Global Team to validate the NLP model in order to focus on the critical points. Discover all this information in Validation process by the NLP Global Team.
9. Merge and generate your understanding package
At this stage, after the Pull Request approval, you are ready to merge the Pull Request in GitHub. Modifications are then included in the NLP release branch.
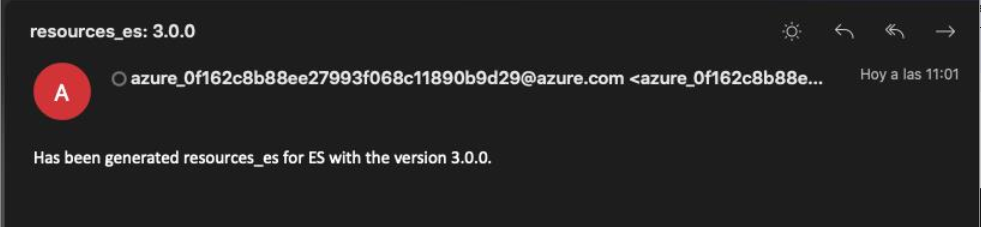
The system automatically initiates the process for the generation of the new version of the understanding package (artifact): a new Debian package with the version and name of the corresponding Platform release. This process can last a few hours.
When the new understanding package is generated, an e-mail is sent to PMOs, communicating that there is a new version available.
The APE Team is in charge of communicating the OB the name of the new package.
Now, the Local DevOps Team is responsible of the deployment of the understanding package.
10. Deploy the new understanding package
Once the previous stages are completed, the Local DevOps Team should deploy the NLP artifact with the new or updated trainings.
Remember that OBs are able to deploy NLP packages through a hot swapping process.
📄 For both processes, the local DevOps Team should check the document Aura Deployment of NLP packages.