This section includes the detailed process for the development of use cases over aura-nlp together with all the complementary stages that linguists and NLP experts need for this purpose.
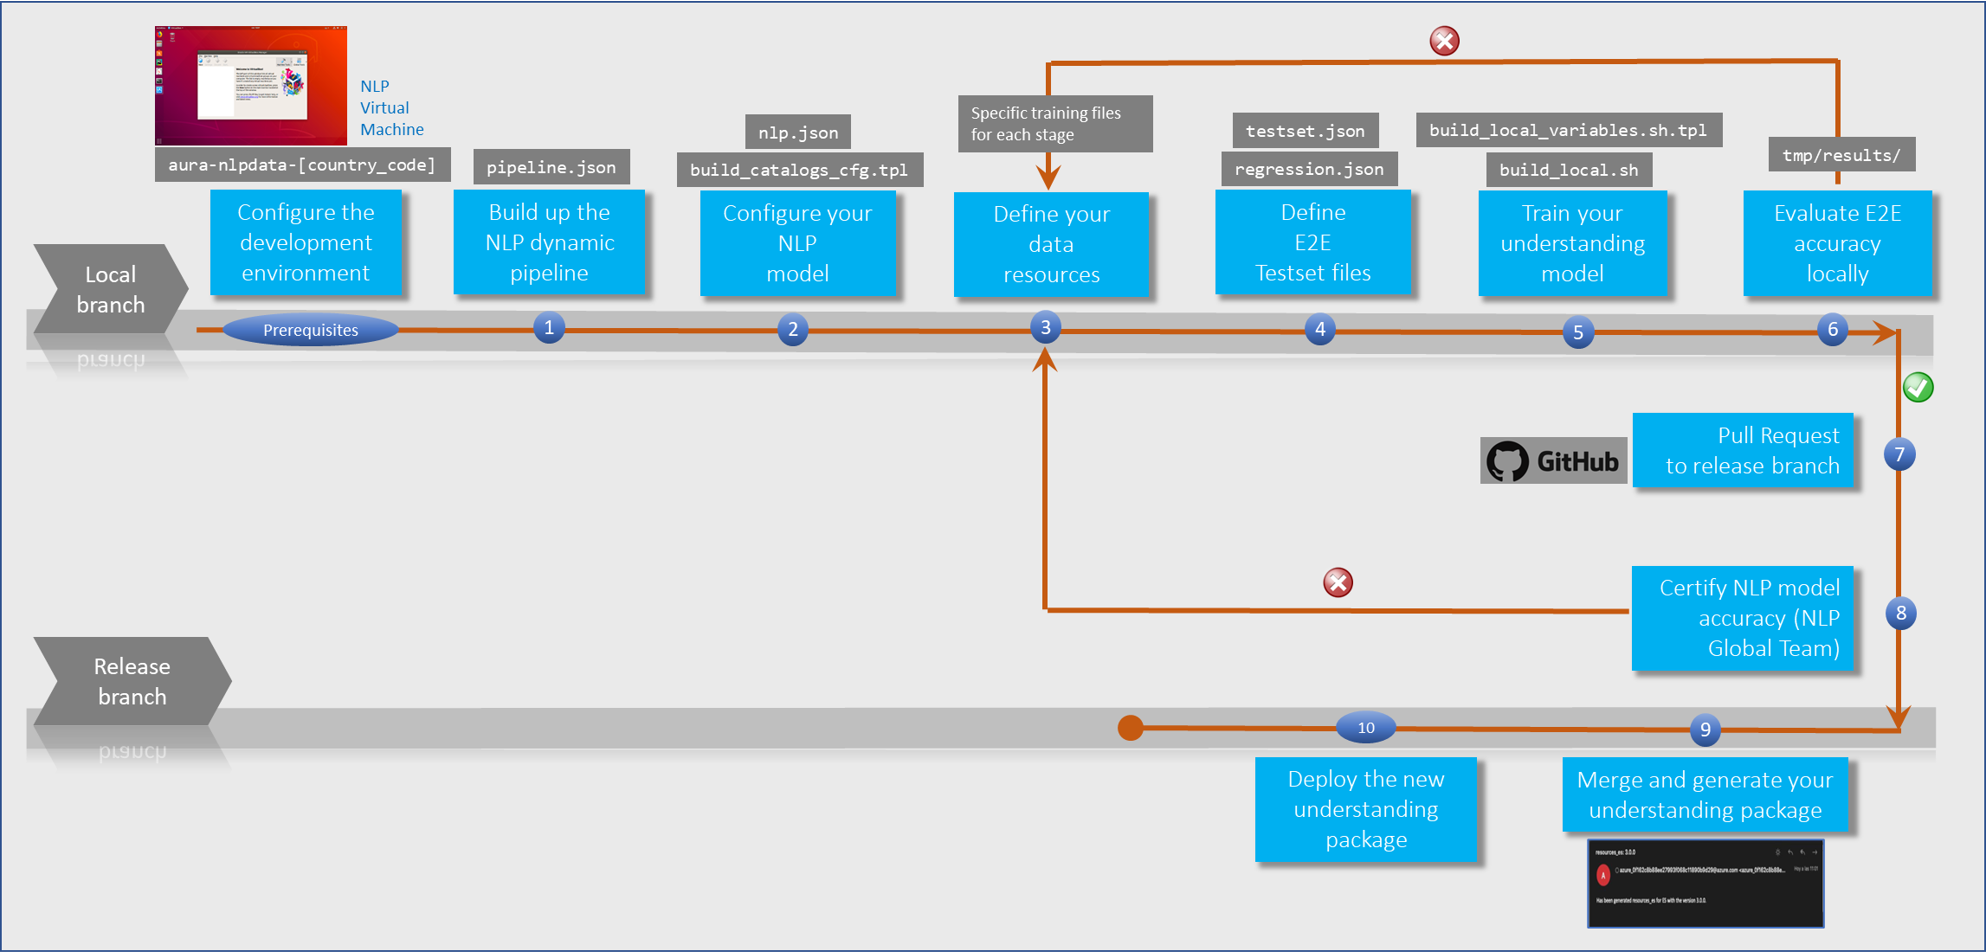
The following figure schematically shows the workflow for the development of a use case over Aura NLP, where every stage is fully described in succeeding sections.
Firstly, get sure you fulfil all the prerequisites for the configuration of the NLP development environment.
Complementary processes: processes that may be carried out over external software when developing a use case and procedures followed by the Aura NLP Global Team.
1 - Prerequisites
Prerequisites for working with Aura NLP
Key requirements that are essential to configure the Aura NLP development environment, prior to the generation and training of an understanding model
Introduction
Before starting the development of use cases over Aura NLP, there are certain tasks that must be carried out in order to install and configure this component:
Local NLP experts must work over a local branch, thus cloning the intended global repository, following the steps in section Generate a local branch.
In the continuous process for Aura NLP optimization, Aura Global Team offers the possibility of splitting the NLP repository into different repos, for a more efficient way of working. Find the details in section Split Aura NLP repository.
The following sections show the content of each folder and file in the Aura NLP repository, for use cases.
Auxiliar script used by other scripts. This script must not be executed by the user.
no
…
ℹ️ Now, all the scripts need to connect with the centralized repository in Github aura-nlp-tools, so it is necessary that your Github user have read access to it. Ask the APE Team to get this permission.
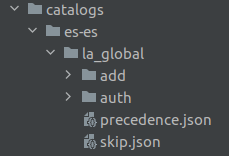
catalogs
Folder required just in case the Aura NLP uses manual catalogs.
Config file containing files to be ignored by the version control system.
CODEOWNERS
Config file indicating which user or group is the code owner responsible for merging the code.
⚠️ This file must not be modified.
config.txt
File containing branch name of current working release, used in different scripts.
⚠️ This file must not be modified.
requirements.txt
File containing Python module dependencies. These dependencies are installed automatically during the training process.
⚠️ This file must not be modified.
Generate a local branch
The GitHub interaction allows the generation of local branches from the master branch.
Local NLP experts must carry out the NLP customization over the local branch, that is a clone of the NLP GitHub repository and, afterwards, create a Pull Request (PR) to push the local branch to master or release branch of the corresponding Aura release.
For this purpose, follow these steps:
Create the working directory:
mkdir-p~/Telefonicacd~/Telefonica
In order to clone the Aura NLP data project (Step 3), generate an SSH key and add it to your Github account.
For this purpose, follow the instructions in Github documentation or access to the document SSH configuration guidelines.
Where [country_code] is the acronym of a specific country, for example: es, br, de, gb
In order to clone the repository, it is possible to use some git client as GitKraken or it can be done directly from a console running the command: git clone <url_repo>
The project should be cloned in the folder where the above command was executed and the folder should have the same name as the repository: git clone git@github.com:Telefonica/aura-nlpdata-[country_code].git
Once the repository is cloned in the local machine, create a new git branch every time modifications need to be made concerning new use cases implementation, bug fixing, etc.
The name of the branch should start with one of the next reserved words, depending on the modification purpose, followed by a slash and a brief description:
feat/: new functionalities (for example, feat/weather_forecast_UC_#56624)
fix/: bugs or non-relevant modifications (for example: fix/balance_light_on_#117076)
release/: release synchronization
The command to create this new branch must follow this pattern:
As a recommendation, the OB’s aura-nlpdata repository can be split by groups of channels with similar uses cases. This provides a greater flexibility and independence to constructors.
At the same time, this functionality allows optimizing the training times, as only the pipelines of the repositories that undergo modifications will be retrained.
In this scenario, the format of the repository name must be: aura-nlpdata-[country_code]-[repo_name]
If OBs want to organize their NLP repo in this way, they must contact with Aura Global Team.
Finally, it is possible to allocate dedicated processing capacity of the C.I, system, if necessary, but only after a joint analysis with Aura Global Team.
2 - Development process
Stages in use cases development over Aura NLP
Guidelines that describe the orderly steps required for the development of a use case over Aura NLP, with the objective of making Aura understand the users’ utterances.
Introduction
These steps correspond to 3 main overall stages:
Build the understanding model and train it, that is, teach Aura to understand
Test the model through an ongoing and cyclical process until the accuracy in terms of intents and entities recognition is good enough
Certify the model and publish it
Prerequisites
Firstly, check that all the prerequisites are fulfilled:
Technical resources are available
Aura NLP Virtual Machine is installed and working
NLP data repository local branch is generated
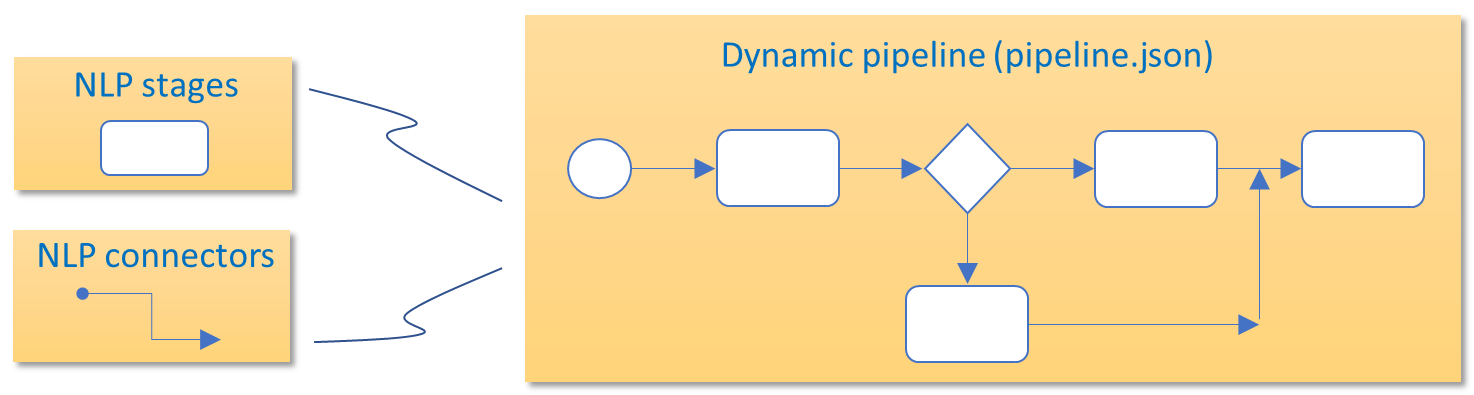
1. Build up the NLP dynamic pipeline
For the development of a new use case, you must design a dynamic pipeline (pipeline.json file) through the most appropriate combination of stages and connectors for the recognition of intents and entities in the use case.
For this purpose, follow the guidelines in the succeeding sections.
1.1. Select the elements composing your NLP pipeline
Select the elements composing the pipeline (stages, connectors, normalization pipelines) depending on the recognition process required for the use case and its associated channel, and combine them for the design of the NLP pipeline.
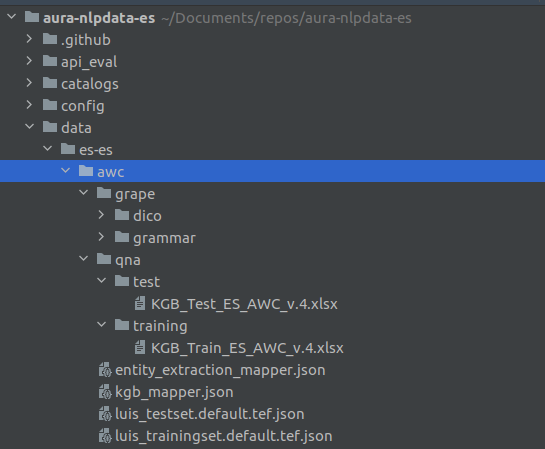
The base file for the dynamic pipeline is pipeline.json, that must be generated in the following path from the NLP repository: aura-nlpdata-[country_code]/data/[language]/[channel]/pipeline.json
Edit this file including the required fields from all your selected stages and connectors and indicating the hierarchy between them:
name: Unique string that identifies the pipeline.
initial_node_id: Key of the element where the pipeline starts. It must appear as the first one also in the fields elements and links.
elements: Include in this field each element composing the pipeline (stages and connectors) and characterize them with two attributes:
type: Two feasible values:
stage: pipeline stage.
joint: connector between pipeline stages.
classpath: Class path of the specific element, that is, Python class reference from the root directory that must be included in order to use this stage.
To obtain the classpath of each element of your pipeline:
links: This field includes the hierarchy of the pipeline and connections between its elements.
Each link item contains the connectors (as keys) and their children are the stages or other connectors they deal with.
Each key in links must be of joint type.
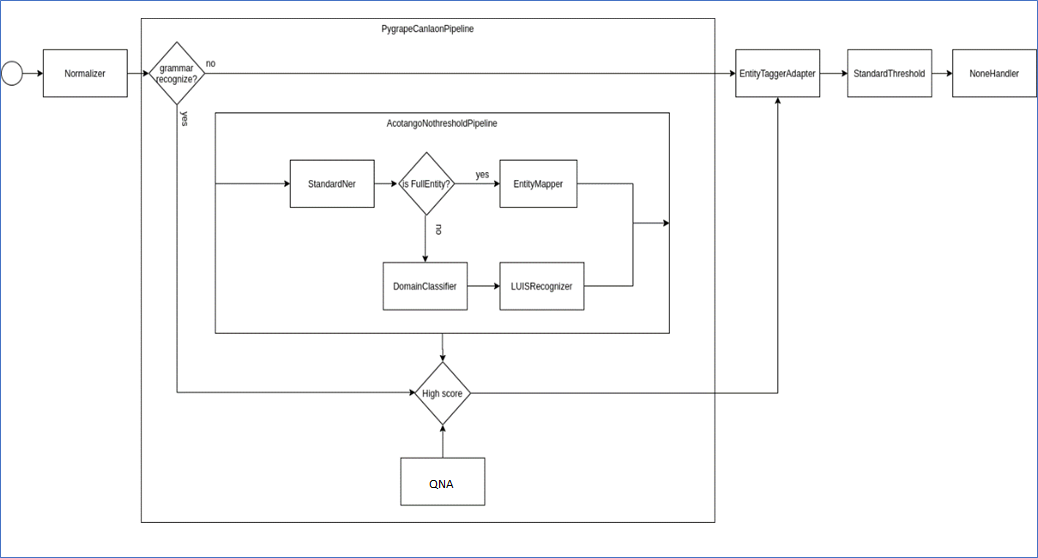
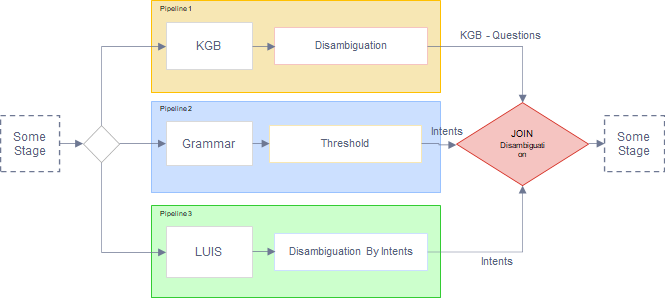
See below a practical examples of the pipeline.json file:
Example 1. Garua pipeline.json file
The pipeline hierarchy can be seen in the boxes that contain other elements (PygrapeCanlaonPipeline and AcotangoNothresholdPipeline). Diamond boxes represent joint stages in the pipeline.
At this stage, it is recommended to validate the generated pipeline.json file in order to assure that it is consistent and that all stages and joint operations are correctly related.
For this purpose, the following verifications are recommended:
Each item of links includes dicts, where the key is a name and the values are lists of class names.
Each item of elements has type and classpath.
initial_node_id is a key in links.
Each key in links is a joint stage (by having type equals to joint in elements).
Each class belonging to the values of a links item is present in elements.
Different examples of invalid pipeline.json files
Invalid pipeline as WrongPipeline key does not have a list of class names in links section:
It is required to configure every element composing the NLP pipeline:
All NLP stages (excepting Length Adapter) and normalization pipelines are configured in the file nlp.json file for each language and channel placed in the [NLP repository]: aura-nlpdata-[country_code]/config/etc/nlp_config/nlp.json
As an exception, Length Adapter stage, Domain Selector connector and Disambiguation connector need a specific configuration in the file pipeline.json(args field) placed in the [NLP repository]: aura-nlpdata-[country_code]/data/[language]/[channel]/pipeline.json
To obtain the configuration of each element of your pipeline:
Every NLP stage needs particular resources for its training and testing that must be generated through the edition of a specific file for each of them.
3.1. Generate the files for each NLP stage
Generate the specific file for each stage composing your NLP pipeline and for each language and channel.
Find in the Files section the specific files required for this stage
Edit them
Place these files in: aura-nlpdata-[country_code]/data/[language]/[channel], where:
language corresponds to the culture code of all the languages supported by Aura (e.g., es-es, en-gb, de-de, pt-br).
The channel variable in the pattern is the channel code used to identify the specific channel (for example, mh (Movistar Home), mp (Movistar Plus)).
3.2. Generate dictionaries
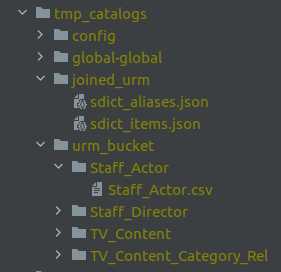
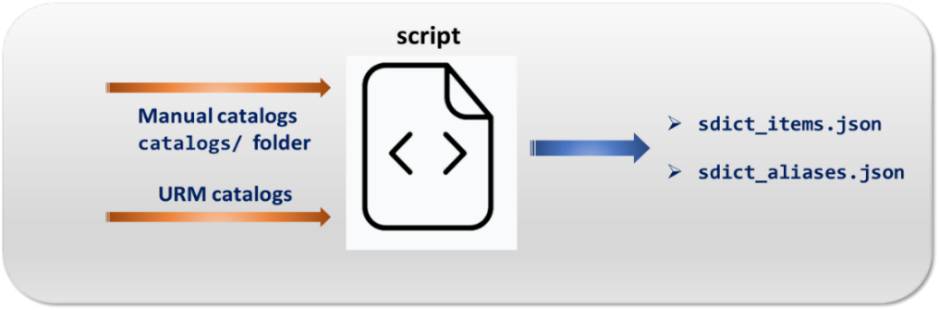
If your NLP pipeline contains entities recognition stages (Entity Tagger Adapter; Standard NER and Gazetteer NER), it is needed to use the dictionaries sdict_items.json and sdict_aliases.json which are automatically generated from two sources: manual catalogs and/or URM data.
E2E test files perform the evaluation of accuracy in the recognition of domains, intents and entities, with two approaches:
Measurement of the overall accuracy of the pipeline (mandatory)
Measurement of the accuracy of the different stages of the pipeline (optional)
Once generated, when running the corresponding pipeline with the user’s utterance as the pipeline input, the system will compare the result provided by the pipeline with the expected values declared in the file (intent, entities and domain) to calculate the pipeline accuracy.
4.1. Define E2E test set files
You must define a file for the end-to-end evaluation of the system as well as regression tests: testset.json and regression.json. They both are dictionaries with the same structure:
phrase: Statement (sentence, phrase or isolated word) to be tested.
domain: Inferred domain for the user’s utterance. Possible values:
<domain_name>: name of the identified domain.
null: when domain is not of application.
default: in case there is only one domain or in case the grammar engine recognizes the whole utterance.
⚠️ The value for the field domain must be included using quotation marks for every value excepting for null.
intent: Expected intent.
options: List of .json containing certain packages of intents and entities to disambiguate (optional field).
entities: Expected entities. It is a list of json with the following fields:
value: entity value to be recognized.
e_type: entity type expected.
start_index: Initial position of the entity in the filled phrase.
end_index: final position of the entity in the filled phrase.
canon: expected canon for a given entity. If canon is deactivated or the entity recognizer does not work with canon, this field must be completed with the same value of the field value but normalized (e.g., “Film”, value: Film; canon: film).
This field is currently used in Spain for those use cases related to TV content searches (e.g., “search for films”) in which there are specific codes (labels) for searching particular content types that the API needs to find in the corresponding catalogs to resolve the petition.
For instance, in the utterance “I want to watch an action movie”, “movie” is the value of the entity whereas “movies” may be its canon and “MV” the label the API needs to find this type of content in the catalogs. The same could be applied to the genre “action”.
label: expected label. It can have the value null. The same use as canon is currently applied.
4.1.1. testset.json
At this stage, you should define the testset.json file in:
pipeline_eval/ob/[country_code]/resources/[language]/[channel]/testset.json
It must include the testing statements for the E2E evaluation of the system’s accuracy (sentences or isolated words) and in order to identify potential problems (e.g., unmatching, low confidence/score).
You can generate different testset.json files for different purposes, for instance, for evaluation of metrics or to carry out regression tests at a later stage. To calculate the metrics, all the different files are considered as a unique one.
Example of testset.json file:
[{"phrase":"put the film Coco","domain":"default","intent":"intent.tv.search","entities":[{"value":"Coco","e_type":"ent.audiovisual_film_title","start_index":13,"end_index":17,"canon":"coco","label":null}],"options":[]},{"phrase":"show me my bill","domain":"default","intent":"intent.billing.check","entities":[{"value":"bill","e_type":"ent.bill","start_index":12,"end_index":15,"canon":"bill","label":null}],"options":[]}]
4.1.2. regression.json
Define your regression.json file in the path:
pipeline_eval/ob/[country_code]/resources/[language]/[channel]/regression.json
It may include crucial functionalities that must work in the system or other key checks that are not included in testset.json. The purpose is to verify that modifications do not impact in existing features and to prevent the system from bugs.
Previously executed test cases are re-executed in order to verify the impact of a change.
4.2. Define stage-specific E2E test set files
ℹ️ This is an optional step if you want to include specific E2E tests for the evaluation of an isolated stage in the testing batch.
You can create specific E2E testsets files for the evaluation of an isolated stage.
It is done adding phrases that must be solved by this specific stage in order to ensure that the end-to-end evaluation is representative for that stage and avoid tests that do not evaluate it.
For the definition of specific E2E tests for this stage, follow these instructions:
Define specific phrases to be resolved by the OpenAI embeddings recognizer stage.
Execute the script build_local_testset.sh in: aura-nlpdata-[country_code]/tools/build_local_testset.sh
Once executed, it creates a stage-specific testset.json file in the path:
tmp_testsets/[country_code]/resources/[language]/[channel]/
Although the name of the file can never be modified, it is possible to modify its content, as long as its structure is respected, adding new test sentences or eliminating them.
To be able to use these E2E test, copy it in the following path for it to be packaged with the general testset.json file:
pipeline_eval/ob/[country_code]/resources/[language]/[channel]/
4.3. Best practices for the definition of E2E test set files
All intents should be represented within all the existing test testset.json files.
Firstly, generate a battery of statements for the use case, taking into account its semantic complexity. After that, divide all the generated statements into three groups in the way that statements in the training set are not included in the test sets and vice versa:
Training set
Specific NLP stage test set
E2E test set
Follow this pre-established ratio between training and testing statements: each intent must satisfy that the number of test statements is, at least, 20% of the total statements (training and test statements).
Depending on the specific NLP stages, the number of recommended testing statements must be representative. In general terms, and only as a guidance, the number of testing statements can be as follows:
Only CLU: 20% of statements in CLU training
CLU + Grammar: 20% of statements in CLU training
Only Grammar: 3 statements
More than 1 use case on an intent: 30 statements per use case.
The testing statements provided by the Product Team and/or UX Team must be included, as prototypical of a given use case.
The statements must include different variations (for example, with/without entities, etc.).
Keys of the testset.json file should be ordered from generic to specific ones:
{"phrase":"Search the film Frozen","domain":"domain.tv","intent":"intent.tv.search","entities":[],"options":[]},
The end-to-end test set is specific for each of the potential channels, as some use cases can be implemented in certain channels but not in others.
The field options is optional and only included when disambiguation is considered.
In case that, due to non-satisfactory results during the evaluation process, a re-training is required, linguists should check that all the modifications are included in the E2E tests.
In case roles are defined in entities for their recognition through the Grammar stage, they do not affect to the E2E tests (See more information regarding roles in Grammars in recognition of utterances with several entities in Grammars.
5. Train your understanding model
Once all the resources for each stage of the pipeline have been generated, you have to launch the training process in order to compare the testing batch against the training model.
For this purpose, the aura-nlpdata-[country_code]/tools folder of the NLP repository includes bash scripts, described in the following sections.
It is important to mention that the NLP system can be locally trained in an intelligent way, meaning that only the stages that have been modified (from a last training) are trained again, thus making the process much more efficient.
5.1. Set up configuration properties
Go the the path:
aura-nlpdata-[country_code]/tools/build_local_variables.sh.tpl
This file is a template used for configuration purposes, specifically for defining CLU connection parameters. To setup these properties, copy this file to a new one named build_local_variables.sh, removing the .tpl extension.
Fill in the config variables included in this file with the local credentials, as explained below.
This file is automatically ignored by git because it has been included in the .gitignore file, thus it must not be included manually.
The parameters to fill in the build_local_variables.sh script are shown below:
AZURE_NLP_MODELS_URL: URL for the Azure NLP models container.
GITHUB_TOKEN: Variable only required for ABACUS. Personal token provided by GitHub for secure authentication.
GITHUB_USER: Variable only required for ABACUS. Name of Github user.
REPO_OWNER: Variable only required for ABACUS. Name of the owner of the repository. Value: Telefonica.
TRAINING_WEB_AZURE_BASE_URL: Variable only required for ABACUS. URL base to get web package. It is provided by APE Team.
TRAINING_WEB_AZURE_SAS_TOKEN: Variable only required for ABACUS. SAS token with the required permission granted. It is provided by APE Team.
OAI_ID_SUBSCRIPTION: Azure OpenAI subscription ID. It can be obtained from the subscription website.
OAI_RESOURCE_GROUP: Name of resource group in Azure where the OpenAI applications are created.
OAI_ACCOUNT_NAME: Name of OpenAI resource to be used.
OAI_AZURE_TOKEN_CLIENT_ID: Client ID of Azure Portal – App registration page assigned to your app.
OAI_AZURE_TOKEN_CLIENT_SECRET: Application secret created in the app registration portal.
OAI_AZURE_TOKEN_TENANT: Value that indicates who can sign into the application.
OAI_USER: Parameter to identify the user of OpenAI application. It is unique for each developer in order not to overlap the OpenAI trainings. This value is used to create database collections.
RESOURCE_NAME_OPENAI: Name of resource to be used.
QDRANT_URL: URL of Qdrant service. In the virtual machine, it is http://localhost:6333.
QDRANT_API_KEY: APIkey of Qdrant service. In the virtual machine, it is void.
CLU_SUBSCRIPTION_KEYS: Parameter provided by CLU to create applications.
CLU_RESOURCE_NAME: Name of resource to be used.
CLU_USER: Parameter to identify the user of CLU application. It is unique for each developer in order not to overlap the CLU trainings.
CLU_STORAGE_RESOURCE_NAME: Name of shared resource to be used as library of applications.
CLU_STORAGE_SUBSCRIPTION_KEYS: Parameter provided by CLU to import and copy applications in CLU shared resources.
From this point on, linguists or NLP experts have two options to continue with the process:
OPTION A
OPTION B
Use our web tool ABACUS 1.0.0. following the guidelines in ABACUS documentation. (*) After using ABACUS, continue with the process for the NLP model deployment in section Certify NLP model accuracy
Execute the training script, following the guidelines below
Execute the training script:
aura-nlpdata-[country_code]/tools/build_local.sh
The script automatically creates a Python virtual environment to ensure the training and evaluation processes are being carried out in an isolated and encapsulated way.
All dependencies included in requirements.txt are installed in the virtual environment.
This script also validates the format of the involved files to ensure they match the specifications.
Once this script is executed, a tmp folder is created in the root repository. In this folder, you can find some temporary files corresponding to the resources, as well as the results and metrics obtained from the training process.
This directory is ignored by the git version control system because it has been included in the .gitignore file and it must not be included manually.
Intelligent training
The NLP system is trained in an intelligent way, so that the training of certain stages can be skipped, if they were previously trained, making the process more agile and efficient. This feature is based on the verification of an internal hash table and hash index generated after training.
The default behavior of the intelligent training is:
On one hand, only the stages that have been modified from a previous retraining in a specific channel are trained again. For this purpose, the system keeps a hash table in the tmp/ folder to detect changes.
On the other hand, if the configuration and the model generated to train a stage are the same as those of a previous stage but of a different channel, the last do not need to be trained and it will use the model trained before, making the process much more efficient.
To achieve this, an internal hash index is generated in the tmp/trained_models folder. It is important that the training files in every channel are exactly the same, with similar name and similar content.
However, the hash table and hash index can be managed manually in order to modify this behavior:
Management of the hash index to force the training of a stage in a specific channel
The hash table is included in the tmp/ folder after training. This folder must not be deleted when tests are executed, unless all the stages are to be re-trained again.
If you want to force the training of a specific stage, its corresponding file can be deleted in the specific channel.
For instance, if there are no modifications on a stage within the mh channel, but you want to force its retraining, then go to the tmp/ folder and delete the file saved_training_hashes.json in the path: tmp/recognizer/ob/ES/es-es/mh/resources/saved_training_hashes.json
Management of the hash index to force the training of a stage in different channels
The hash index identifies similar training files from stages of the same type that belong to different channels. It is included in the following folder:
tmp/trained_models/[stage]/[hash]/
[stage]: name of a stage.
[hash]: it is resulting from the content of the training files used for that stage and its specific configuration.
Each sub-tree contains the necessary files that were used during the training phase for that specific stage.
By default, if the same stage with the same training files exists in different channels, only the first one found is retrained.
If you want to force the training for a specific stage, in addition to eliminating the hash tables seen in the previous section, delete the tmp/trained_models/[stage] for this stage.
5.3. Generation of results from the training process
When the training process is finished, certain temporary files are created in the tmp/ directory in the root repository.
This folder contains the resources of the NLP model and results and metrics from the training process obtained from launching the testing batch against the training model.
Files generated in the tmp/ directory are organized as shown in the following tables:
Input resources for the NLP model
The input resources for the NLP training are placed on:
If you have defined stage-specific E2E testset files, then after the execution of the script build_local_testset.sh, some temporary files are created in the tmp_testsets/ folder:
Each channel folder contains the end-to-end test files for each stage (currently, only for OpenAI embeddings recognizer). These files are used for the evaluation of the pipeline in future trainings and can be extended with as many tests as desired.
Hash index including the modified training and test set files for a specific stage
tmp/trained_models/[stage]/[hash]/
6. Evaluate E2E accuracy locally
With all the results from the training process, saved in the tmp/results/ folders as explained before, now these results must be analyzed in order to evaluate if the NLP process is accurate enough for the recognition of intents and entities.
✅ If the local analysis of results is satisfactory at this stage, linguists can proceed to create the Pull Request.
⛔ If the analysis shows that the metrics are not good enough, meaning that the recognition is less accurate than required, then linguists must work again on the resources data to increase the performance and repeat the training process to re-calculate the metrics.
The analysis of results can be carried out from two different points of view, as explained in the following sections:
Focusing on each stage composing the pipeline
Or treating the pipeline as a single component to measure the end-to-end performance.
6.1. Evaluate NLP stages accuracy
For this purpose, analyze the following file, generated after training in the tmp/results/ folder:
This file is generated per each pipeline stage, country, language and channel in the above-mentioned path and contains the metrics of the stage performance:
However, these metrics depend on the specific stages of the pipeline as, for example, the normalizer stage requires no evaluation and others such as Domain Classifier, NER or the intent recognizers can use all or some specific metrics among the four previously defined.
Moreover, depending on the stage, it is possible to find other files such as:
cv_results.txt that includes metrics regarding cross-validation
fitted-params.txt with information about the algorithm and parameters used to train the model.
Below, an example of test_results.txt file is shown, that corresponds to the Domain Classifier stage evaluation. The values for precision, recall, f1-score and support for each domain classified are calculated, as well as the total average.
precision
recall
f1-score
support
None
0.40
0.84
0.54
32
intent.tv.search
0.97
0.89
0.93
122
intent.common.greetings
0.99
0.99
0.99
715
intent.billing.check
1.00
1.00
1.00
53
avg / total
0.84
0.93
0.86
922
6.2. Evaluate the overall pipeline accuracy
For the evaluation of the accuracy of the complete pipeline, you should analyze the files generated in the tmp/results/ folder after training:
In both folders, the files are shown below, both generated from launching the testset filestestset.json and regression.json:
- results.json
- details_[language]_[channel].csv
- test_results_by_intent_[language]_[channel].json
- test_results_by_intent_[language]_[channel].txt
- test_results_by_entity_[language]_[channel].json
- test_results_by_entity_[language]_[channel].txt
At this point, you are expected to analyse the results of the metrics included in these files in terms of accuracy and precision of intents and entities recognition. The files provide a detailed description about the testing statements that have obtained an unexpected result, as well as useful information for debugging purposes.
⚠️ If you use ABACUS, take into account that, currently, the tool only shows two test files:
results.json and details_[language]_[channel].csv
results.json
General file that includes the results of the overall pipeline performance through statistics regarding the number of entries misclassified in the test set and their relative scores.
The metrics that contain this file are defined below:
Accuracy intent: Percentage of successful intents.
Accuracy overall: Percentage of successful inputs.
Accuracy perfect in options: Percentage of successful inputs included when the first option is right.
Entity error: Number of inputs in which entity recognition has failed.
Intent error: Number of inputs in which intent recognition has failed.
Option error: Number of inputs in which options recognition has failed.
Missing entities overall: Ratio of training statements (sentences, phrases or isolated words) in which entity recognition is failed to the total number of statements.
Missing entities right intent: Ratio of training statements in which entity recognition is failed but intent recognition is successful to the total number of statements with the intent recognized.
Missing options overall: Ratio of training statements in which options recognition is failed to the total number of statements.
Missing options right intent: Ratio of training statements in which options recognition is failed but intent recognition is successful to the total number of statements with option recognized.
Perfect: Total number of inputs without errors.
Perfect in options: Total number of inputs without errors where the first option is right.
Test size: Total number of inputs in test set file.
Additionally, each time a Pull Request (PR) is generated, a comment appears automatically in the results.json content in the GitHub repository to ease the reviewing task.
An example of the results.json file is included below:
One file is generated per each pair language/channel, containing the original training statement, the expected values versus the obtained values for intents, entities and domains after the pipeline execution as well as an additional column with a tag summarizing the error type, with five possible values:
D: error when recognizing the domain.
I: error when recognizing the intent.
E: error when recognizing the entity.
O: error when recognizing the options.
W: special tag used when result expected is the first option in recognized result.
This additional column is able to have more than one of these values.
In detail, fields contained in the .csv file are:
phrase: Original statement (sentence, phrase, or isolated word) evaluated.
different: Summary of errors. It could have from one to three letters depending on the errors found. Suitable letters are D (domain), E (entities), and I (intent).
intent_obtained: Intent obtained by the pipeline.
intent_expected: Intent expected as defined in the test set.
entities_obtained: Entities obtained by the pipeline.
entities_expected: Entities expected as defined in the test set.
options_obtained: Options obtained by the pipeline.
options_expected: Options expected as defined in the test set.
domain_obtained: Domain obtained by the pipeline.
domain_expected: Domain expected as defined in the test set.
An example is shown below:
phrase
different
intent_obtained
intent_expected
entities_obtained
entities_expected
domain_obtained
domain_expected
options_obtained
options_expected
test_results by intent and by channel
They are both .txt and .json files containing the results of the pipeline performance per each pair language/channel and per intent, with the following format:
test_results_by_intent_[language]_[channel].json
The metrics that contain this file are defined below:
n: Number of successful statements.
total: Total number of statements by intent.
overall: Total accuracy by intent.
intent: Accuracy of intents by intent.
entities: Accuracy of entities by intent.
options: Accuracy of options by intent.
domain: Accuracy of domains by intent.
perfect_in_options: Number of successful statements recognized in the first option by intent.
Example of test_results_by_intent_[language]_[channel].json:
They are both .txt and .json files containing the results of the pipeline performance per each pair language/channel and per entity, with the following format:
test_results_by_entity_[language]_[channel].json
The metrics that contain this file are defined below:
n: Number of successful statements.
total: Total number of statements by entity.
overall: Total accuracy by entity.
intent: Accuracy of intents by entity.
entities: Accuracy of entities by entity.
options: Accuracy of options by entity.
domain: Accuracy of domains by entity.
perfect_in_options: Number of successful statements recognized in the first option by entity.
6.3. Analyze compatibility between global grammars and local grammars
⚠️ The current section only applies if both global and local grammars are implemented in the NLP recognition process.
As explained in Grammars management the two types of grammars defined in Aura NLP recognition process, global and local, must be aligned. For checking the compatibility between both grammars, you must generate two test set files:
data/[language]/[channel]/test_grammar/commons/testset.json
Test set with statements that must be recognized by both grammars (with identical results).
data/[language]/[channel]/test_grammar/disjoints/testset.json
Test set with statements that must be only recognized by the global grammar (as the local grammar is a subset of the global grammar).
Both tests are JSON files including a list of test phrases, as shown in the example:
["push play again","turn on the light"]
These tests run through an automatic process and, if some error is detected, it is reported. In this scenario, linguists must check the errors and fix them:
Errors in disjoints testset
Local grammar recognizes a global phrase
This error occurs when a disjoint testset statement is recognized by the local grammar. An example of this error message for the language es-es, channel mh and the statement “push play again”:
Localgrammarrecognizedaglobalphrase"push play again"forlanguagees-esandchannelmh
To resolve this problem, carry out the required modifications over the local grammar in order not to recognize the statement.
Global grammar does not recognize a test statement
This error occurs when a disjoint test set statement is not recognized by the global grammar.
Errorrecognizingphrase:" push play again "bypipelinegrammarforlanguagees-esandchannelmh
To resolve this problem, carry out the required modifications over the global grammar in order to recognize the statement.
Errors in the commons testset
Local grammar does not recognize the statement but global grammar does. The program logs the following error message:
Errorrecognizingphrase:"turn on the light"bylocalgrammarforlanguagees-esandchannelmh
In order to fix this error, improve the local grammar.
Global and local grammars recognize different intents
The program logs the following error message:
Recognizedphrase"turn on the"bybothgrammarwithdifferentintents.Pipelineintent: intent.domotics.light_off,Localgrammarintent: intent.domotics.light_on
In order to fix this error, improve both grammars to make them recognize the same intents.
Global grammar does not recognize the statement but local grammar does
The program logs the following error message:
Errorrecognizingphrase:"turn on the light"bypipelinegrammarforlanguagees-esandchannelmh
In order to fix this error, improve the global grammar.
6.4. Launch and test your pipeline locally (live mode)
Another useful functionality for a quick a real-time evaluation of the accuracy of the NLP model is running the pipeline in live mode in local environment.
To use this interactive execution approach:
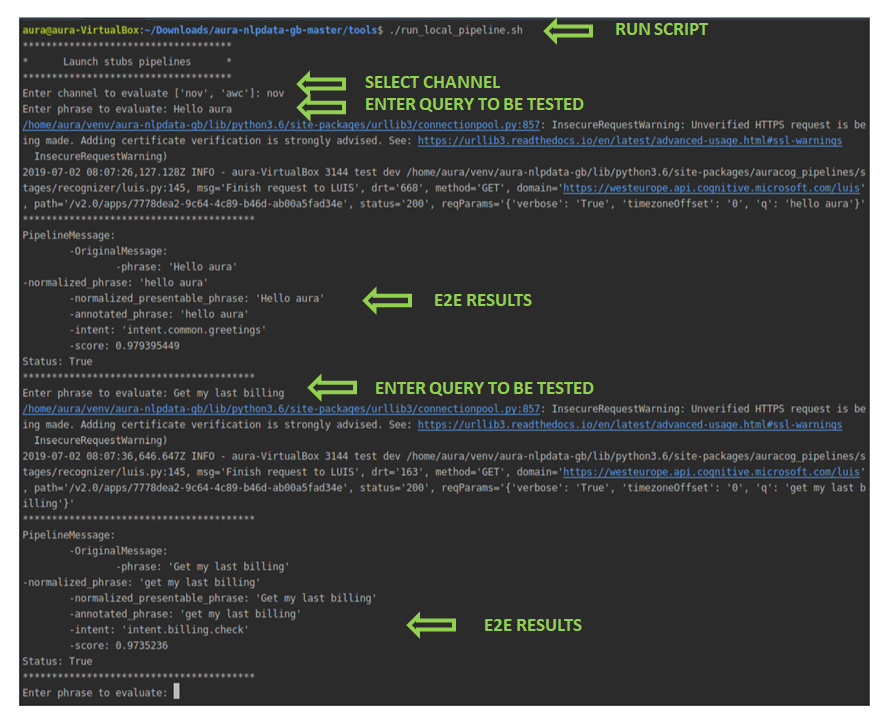
Execute the script: aura-nlpdata-[country_code]/tools/run_local_pipeline.sh
Once the script is run, select manually both channel and language.
After that, insert testing statements representing potential users’ utterances through the command line in a responsive way.
Evaluate the response in real time to the input statement: the associated intents, entities and score provided by the system.
⚠️ It is important to run this script after the build_local.sh (that is, after training the model) to ensure the system has been trained and all the resources have been generated.
This script neither generates temporary files nor directories and it can be run from the IDE or the OS terminal.
7. Pull Request to release branch
All the steps in previous sections are developed in a local branch, cloning the NLP master branch.
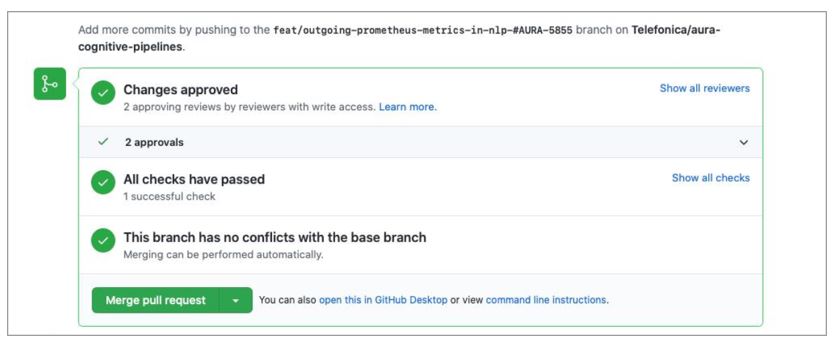
Once the NLP model is validated locally, now you must create a Pull Request (PR) to your release branch in order to upload your files and apply for validation to the NLP Global Team.
Follow the steps explained hereunder to create a Pull Request in the GitHub web application:
Verify current working branch and files to be included in the Pull Request: git status
If, when executing this command, there are files that should not be uploaded, remove them using git checkout and the path of the corresponding file that appears in status.
Add the local files: git add <file_name>
Use git add -A to upload all files in your local branch.
Use git rm <file1> <file2> <file3> if you need to remove certain modified files.
Commit changes with the command git commit -a "[[<feat>]] change description"
Execute the command git pull as an optional step to check if, during the execution of these commands, there are modifications in the same path that can produce further errors.
Push local branch: git push origin <branch_name>
Create a Pull Request to release branch:
Access to the corresponding directory:
aura-nlpdata-[country_code]/
And create a Pull Request from this branch to master or to the current release branch.
The title of the PR should start with [[feat]], [[fix]], or [[release]] and contain a representative description of the modifications.
⚠️ REMEMBER… If you have used the tool ABACUS for the local training, testing and publication of your NLP model, now you must continue here with the process for its deployment.
When the Pull Request is launched, a validation process starts for the evaluation of the NLP recognition process: the so-named Continuous Integration (CI), defined as a process for the integration of code into a shared repository and its validation.
The validation comprises the execution of the training script build_local.sh by the NLP Global Team, that launches two processes:
An automatic validation process.
A manual review of results by the NLP Global Team.
Automatic generation of the NLP metrics
The system automatically generates certain metrics files for checking:
Accuracy of the whole pipeline
Accuracy of specific intents
Ratio of test set
Valid format of files
Modification without permission or by mistake of certain tasks
Complementary, the NLP Global Team carries out a review of results and report the existing problems.
The setting of an adequate threshold for the NLP system accuracy depends on the use case. Therefore, for a specific use case, the minimum accuracy should be agreed by L-CDO and the NLP Global Team.
After the Pull Request approval by Aura Global Team, the modifications are ready to be merged.
It can be very useful for Local Teams to know the process and criteria used by the NLP Global Team to validate the NLP model in order to focus on the critical points.
Discover all this information in Validation process by the NLP Global Team.
9. Merge and generate your understanding package
At this stage, after the Pull Request approval, you are ready to merge the Pull Request in GitHub. Modifications are then included in the NLP release branch.
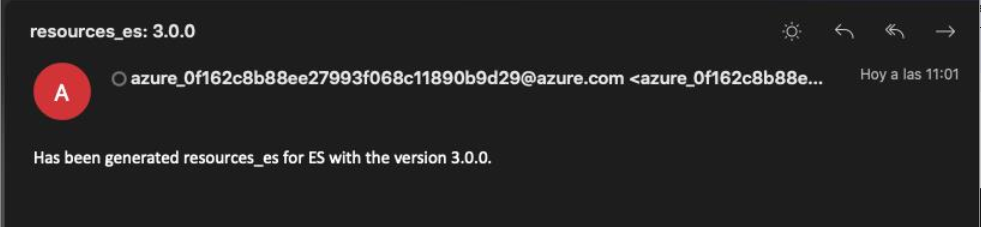
The system automatically initiates the process for the generation of the new version of the understanding package (artifact): a new Debian package with the version and name of the corresponding Platform release. This process can last a few hours.
When the new understanding package is generated, an e-mail is sent to PMOs, communicating that there is a new version available.
The APE Team is in charge of communicating the OB the name of the new package.
Now, the Local DevOps Team is responsible of the deployment of the understanding package.
10. Deploy the new understanding package
Once the previous stages are completed, the Local DevOps Team should deploy the NLP artifact with the new or updated trainings.
Remember that OBs are able to deploy NLP packages through a hot swapping process.
Current catalog of stages, connectors and normalization pipelines existing in the Aura Platform release that can be used to compose the NLP pipeline
Aura NLP pipelines are the basis for the generation of an understanding model.
Linguists must design their pipeline through the most appropriate combination of stages for the recognition of intents and entities in the use case and join these stages through different types of connectors in order to set a specific behavior in the pipeline flow. They can also use nested normalization pipelines in order to homogenize the input request.
Afterwards, aura-bot will receive the recognized intent and the entity ID as an output from the NLP stage.
Review that all the included IDs in this file are existing in the corresponding sources and the matching between the intents and entities for this ID.
Review that the intent name is previously defined.
Include the intents in alphabetical order.
It is recommended to include in the E2E tests phrases to validate that the mapping is correctly done.
Configuration
This stage requires the following configuration in the nlp.json configuration file, in which the field intent_template should point to the use case intent.
As an example, if Exact match is the intent recognizer stage, it can be:
"intent_template":"intent.exact-match.faq"}
Intent Entity Mapper
Description
It can be used in:
Personalized experiences to configure a particular entity based on a specific intent.
In both scenarios:
An intent recognition stage (CLU, Exact match, Grammars, etc.) recognizes the user’s intent.
Intent Entity Mapper adapter is trained to map the intent with an entity name and label.
Aura NLP provides as an output the recognized intent and entity.
None Handler is a stage used when the intent recognized by the pipeline stages is None.
It modifies the None intent by the intent predefined in the file none_mapper.json for the specific domain. You can select any intent defined in the system to be pointed in this adapter.
None Handler requires one file: none_mapper.json that indicates, within a specific domain, which intent must be set if the recognized intent is None.
Therefore, if the domain is already defined and the system recognizes the intent None, then the intent is replaced by the value indicated in the file.
In this file:
Keys: different domains
Values: value for each key is the intent mapped with this domain.
Developers can select any intent defined in the system to be pointed in this adapter.
In the example, if the domain is domain.tv_content and the system recognizes the intent None, then this intent is replaced by intent.tv.none.
Configuration
This stage does not require any configuration.
Standard Threshold
Description
Standard Threshold allows the establishment of a threshold for the scores provided by preceding pipeline stages.
If the score obtained by the previous stages is lower than the established threshold, the Standard Threshold provides score 0 and the intent is replaced by the default value set in the configuration.
This stage is useful to prevent false positives and can be included in any place of the pipeline. The NLP Global Team recommends to set this threshold to 0.6.
threshold: value between 0 and 1 indicating the limit that triggers the action of the adapter.
This field can be defined per intent, thus having a different threshold for each intent.
The default intent must be always specified and, additionally, you can define a different threshold for other specific intent in order to improve the recognition process.
The NLP Global Team recommends to set this threshold to 0.6.
intent: this field contains an internal string identifier, that is associated if the score value is lower than the threshold.
In the previous example, the default config applies to every intent, with accuracy 0.1 and intent intent.default. But, specifically for the intent intent.test, the applied configuration has accuracy 0.8 and the associated intent is None.
Entity Tagger Adapter
Description
Entity Tagger Adapter is a stage that allows entities tagging through the definition of aliases and labels on them.
Where default represents the default value if the entity type is not included in the dictionary. The default field is not mandatory if all the entity types are defined in the file.
When a new entity is added, it must be included in the ner_entity_translation.json file with the expected behavior for the canon and label. Likewise, if the behavior for canon and label of an entity changes, it is required to update this file.
As best practices, entities should be ordered alphabetically.
ner_aliases.json
ner_aliases.json is an optional file required if you need to match/map the canon value to some other value requested by an API or search engine (currently, it is used by Spain to search content in the M+ database).
It is a JSON dictionary that must be generated manually, where:
Keys: entity types.
The value of each key includes another key-value pair:
Keys: labels
Value for each key: list of values contemplating just the canonical form(s) of the entity label
When adding a new entity, in case the entity should have a label, the label has to be assigned to the canons that we want to be identified by this label.
An example of ner_aliases dictionary is shown below:
The following example shows the mapping between alias-canon-label and their corresponding files:
docu (`sdict_aliases`) -> documentary (`sdict_items`)-> DC (`ner_aliases`)
Best practices for the edition of ner_aliases.json
Canon names should be expressed as in sdict_items.json, including capitalization, diacritic marks and punctuation.
Entities should be ordered alphabetically.
Labels inside entities should be ordered alphabetically.
Configuration
No configuration is required.
Description
If the disambiguation process cannot discern between multiple entities, then the intent returned by Aura NLP to the bot will be a disambiguation intent as a top intent at first level. In this intent, each option is composed of the original top intent and one entity per option. These options will be presented to the user for him to choose the most appropriate one.
The input for this stage includes: a list of intents; 1 top intent (intent recognized with the higher score); a list of entities.
The output from this stage includes: the top intent and different options (options in the data model) of recognized entities.
Here is an example of the input and output data models for the disambiguation by entities stage, where entities are IDs.
The fields determine how the disambiguation process is carried out:
intent_template: This field contains an internal string identifier corresponding to the intent resulting from this stage if no disambiguation can be carried out.
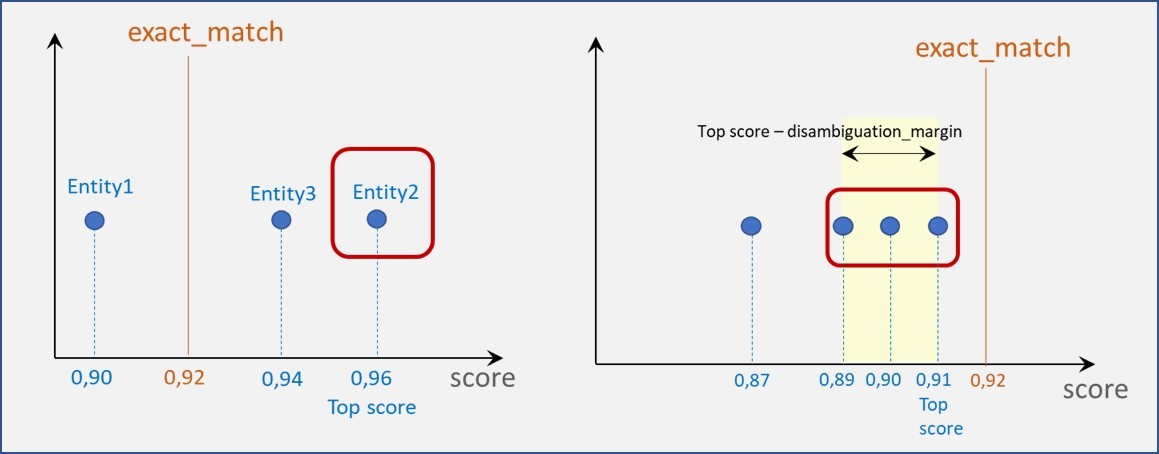
exact_match: value between 0 and 1. This value is used to check if any recognized entity score is above this value.
disambiguation_margin: value between 0 and 1 used to set an interval.
The combination of these two last parameters provides different scenarios:
The score of certain entities is equal or higher than exact_match (left graphic).
Only the entity with the best score is considered.
In case of tie (more than one entity with the highest score), all of them are returned.
The score of all entities is below the exact_match (right graphic).
Only those entities whose score is in the interval:
([top score], [top score - disambiguation_margin]) (both included) are considered.
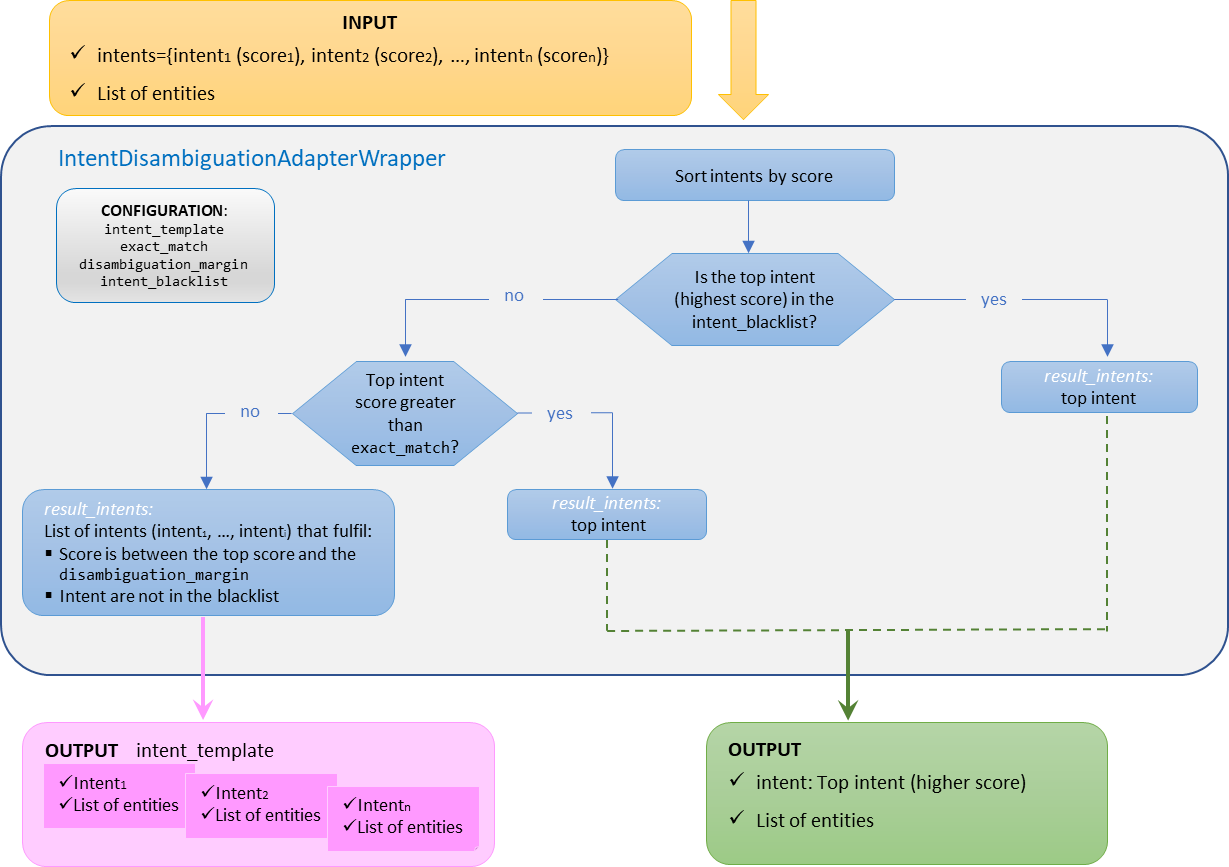
Intent Disambiguation Adapter
Description
The goal of this stage is to disambiguate when, in an utterance, several intents are recognized.
If the disambiguation process cannot discern between multiple intents, then the intent returned by this stage will be a disambiguation intent as a top intent at first level. In this intent, each option is composed of one intent (that fulfils the conditions to be disambiguated) and a list of entities. These options will be presented to the user to choose the most appropriate one.
The general behavior of this stage is explained below:
The input for this stage includes: a list of intents and a list of entities.
The output for this stage includes: the different options for intents recognized during the disambiguation (options in the data model) and the original list of entities.
However, if black lists are defined, the behavior is explained in the following sub-section.
Intent disambiguation with a blacklist of intents
Aura NLP allows the integration of configurable blacklists of intents for a custom behavior of disambiguation.
In this case, the disambiguation mechanisms will not apply for the intents included in the blacklist. The use case constructors can edit a blacklist of intents in the nlp.json configuration file, filling the parameter intent_blacklist.
When there is a blacklist of intents, the disambiguation process behaves as explained below:
a. If the top scored intent is included in the intent_blacklist, the pipeline will return this unique intent (no disambiguation is launched).
b. If the top scored intent is not included in the intent_blacklist, then the predefined values of the configuration parameters come into play:
If the score of the top scored intent is higher than exact_match, then this intent is returned. In case of tie (more than one intent with the highest score), all of them are returned.
If the score of the top scored intent is lower than exact_match, then all the intents whose score is in the interval between the top score and the disambiguation_margin and are not in the intent_blacklist are returned.
In this case, the final intent will be the one described in intent_template (with a score of 1.0) and the selected intents will be placed in the options of the result.
This stage requires the following configuration in the nlp.json file for each country and channel, within the key intent_disambiguation.
The following parameters are required for this stage:
exact_match: Float number, value between 0 and 1. If the intent with the highest score is greater than this value, the result is this intent (if this intent is not included in the intent_blacklist).
disambiguation_margin: Float number. Margin between the highest score and the lower score considered for the response.
intent_template: String. Name of the intent that the stage returns when there are multiple options as response.
intent_blacklist: List of intents for which the disambiguation mechanisms will not apply. This parameter is mandatory. If there are no blacklisted intents, it will have to be an empty list.
⚠️ none intent must always be included in the blacklist, as it is not going to be offered as an option to disambiguate.
See an example of nlp.json file configuration for this stage:
General behavior of intent disambiguation stage (with no blacklist of intents)
Here is an example of the input and output data models for the intent disambiguation stage, belonging to the OpenAI embeddings stage, where the disambiguation margin is 0.2:
Output data model: the top intent is not included in the blacklist and more than one intent fulfil the condition for disambiguation » The options in the blacklist are ignored and the remaining intents are disambiguated.
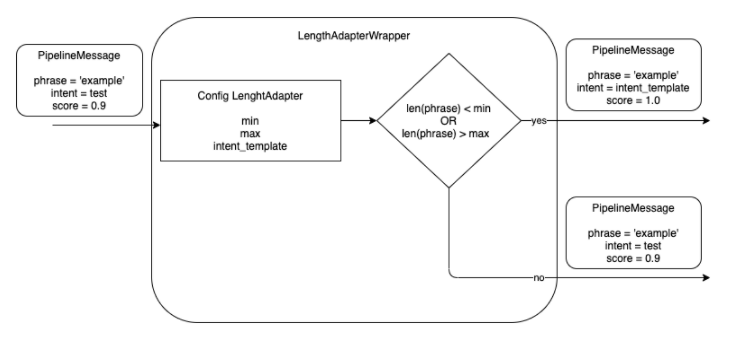
The objective of this stage is to control the maximum and minimum length of a phrase in order to avoid it to be too short or too long. The maximum/minimum number of characters is configurable.
The stage discards the out-of-range phrases, as they are not recognized properly by Aura NLP, thus saving time and resources in the recognition process.
The Length Adapter returns a configurable intent template if the length of the received phrase in the pipeline message is higher than the maximum number of configurable characters or lower than the minimum one. The intent template is also configurable.
This stage requires a specific configuration in the pipeline configuration file pipeline.json, within the args section of this file, that contains the following fields:
max: maximum number of characters in the phrase of the received pipeline message.
min: minimum number of characters in the phrase of the received pipeline message.
intent_template: intent name to be returned if the number of characters is lower than the min value or higher than max value.
You can also configure more than one stage of the Length Adapter to return different intents for max or min length characters.
3.1.2 - Normalizers
Aura NLP normalizers
What are Aura NLP normalizers
Text normalization is the process of transforming an Aura user’s utterance (expressed in natural language) into a standardized one to be more easily recognized by Aura NLP.
During the normalization process, certain characters are replaced/removed in order to reduce the input diversity that does not provide relevant information to Aura, such as replacing uppercase by lowercase letters, removal of punctuation marks, etc.
Within Aura NLP, there are different normalization stages which are handled as simple stages, taking part of a pipeline. Additionally, it is possible to define pipelines composed only by normalization stages suitable to be nested into another pipeline.
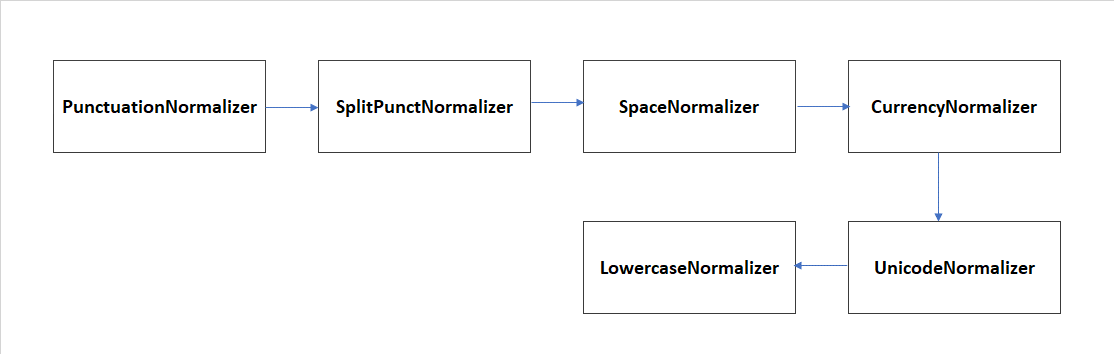
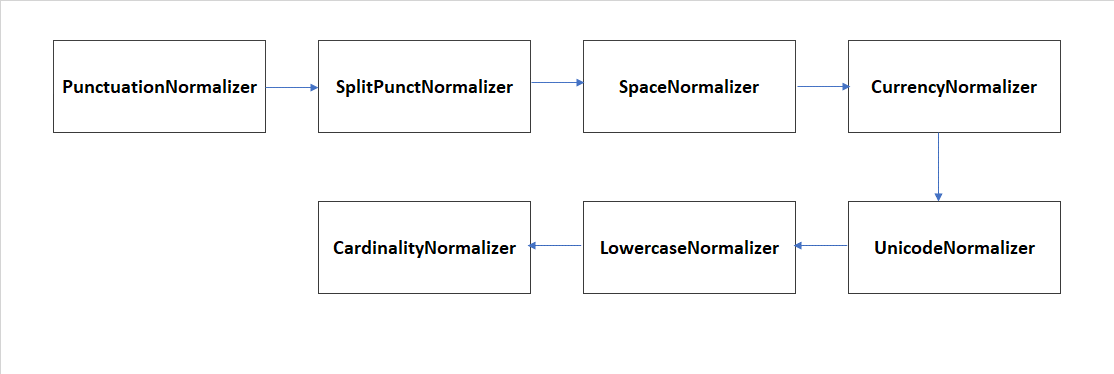
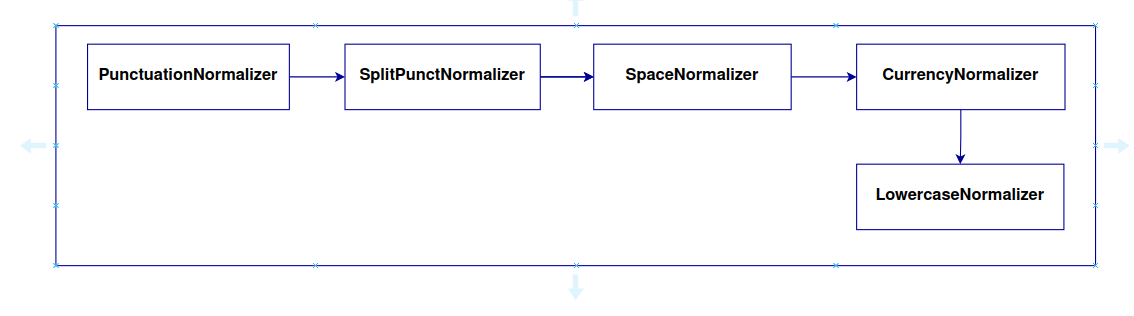
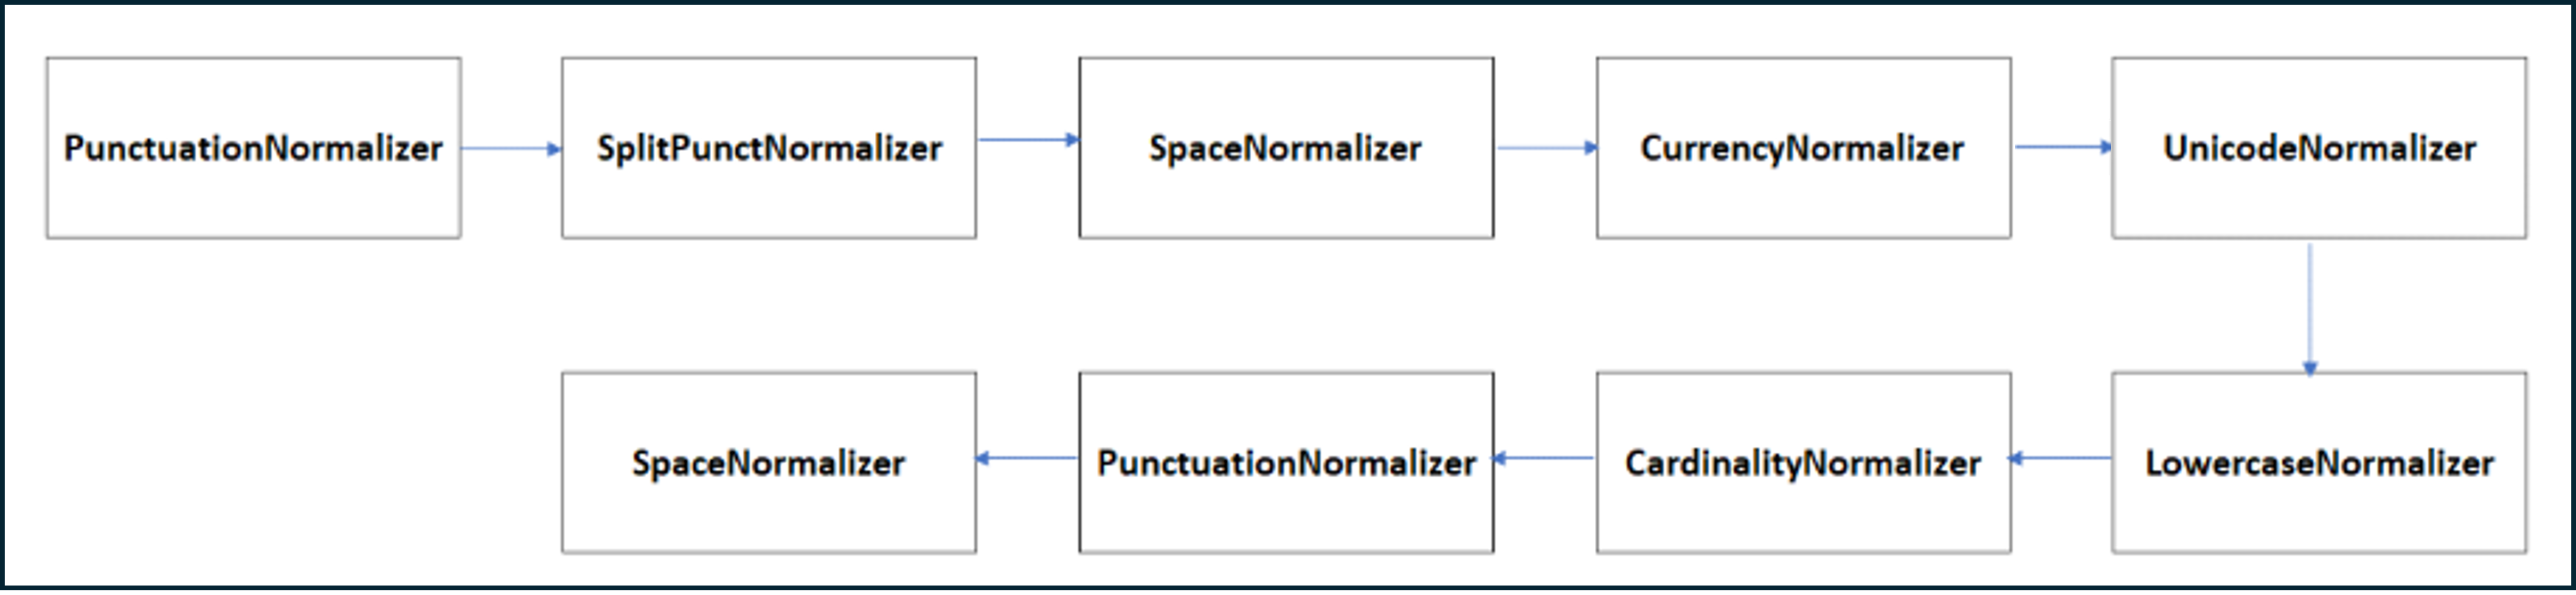
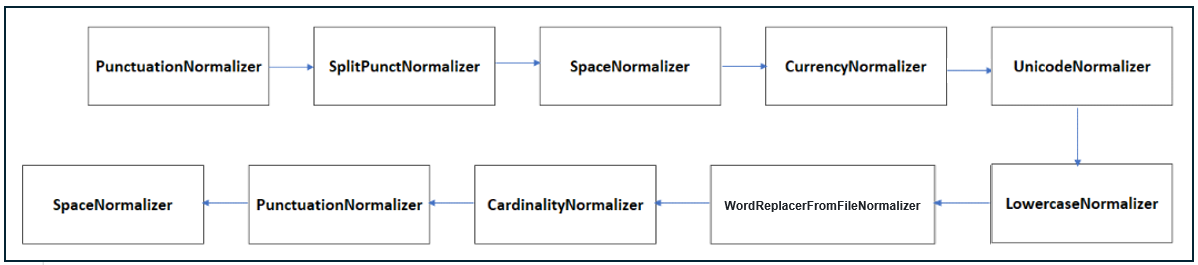
The following sections show the Aura NLP normalizers included in the current catalog.
Cardinality
The cardinality normalizer replaces ordinal or cardinal numbers expressed in text characters by digits. It cannot be used for percentages. For this purpose, the normalizer uses a fork of the library Microsoft.Recognizers.Text.
Example: “Put the second $” –> “Put the 2$”; “$Give me ten results” –> “$ Give me 10 results”.
This normalizer does not require any file or configuration.
This normalizer provides an appropriate format to the amount and currency in an utterance, separating the currency symbol from the amount with a single space. The implementation of this normalizer can be consulted in
https://github.com/Telefonica/Recognizers-Text.
It is able to read the following currencies: $, € and £.
Split Punct normalizer tokenizes the utterance splitting by words and punctuation marks using the NLTK framework. This framework uses NLTK recommended word tokenizer (currently an improved TreebankWordTokenizer that uses regular expressions to tokenize the text, together with PunktSentenceTokenizer that builds a model for abbreviations, collocations and words starting sentences.
The model is used to find sentence boundaries. The result is the utterance split by words separated by single spaces.
Example: “Please!!, get out now… right?” –> “Please ! ! , get out now … right ?”.
This normalizer does not require any file or configuration.
The stop words normalizer removes stop words, defined as commonly used words such as “the”, “is”, “at”, “which”, or “on” from the user’s utterance. This normalizer is able to recognize stop words from different languages using the NLTK framework.
Example: “its ok, I prefer the first or second option too” –> “ok prefer first second option”
This normalizer does not require any file or configuration.
While the previous normalizer identifies predefined stop words from a database, the current normalizer allows the generation of a customized list of stop words, leading to a more accurate recognition of the user’s utterance.
The stop words from file normalizer requires the edition of the stop_words.json file to define a list of personalized stop words for each language and channel. This file must be placed at: aura-nlpdata-[country_code]/data/[language]/[channel]/stop_words.json
The stop_words.json file performs the following tasks during the training process:
- Transforms each word to lowercase
- Removes repeated words
This normalized file is saved in a new file normalized_stop_words.json, in a temporary directory.
When Aura receives a request from the user, the behavior of the stop words from file normalizer is shown below for a specific example:
Utterance: “its ok, I prefer the first or second option too” –> “ok prefer first second option too”
⚠️ When this normalizer is used, the words to be included in the stop_words.json file must be already normalized.
⚠️ The normalization does not validate if the defined “stop word” in the file is composed by only one word. Therefore, a “stop word” could be composed by more than one word.
The Word replacer from file normalizer allows the exchange of words in the utterance.
The word replacer from file normalizer requires the edition of the word_replacer_mapper.json file to define a mapper containing the final words as a key and the list of words to replace as a value for each language and channel. This file must be placed at: aura-nlpdata-[country_code]/data/[language]/[channel]/word_replacer_mapper.json
The word_replacer_mapper.json file performs the following tasks during the training process:
- Transforms each word to lowercase
- Removes repeated words in word values
This normalized file is saved in a new file normalized_word_replacer_mapper.json, in a temporary directory.
When Aura receives a request from the user, the behavior of the word replacer from file normalizer is shown below for a specific example:
Utterance: “howdy, i want the second alternative” –> “hello, i want the second option”
⚠️ When this normalizer is used, the words to be included in the word_replacer_mapper.json file must be already normalized.
⚠️ All values should be only composed by one word. If a value contains more than one word, the normalizer raises an error in the training process. If multiple words are allowed, the normalization process is not idempotent.
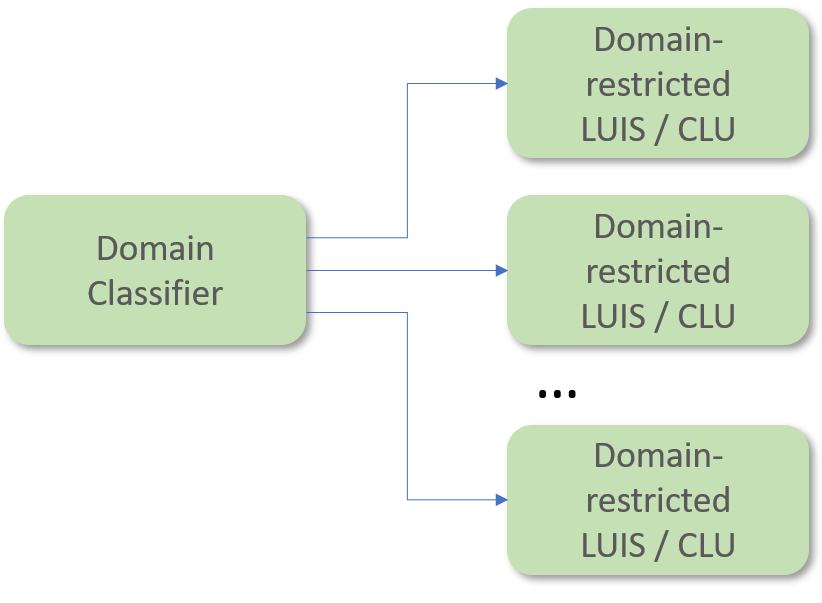
Aura NLP can include the Domain Classifier stage preceding CLU.
The Domain Classifier stage has the objective of providing a coarse and probabilistic classification of intents per pre-defined service domains (TV services, telecom services, etc.).
Including a Domain Classifier just before the CLU stage allows to have several apps, each of them expert on a specific domain (domain-restricted CLU). Once the user’s query is classified in its corresponding domain, it will be finely recognized by the CLU app pointed out by the Domain Classifier.
The Domain Classifier requires one training file called dispatcher.tef.json.
This file has the following fields:
metadata: metainformation such as name, modification date, domain or country of the linguistic model under consideration.
intents: dictionary, where:
Keys: domain name
Values: list of all the training statements (sentences, phrases or isolated words) under that particular domain.
The defined domains and statements must be the same as the ones used to train CLU in different instances. However, whereas each domain is trained in a different CLU app, the training for the Domain Classifier consists of all the training examples condensed in a single file and, instead of having the intent names as dictionary keys, it will have the domain names as dictionary keys.
To add a new domain, it is necessary to append it in the instance_map property of CLU configuration.
In addition, the training and test set files for the CLU stage must be generated including the new domain and this domain must be included, together with the statements, in the dispatcher.tef.json file.
It is recommendable to add comments (using double hash ‘## intent_name ##’) with the intent name, instead of removing it. In this way, it would be easier to know where the training statements of a given intent start from.
Put intents and utterances in the same order as in the CLU training. In that way, it would be easier to control changes.
Update the date of the file in order to know when the last modification was made.
Configuration
This stage requires the following configuration in the nlp.json file:
model_name: name of the algorithm used to train the model. NBayes, Rlogistica and RandomForest are the only values allowed.
apply_cv: this field indicates if the training uses cross-validation or not through true/false values.
n_cv_folds: number of folds for cross-validation.
fit_params: this field can have true/false values. If true, at the end of the training a file is created with the params used.
model_params: used as optional arguments for the algorithm selected.
tv_ratio: value between 0 and 1 indicating the percentage of test statements (sentences, phrases or isolated words) that composes the test set file.
pseudo_seed: value to initialize the seed in order to split training/test sets.
ngram_min: minimum ngrams used for internal term frequency.
ngram_max: maximum ngrams used for internal term frequency.
3.1.4 - Grammars
Grammars stage
Description of Grammars
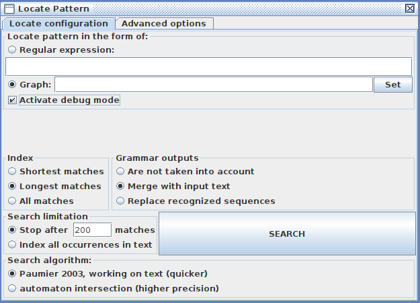
Grammars provide an exact and lightweight utterance’s recognition method that offers a deterministic approach: specific utterances from the users are recognized if they are included in Grammars.
This approach makes Grammars interesting for Aura NLP, due to the existence of specific utterances from Aura users that must be recognized by Aura (such as common utterances from users or difficult ones that are hardly recognized by an intent recognition stage such as CLU).
This stage needs the following training files for each language and channel:
Dico: .dic files. These files include standardized content and must not be modified.
Grammar: .grf files, generated by Unitex.
[entity_extraction_mapper.json]
In addition, if local grammars are used, you must generate two additional files in order to evaluate the compatibility between the global and the local grammars. These two files are placed in the test_grammar folder:
commons/testset.json. This file is used for checking that both grammars, global and local, recognize the same test set statements. You must fill in the test set with key statements, as shown in the following example:
["call 600586375","turn on the light"]
disjoints/testset.json. This file is used for checking that the test set statements are only recognized by the global grammar (if the statements do not apply to the local grammar scope). You must fill in the test set with key statements, as shown in the following example:
["watch coco on tv"]
Configuration
This stage requires one of the following configurations per channel in the nlp.json file:
Use this configuration to define a single intent prefix with a pre-defined string.
In this example, the string intent is defined as the intent prefix in the mp channel.
Use this configuration to define a list of possible intent prefixes for the intent name.
The items passed inside the list intent_matches can be explicit strings or regular expressions written in string
format that the intent name must start with, according to the pattern passed in the regex. In order to define a regex
for the intent prefix, start the string with the keyword regex: and then add the regular expression.
In this example, the strings tef.int. or intent. are the two possible intent prefixes that the intent name must
start with in the mp channel.
There are two mutually exclusive allowed parameters per channel in the configuration file. They are defined below:
intent_prefix: prefix to be added to the intent determined by the grammar.
intent_matches: a list of strings with possible prefixes to be added to the intent determined by the grammar.
The strings passed can be explicit strings or regex written in string format. If a regex is passed, it must contain
the keyword regex: at the beginning of the string to be processed as a regular expression.
3.1.5 - Standard NER
Standard NER stage
What is Standard NER?
Standard Named Entity Recognition (Standard NER) is a process based on machine learning for information extraction that seeks to locate and classify named entities in a text into pre-defined categories.
The input for Standard NER is the normalized user’s utterance. It searches for entities in the utterance and categorizes the recognized words in pre-defined categories (labelling).
The first step when using Standard NER is the creation of dictionaries of entities that are knowledge bases (KB) used to train the NER to recognize, extract and label entities from the user’s utterance. Once the NER is properly trained, it will act as an intelligent system able to think by itself and recognize entities not previously existing in the dictionaries.
Moreover, Standard NER takes into account the entity context (considering not only the analysis of the isolated word but also the left and right words).
Which movies do you have with Clint Eastwood as actor?
Which movies do you have with Clint Eastwood as director?
Standard NER training flow
The training process for Standard NER is schematically shown in the figure below.
Aura Standard NER uses the BILOU tagging scheme for encoding information in a set of labels. BILOU encodes the Beginning, Inside and Last token of multi-token chunks while differentiates them from unit-length chunks.
The feature extraction phase extracts features from tokens, therefore helping their characterization and recognition. This process uses diverse ways to discriminate tokens with the purpose of extracting named entities: Cases; Numbers; Part of speech (PoS); Dictionary entries; Word itself. The feature extraction can also use features from adjacent words in order to take into account the entity context in the decision-making.
When the tokens are recognized as pre-defined entities, Standard NER replaces these tokens by labels. Therefore, the output generated is the user’s utterance tagged in the following way:
Standard NER input
Standard NER output
I want to watch the movie The Matrix
I want to watch the [ent.audiovisual_genre] [ent.audiovisual_film_title]
Standard NER is also capable of recognizing multi-token entities. (i.e., “Out of Africa”). However, Standard NER has a limitation: It can recognize an entity composed of a maximum of 6 tokens.
In the previous example the format indicates that, in the NLP recognition process, four stages are in charge of the entity extraction: Standard NER, Grammar, CLU and Gazetteer NER. But for a specific entity type, ent.audiovisual_film_title, the entity extraction is only done by CLU, and the stages Standard NER, Gazetteer NER and Grammar ignore it.
The name of the corresponding stage must be defined as shown in the example above.
The default key is not mandatory. If a specific entity type is not declared specifically or there is no default key within the entity_extraction_mapper.json file, then every entity of this type is discarded.
Configuration
This stage requires the following configuration in the nlp.json file.
The Standard NER config is distributed between the training-sner section (config fields for the training stage) and the ner section (fields for the production phase), with the following fields:
apply_cv: this field indicates if the training uses cross-validation or not through (true/false).
n_cv_folds: number of folds for cross-validation.
fit_params: this field can have true/false values. If true, at the end of the training a file is created with the params used.
model_params: used as optional arguments for the algorithm selected.
algorithm: name of the training algorithm, with the next allowed values:
lbfgs: gradient descent using the L-BFGS method
l2sgd: stochastic Gradient Descent with L2 regularization term
ap: averaged Perceptron
pa: passive Aggressive (PA)
arow: adaptive Regularization of Weight Vector (AROW)
verbose: boolean value to enable trainer verbose mode.
max_iterations: integer value with the maximum number of iterations for optimization algorithms.
tv_ratio: value between 0 and 1 indicating the percentage of statements (sentences, phrases or isolated words) that composes the test set file.
pseudo_seed: value to initialize the seed in order to split training/test sets.
explore_n_features: parameter used for the model evaluation.
repeat: parameter of BILOU algorithm that defines the number of repetitions for each value.
n_context_words: number of context words used in the BILOU algorithm.
phone_number_entity_type: type of entity to be assigned to an entity recognizer as phone number.
Additionally, for the configuration of dictionaries, two aditional fields can be included optionally:
urm_type_entities: from all the URM entities, in this section developers should indicate which ones they want to be downloaded.
headers_ignore: list with all the headers to be ignored.
3.1.6 - Gazetteer NER
Gazetteer NER stage
What is Gazetteer NER?
Gazetteer NER is a stage defined in the NLP recognition process as an alternative engine to NER for entities recognition. This stage is based on deterministic entity detection: it recognizes entities only based on their presence in the dictionaries, matching terms in the dictionaries with a user’s utterance.
Moreover, Gazetteer NER has been designed with entity-level discrimination capabilities, therefore enhancing its selectiveness by allowing it to detect only instances for a given entity type.
Gazetteer NER stage can appear in a pipeline in parallel to Standard NER (merging both results according to a fixed criteria) or sequentially (letting one engine detect entities not covered by the previous NER engine).
This stage is also capable of recognizing multi-token entities. (i.e “Out of Africa”). However, it has a limitation, as Gazetteer NER can recognize an entity composed of a maximum of 6 tokens.
No configuration is required for the Gazetteer NER in the nlp.json file.
3.1.7 - Full Entity
Full entity stage
What is Full Entity?
Full Entity is defined as a token or a multi-token that univocally corresponds to a specific Aura entity, this is the case when an entire utterance corresponds to a unique entity.
An example of Full Entity is the case of a user’s utterance as “Frozen” or “Ice Age”.
When part of an NLP pipeline, the Full Entity stage develops the following process:
The pipeline searches in the EntityMapper, that is, a database where Aura Full Entities are pre-defined.
If the utterance is recognized as a “full entity”, then the score is 1.0.
If the utterance is not recognized as a “full entity”, then the score is 0 and the pipeline proceeds through another path for the entity recognition.
The Full Entity Recognition is always preceded by NER, meaning that the input to Full Entity is a normalized user’s utterance, with labelled and classified entities.
Moreover, the Full Entity recognizer is able to identify the user’s intent, if the entity is associated to an established domain of intents (i.e., if the recognized entity is a film title, Full Entity identifies the intent as search). This process is done through a mapping file mapper_entities_intent.json which is defined in the correspondent configuration section.
Full entity stage requires the file mapper_entities_intent.json. It is a dictionary where:
Keys: entity types
Values: intent mapped with this entity type in case the user’s input corresponds to the entity at issue.
There can be four situations in which Full Entity is not be able to map the entity with an intent. Therefore, the pipeline flow continues to the next stage for the recognition of the intent:
Value is an empty string "" (entity with no intent assigned)
Value is null
Value is false
Entity type is not declared in file
Any other value, including the intent None, is recognized with score 1.0.
NLP Global Team recommends including always all entity types and being consistent when assigning the option.
If an entity should map None, declare it by adding None to ensure that there are no wrong potential recognitions.
OpenAI embeddings is a stage capable of recognizing the user’s statement and finding the one that most resembles it.
This stage allows using semantic search technology based on OpenAI capabilities, thus improving clearly Aura recognition capabilities.
This semantic search uses embeddings, which are real-valued vectors of numbers that represent the meaning and the context of tokens (in the case of Aura, text blocks) in such a way that words with similar meaning are expected to have similar vector representation. Embeddings work with concepts rather than with keywords. The information structured in these vectors allows OpenAI algorithms to make an optimized semantic recognition of the input texts.
To do so, it is necessary to use the embeddings method of OpenAI, a Microsoft service in charge of working with Machine Learning models and to use the Qdrant database to be able to feed all the frequently asked questions (FAQs).
The user’s utterance recognition through OpenAI embeddings has two major steps:
Training: Sets of structured questions and answers are extracted from data sources such as FAQs; afterwards, the OpenAI embeddings process is performed on those questions and, finally, the Qdrant knowledge base is fed with all of them.
Matching: Once the knowledge base has been loaded, it is necessary to publish it. This enables an endpoint to the Qdrant knowledge base, which can be used in the client application. This endpoint accepts a user’s question, performs the OpenAI embedding process and queries within Qdrant responding with the best answer from the knowledge base, along with a confidence score of the match.
⚠️ In the current release, this stage must not compete in parallel with other NLP recognition stages (CLU, Exact match, etc.) in the pipeline, in the way that the scores of each stage are compared.
⚠️ In order to use the OpenAI embeddings stage, it has to be previously enabled in the aurak8s installer, following the guidelines in the document Enable OpenAI deployment.
In terms of time, obtaining the embeddings through OpenAI and storing them in the Qdrant database is fast. Note that when training from the package, embeddings are not recalculated.
⚠️ In order to use the OpenAI embeddings stage, OpenAI has to be previously enabled in the aurak8s installer, following the guidelines in the document Enable OpenAI deployment.
On the other hand, if new training files are uploaded to Azure, all the embeddings are recalculated.
For OpenAI embeddings recognizer, two kinds of files are required: training and testing ones:
On one hand, training files placed in folder: aura-nlpdata-[country_code]/data/[language]/[channel]/openai-embeddings/training/ with extension .xlsx or .xls are used for training.
On the other hand, test files placed in folder: aura-nlpdata-[country_code]/data/[language]/[channel]/openai-embeddings/test/ with extension .xlsx or .xls are used for testing.
Configuration
This stage requires the following configuration in the nlp.json file:
openai_embeddings_recognizer: This field is used to configure the OpenAI embeddings recognizer stage.
openai: Specifies the OpenAI model to be used. This variable supports the following values:
model_base: Base model to be used. Check azure documentation to know more about values supported.
model_version: Version of the model to be used.
subscription_key: This value is replace automatically in training process.
deployment_name: This value is replace automatically in training process.
search_params: Specifies the parameters to be used in the database search process.
knn: Number of nearest neighbors to return.
exact: If set to true, will perform exact search, which will be slower but more accurate.
distance: Type of distance to calculate between vectors. This variable supports the following values: Cosine, Euclid, Dot.
database: Database to be used. This variable supports the following values: qdrant.
dataset_name: Dataset to be used. This value will change automatically.
intent_template: Intent name to return the response.
entity_label_template: Entity label to return the response.
entity_type_template: Entity type to return the response.
score_factor: Parameter used to weight the score of the response returned by OpenAI to be used during the winning response selection.
3.1.9 - Exact Match
Exact Match stage
What is Exact Match?
Exact match is a deterministic stage. Its purpose is to recognize the users’ requests with a 100% accuracy so as to match them with a specific and unequivocal intent.
When part of an NLP pipeline, the Exact Match stage develops the following process:
The pipeline loads the exact_match.json file, that defines certain intents and their associated utterances.
If the utterance is recognized as an “exact match”, then the score will be 1.
If the utterance is not recognized as an “exact match”, then the score will be 0 and the pipeline will proceed through another path.
As explained in the Exact Match description, this stage requires the file exact_match.json, that must include:
Specific intents.
Utterances that we want to be recognized as these specific intents.
An example of exact_match.json is shown below, for the case of several specific utterances such as “more information regarding control plans” or “discover control plans in Vivo” that we want Aura to recognize as the intent.plans.portability intent.
{'intents':{'intent.plans.portability':['more information regarding control plans','discover control plans','discover control plans in Vivo']'intent.tracking.waterfall':['intelipost eco berrini']}}
Configuration
No configuration is required.
3.1.10 - CLU
Conversational Language Understanding (CLU) stage
What is Microsoft CLU?
Intent recognizers are defined as specific NLP stages used to detect the intent in a user’s utterance.
Conversational Language Understanding (CLU) is a cloud-based API service that applies custom machine-learning intelligence to a user’s conversational and natural language text to predict the overall meaning and pull out relevant and detailed information.
CLU interprets the user’s goals (intents) and extracts valuable information from the utterance (entities),
for a high quality, nuanced language model.
Currently, Aura NLP includes two CLU features to recognize the user’s intent and associated entities:
Intent recognition: statistical recognition.
Entity recognition: declared CLU entities.
Therefore, from the user’s utterance, CLU returns the user’s intent and entities as an output, as well as the score
(number between 0 and 1 that shows the accuracy of the recognition process).
Regarding the stage training, the duration depends on the specific project, although in certain scenarios in can take up to four hours.
On the other hand, in CLU allows:
- Training all domains in parallel, so the maximum training time corresponds to the time taken by the “slowest” project.
- Reuse trainings, so if only one domain is changed, the rest are not retrained.
Specific CLU behavior of CLU with entities
CLU Azure services are able to recognize differents entities over the same part of the utterance or share parts of a utterance between
differents entities but for consistency, CLU stage applies the following rules in these cases:
When an entity is completely a substring of another entity, that is removed and the longest entity is preserved.
When any entity has partial collisions (share parts of utterance or similar), preserve both entities.
When two entities have exactly the same text but different types, preserve both entities.
When two entities have exactly the same text and same type, preserve the entity with more info (the one that has different canon that text/name).
intent_confidence_threshold: Float between 0.0 (by default) and 1.0 used by CLU to set a score threshold to determine the validity of a recognized intent.
domain: Domain name of this training file.
intents: JSON dictionary, where:
Keys: Intents.
Values: List with statements (sentences, phrases, words) to train the model.
These statements could contain entities, using 2 formats:
If an external entity extractor is used: [entity_type]
If CLU is used to extract entities using learned entities: [entity_value:entity_type]. This way of adding entities, build a set of entities of learned type.
entities: JSON dictionary, where:
Keys: Entities.
Values: Dict entities parameters to train the model. The feasible values (combination, lists, regex, prebuilts, learned) correspond to entity types for CLU and are described below:
lists: Dict field to include entities of list component type.
required: Boolean field to indicate if it is necessary to recognize an entity using this component. By default, is false, so in this case it is not necessary to include it.
values: Dict with canon as key and aliases as values.
regex: Dict field to include entities of regex component type.
required: Boolean field to indicate if it is necessary to recognize an entity using this component. By default, is false, so in this case it is not necessary to include it.
values: Dict with all regex components used to recognize this entity.
required: Boolean field to indicate if it is necessary to recognize an entity using this component. By default, is false, so in this case it is not necessary to include it.
values: List with all prebuilt components used to recognize this entity.
required: Boolean field to indicate if it is necessary to recognize an entity using this component. By default, is false, so in this case it is not necessary to include it.
The entities defined as learned are not necessarily defined as list, regex or prebuilts and vice versa.
Example of clu_trainingset.[domain].tef.json:
{"metadata":{"language":"es-es","description":"CLU trainingset for test domain","version":"dev","date":"2023-10-11","intent_confidence_threshold":0,"domain":"domain.default"},"intents":{"intent.common.greetings":["Hi","Hi, how are you?","Hello, what is up?"]},"entities":{"ent.audiovisual_sports_circuit":{"combination":true,"lists":{"values":{"names":["Le Mans","Misano"]}},"regex":{"values":{"expression-1":"circuito de [a-zA-Zãéíó]+( [a-zA-Zãéíó]+)*"}}}}}
Complete example of clu_trainingset.[domain].tef.json
{"metadata":{"language":"es-es","description":"CLU trainingset for test domain","version":"dev","date":"2023-10-11","intent_confidence_threshold":0,"domain":"domain.default"},"intents":{"intent.default.test1":["## comment","# Lanza este canal,","Esta [película:ent.audiovisual_genre] lánzala a la [tele:ent.device_tv] [ahora:ent.time_instant]","Quiero que me lances este [capítulo:ent.audiovisual_tv_episode_number] de la [temporada 3:ent.audiovisual_tv_season_number] a mi [tv:ent.device_tv]","¿Puedes lanzarme la [etapa:ent.audiovisual_sports_unit] del [Dakar:ent.audiovisual_sports_season_motor] a la [tele:ent.device_tv]?"],"intent.default.test2":["[ent.audiovisual_best]","Busca algún [ent.audiovisual_genre]","Dime alguna [ent.audiovisual_subgenre] por favor","Me gustaría ver una [ent.audiovisual_genre] que protagonice [ent.audiovisual_actor]","Ponme algún [ent.audiovisual_genre]","Quiero una [ent.audiovisual_genre] chula entre las de [ent.audiovisual_releases]","[ent.audiovisual_genre] sobre [ent.audiovisual_subgenre] y poder","¿Puedo ver [ent.audiovisual_actor]?","¿Tienes algo de [ent.audiovisual_subgenre] por favor?","Nos apetecería ver [ent.audiovisual_tvseries_title] [ent.audiovisual_tv_season_number] [ent.audiovisual_tv_episode_number]","¿Me puedes encontrar de la [ent.audiovisual_tv_season_number] el [ent.audiovisual_tv_episode_number] de [ent.audiovisual_tvseries_title]?","Busca la de [ent.audiovisual_sports_circuit]","Me gustaría ver algún [ent.audiovisual_sports_unit] de [ent.audiovisual_sports_unit], ¿cuál puedo ver?","Quería ver los [ent.audiovisual_sports_unit]","[ent.audiovisual_sports_player_driver] [ent.audiovisual_sports_circuit]","Hazme alguna recomendación con [ent.audiovisual_actor]","¿Qué [ent.audiovisual_genre] recomiendas?","Recomiéndame una [ent.audiovisual_sports_unit] de [ent.audiovisual_sports] o [ent.audiovisual_sports] para ver en la [ent.device_tv]","Recomiéndanos una [ent.audiovisual_subgenre] para [ent.time_interval]","¿Puedes recomendarme algo de [ent.audiovisual_genre] de [ent.audiovisual_subgenre] del [ent.time_interval_future]?"],"intent.default.test3":["Comenzar a reproducir","Aura vete al [ent.audiovisual_channel]","¿Podrías ponerme [ent.audiovisual_channel]?","Déjame ver de la [ent.audiovisual_tv_season_number] el [ent.audiovisual_tv_episode_number] de [ent.audiovisual_tvseries_title]","Necesito que me pases el [ent.audiovisual_tv_episode_number] de la [ent.audiovisual_tv_season_number] de [ent.audiovisual_tvseries_title] al [ent.device_tv]","Prefiero la [ent.audiovisual_subgenre] [ent.audiovisual_film_title]","Ver el [ent.audiovisual_genre] de [ent.audiovisual_documental_title]","¿Puedo ver [ent.audiovisual_film_title]?","Estoy interesado en ver esta [ent.audiovisual_tv_season_number]","Preferiríamos la [ent.audiovisual_tv_season_number] de esta [ent.audiovisual_genre]","Ver la [ent.audiovisual_tv_season_number]","Dame la que es en [ent.audiovisual_sports_circuit]","Pon a reproducir el [ent.audiovisual_sports_unit] del [ent.audiovisual_sports_team]","Quiero que reproduzcas la [ent.audiovisual_sports_unit] de [ent.audiovisual_sports_team]","¿Puedo ver la [ent.audiovisual_sports_unit]?","Que pongas la [ent.audiovisual_sports_season] [ent.time_instant]","Quiero que pongas la [ent.audiovisual_sports_unit] del [ent.time_interval]","¿Se puede ver la [ent.audiovisual_sports_unit] de [ent.audiovisual_sports_player_rider] de la [ent.time_interval_past]?"],"intent.default.test4":["Afín a [ent.audiovisual_tvshow_title]","Del estilo [ent.audiovisual_tvshow_title]","[ent.audiovisual_genre] que sean iguales a [ent.audiovisual_tvshow_title]"],"intent.default.test5":["Empieza de nuevo en el [ent.device_mobile]","Ponme el principio en la [ent.device_tv]","Ponme esta [ent.audiovisual_tv_season_number] desde el comienzo","Reproducir desde el principio la [ent.audiovisual_genre]","Inicia la reproducción de [ent.audiovisual_documental_title] desde el comienzo","Quiero que reinicies de [ent.audiovisual_documental_title]","Volver al principio de [ent.audiovisual_tvshow_title]","Vuelve a poner el [ent.audiovisual_sports_unit] de [ent.audiovisual_sports_season]"],"None":["6587234578164589234729878432874624","Pillata micropoliz gusta","gracioso y lento","graciosa y lenta","gracisa lenta","graciso lento","gtgt","gustan y gusy gusanillo di"]},"entities":{"ent.audiovisual_sports":{"combination":true,"lists":{"values":{"teamed":["baloncesto","fútbol"],"individual":["golf","tenis"]}}},"ent.audiovisual_sports_circuit":{"combination":true,"lists":{"values":{"names":["Le Mans","Misano"]}},"regex":{"values":{"expression-1":"circuito de [a-zA-Zãéíó]+( [a-zA-Zãéíó]+)*"}}},"ent.audiovisual_tv_episode_number":{"combination":true,"regex":{"required":false,"values":{"expression-1":"[0-9]+ capítulo","expression-2":"[a-z]*(último)* capítulo"}}},"ent.time_interval":{"combination":false,"prebuilts":{"required":true,"values":["DateTime"]}}}}
clu_testset.[domain].tef.json
JSON file where the statements for testing CLU must be included when the training_kind property in CLU configuration
is set to manual.
The extension .tef.json identifies these files as both JSON files and TEF format.
If there is only one domain, the file is named as: clu_testset.default.tef.json
The test set is a JSON file where:
Keys: Intents.
Values: List with testing utterances.
The testing statements must not be part of the training set, they should include linguistic variations of the training phrases and as authentic as possible (user’s logs).
Each domain declared in this file must be defined in the instance_map property of CLU configuration.
CLU testset should be saved in the same directory as the training file(s).
All intents must be represented in the testset, including the None intent.
Example of clu_testset.[domain].json:
{"intent.common.greetings":["Hello","What is up?","Hola","Good morning","Hello there"]}
Configuration
This stage requires the following configuration in the nlp.json file.
fetch_entities: It indicates whether you want to receive the entities from CLU or not.
score_factor: Parameter used to weight the score of the response returned by CLU to be used during the winning response selection. For example, if score_factor = 0,5 and the score returned by CLU is 1, the final score is 1*0,5=0,5.
n_clu_responses: Number of recognized intents that CLU can provide. By default, it is 1. It is used in the intent disambiguation stage, where CLU offers more than one intent that can be disambiguated afterward.
training_kind: Kind of evaluation training. Values manual and percentage are defined below:
percentage: a percent (defined in test_split_percentage field) of training set will be used to test train.
test_split_percentage: If we set training_kind as percentage, it is required to fill this field to set the percentage of training phrases that will be used to test this stage.
This field accepts an integer between 0 and 100.
instance_map: It replaces the project_name and subscription_key with the appropriate value of the CLU service. This replacement process is performed automatically.
project_name: Name of the project that contains CLU application. This field is automatically generated.
subscription_key: key needed to connect to CLU. This field is automatically generated.
3.1.11 - Embeddings Domain Classifier
Embeddings Domain Classifier stage
What is Embeddings Domain Classifier?
The Embeddings Domain Classifier stage is capable of classifying an input request into specific service domains (TV services, telecom services, etc.) from the ones pre-defined in Aura. This will help Aura NLP better understand the user’s requests and, ultimately, to more accurately resolve each received utterance.
A use case can include the Embeddings Domain Classifier stage at the beginning of an Aura NLP pipeline, before an intent recognition stage, so a user’s request (i.e., “I have problems with my wifi”) is firstly classified as belonging to a specific domain (in the example, “wifi”). Once classified as described, it can be precisely recognized by the most appropriate intent recognition stage for that domain.
The Embeddings Domain Classifier is based on OpenAI semantic search technology for the recognition of the domain in the user’s request. This semantic search uses embeddings, which are real-valued vectors of numbers that represent the meaning and the context of tokens (in the case of Aura, text blocks) in such a way that words with similar meaning are expected to have similar vector representation. Embeddings work with concepts rather than with keywords. The information structured in these vectors allows OpenAI algorithms to make an optimized semantic recognition of the input texts.
The process is schematically shown in the figure below and explained afterwards:
The Embeddings Domain Classifier stage is trained to map utterances with domains.
The Azure OpenAI embeddings model text-embedding-ada-002 generates embeddings (vectors) from the training statements.
If Aura receives a request from the user, Azure OpenAI generates an embedding from the input utterance.
This embedding is sent to Qdrant and returns the k-nearest neighbors (KNN). A search is done for the identification of the embedding (domain) more closely aligned with the user’s utterance embedding, together with its score. Different ways can be used to calculate the distance between vectors, which are defined in the configuration.
The output from Qdrant is the identified domain and the associated score.
⚠️ In order to use the Embeddings domain classifier, OpenAI has to be previously enabled in the aurak8s installer, following the guidelines in the document Enable OpenAI deployment.
The following sections include the necessary path and configuration for the Embeddings Domain Classifier stage, as well as the files required to train it.
The Embeddings Domain Classifier stage requires one training file called dce_training.json and one testing file called dce_testset.json.
These files have the following fields:
metadata: metainformation such as name, modification date, domain or country of the linguistic model under consideration.
intents: dictionary, where:
Keys: domain name
Values: list of all the training statements (sentences, phrases or isolated words) under that particular domain.
These files placed in folder: aura-nlpdata-[country_code]/data/[language]/[channel]/domain_classifier_embeddings.
The defined domains and statements must be the same as the ones used to train CLU in different instances. However, whereas each domain is trained in a different CLU app, the training for the Embeddings Domain Classifier consists of all the training examples condensed in a single file and, instead of having the intent names as dictionary keys, it will have the domain names as dictionary keys.
To add a new domain, it is necessary to append it in the instance_map property of CLU configuration.
In addition, the training and test set files for the CLU stage must be generated including the new domain and this domain must be included, together with the statements, in the dce_training.json file.
It is recommendable to add comments (using double hash ‘## intent_name ##’) with the intent name, instead of removing it. In this way, it would be easier to know where the training statements of a given intent start from.
Put intents and utterances in the same order as in the CLU training. In that way, it would be easier to control changes.
Update the date of the file in order to know when the last modification was made.
It is recommended to avoid writing duplicate intents in the same domain and also to avoid duplicate intents after normalisation. In case this happens, one of the intents shall be omitted.
It is important not to write the same intent for different domains and also to avoid duplicate intents after normalisation. In this case an error will occur and the training stage will fail.
Configuration
This stage requires the following configuration in the nlp.json file:
openai_embeddings_domain_classifier: This field is used to configure the Embeddings Domain Classifier stage.
openai: Specifies the OpenAI model to be used. This variable supports the following values:
model_base: Base model to be used. Check Azure documentation to know more about supported values.
model_version: Version of the model to be used.
subscription_key: This value is replaced automatically in the training process.
deployment_name: This value is replaced automatically in the training process.
search_params: Parameters to be used in the database search process.
knn: Number of nearest neighbors to return.
exact: If set to true, it will perform an exact search, which will be slower but more accurate.
distance: Type of distance to calculate between vectors. This variable supports the following values: Cosine, Euclid, Dot.
database: Database to be used. This variable supports the following values: qdrant.
dataset_name: Dataset to be used. This value will change automatically.
3.2 - NLP connectors
Catalog of NLP connectors
NLP connectors to compose the NLP pipeline
Aura Platform Team has implemented different types connectors to join NLP stages in order to configure the pipeline.
Select your intended connector in the left menu. Each of them is characterized by its description, path, files and configuration.
Section
Content
Role in the NLP process
Description
Identification and objective of the stage in the recognition process
Descriptive purpose of the stage in the recognition process
Path
Class path (Python class) of an element (stage or connector)
The path of each stage of the pipeline must be included in the file pipeline.json for building up the NLP dynamic pipeline
File
Specific training files and test set files for the NLP stage required to train and validate the NLP model
Linguists must generate these files for the training and the validation of the NLP model during the data resources definition
Configuration
Required configuration for each NLP stage
Configuration of each stage of the NLP model
3.2.1 - Logical connectors
Logical connectors
Introduction
Connectors are components that connect different NLP stages and control the flow of the pipeline. Specifically, logical connectors use the logical connectives to combine different stages.
The purpose of this connector is to execute in sequential order the stages that the connector contains and to return the status false.
This connector ignores the status of the different stages which are contained.
The purpose of this connector is to execute in sequential order the stages that the connector contains and to return the status true.
This connector ignores the status of the different stages which are contained.
These connectors work as follows: Stage B input is the output of its preceding stage A, with stage B output the result of summing both stages result.
The way the different stages are connected defines how the interactions between them are carried out. For example, two or more stages can run in a simultaneous competitive way, in which the winner is the stage with higher score or stages can be executed in a sequentially way in which a first stage generates information used by the succeeding stage.
BasePipeline
Description
BasePipeline is the simplest connector in charge of the sequential execution of the different stages composing the pipeline. These stages are executed in the specified order.
Path
auracog_pipelines.pipelines.base.BasePipeline
Configuration
No configuration is required
3.2.2 - Selection connectors
Selection connectors
Introduction
Selector connectors allow, when included on a pipeline, to specify which path of the pipeline is applied depending on a certain parameter.
Currently, only one selection connector is developed in Aura NLP: Domain selector connector.
Domain selector connector
Description
The domain selector connector allows specifying which path of the pipeline is applied depending on the recognized domain. Therefore, it has to be preceded by a domain classifier step.
In this example, once the Domain Classifier has recognized the domain, the Domain Selector stage comes into play. In case the recognized domain is “domain1”, the flow continues to “Pipeline1”. Otherwise, if domain is “domain2” or “domain3”, “Pipeline2” or “Pipeline 3” are selected respectively as the following stage.
If domain is 1, then pipeline continues with element defined in position 0.
If domain is 2, then pipeline continues with element defined in position 1.
3.2.3 - Disambiguation connector
Disambiguation connector
Description
The disambiguation connector is a joint stage that allows disambiguation between different pipelines (therefore, between different recognizers).
The general behavior of this connector is shown as follows:
It executes in parallel the different pipelines.
When the execution of all the pipelines is finished, the connector will carry out a disambiguation by intents, comparing the top results from the execution of the pipelines.
However, take into account that, if there is a blacklist of intents, this behavior changes, as explained in the following section.
Disambiguation connector with a blacklist of intents
Aura NLP allows the integration of configurable blacklists of intents for a custom behavior of disambiguation.
In this case, the disambiguation mechanisms will not apply for the intents included in the blacklist.
The use case constructors can edit a blacklist of intents in the nlp.json configuration file, filling the parameter intent_blacklist.
When there is a blacklist of intents, the disambiguation connector behaves as explained below:
It executes in parallel the different pipelines, with their corresponding stages.
The recognized intents from each pipeline are extracted (unless they have a None intent).
If the top scored intent of these pipelines is included in the intent_blacklist or its score is greater than the exact_match threshold, then this intent is returned.
If the top intent is not included in the intent_blacklist, then the predefined values of the configuration parameters come into play:
All the intents between the disambiguation_margin and the top score, and not present in the intent_blacklist, are selected.
If there is only one intent, it will be returned in a pipeline message.
If there is more than one intent, a pipeline message with the intent intent_template and a score of 1.0 is assigned. This pipeline message will contain nor entities, neither domains, but it will contain all the selected intents in pipeline messages as options.
This stage requires a specific configuration in the dynamic NLP pipeline pipeline.json.
The following parameters are required for this stage:
elements: definition of every element composing the pipeline (stages and joints). It must include:
Element name. In this case, JointDisambiguation
type: It must be set to joint
classpath: path to be included in order to use this stage:
auracog_pipelines.pipelines.joint.disambiguation.DisambiguationPipeline
args section: dictionary with the following fields:
exact_match: If the intent with the highest score is greater than this value, the result is this intent. Float number.
disambiguation_margin: Margin between the highest score and the lower score considered for the response. Float number.
intent_template: Name of the intent that the stage returns when there are multiple options as response. String.
intent_blacklist: list of intents that will be removed in case there are other options. If there are no blacklisted intents it will have to be an empty list. List of strings.
See two examples of configuration for the disambiguation connector:
Catalog of NLP normalization pipelines to compose the NLP pipeline
Aura Platform Team has implemented a set of normalization pipelines in order to be nested in the NLP model pipeline. They are built joining different normalization stages (normalizers).
In every use case, it is necessary to choose the most adequate normalization pipeline.
For example, if numbers are expected to be expressed with text characters (i.e., “one”), it is useful to include the normalization stage CardinalityNormalizer to turn them into digits (“1”).
Another example refers to the fact that written requests are required. In this situation, it can be important to include a normalization stage that reduces transcription mistakes.
Select your intended normalization pipeline in the left menu. Each of them is characterized by its description and configuration.
Section
Content
Role in the NLP process
Description
Identification and objective of the stage in the recognition process
Descriptive purpose of the stage in the recognition process
Configuration
Required configuration for each NLP stage
Configuration of each stage of the NLP model
3.3.1 - Nabro
Nabro normalization pipeline
Description and stages
Nabro is a pipeline used for the normalization of the user’s utterance through the execution of the following normalizers:
For the specific language and channel, in the nlp field of this JSON file, the key normalizer_pipeline_class must be filled in with the value:
auracog_pipelines.pipelines.normalization.nabro.NabroPipeline
For the specific language and channel, in the nlp field of this JSON file, the key normalizer_pipeline_class must be filled in with the value:
auracog_pipelines.pipelines.normalization.narugo.NarugoPipeline
For the specific language and channel, in the nlp field of this JSON file, the key normalizer_pipeline_class must be filled in with the value:
auracog_pipelines.pipelines.normalization.naeba.NaebaPipeline
For the specific language and channel, in the nlp field of this JSON file, the key normalizer_pipeline_class must be filled in with the value:
auracog_pipelines.pipelines.normalization.nikko.NikkoPipeline
For the specific language and channel, in the nlp field of this JSON file, the key normalizer_pipeline_class must be filled in with the value:
auracog_pipelines.pipelines.normalization.niseko.NisekoPipeline
For the specific language and channel, in the nlp field of this JSON file, the key normalizer_pipeline_class must be filled in with the value:
auracog_pipelines.pipelines.normalization.norikura.NorikuraPipeline
For the specific language and channel, in the nlp field of this JSON file, the key normalizer_pipeline_class must be filled in with the value: auracog_pipelines.pipelines.normalization.noro.NoroPipeline
Entities catalogs are the input for the Aura NLP dictionaries, used to recognize entities from the users’ utterances.
Introduction
Catalogs in Aura are knowledge bases of entities. These catalogs are the input for the generation of Aura NLP dictionaries to be included in an NLP model.
Telefonica Kernel URM is a database that includes data from different key content such as film title, documental title, TV series title, TV shows, actors’ name, directors’ name, etc.
Aura can connect to the URM and automatically download the URM content when the NLP dictionaries (sdict files) are generated. You can indicate in the configuration whether to take data from Azure or AWS.
Data that can be downloaded from the URM correspond to the section urm_type_entities in the nlp.json configuration file:
audiovisual_director
audiovisual_actor
audiovisual_documental_title
audiovisual_film_title
audiovisual_tvshow_title
audiovisual_tvseries_title
The URM database should be continuously updated, in order to show the most recent content and scheduled programs (for instance, new films or series in Movistar + catalog).
As NLP dictionaries automatically include the data from the URM database, two situations are found that can lead to the generation of manual catalogs:
The URM must be completed with the very latest content that can be offered to the user and must be recognized by Aura. In case a relevant entity is missing, the catalog must be updated manually.
Linguists can detect mistakes in URM data: wrong formats, typos, missing aliases, etc. To overcome this problem, the manual updating of catalogs is required.
Manual catalogs
Catalogs can be updated manually in the catalogs/ folder, included in Aura NLP data directory: aura-nlpdata-[country_code]
This folder contains, categorized by language and channel, all the files required for the manual updating of entities.
The final goal is to complete the dictionaries with entities that should be recognized by the NLP system (when a NER stage is used) and to complete and/or refine data from URM (in case this source is used).
Guidelines for the generation or update of manual catalogs
As explained before, apart from automatic catalogs, that provides data from Kernel URM database, manual catalogs can be also generated to complete the automatic ones with new entities or correct mistakes.
The following sections include the orderly guidelines for the generation or update of manual entities catalogs.
1. Identify content
Identify content to be updated in dictionaries: very latest content that must be included in dictionaries and recognized by Aura (for instance, new films or series in Movistar+ catalog).
Check if this content (entities) are included in the URM database:
These specific entities are missing
Any mistake is detected in URM data regarding these entities (wrong formats, typos, missing aliases, etc.)
2. Access the catalogs/ folder and edit it
Access the catalogs/ folder in:
aura-nlpdata-[country_code]/catalogs
Now, you should edit the different files, each one with its corresponding data as shown in the following sections.
2.1. auth/ folder
Working directory:
aura-nlpdata-[country_code]/catalogs/[language]/[channel]/auth/
auth/ folder contains multiple JSON files including prioritized content that are added to the sdict_item.json and sdict_aliases.json dictionaries.
Follow these steps to edit the auth/ folder:
Organize data into different JSON files by entity types (for example, one file for time entities and another for tv entities).
It is mandatory that files names have the format:
<file_name>.ent.json
Add a file named most_relevant_content.ent.json for those key entities that must be recognized with 100% accuracy related to these fields:
Film title > ent.audiovisual_film_title
Documental title > ent.audiovisual_documental_title
TV series title > ent.audiovisual_tvseries_title
TV shows > ent.audiovisual_tvshows_title
Add a JSON file for organizing any other entity type or topic (for example, movistar+_sports.ent.json.
Edit each JSON file:
metadata field should include the following fields:
format: specification of format used in file.
name: representative name to identify the content of the file.
version: this should be updated when changing the file.
Keys: entity types
Values: list of entities
If the item is a string, it is considered a canon and deleted from the rest of the entity types where it is found.
If it is a list, the first element of the list is considered a canon and the rest of values are aliases for this canon. The canon is deleted from the rest of the entity types where it is found and aliases are removed from the sdict_aliases.json dictionary.
Example
{"metadata":{"format":"tef:dict:entity","name":"AURA Movistar XXX","version":"1.0"},"ent.audiovisual_sports_team":[["Real Madrid","el Real Madrid|comment","##el Real Madrid","Madrid"],["Sevilla|comment","el Sevilla","Sevilla club de fútbol","Sevilla futbol club"]]}
Best practices
Comments can be added, since the script ignores them:
Adding “##” before a value. ("## Spanish Football Teams")
Adding “|” in a value or entity type, the text after this symbol is not considered as part of the entity (“el Real Madrid|comment”)
Maintain correct indentation to ease catalogs reading.
Declared entities, canons and aliases should be ordered alphabetically.
Capitalize: first letter for proper nouns, titles, teams, companies, etc. (“The Wedding Date”); acronyms (“Chelsea FC”).
Write punctuation correctly within values. For example, “Chelsea F C” could be written also as “Chelsea F.C.”. Do not include both forms because it could cause a duplicate due to normalization process.
If the language includes words with diacritical marks, write values correctly.
Check that the canon is the expected in case the API expects a specific one.
Compare canon/alias included in catalogs to avoid overlaps and conflicts.
Avoid duplicates.
2.2. add/ folder
Working directory:
aura-nlpdata-[country_code]/catalogs/[language]/[channel]/add/
add/ folder contains multiple JSON files including additional or non-prioritized content to be added to the sdict_item.json and sdict_aliases.json dictionaries. It is used to complement information in dictionaries.
In case there is non-prioritized content, this folder will be empty.
Follow these steps to edit the add/ folder:
Organize data into different JSON files by entity types (for example, one file for time entities and another for tv entities).
It is mandatory that files names have the format:
<file_name>.ent.json
Edit each JSON file:
metadata field should include the following fields:
format: specification of format used in file.
name: representative name to identify the content of the file.
version: this should be updated when changing the file.
Keys: entity types
Values: list of entities
If the item is a string, it is considered a canon and added to sdict_items.
If it is a list:
The first element of the list is considered a canon and added to sdict_items.json.
The rest of values are aliases and are included in sdict_aliases.
Best practices for the auth/ folder also apply to add/ folder.
2.3. precedence.json file
Working directory:
aura-nlpdata-[country_code]/catalogs/[language]/[channel]/precedence.json
precedence.json file establishes the priority of an entity type over the rest in the sdict_items.json dictionary.
Follow these steps to edit the precedence.json file:
Edit the file including:
Keys: entity type
Values: list of entity types over which the key prevails.
Example
If the entity “Real Madrid” is present in both ent.audiovisual_documental_title and ent.audiovisual_sports_team, and we want soccer teams to have priority over documentaries, it has to be defined in precedence.json like this:
Entities declared should be ordered alphabetically.
Values inside entities should be ordered alphabetically.
Be careful to maintain the required JSON format.
Include values as they are found in dictionaries, respecting capitalization, diacritical marks, etc. The system deletes not only these values but also their normalized version.
5 - Aura NLP dictionaries
Generation of Aura NLP dictionaries
Aura NLP dictionaries are knowledge bases used to recognize entities from the users’ utterances.
Process at a glance
Update catalogs
. Firstly, check if catalogs must be updated to include the latest content.
. If required, update catalogs manually.
The recognition of entities in the Aura NLP model is based on dictionaries: knowledge bases of entities that are included in the NLP model as part of stages for the recognition of entities in the user’s utterance.
There are two types of dictionaries defined in Aura:
Items dictionary: it includes all the different values in its canonical form for each entity type. The canonical question is defined as the most common way to mention a specific entity. This file distinguishes by entity types.
Alias dictionary: it includes the canonical value of a given concept (those found in items dictionary) and its list of aliases, that is, the most significant alternative names of an entity canon. This file does not distinguish by entity types.
For example, a TV use case can include the following dictionaries:
Items dictionary: ent.audiovisual_actor: [Robert de Niro, Dustin Hoffman; Al Pacino, …]
Alias dictionary: Robert de Niro: [De Niro, Robert Niro, Robert Deniro, …]
Aura NLP uses two dictionaries for entities recognition:
Items dictionary: sdict_items.json
Alias dictionary: sdict_aliases.json
Items dictionary
sdict_items.json consists of a dictionary whose keys are the names of all the entity types and the value of each key includes a list with the canonical values of those entities. All canonical forms should be contemplated in this file.
This file is automatically generated based on the data from manual catalogs and data from URM.
An example of sdict_items.json dictionary is shown below:
sdict_aliases.json contains all the possible values (aliases) for an entity. These aliases are different ways to refer to the same value.
The dictionary keys are the canonical value of a given concept (those found in the sdict_items.json file) and their value is a list of aliases, meaning all the potential ways of referring to that concept. This file does not distinguish by entity types.
The alias dictionary is automatically generated based on the data from manual catalogs and data from URM.
Examples of the sdict_aliases.json dictionary are shown below:
In these stages, as part of the step for defining data resources, where all the training files required for every specific stage must be generated, the sdict dictionaries must be included.
For this purpose, follow these steps:
1. Check if content in catalogs is updated and complete
Manual catalogs are one of the inputs for NLP dictionaries.
At this stage, you have to check if their content is totally updated or if it is required to generate a newer version to include the very latest content (for instance, new films or series in Movistar+).
⚠️ If the catalogs content is identical in different channels, the dictionaries can be generated just for one channel and then copied to the rest of them.
2. Configure the NLP model to use dictionaries
Dictionaries require a specific configuration, that must be set during the configuration of the NLP model, with two differentiated stages:
2.1. Dictionaries configuration in nlp.json file
If dictionaries are used, specific sections must be included in the nlp.json file, placed in the path:
aura-nlpdata-[country_code]/config/etc/nlp_config/nlp.json
urm_type_entities: from all the URM entities in the catalogs, it indicates which ones must be downloaded.
headers_ignore: list with all the headers to be ignored.
ner: this section is required as the StandardNer class is instantiated when building the catalogs:
n_context_words: number of context words used in the BILOU algorithm.
phone_number_entity_type: type of entity to be assigned to an entity recognizer as phone number.
2.2. Dictionaries configuration in build_catalogs.cfg.tpl
The file build_catalogs_cfg.tpl is only required if the dictionaries sdict_item.json and sdict_aliases.json are generated from the manual catalogs in three specific stages: Standard NER, Gazetteer NER, and Entity Tagger Adapter.
It is placed on the path: aura-nlpdata-[country_code]/config/etc/build_catalogs.cfg.tpl
Edit this file to indicate, for each language and channel, if URM data is to be downloaded and used as source for the generation of dictionaries.
For this purpose, the following fields must be filled, depending on the script used for the generation of dictionaries:
If the new global scriptbuild_local_catalogs_etl.sh is used, the following parameters must be filled: Recommended method
urm_mapper: dictionary that indicates, for each language and channel, if it has to download the URM.
To connect to API URM:
$API_URM_ENDPOINT
$USER_KERNEL_ACCESS_TOKEN
$PASSWORD_KERNEL_ACCESS_TOKEN
If the original scriptbuild_local_catalogs.sh is used, the following parameters must be filled:
urm_mapper: dictionary that indicates, for each language and channel, if it has to download the URM.
resources_provider: provider, that can be aws or azure.
container: folder that includes the data to be downloaded. It can be $AWS_S3_BUCKET or $AZURE_CONTAINER.
key and secret: these fields correspond to provider credentials.
3. Set up specific configuration variables for dictionaries
Before training your understanding model, it is required to set up the configuration properties. Check the general process in the previous link.
If dictionaries are included in the model, there are certain additional variables required for the execution of the dictionaries script, which are enumerated below.
Moreover, the last six variables must only be defined when data from URM is included for the generation of the dictionaries.
Remember that you need to indicate the name of the CATALOGS_RESOURCES_PROVIDER provider and the container where the data is. Then, you only need the credentials of the chosen provider:
export CHANNEL_LIST: list of channels where dictionaries are generated. For example: export CHANNEL_LIST="la_global mh mp"
export LANGUAGE: language for the generation of files. For example: export LANGUAGE=“es-es”
export AZURE_CATALOGS_ACCOUNT_NAME: Azure account name where the data is.
4. Run the script for the generation of dictionaries
There are two alternatives to generate dictionaries:
Use the new global script that makes use of the URM content datasets uploaded to the Kernel platform: Recommended method
Run the global script build_local_catalogs_etl.sh, located at: aura-nlpdata-[country_code]/tools/build_local_catalogs_etl.sh
Use the original script that downloaded the information from the previously chosen URM containers:
Run the original script build_local_catalogs.sh, located at: aura-nlpdata-[country_code]/tools/build_local_catalogs.sh
After the script execution, the NLP dictionaries sdict_items.json and sdict_aliases.json are automatically generated in: /aura-nlpdata-[country_code]/data/[language]/[channel]
You can create a Pull Request directly and see changes in comparison with the previous files.
Complementary, they are also placed in the temporary folder tmp_catalogs:
You can also check the downloaded data from URM in the urm_bucket folder inside tmp_catalogs.
5. Best practices for checking dictionaries
Once the dictionaries are generated, there are certain checks that should be done:
Check that values that have been added and removed from catalogs are updated in sdict_items.json and sdict_aliases.json.
Check that all the canons that have been included in the catalogs appear in sdict_items.json and all the aliases appear in sdict_aliases.json with its corresponding canon.
Check that, at least, all the aliases of a canon that have been included in the catalogs appear in sdict_aliases.json under the expected canon.
Check that there are no unwanted duplicates. It is highly recommendable to check that the same canon (or normalized one) does not appear in different entities to avoid possible overlaps. For these situations, use the catalogs’ skip.json file for skipping values from dicts and use the precedence.json file to prioritize an entity type.
Once both sdict_items.json and sdict_aliases.json have been generated, all the values that were added to the catalogs should be tested in your local environment to check that they retrieve their corresponding canon, entity type and label. In case there is an error, check what it is due to and make the necessary modifications. This step should be repeated until the result is the expected one.
5. Add new entities in dictionaries to the Grammars stage
⚠️ Of application just in case Grammars stage is included in the NLP model.
If you want to assure that new entities included in dictionaries are recognized with 100% accuracy, they must be included in the Grammar stage.
Take into account that input data for the Grammars stage should be normalized first.
6 - Aura NLP tutorials
Aura NLP tutorials
Tutorials for the development of a use case over aura-nlp
Index of tutorials
COMING SOON
7 - Grammars
Use of Grammars in Aura NLP
This section includes the description of Grammars, a deterministic recognition method used in Aura NLP for the recognition of the users’ utterances, their role in the NLP model and practical processes regarding how to use this stage in the understanding process
What are Grammars?
Grammars are a tool that provides an exact and lightweight utterance’s recognition method through a deterministic approach. Grammar uses probabilistic formalisms to recognize specific utterances from the users and to identify how to interpret them.
Aura NLP include Grammars as a stage that can be included in the NLP pipeline. It use has key limitations due to the large burden of building the language model, as Grammars are only able to recognize exact utterances. However, because of it, they constitute an interesting segment within Aura NLP, due to the existence of specific utterances produced by Aura’s users that must be recognized by Aura (such as common utterances from users or difficult ones that are hardly recognized by CLU).
GrapeNLP is used by Aura NLP for intent recognition and entity extraction using grammars. This grammar engine is based on handcrafted grammars which describe in an exact manner the sentences that are to be recognized and the output information that is to be generated for each one, in our case, the intent the sentence corresponds to and the entities to extract.
Linguists should develop by hand the grammar that exactly recognizes the required sentences. Just in the case of ambiguity (multiple interpretations defined in the grammar for the same sentence), GrapeNLP uses a heuristic approach in order to choose one of the interpretations: the one that in the grammar uses more restrictive linguistic conditions.
The core of GrapeNLP is implemented in C++ and includes a Python module to facilitate its integration with Python programs. It can analyse around 2700 sentences per second in an average computer and can be run in Ubuntu, Alpine, MacOS and Android. Moreover, it is open source and LPGL licensed, thus it can be used in commercial products.
GrapeNLP does not include a grammar editor. Instead, we use the editor included in the Unitex / GramLab platform.
Unitex / GramLab is also LGPL licensed and can be installed in Windows, Linux and MacOs machines.
The grammars created with Unitex are represented with graphs organized in connected boxes that linguists can easily create and update manually. Each box contains a set of possibilities for each token from the user’s utterance. The combination of different connected boxes provides a full variability of sentences to be recognized. The system also allows the generation of sub-grammars for specific Aura domains or for certain intents.
Once the grammars have been developed in Unitex, the grammar engine goes through all the graph paths from the beginning (left side) and compares box by box the user’s utterance with the grammar to evaluate the matching.
At the end of each path, a score is specified corresponding to the highest score among all the feasible paths. The output is a set of labels together with a start and end index and a score. The output is presented as a .json format.
It is important to bear in mind that, currently, grammars are used in Aura mainly for intents recognition. The grammar engine only provides recognized entities that have previously been labelled in the graphs.
As another example of Grammars, the utterance “I would like to watch the film Frozen” provides the following output:
PipelineMessage:-OriginalMessage:-phrase:'I would like to watch the film Frozen'-normalized_phrase:'i would like to watch the film frozen'-normalized_presentable_phrase:'I would like to watch the film Frozen'-annotated_phrase:' i would like to watch the film frozen'-intent: intent.tv.search'-score: 1.0-entities:
Entity:Frozen,Type: ent.audiovisual_film_title,Score: 1.0,Startindex: 31,Endindex: 37,Canon: frozen,Label: None,DeepLinks: None
Note that, even though GrapeNLP does not make use of statistical methods or probabilities, the resulting .json includes a score field. This has been added for homogeneity with the machine learning workflow, but it is always hardcoded to 1.0 (since GrapeNLP performs exact matching, the probability is 100%). The machine learning pipeline never returns a score of 1.0, thus this field can be used for knowing whether the sentence was recognized by GrapeNLP or by an intent recognition stage (CLU, etc.).
📄 For more information regarding the use of Grammars for language recognition, please check the Unitex User Manual.
Global and local grammars
There are two types of grammars defined in Aura NLP recognition process, both based on the Grammars engine that offer a different performance depending on the location where they are executed:
Global grammars: defined and executed in Aura back-end.
Local grammars: they are a subset of the Global grammar.
The understanding process is carried out locally, in the channel side, for an agile resolution of the process, therefore allowing a significant latency reduction. It is available for a selected set of use cases.
Global and local grammars must be aligned, so there are no differences in the E2E understanding process (for instance, the same user input must provide the same result in terms of NLP recognition both global and local grammars).
Channels can automatically update their local grammars based on the grammar backend information. Moreover, the channel needs to be able to share the information with the global backend in terms of logs and KPIs.
7.1 - Grammars generation guidelines
Guidelines for the generation of Grammars in Unitex
Guidelines and best practices for working with Unitex for the generation of the Grammars to be included in the NLP model.
General guidelines
Grammars is an Aura NLP stage that has its own path, files and configuration required to be included in the NLP model.
Firstly, if your pipeline contains the Grammar stage, you need to work with Unitex Gramlab and Grape NLP, which are included in the NLP Virtual Machine.
After that, linguists can proceed to create the grammars associated to the new use case. This process will be similar for global and local grammars.
The intent, entities and utterances defined for the new use case must be considered. A representative set of utterances will be selected and represented in Unitex through the creation of connected boxes that will contain, from left to right, different options for expressing each token of the selected utterances. The combination of different connected boxes provides a full variability of utterances to be recognized.
It is necessary to bear in mind that grammar engine only provides an exact recognition of utterances previously integrated in the model. Therefore, it is necessary to build up a rich and realistic utterance database to cover all the representative users’ utterances for a given use case.
Once the grammars have been developed in Unitex, the grammar engine Grape NLP goes through the grammar from the beginning (left side of the graph) and compares box by box the user’s utterance with the grammar to evaluate the matching.
The output will be a set of labels together with a start and end index.
Intents and entities tagging
Tag an intent in the grammar interface
In order to tag an intent in a grammar graph, a box previous to the closing box of the graph should be created with the following information and format:
<E>/<intent.[intent_name]/>
Tag an entity in the grammar interface
Two separate boxes need to be created: one before and one after the entity values.
We need two entity tags because we need to wrap the entity values in order to know its position in the user’s utterance.
Opening entity tag should have the following information and format:
<E>/<ent.[entity_name]>
Closing entity tag requires the following information and format:
<E>/</ent.[entity_name]>
Consider the difference between the opening and closing entity tag and remember that the entity tags need to be included within the entity graph and not outside of it.
The verbal graphs should be vertically aligned and the arrows connecting boxes should be horizontally aligned.
Be careful when using too much optionality (“Epsilon” symbol), this may lead the grammar to recognize unwanted strings, collisions between UCs, etc.
All graphs should have an appropriate size not to leave info/boxes out of the them.
Try not to repeat the same box structure several times. Try to reuse it for different paths or to create a subgraph that can be reused anywhere in the intent axiom. Hence, avoid creating two or more paths recognizing the same input.
Use comments if needed to clarify, for instance, if a path has some limitations due to potential conflicts with other UCs or just as explanatory notes of what a path is contemplating. For creating a comment within a graph, create a box and do not connect it to any other box. This way, you will see that the characters of comment message appear in red colour.
Avoid leaving empty boxes in any graph.
Avoid typos within the boxes info.
The opening and closing entity tags used for wrapping the entity values should be contemplated in the entity graph and not outside of it.
Make sure the intent and entity tags have been properly included.
When adding prepositions and articles in boxes, put them separately. That is, create a box for the prepositions and another one for the articles.
The circumstantial complements (e.g., time, location, manner…) are optional on many occasions regardless of whether they are in initial, middle or final position.
No graph must recognize the “Epsilon” symbol:
<E>
So in case of optional subgraphs, the optionality should be in the graph where it is called and not in the subgraph.
If the grammar makes use of the NER dictionaries to do the matching value > canon > label, the values contemplated in the different dictionaries should be also contemplated in the entity graphs of the grammar for the matching process to be successful.
It is crucial to consider here that the grammar values contemplated in the entity graph should be normalized (same process as the normalization pipeline carries out except for the normalization of upper-case characters) in order to be recognized.
That is, if a value in the dictionaries is ‘Mr. Robot’, since the normalization pipeline erases punctuation marks, the value that should be included in the entity graph should be ‘Mr Robot’.
There are special symbols that have specific meaning for the grammar and should be escaped (to check these symbols go to “Encoding of special characters in the graph editor” section of the Unitex Gram Lab official documentation).
An example of a special character would be “+” that needs to be escaped by using ““ (See figure below).
It is highly recommendable to compile the grammar before pushing changes into the Pull Request. This way, the NLP developer will see if there is any error in the call to the subgraphs, if the grammar recognizes an empty path (the grammar recognizes: " “) or if there is any corrupt file.
When compiling the grammar, some files are generated. These files have different extensions (.fst2, .snt, .diff) and should be avoided. Thus, the NLP developer should erase them locally before committing further changes into the PR.
For main verbs or list of keywords, create another graph.
Try to reuse basic structures (grammar block) from one graph to another.
Try to avoid ungrammatical paths if possible.
If one graph gets too complex, try to split it into smaller blocks/subgraphs.
Best practices for the generation of .grf files
Create as many folders as existing domains/intents.
Graphs
Call axiom.grf to the main graph of the whole grammar (general graph that calls to the different domains).
Generate another axiom.grf file in the subfolder of each specific domain, which will be the main graph for this domain (graph that calls to the UCs related to that domain).
Generate another axiom.grf file for each use case/intent. Remember that, if different subgraphs are created to contemplate different structures or entity combinations for a given UC, the intent tag should be found in this general UC/intent axiom and not in the individual subgraphs.
Domain folder
The name of the domain folder should be identical to the name of the corresponding domain.
This way, when opening the main graph of the whole grammar, one could quickly see the domains that have, at least, some UC developed through the grammar engine. Make sure when including a new domain to make the proper call to it in the main axiom of the whole grammar.
Intent folder
The name of the intent folder should contemplate the name of the corresponding intent.
For example: If the intent name is intent.common.greetings, the intent folder name would be greetings.
If a given intent has different sub-use cases or the intent is divided into different graphs according to different linguistic structures/entities combination, the intent tag should be only tagged once in the main axiom of the use case and not in each of the different subgraphs.
Make sure when including a new intent to make the proper call to it in the domain axiom.
Entity graphs
The entity graphs should have the name of the corresponding entity name, that is, if an entity name is ent.device_tv, the name of the graph in the grammar folder should be ent.device_tv.grf.
If an entity is only used in one use case/intent, the entity graph should be located in the intent folder.
Otherwise, if an entity is used in different intents/UCs of the same domain, the entity graph should be located in the main folder of the domain.
If an entity is used in different domains, the entity graph should be in the main folder of the whole grammar.
Verbal structure and nomenclature
Introduction
Verbal graphs need to be adapted based on the target language the NLP developer is working with.
The following verbal forms and tenses have been provided in Spanish as illustrative examples because the Spanish language varies morphologically depending on the person/number and tense info.
Nomenclature of auxiliary verbs:
Auxiliary verbs: They serve, among other things, to form the compound tenses, the progressive forms, the passive voice, as well as negations and questions (e.g., “I would like to eat an apple”).
Main/Full verbs: They add meaning to the sentence and are essential for understanding the statement (e.g., “I eat two apples every morning”).
To this end, the NLP team has been working on an efficient structure and nomenclature to have them contemplated in the grammar.
Auxiliary verbs
aux_W: auxiliary verb + infinitive tense
It contemplates all the possible auxiliary verbs that can be found before a verb in infinitive tense.
This graph should be always optional since the infinitive tense without the auxiliary verb is also acceptable in linguistic terms (e.g., “I want to check my agenda” & “Check my agenda” are both linguistically correct).
aux_Y2s: second person singular in imperative tense.
aux_Y3s: third person singular in imperative tense.
aux_Y2p: second person plural in imperative tense.
aux_Y3p: third person plural in imperative tense.
All these graphs contain possible auxiliary expressions that may be found before verbs in imperative tense.
These graphs should be also optional as the verbs in this tense can be also found in isolation (e.g., “Go and bring me some water” & “Bring me some water”). All these graphs should be found within the graph containing all imperative tenses of a given verb (e.g., verb_Y.grf -> buy_Y.grf).
It contains all possible expressions that can be found before a verb in present imperfect subjunctive tense (S) and past imperfect subjunctive tense (QT).
This graph should be always mandatory in these two tenses as the structure “I would like you to bring me some water” vs. “I like you to bring me some water” would be agrammatical without the modal verb.
Main verbs
This graph is used for ambivalent verbs that could work both as auxiliary and main/full verbs.
When this graph is used, all these verbs are conceived as being main/full verbs and thus do not need to be accompanied by another verb but by a complement in the form of a noun (e.g., “I want some water” vs. “I want to drink some water”).
Verbal graphs
The names of the verbal graphs should be in English. This also applies to the name of the domain, intent, keywords and complement graphs.
Before creating any verbal graph, make sure it is not repeated, that is, it is not already contemplated in any other of the grammar UCs. If a given verb is only used in a particular UC, place the verbal graphs within the folder of the UC. If a verb is shared by several UCs of the same domain, place the verbal graph at the domain folder level.
If, on the other hand, a given verb is used by UCs belonging to different domains, place the verbal graphs in the folder of the whole grammar.
If you create different verbal subgraphs for different verbal tenses, make sure you include all the verbs in each tense.
The basic verbal tenses included for each verb are:
In case the developer needs to contemplate more verbal tenses, please consult the section “Common inflectional codes” in Unitex Gram Lab official documentation.
[verb]_main_graph structure
To ease the grammar development process, we propose a common structure for all verbs.
The name of the verbal graph would be [verb]_main_graph.grf and would have the following structure:
As it can be appreciated in the example, some pronouns have been added between aux_SQT and the verbal boxes for those tenses. This also happens before P3s/p, P2s and C2s verbal boxes.
These pronouns are needed for sentences such as: “Quiero que me compres este vuelo” (“I want you to buy me this flight”). Besides, the interrogative particle “cómo” has been added before aux_W and before P1s/p tenses for questions such as “¿Cómo puedo comprar este ticket?” (“How can I buy this ticket”) and “¿Cómo compro este ticket?” (“How do I buy this ticket”).
In case the clitic forms of verbs are needed, create a separate graph for them.
For this, create a verbal graph called [verb]_clitic_forms.grf.
As in the previous example, some pronouns have been included in some of the paths, but the main difference here would be that the boxes containing the clitic pronouns have been included in a mandatory way.
As seen in the figure, this graph would recognize sentences such as: “Quiero que me lo compres” (“I want you to buy it for me”).
Guidelines for testing Grammars in Unitex
There are two alternative ways of testing the grammars generated with Unitex:
1. Testing grammars using the Unitex interface
Useful for checking the potential overlaps among the different use cases developed through the grammar engine.
For this purpose, a .txt file should be created with the testing statements (sentences, phrases or isolated words) to be tested (each one on a different text line).
Keep in mind that when testing the grammar in the Unitex interface, the testing statements are not going to be processed with the normalization pipeline and, thus, must consider capitalization, accentuation marks, etc.
Afterwards, the following instructions should be carried out:
Open the Unitex interface and go to the menu found in the upper section of the interface.
Click on “Text > Open” and open the .txt previously created (say “OK” to Process Text).
Once the .txt file is selected, go to “Text > Locate Pattern” and a window will pop up in which it is required to select the graph to be used to process the testing examples. The “Merge with input text option” should be also selected to see the intent and entity tags.
Besides, we need to select the “Activate debug mode option” to see the paths activated in each of the testing examples as well as the “Longest matches option” to replicate how the system works.
Click on “Search” and another window will pop up with the results.
If all the provided examples have obtained the expected intent, that means that the grammar engine has the expected behaviour.
2. Testing grammars through run_local_pipeline.sh scripts
The second option would be to launch queries through the run_local_pipeline.sh script to validate their intent assignment (remember that you must previously execute the build_local.sh script in order to train the pipeline).
Since the grammar engine is deterministic, based on the score (confidence) obtained, it is possible to know whether an utterance has been solved by CLU or by the grammar engine:
Utterances detected by the grammar module obtain a score of 1.0
The scores of utterances detected by CLU are float numbers between 0 and 1 (e.g. 0.98, 0.65…).
This testing option is the most recommendable one since this way we can see the faithful output of how the system works end-to-end.
7.2 - Recognition of several entities
Recognition of utterances with several entities in Grammars
Specific guidelines in the scenario when the user’s utterance includes several entities to be recognized by Grammars through the use of roles
Use of roles for the recognition of utterances with several entities
If the user’s utterance contains several entities of the same type, it is required to add a role tag to the entity identifier, following the format:
[entity_name:rol_value]
The role tag is used by the system to identify that there are two entities of the same type but with different roles.
This process will not affect the final output of the Grammars.
That is, if the entity with the role is ent.audiovisual_sports_team:visitor, the system will only retrieve the tag ent.audiovisual_sports_team.
A practical example of Grammars that use this functionality is shown below:
The utterance “I would like to see Madrid against Barsa” contains two entities of the same type: [ent.audiovisual_sports_team]
For both entities to be detected correctly, it will be necessary to add the role when defining the name of the entities. For example, the roles of local and visitor could be assigned, resulting [ent.audiovisual_sports_team:local] and [ent.audiovisual_sports_team:visitor]
Certain considerations must be considered:
In order to recognize two entities of the same type in sequence, there is no need to create two entity graphs with the role tag but one, since the system is capable of discerning between the tagged entity and the untagged one.
Entity values should be the same in both graphs.
For better understanding purposes, we suggest using digits to name the entity graph having the role with the name of the role itself. For example:
ent.audiovisual_sports_team:1 -> ent.audiovisual_sports_team_1.grf
This can be also done using non-digit characters. That is, if the entity ent.audiovisual_sports_team has the role “visitor” (ent.audiovisual_sports_team:visitor), the name of the graph should be ent.audiovisual_sports_team_visitor.grf.
8 - Kernel configuration for URM Global script
Kernel configuration for URM Global script
Guidelines for the configuration of the script URM Global in Kernel
In order to have a correct behavior for the URM data extraction used in the global script, it is necessary to execute the tasks defined in the following sections, that are a particularization of the general guidelines “Kernel configuration: General steps”.
A Kernel application with the name aura-cognitive-trainings must be created and configured with specific scopes.
Ask the Kernel Team to create the new application in Kernel:
"id": "aura-cognitive-trainings"
Once the app is created, two parameters will be provided for securely accessing:
- client_id: unique identifier of the consuming app acting as Kernel API client.
- client_secret: password.
4. Assign purpose/scopes to the application
No purpose is required, as datasets do not include personal information.
Ask the Kernel Team to assign the following scopes to the application:
data:Video_Content:read
data:Video_Content_Staff_Rel:read
data:D_Video_Staff:read
data:D_Video_Content_Category:read
data:D_Video_Staff_Role:read
data:D_Video_Age_Rating:read
data:D_Gbl_Video_Content_Category:read
data:D_Gbl_Video_Staff_Role:read
data:D_Gbl_Video_Content_Type:read
data:D_Gbl_Video_Age_Rating:read
directsql:query
5. Add other required fields
Provide the Kernel Team with other necessary fields, as shown in the code snippet.
The final file for the configuration of the application, including all the above-mentioned parameters, is shown below:
{"name":"Data consumption for Aura Cognitive Trainings","grant_types":[{"authentication":"client_credentials""scopes":["data:Video_Content:read","data:Video_Content_Staff_Rel:read","data:D_Video_Staff:read","data:D_Video_Content_Category:read","data:D_Video_Staff_Role:read","data:D_Video_Age_Rating:read","data:D_Gbl_Video_Content_Category:read","data:D_Gbl_Video_Staff_Role:read","data:D_Gbl_Video_Content_Type:read","data:D_Gbl_Video_Age_Rating:read","directsql:query"]"purposes":[]"api":"directsql:query"}],"description":"Aura cognitive application to consumption data of the kernel","raw_dataset_read":true,"tags":{},"encrypt_access_tokens":true,"id":"aura-cognitive-trainings","requires_authorization_id":true,"client_type":"CONFIDENTIAL","legal_entity_id":"telefonica","redirect_uris":[]}
9 - Complementary processes
Complementary processes in the development process
Processes over external software that may be required when developing a use case over Aura NLP and best practices
Introduction
This section includes certain processes that may be carried out over external software when developing a use case in order to obtain credentials from these software, best practices for the generation of Pull Requests and procedures followed by the Aura NLP Global Team.
Sign in with your account credentials in the browser.
You will obtain the different subscriptions within Azure corresponding to the logged account.
Select the specific subscription to be used, with its corresponding field id, and execute the following command to switch to this subscription (documentation):
az account set --subscription <subscription_id>
<subscription_id> is the id of the selected subscription
Create a resource group (documentation):
az group create --name <name_resource_group> --location <location>
<name_resource_group>: name of the resource group
<location>: one location available for Azure (i.e., northeurope)
Create app (documentation):
az ad app create --display-name <display_name>
<display_name>: name of the service principal
From the output of az ad app create, we can obtain the field appId. This value is used for the variable OAI_AZURE_TOKEN_CLIENT_ID.
Create password for app (documentation):
az ad app credential reset --id <app_id>
<app_id>: app_id obtained from previous app creation
From the output of az ad app credential reset, we can obtain the field password. This value is used for the variable OAI_AZURE_TOKEN_CLIENT_SECRET.
From the output of az ad app credential reset, we can obtain the field tenant. This value is used for the variable OAI_AZURE_TOKEN_TENANT.
Create service principal (documentation):
az ad sp create --id <app_id>
- AppId: app_id obtained from previous app creation
Assign role contributor (documentation):
az role assignment create --assignee <appId> --role Contributor --scope <scope>
- <app_id>: app_id obtained from previous app creation
- <Scope>: scope of the role assignment. Read more in (documentation). A possible value is the of the resource group, you can obtain it with the command az group show --name <name_resource_group> | jq .id(documentation).
Create the OpenAI application (documentation):
az cognitiveservices account create --kind "OpenAI" --name <name_openai> -g <name_resource_group> --sku s0 -l <location>
<name_openai>: resource name
<name_resource_group>: name of resource group (previously generated)
<location>: location available for Azure (i.e., northeurope)
The values for the parameters required to fill in the build_local_variables.sh script for OpenAI execution must be obtained from the above-defined steps:
exportOAI_ID_SUBSCRIPTION="$(az account show | jq -r .id)"exportOAI_RESOURCE_GROUP="<name_resource_group>"exportOAI_ACCOUNT_NAME="<name_openai>"exportOAI_AZURE_TOKEN_CLIENT_ID="<app_id>"exportOAI_AZURE_TOKEN_CLIENT_SECRET="<password>"exportOAI_AZURE_TOKEN_TENANT="$(az account show | jq -r .tenantId)"
Best practices for the generation of a Pull Request
This process is required once the NLP model is fully developed and tested in local environment and it’s time to create a Pull Request to the corresponding release branch : Pull Request to release branch.
Best practices
When creating a Pull Request, include the NLP Global Team as reviewers of the process and, likewise, notify the APE Team.
It is mandatory to create reduced PRs (per use case, per bug, etc.) in order to speed up the validation process.
Do not modify configuration files during the Pull Request, excepting in case the pipeline has been changed or if any configuration adjustment is required for the system’s proper performance. If configuration files have been modified locally for testing purposes, get sure that they are not uploaded in the PR in order to avoid conflicts.
It is recommended to specify different tasks in the PR, so the review progress can be marked:
It is recommended to make a backup for those PRs modifying files that may conflict with other ones, or for large Pull Requests.
If the use case is going to be available in different channels, check that the content and order of the training files is the same.
9.4 - Review by NLP Global Team
Review of a Pull Request by NLP Global Team
Procedure followed by the NLP Global Team in order to validate the Pull Request including the NLP model
The review of the Pull Request including the NLP model carried out by the NLP Global Team includes the processes explained in the following sections.
It can be very useful for Local Teams to know these processes and criteria used by the NLP Global Team in order to focus on the critical points.
Categories of errors and problems
Detected errors are classified into three categories:
BLOCK: Blocking task. It must be resolved in order to approve and merge the PR.
In case there are certain blockers to be modified, the system dismisses the GitHub Pull Request and publishes a comment describing the problem and indicating the procedure to resolve it. This case requires re-training the NLP model.
NON-BLOCK: Mandatory but non-blocking task. It must be resolved following the guidelines and best practices in the current or in further PRs.
SUGG: Not mandatory but recommended modifications that should be taken into account even for subsequent PRs. For them, it is recommended to inform the NLP Global Team whether the suggestion is taken into account or not.
The setting of an adequate threshold for the NLP system accuracy depends on the use case. Therefore, for a specific use case, the minimum accuracy should be agreed by L-CDO and the NLP Global Team.
Best practices for the Pull Request validation
These best practices should be followed both by the NLP Global Team and the local linguists, if they participate in the validation process.
Take into account the following icons that indicate different status to reviewers:
👍 It indicates that the reported problem has been visualized and will be included in further commits.
👀 It indicates that linguists have gone over the comment but it is not resolved yet. In this situation, linguists must include an explanatory text with the justification of this status (for example, to be resolved later; disagreement; etc.)
Comments should be launched from the corresponding file or from the general screen (conversation). For its resolution, click Resolve conversation or select Hide from the drop-down menu. Afterwards, select the option Resolved.
If the comment cannot be resolved, it is edited and substituted by “OK”.
In general, reviewers are in charge of changing the comment status to Resolved.
Comments should be as clarifying as possible by including screenshots or other references.
In case a comment resolution is pending, the local developer must be informed and it is recommended to change the status to still pending.
If the answer to a comment by the reviewer is not clearly understood, the local team can contact him.
If modifications affect to several channels, changes can be uploaded to one channel and, afterwards, copied to the other channels.
Comparation of branches:
In case of merging of a large PR, it is recommended to compare the corresponding branches to avoid information to be lost. For this purpose, Pycharm can be useful.
The tool compare allows this comparison, just by selecting the folder/file with the right bottom, selecting the option Git and compare with branch and then clicking on the branch to be compared.
The different files appear in different colors: existing files in blue, added files in green and deleted ones in grey. By clicking on a file, a new window is opened showing the differences between branches.
For the PR review, it is recommended the use of REGEX. Some examples are included below:
Finding duplicates: ^(.?)$\s+?^(?=.^\1$)
No space after an entity: [ent.[a-z_]+][a-z]+
No space before an entity: [a-z]+[ent.[a-z_]+]
No extra spaces after values: \h+$
Sentences missing: "\¿[a-záéíóúñ _[].]+"
Sentences missing: "[a-záéíóúñ _[].]+?"
The PR is reviewed by different members of the team, within an ongoing process.
Most frequent comments in the review process
The following table includes some of the most frequent comments that are reported during the review of the Pull Requests by the NLP Global Team, organized by category.
⚠️ Please, take the following tables as merely indicative in terms of the category where each comment is included as, depending on the specific scenario and the use case specifications, a comment can be moved from one category (“block”, “non-block” or “sugg”) to another.
Review of CLU training and testset
The following best practices are valid for the CLU intent recognition stage.
Entities
Block
non-block
Sugg
Ill-formed (incorrect name, missing ‘[‘, blank space missing before/after the entity; blank space before ‘:’ in the entity name)
Alphabetic order missing (by type and by value)
Structuring of training and test set files in blocks (for example, verbs, use cases, entities, etc.)
Value declared in phraselist but not tagged in training set
Suggestions on phrases for training and test set files
Repeated values in two entities
Suggestions on new entities
Repeated values for a specific entity
Suggestions on patterns for the test set file
Value tagged but not declared in a phraselist
Typographical errors (if not on purpose), missing words
Values representativeness: as far as possible, the training set must contain all the different values of entities. At least, it must include a representative list of them
Intents
Block
non-block
Sugg
Intent name not agreed by the Global Team
Alphabetic order missing (by type and by value)
Structuring of training and test set files in blocks (for example, verbs, use cases, entities, etc.)
All intents not represented in the training set and testset files
Structuring of training and test set files in blocks (for example, verbs, use cases, entities, etc.)
Wrong position of entities
Lack of representativeness of the different structures
New values for entities
Incorrect tags
Alphabetic order missing (by domain, intent & utterance)
Suggestions on phrases for training and test set files
Not represented intent
“Default” domain
Suggestions on new entities
Wrong order for keys: phrase, domain, intent, entities
Suggestions on patterns for the test set file
Typographical errors (if not on purpose), missing words
Accuracy lower than 80% (by default value set by Aura Global Team)
Result validation: Review of results from the PR, identification of errors and improvement suggestions
Regression file: Bugs or specific phrases not included in the testset.json file that must be recognized
Canonical phrase not included in E2E testset
Unfulfillment for recommended number of testing statements in the E2E test set: - 20 statements (CLU); - 30 statements (CLU + Grammar); - 3 statements (Grammar)