Categories:
Installer aurak8s
Scope: Guidelines for the use of the installer aurak8s to deploy Aura Virtual Assistant and ATRIA releases, configure and enable resources and components and other operational tasks
Introduction
The current document describes the required stages for the deployment of a new Aura Virtual Assistant and ATRIA version through the use of the aurak8s installer.
- Download the installer
- Create the service principal (set of credentials to perform all the operations)
- Set configuration for the intended deployment environment
- Create Aura APIKeys
- Configure the Nginx protocols
- Enable/disable components
- Deployment process: types of deployment and strategies depending on the purpose
- Hot swapping deployment: Aura operator
Installer download
Aura installation is done with an installer that deploys and configures all the required infrastructure and services.
The installer is stored in a bucket in Amazon S3, in an AWS account that belongs to the Aura team.
To download and use it:
-
Export the user credentials provided by the Aura team:
AWS_ACCESS_KEY_ID="XXX" AWS_SECRET_ACCESS_KEY="YYY" -
List different versions for the specific OB (
$OB). Note the/at the end.aws s3 ls s3://aura-release/$OB/ -
List the files for the chosen version of the OB. Note the / at the end.
aws s3 ls s3://aura-release/$OB/7.2.0/ -
Zip file name has to match with the desired version to download.
aws s3 ls s3://aura-release/$OB/7.2.0/auradeploy-$HASH-$OB-7.2.0.zipWhere:
$HASH: commit id obtained in the previous step.
To use this installer, ask Aura Global Team for a secret (VAULT_PASSWORD) if it is not provided with the bucket access credentials.
ℹ️ Please contact the Aura Team at auradev@tid.es if you have any issue accessing the installer.
Create Service principal
To deploy Aura, firstly it is required to create an application (service principal) which is a set of credentials needed to perform all the operations.
During this proccess the service principal is added as contributor to the subscription and AssignRoles custom role (which allows to assign roles to others) is created and assigned to the service principal at the subscription level too.
⚠️ From Hannah Montana release onwards, the service principal must have the following permissions to be able to assign roles to the AKS managed identities:
"Microsoft.Authorization/roleAssignments/read",
"Microsoft.Authorization/roleAssignments/write",
"Microsoft.Authorization/roleAssignments/delete"
To create service principal just run the following command included in the installer.
$ aura create_sp -n $APP_NAME
Where:
APP_NAME: service_principal name. It is recommended to select a descriptive name.
The execution could take some time if it is the first time running the installer, as the docker deployment image has to be built.
You will be prompted for a code on the website: https://aka.ms/devicelogin in order to authenticate the device. It is recommended to use a browser in incognito mode.

Once the command ends, the service principal is created and a set of credentials is shown as output.
export AZURE_CLIENT_ID=xxxxxxxxxxx
export AZURE_SECRET=xxxxxxxxxx
export AZURE_TENANT=xxxxxxxxxx
export AZURE_SUBSCRIPTION_ID=xxxxxxxxxx
These credentials will be needed each time Aura is installed and configured in some of the components, so any change in this service principal could have an impact in certain operations done by Aura.
Credentials will also be stored in an output file: credentials.json. It can be used as an installation command parameter to avoid exporting the environment variables.
By default, the service principal is created with some cross tenant permissions needed for the Bot Channel Registration deployment. These extra permissions are just needed for the deploy_core phase and are disabled after that step.
The -p parameter can be included in the create_sp command to create a service principal without those extra permissions that can be used for the deploy_infra phase.
Configuration
Together with the installer, an example config.yml file is included.
Use this file to complete the required values for the intended environment.
⚠️ This file is a yaml file. Keep it in mind when modifying the configuration file to avoid syntax issues.
Every value is described in the config.yml example file. However, a more detailed explanation is provided in the succeeding sections.
ℹ️ If the config field has no default value, it means it is mandatory.
Environment type
Value used to characterize the environment name, the DNS entries and resources names.
For the OBs, pre, pro and int values are reserved.
If you need to use a different one, ask the Aura Team first.
environment_type: pro
Environment profile
Value used to characterize the environment name, the DNS entries and resources names and also to use different resources, locale, timezone, etc.
environment_profile: $OB
Cluster name
Value to configure the cluster name. It is used as a base for the kubernetes cluster and the resources names related to it. The following value, including the environment and the OB, is recommended as the name has to be unique.
cluster_name: auraclusterpro$OB
Configure your own resource tags
You can add your own tags to the resources created by the installer with the following configuration:
resources_tags:
  example_tag: "example_value"
Notifications email
Value to be filled with the desired email where the alerts and notifications will be sent.
notifications_email: example@telefonica.com
Configuration for notifications through webhooks
For the configuration of notifications through webhooks, the following parameter must be configured, where:
severitycan have these values:warning,critical,info.
By default, there are no configured webhooks.
notifications_webhooks:
  - name: mywebhook
    url: "http://myurl"
    severity: critical
Telefónica Kernel configuration
This is the required configuration for Telefónica Kernel. The description of each field is included in comments.
fourth_platform:
    client_id: "aura-bot" # Aura Kernel app client id
    client_secret: "XXXXXX" # Aura Kernel app secret
    client_id_context: "aura-cognitive-context" # Context Kernel app client id
    client_secret_context: "YYYYYY" # Context Kernel app secret
    apigw_url: "https://api.$OB-pro.baikalplatform.com" # must be filled with the right value. Usually, https://api.{{environment_profile}}-{{environment_type}}.baikalplatform.com
    apigw_url_context: "$OB-pro.baikalplatform.com" #Usually {{environment_profile}}-{{environment_type}}.baikalplatform.com
    authserver_url: "https://auth.$OB-pro.baikalplatform.com/" # must be filled with the right value. Usually https://auth.{{environment_profile}}-{{environment_type}}.baikalplatform.com/  # The / at the end is needed
    synchronizer_sdk_repos: "https://mymavenrepo.com/repo/J4yLiGooDXJRjOOFrWjB" #The default value is "https://mymavenrepo.com/repo/J4yLiGooDXJRjOOFrWjB" and can be checked in the url https://developers.baikalplatform.com/sdk/spark/0.8/#spark-sdk-cli
    conversations:
      days_to_find: 1
      platform: "" # azure or aws (where Kernel is deployed)
      bucket: "" # Bucket or blob name to store aura conversations in Kernel. Usually aura-conversations
      access_key: "" # Access key (aws) / storage account (Azure) from the aura-conversations bucket/blob container
      secret_key: "" # Secret key (aws) / storage key (Azure) from the aura-conversations bucket/blob container
Genesys configuration
This is the required configuration for Genesys. The description of each field is included in comments.
genesys:
  api_url: https://www.movistar.es/atcliente/Chat_PRE/ReActivo  # url of the Genesys API.
  push_provider: Aura # It will be used by the genesys service to send push notifications. Genesys matches this identifier with a notification URL.
                      # By default is set with the aura-{{ environment_name }}
  user: aura # Username provided by the Genesys team.
  secret: XXXX # Secret provided by the Genesys team.
Encryption algorithm
Encryption algorithm used to validate APIKeys. By default, 'aes-256-cbc'.
This value has to be the same when a new APIKey is created.
aura_encryption_algorithm: 'aes-256-cbc'
Encryption key
Encryption key used to validate APIKeys.
- Mandatory size: 32 alphanumeric characters.
This value has to be the same when a new APIKey is created. If changed, previous APIKeys will not work anymore.
aura_encryption_key: "5eb23be8ba10455e78455c84b4512af3"
Starting in No Doubt release (delivered in March 2025) the value of this variable admits a comma-separated list of encryption key, all of them must be created with the same requirements. This will allow to change the encryption key, because the servers will be able to validate APIKeys generated with all the provided encryption keys. The installer will generate the APIKeys based on the last item in the chain, because it is considered the latest and the most up to date encryption key.
aura_encryption_key: "5eb23be8ba10455e78455c84b4512af3,7387dd96cd704d95dd9e4bfa417ab8ff"
In this example, all servers that validate APIKeys will be able to validate those created with both of them, but the active one for the release will be the one ending with ab8ff.
Encryption IV position
Encryption IV position used to validate APIKeys.
By default, 35.
This value has to be the same when a new APIKey is created. If changed, previous APIKeys will not work anymore.
aura_encryption_iv_position: 35
APIKeys
Check the section Create Aura APIKeys to know hot to create Aura APIKeys.
APIKeys for aura-services
APIKey to allow the bot to talk with aura-services.
This APIKey has to be created from the aura_encryption_key and the aura-services scope.
aura_bot_services_api_key: "f3fe52203f56027fa11cd51fbfa17f1f260f9e9fd73a4721dd0b0aff36fc08003ef991c6f75495835f645a8757f5adedee7bd4d75731d49ad518538f394cf4f5d2c4b3417b8695184a5570c6b84a1a0afeb5de233b6df6bf8e1516c467c9506b8828e2b35395cb14732521fd0b753b051ba98052d0d1e77148c6d33890cdf7d4f0b9614b93384c9df92d8863b32"
Backup retention time
Days to keep the objects in the aura-backups (where users’ database and Grafana database are stored) blob container.
By default, 7.
backup_retention_time: 4
Logs retention time
Days to keep logs in the Elasticsearch cluster.
By default, 7. Higher values are not recommended as they will increase the load of the Elasticsearch cluster.
log_retention_time: 4
Update DNS endpoints
Flag to allow the installer update the aura DNS endpoints.
By default, false. Set to true if the infra has changed and you need to update the DNS entries.
force_dns_update: false
Next environment
Next DNS endpoints
If this configuration is set to true, the installer will create a new set of DNS entries for the new environment similar to the ones from the environment with the suffix -next, allowing some tests before the final DNS update.
Moreover, the installer will create and configure the needed virtualserver and virtualserverroute to expose the next endpoints. Also, if this parameter is true, the next DNS entries will be deleted once the delete_core phase is executed.
By default, false.
next_domains_enabled: false
The virtualserver and virtualserverroute will not be deleted after the delete_core phase as they reside in a different namespace than the one that will be deleted, so once they are not needed anymore they should be deleted manually.
Next Azure Bot Channel
If this configuration is set to true, the installer will create a new Azure Bot Channel with the suffix -next, pointing to the next DNS domain. Also aura-groot and aura-authentication-api will be configured to use this Bot Channel allowing to test the new environment before the final DNS update.
To configure the environment just before the final DNS update, just set back this value to false and run the command below to configure aura-groot and aura-authentication-api to use the current Bot Channel.
./aura deploy_core [-c $PATH_TO_CREDENTIALS_FILE] --cfg $PATH_TO_CONFIG_FILE -v "$VAULT_PASSWORD" -t aura-groot authentication-api [--ns]
Configured agents
By default, Aura context has some agents configured. Add a new one if required following the configuration below (example with an agent named new_agent_name).
context_agents:
  new_agent_name:
These agents will use the default storage account from the environment to store their transformations but an external Azure storage account could be used. To configure the external account, the configuration has to be as follows:
context_agents:
  new_agent_name:
    azure_account: "external_azure_storage_account"
    azure_sas_token: "sastoken_from_external_azure"
    azure_container: "external_azure_container_name"
⚠️ To configure the external account, the three different variables are needed. If some of them are missing the account configured will be the default one.
aura-gateway-api allowed network ranges
aura-gateway-api access must be allowed just from Kernel IPs as is a service exposed through it. To add custom network ranges, configure the option below. By default, this value will be an empty list and just the TID VPN will be allowed.
aura_gateway_api_allowed_origins:
  - 195.235.92.0/23
  - 196.235.92.0/23
aura-manager allowed network ranges
List of CIDRs allowed to access the aura-manager webpage. By default, this value will be an empty list and just the TID VPN will be allowed.
aura_manager_allowed_origins:
  - 195.235.92.0/23
  - 196.235.92.0/23
CLU allowed network ranges
By default, CLU resource will just be allowed from the cluster IP. To add custom network ranges, configure the option below. By default, this value will be an empty list.
clu_allowed_ranges:
  - 195.235.92.0/23
OpenAI allowed network ranges
By default, OpenAI resource will just be allowed from the cluster IP. To add custom network ranges, configure the option below. By default, this value will be an empty list.
openai_allowed_ranges:
  - 195.235.92.0/23
Aura context expiration days
To configure the days to keep context data in Aura, use the following parameters.
⚠️ keep in mind that the more days are set, the more memory will be needed for Redis.
context_expiration_days: 15
Keeping old services
If (for some reason) you want to keep the old SERVICES domain (ai-services-${ENV}.auracognitive.com) from Aura (previous to Kubernetes versions), set this value:
legacy_services_domain: "ai-services-xx.auracognitive.com"
Azure region
Azure region where to deploy the infra.
Allowed values are westeurope, northeurope, brazilsouth, westus, westus2, eastus, eastus2, westcentralus.
Default value: westeurope
azure_region: "westeurope"
CIDR ranges
By default, kubernetes cluster is deployed with SSH port in master nodes, just allowed for Telefonica global source network ranges. To replace these ranges by your own, set the following variable with the Classless Inter-Domain Routing (CIDR) allowed.
ssh_allowed_sources:
  - X.X.X.X/XX
  - Y.Y.Y.Y/YY
CIDR for k8s API access
Use the following parameter to configure the allowed CIDR to k8s API access.
By default, * is allowed.
kubernetes_api_allowed_sources:
  - X.X.X.X/XX
  - Y.Y.Y.Y/YY
Allowed source ranges
Configure the allowed source ranges to connect to the different management web pages.
By default, any source is allowed.
A new endpoint raw_logs is available to integrate an external Kibana or to include the Aura Elasticsearch cluster as a remote server in an external Elasticsearch cluster.
service_whitelist_source_ranges:
    dashboard:
      - 0.0.0.0/0
    metrics:
      - 0.0.0.0/0
    logs:
      - 0.0.0.0/0
    raw_logs:
      - 0.0.0.0/0
    alerts:
      - 0.0.0.0/0
⚠️ Keep in mind that you have to balance the load to this external endpoint to avoid any saturation scenario where the local and remote will miss any log access in the platform.
Configure users and passwords for webpages
Configure the users and passwords for each management webpage. In dashboards, the first user of the list will be the admin user in Grafana and the rest of the users will be read-only users. In logs, it is also required to configure the roles of the user. Take a look to the built-in roles. There is also a custom role “aura” with read access to Aura indexes.
backoffice_users:
    dashboards:
      - name: admin
        password: "admin"
    logs:
      - name: admin
        password: "admin"
        role: '"kibana_admin","aura"'
    metrics:
      - name: admin
        password: "admin"
    alerts:
      - name: admin
        password: "admin"
    aura_manager:
      - name: admin
        password: "admin"
⚠️ Currently, aura-manager is added to the dict of backoffice_users. This just will be used if aura-manager is enabled in the environment.
Admin user for Elastic
Kibana and Elasticsearch have an admin user called elastic.
To configure the password, use this parameter:
elastic_admin_password: "ROOT_PASSWD"
Elasticsearch repository readonly
To keep a logs backup, the installer will create a repository in the Elasticsearch cluster using the common Azure Storage account. As this storage account is shared between different clusters, this repository will be readonly by default to avoid new clusters lock the repository. This can be changed by modifying the following parameter to false:
eck_azure_snapshot_readonly: true
Elasticsearch repository expiration
Number of days to keep the logs backup in the Elasticsearch cluster. By default, 366 days.
eck_azure_snapshot_expire: "366d"
Elasticsearch snapshot schedule
UTC string to schedule when the index snapshot will be created. The default configured value is shown below:
eck_azure_snapshot_schedule: "0 0 1 * * ?"
AKS SLA configuration
Configuration of the Service Level Agreement (SLA) for the Azure Kubernetes Service (AKS). The only allowed values are “Paid” and “Free”. The default value is “Paid”.
aks_sku_tier: "Paid"
Availability zones
Use multiple availability zones. By default, is enabled.
aks_multi_az: true
Infrastructure configuration
Configure the region to deploy, the min and max size of each node pool.
- The min size corresponds to the nodes created during the installation.
- The max size corresponds to the maximum value of nodes per type that can be created by the autoscaler. The default configuration is as follows:
infrastructure:
  compute:
    agentpools:
      common:
        mode: User
        min_size: 2
        max_size: 15
        type: "Standard_D4as_v4"
      management:
        mode: User
        min_size: 3
        max_size: 6
        type: "Standard_D4as_v4"
      system:
        mode: System
        min_size: 2
        max_size: 6
        type: "Standard_D2as_v4"
Disk size configuration
These are the values to configure the disk size for Elasticsearch and Prometheus.
The default configuration is as follows:
 elasticsearch:
   storage_size_gb: 100
 prometheus:
   storage_size_gb: 100
Fluent-bit configuration
The following parameter enables an external forwarding for fluent-bit:
external_forwarding:
    secret_shared_key: "mysecretkey"
    tls_config:
      tls_enabled: True
    remote_servers:
    - hostname: xxx
      port: yyy
Multitenant configuration
Both Aura Virtual Assistant and ATRIA are designed as multibrand, capable of providing services to multiple brands. This feature is based on a multitenant architecture.
If an OB commercializes its services through different brands, a specific tenant for each brand must be deployed. Follow the guidelines below for creating and configuring a tenant in Aura installer.
-
The
tenant_namevariable is used to configure the name of the tenant to be deployed. The maximum length of the tenant name is 6 characters, orenvironment_profile+environment_type+tenant_name= 11 characters.tenant_name: "default" -
By default, it is set to
default, meaning that the default configuration will be used. -
If a different tenant is configured, the corresponding configuration files for that tenant must be set up in the configuration repository aura-config-provision.
-
In this repository:
-
The configuration for the default tenant is shown in the root folders: applications, channels and skills.
It can be used in case the OB has only one brand (tenant) or wants to define a specific tenant as the default one. -
If a new tenant is created, it must be included in the tenants folder, using the name of the tenant being configured.
An example is shown below for the tenant corresponding to the brand WhatsApp SIM in Germany:
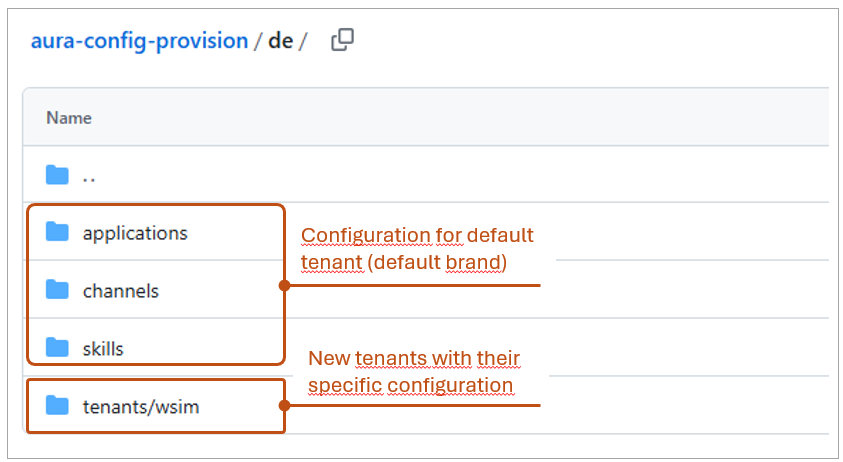
Example of the tenants/ folder in aura-config-provision -
-
Once created, the configuration of this new tenant must be added.
The structure will be as follows (Example for AP (Global profile), environment “PRO”, and tenant “tenant_one”):ap: channels: ... skills: ... applications: ... tenants: tenant_one: channels: ap-pro: <channel files> skills: ap-pro: <skill files> applications: ap-pro: <application files> <etc> -
When deploying a tenant, a dedicated resource group and namespace are automatically created for isolation and management.
NGINX configuration
We can configure the NGINX SSL protocols, ciphers and enable/disable forward secrecy.
The NGINX default configuration is shown below. In order to change some of the default values, add the desired keys to the environment config file.
nginx:
  ssl_protocols: "TLSv1.2 TLSv1.3"
  ssl_ciphers: "EECDH+ECDSA+AESGCM EECDH+aRSA+AESGCM EECDH+ECDSA+SHA384 EECDH+ECDSA+SHA256 EECDH+aRSA+SHA384 EECDH+aRSA+SHA256 EECDH+aRSA+RC4 EECDH EDH+aRSA RC4 !aNULL !eNULL !LOW !3DES !MD5 !EXP !PSK !SRP !DSS +RC4 RC4"
  ssl_prefer_server_ciphers: "True" # True / False
Germany has a specific configuration, set in Section NGINX Plus.
NGINX Plus configuration
Aura Platform includes NGINX Plus features:
-
NGINX App Protect WAF, a solution that provides web application firewall (WAF) security protection for web applications.
-
Protection against distributed denial-of-service (DDoS) attacks, that overload a server or web application to interrupt services and avoid legitimate users from accessing.
In order to configure NGINX Plus and take advantage of it, the Global DevOps Team has integrated new components:
-
New flags have been generated, allowing the use of NGINX Plus capabilities:
nginx_plus_enabled: Enable the NGINX Plus servicenginx_plus_dos_enabled: Enable the NGINX Plus DoS serviceprometheus_es_exporter_enabled: Enable the Prometheus exporter for Elasticsearch (required for NGINX Plus alerts)
-
New indexes are generated in Elasticsearch, with the format
aurak8s-waf-*, containing the security logs. -
Two new dashboards are added to Kibana, along with a new index template:
-
Nginx Plus - Overview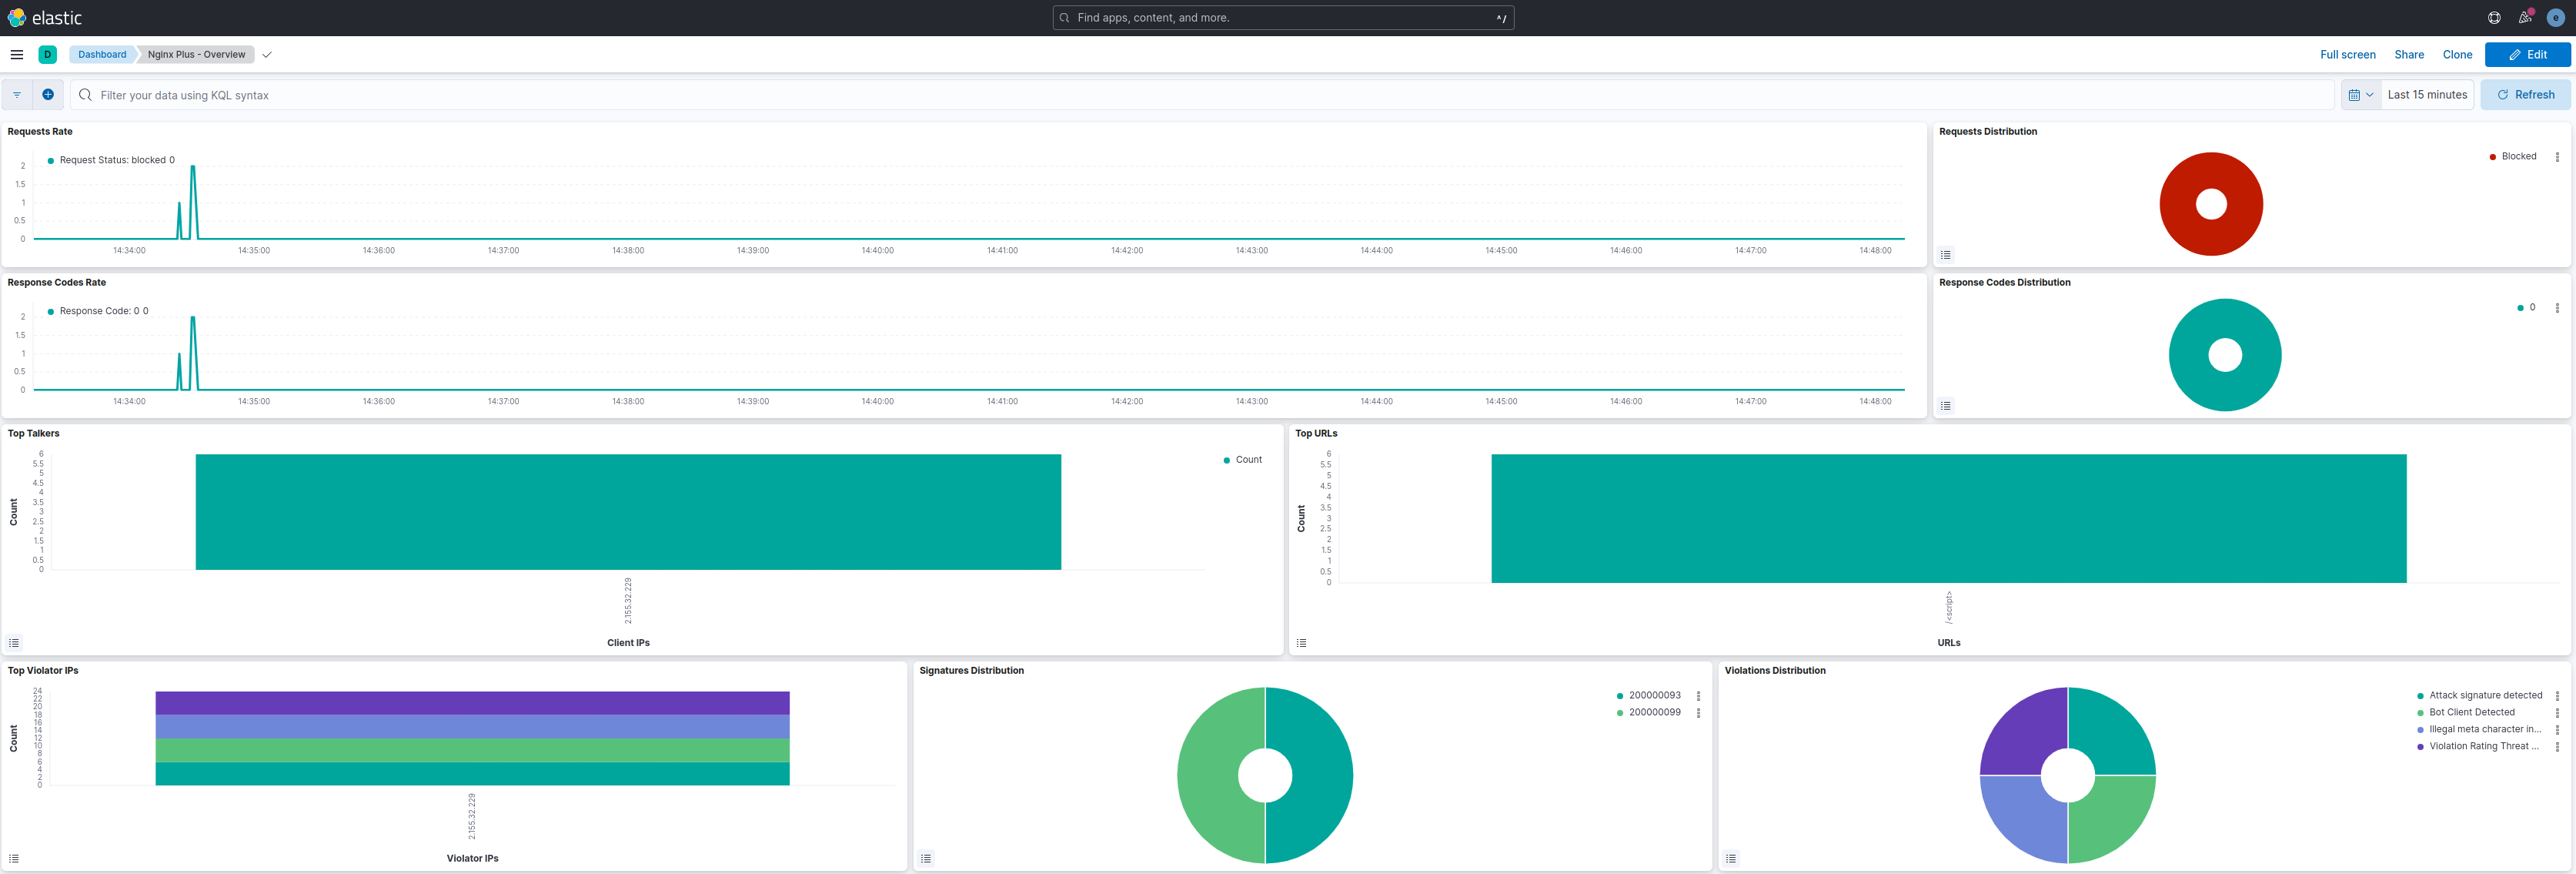
-
Nginx Plus - False Positives Interpretation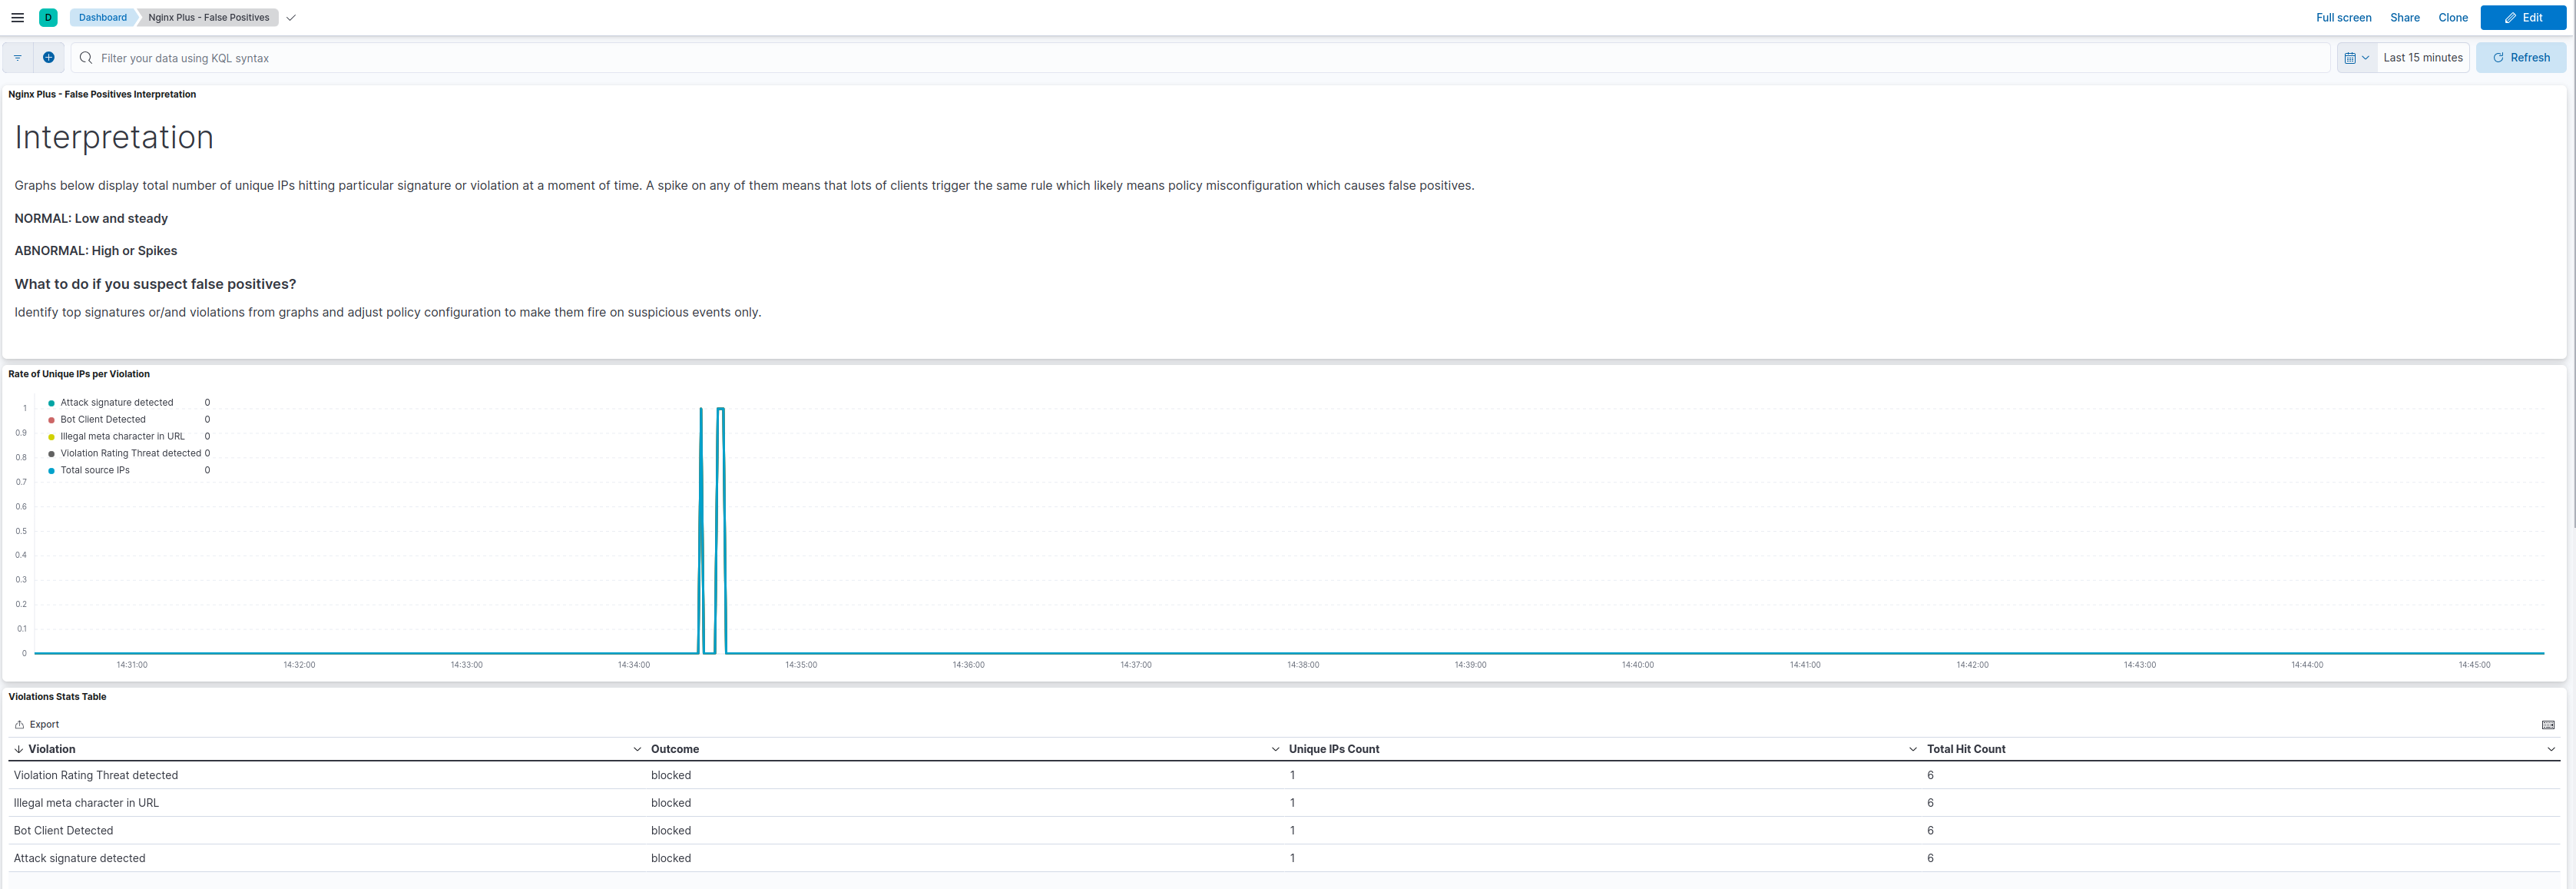
-
-
A new dashboard has been added to Grafana:
-
Nginx Plus - Dashboard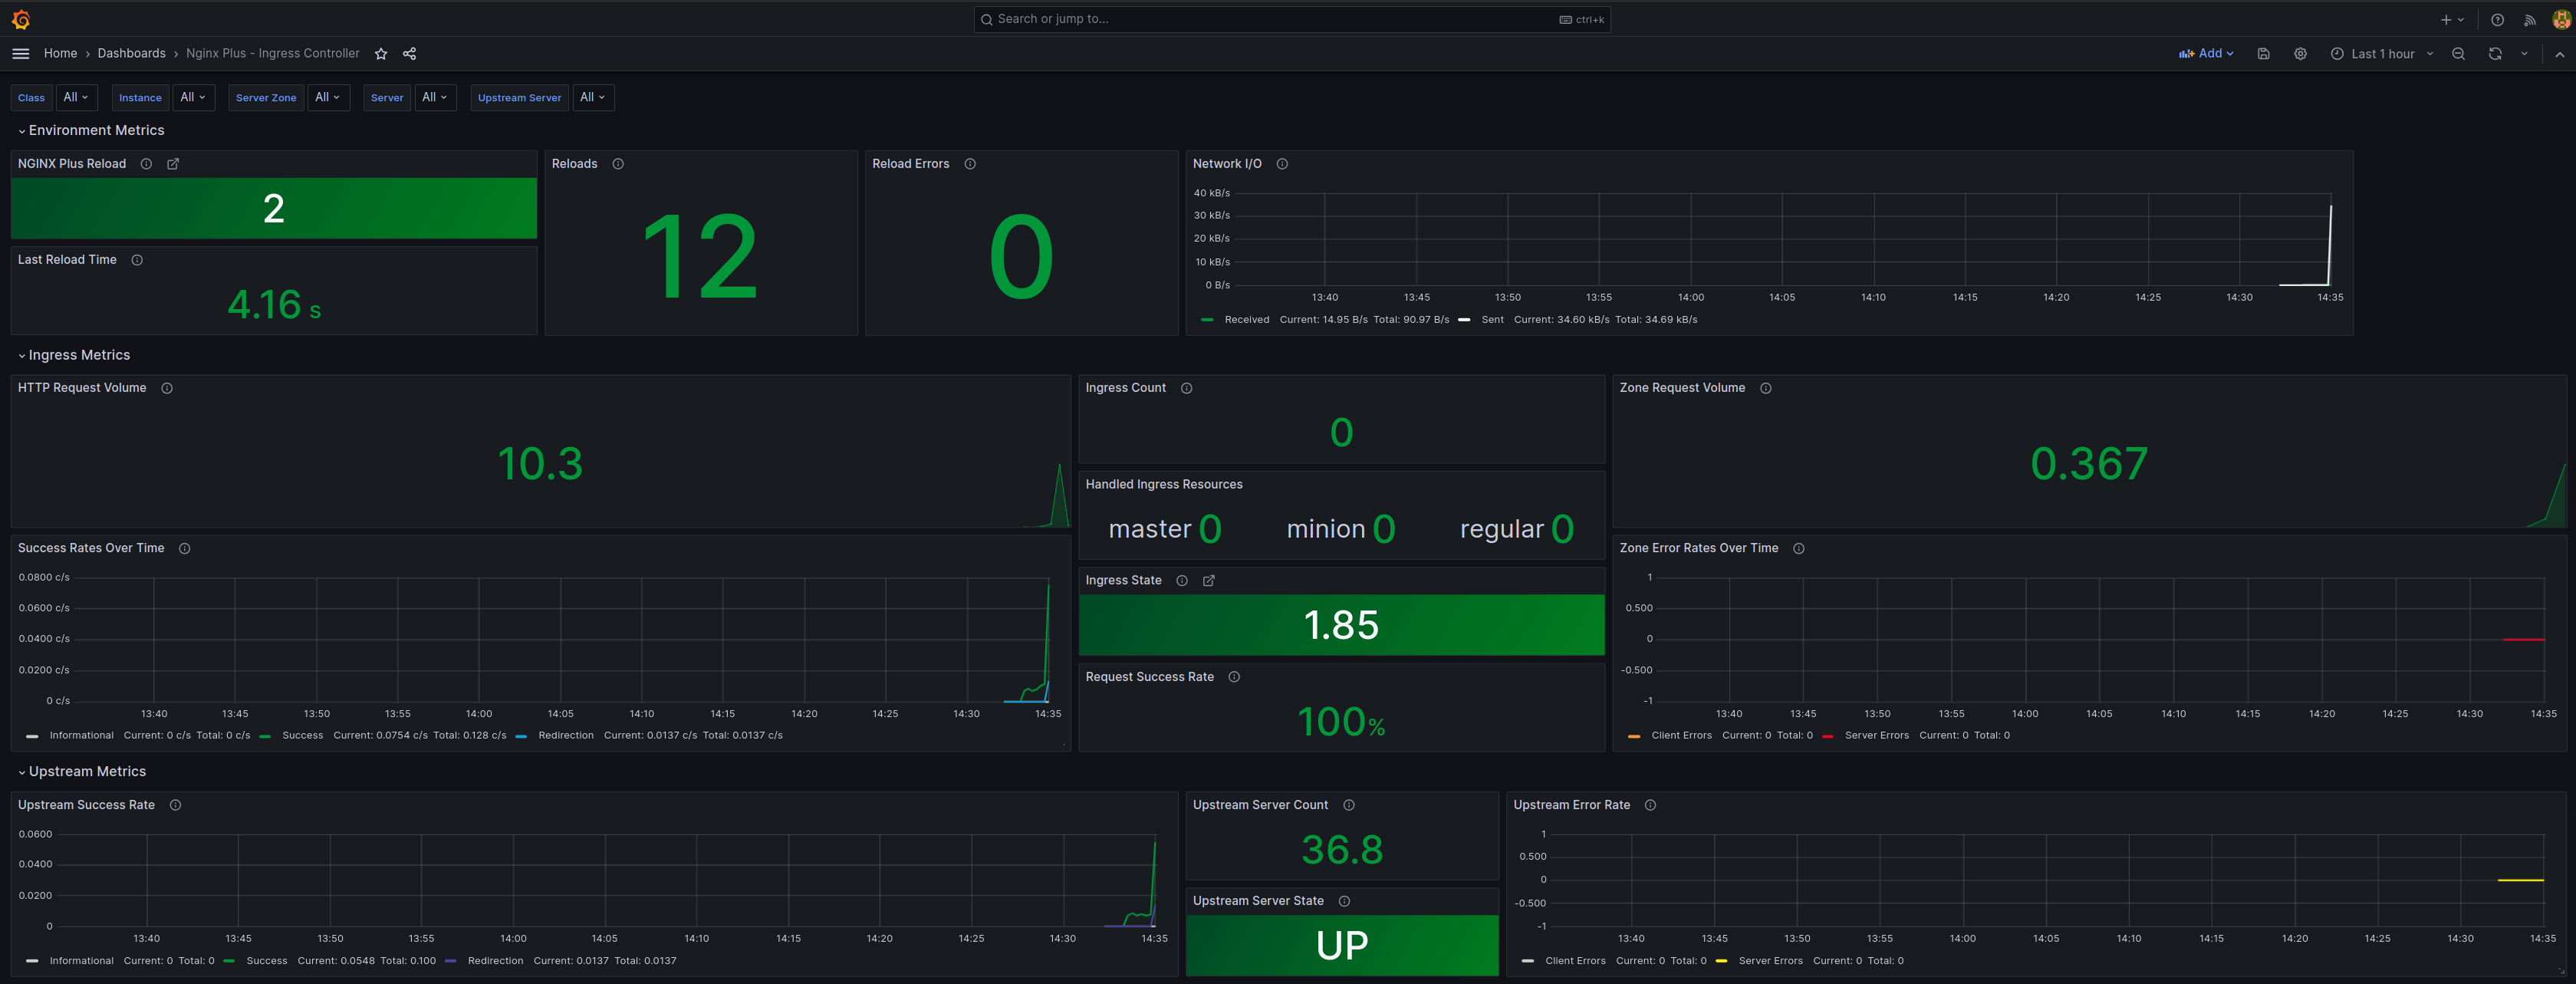
-
-
A new Prometheus alert has been added:
waf_policy_hits_increase- Alert that will be activated when the number of hits of a WAF policy increases compared to the last minute.
Create Aura APIKeys
You can use the installer to create APIKeys, using the following commands:
Remember that it is also possible to generate an APIKey using the Generate an APIKey guidelines
./aura api_key -h
usage: aura api_key [-h] --cfg CONFIG_FILE [--debug] -v VAULT_PASS
                    [-s {aura-services,aura-services:token,aura-services:users,aura-services:token,users,aura-services:token,,aura-services:users,aura-services:users,token}]
                    -a AUDIENCE [-m {r,w,rw}]

optional arguments:
  -h, --help            show this help message and exit
  --cfg CONFIG_FILE     Config file.
  --debug               Enable debug mode
  -v VAULT_PASS         Password to decrypt vault files
  -s {aura-services,aura-services:token,aura-services:users,aura-services:token,users,aura-services:token,aura-services:users,aura-services:users,token}
                        Scope for the api key. Default aura-services
  -a AUDIENCE           Name of client that will be use the API Key (Novum,
                        Kernel, aura-bot,etc ....
  -m {r,w,rw}           Access mode to API, values: r|w|rw. Default: r
Enable or disable components
It is possible to enable or disable specific components for each profile (es, br, de, uk) through the following configuration options. By default, each profile has these components enabled for that OB.
⚠️ This default configuration should not be modified in environments different than dev purposes.
In order to enable/disable each of the components included in the following sections, the value of the corresponding variable must be set to true or false respectively.
Enable ATRIA components
Depending on the ATRIA capability to be used, it is required to enable different components beforehand, which are described in the following sections.
⚠️ Every change on a flag implies a redeployment, unless it is the first installation of a release.
Enable NLP as a Service components
nlpaas_enabled: true
Enable Generative components
generative_enabled: true
Enable RAG components
atria_rag_enabled: true
Enable OpenAI deployment
Changing the value of the following variable to true will enable the deployment of OpenAI resource in Azure, Qdrant vector database and will configure aura-nlp component to use it (you will need an NLP training with a pipeline that includes the OpenAI embeddings recognizer stage or Embeddings domain classifier).
⚠️ Follow the Microsoft documentation to enable Azure OpenAI in the subscription and get enough quota before enabling this option or the installer will fail.
openai_enabled: false
Enable Aura Gateway API
If any of the variables below is set to true, then aura-gateway-api will be deployed:
nlpaas_enabled or generative_enabled or atria_rag_enabled.
To disable aura-gateway-api deployment, all the variables must be set to false.
aura_gateway_api_enabled: true
Enable Aura Manager
If any of the variables below is set to true, then aura-manager will be deployed:
generative_enabled or atria_rag_enabled.
To disable aura-manager deployment, all the variables must be set to false.
aura_manager_enabled: true
Enable Atria Model Gateway
If any of the variables below is set to true, then atria-model-gateway will be deployed.
To disable atria-model-gateway deployment, all the variables must be set to false.
It really depends on generative_enabled or atria_rag_enabled.
atria_model_gw_enabled: true
Enable Atria RAG Server
If any of the variables below is set to true, then atria-rag-server will be deployed.
To disable atria-rag-server deployment, all the variables must be set to false.
atria_rag_enabled: true
Enable Aura bridge
If any of the variables below is set to true, then aura-bridge will be deployed.
To disable aura-bridge deployment, all the variables must be set to false.
whatsapp_enabled: true

async_callback_enabled: true

genesys_enabled: true

rcs_enabled: true
Enable Whatsapp
whatsapp_enabled: true
Enable RCS
rcs_enabled: true
Enable Genesys
genesys_enabled: true
Enable Context 4P Sync to Kernel
context_4p_sync_enabled: true
Enable Complex Logic
complex_logic_enabled: false
Enable MongoDB Atlas
Enable MongoDB Atlas by setting the value of the following variable to false.
By default, this value is set to true.
atlas_enabled: true
Enable Aura Operator component
In order to enable Aura Operator, set the following variable to true.
aura_operator_enabled: true
⚠️ This component may require extra configuration. Go to Aura Operator configuration section.
Enable prometheus-es-exporter component
In order to enable prometheus-es-exporter, the component used for generating metrics from queries from ElastisSearch index, set the following variable to true.
prometheus_es_exporter_enabled: true
⚠️ This component may require extra configuration. Go to prometheus-es-exporter section.
Enable Databricks deployment
-
In order to enable Databricks, set the following variable to
true. The Databricks resource is created during thedeploy_commonphase:databricks_enabled: true -
For configuring the Databricks cluster node type, modify the
databricks.cluster.node_type_idconfiguration:databricks: cluster: node_type_id: "Standard_D8as_v4" # To check the available node types, go to the Databricks workspace.
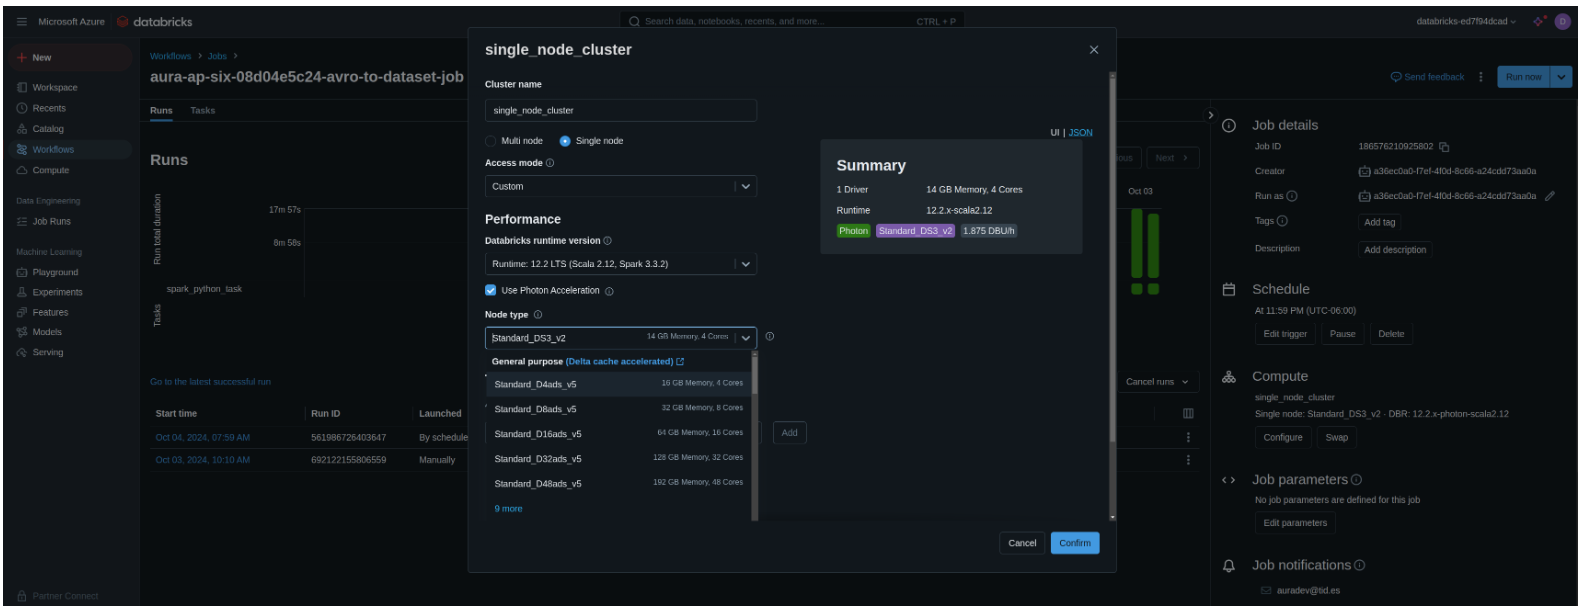
-
The Databricks job will be created when deploying the Aura services
deploy_core. -
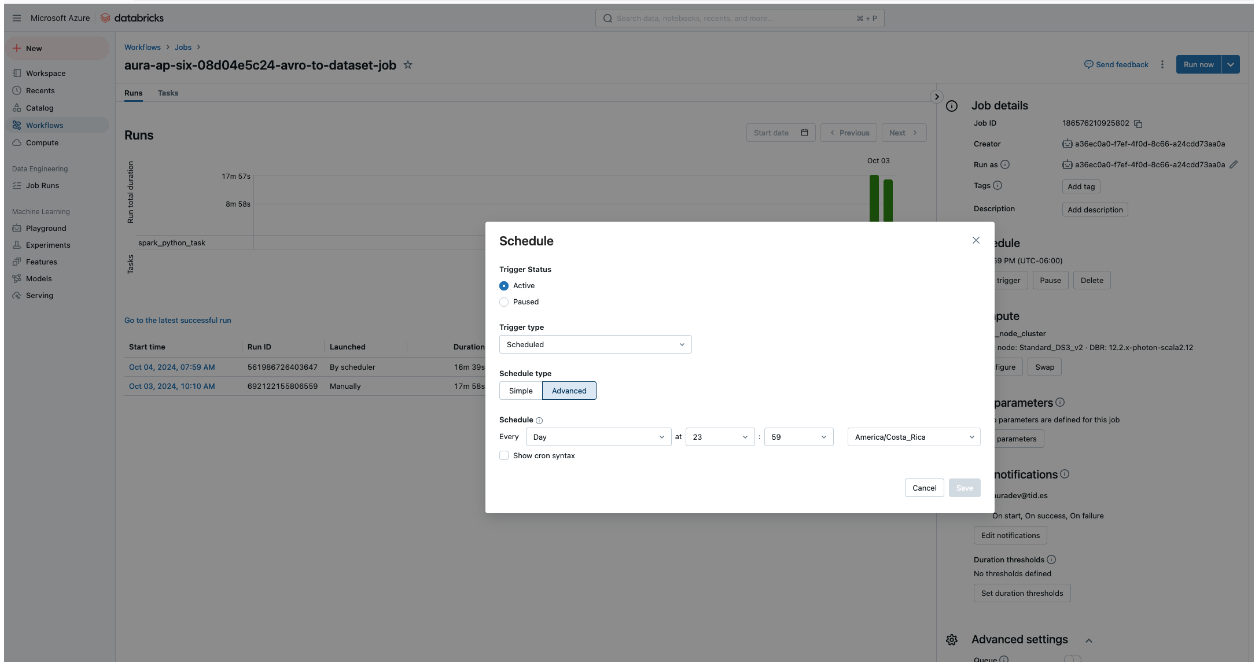
For configuring the execution of the Databricks job, modify the databricks.job.schedule cron, so that it runs at the desired time:
databricks: job: schedule: "59 59 23 * * ?" # Every day at 23:59:59 - By default, the Ob's timezone will be configured-
You can check that the job has been configured correctly in Azure, within the Databricks resource:
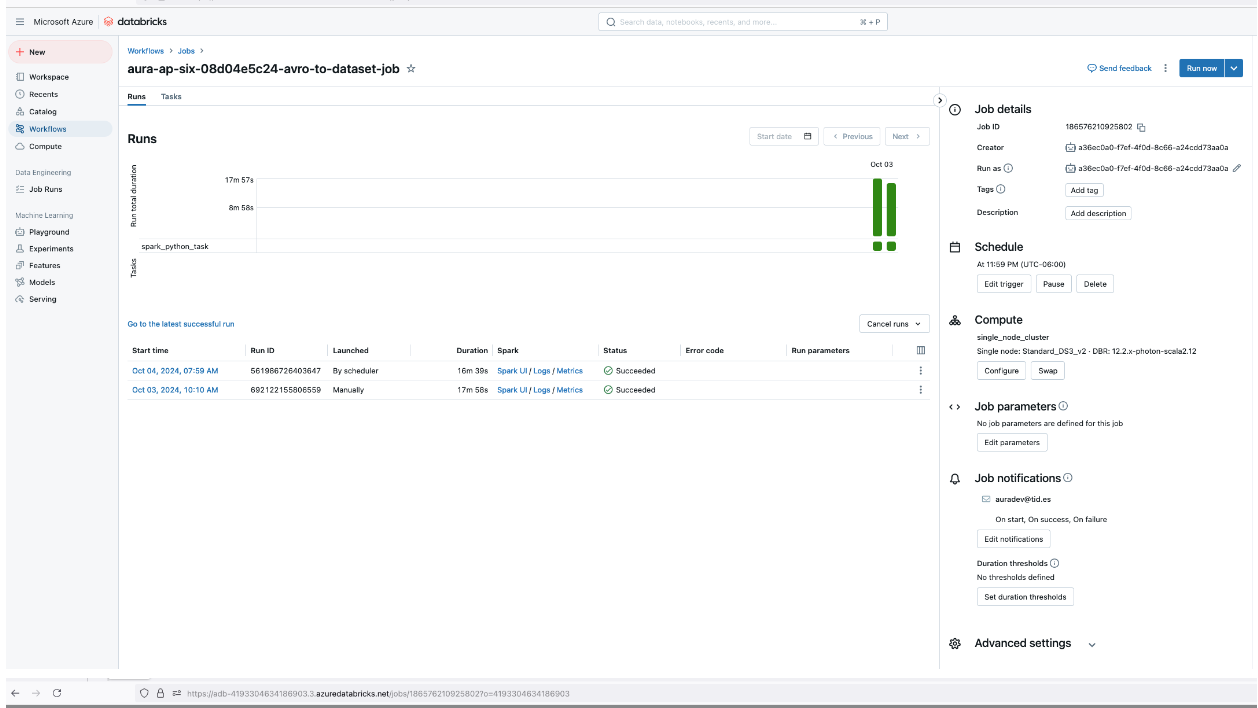
-
Enable Confidential Computing Databricks
This is an optional step, which represents a specific cost.
It is important to mention that these settings cannot be disabled once the Databricks workspace has been created.
The steps to enable Confidential Computing Databricks are listed below.
These settings only affect when deploying the deploy_common phase:
-
To enable client key encryption:
enable_customer_key_databricks_encryption: false -
To enable Enhanced Security Compliance Settings, the following compliance standards will be set by default:
databricks_enhanced_security_compliance: false databricks: params: complianceStandards: - "HIPAA" - "PCI_DSS" -
To enable encryption infrastructure settings:
databricks_requireInfrastructureEncryption: false
Specific OB configuration
Brazil
Configure aurapush-sendfeedback-service
To configure the aurapush-sendfeedback-service plugin, the following parameters must be used:
aurapush_feedback_endpoint: 'https://hmlapi.telefonicabigdata.com/feedback'
aurapush_feedback_subscription_key: XXXX
Germany
Enable Confidential Computing
Confidential Computing is enabled in Germany profile by default. The configuration changed in the profile to enable it is as follows:
enable_encryption_in_transit: true

enable_customer_key_encryption: true

enable_customer_key_atlas_encryption: true

infrastructure:
  compute:
    agentpools:
      common:
        type: "Standard_DC2ds_v3"
      management:
        type: "Standard_DC2ds_v3"
      system:
        type: "Standard_DC2ds_v3"
NGINX Plus
The activation of changes described here requires the deployment of the Aura platform system.
The Global DevOps team has enabled the NGINX Plus service in Germany, through the setting of the corresponding flags in DE profiles and enabling the use of the new Elasticsearch, Kibana and Grafana elements and Prometheus alerts for this purpose.
No policies are applied by default, therefore, to add them, we recommend the approach set by the Global DevOps team:
- By default, we have configured a LogConf with the name
logconfthat will be displayed automatically. - To use LogConf, it is necessary to enable security logs and configure both logconf and logDest. LogDest will always be the same and the apLogConf is the same but depends on the namespace. The following example corresponds to the ‘de-pro’ configuration:
apiVersion: k8s.nginx.org/v1
kind: Policy
metadata:
  name: waf-policy
spec:
  waf:
    enable: true
    apPolicy: "{{kubernetes_core_namespace }}/dataguard-alarm"
    securityLogs:
    - enable: true
      apLogConf: "aura-de-pro/logconf"
      logDest: "syslog:server=fluent-bit-aggregator.aura-system:5140"
If the OB wants to add new policies to the installer, the logConf and logDest configurations are given by the following variables and could be configured as follows:
apiVersion: k8s.nginx.org/v1
kind: Policy
metadata:
  name: waf-policy
spec:
  waf:
    enable: true
    apPolicy: "{{kubernetes_core_namespace }}/dataguard-alarm"
    securityLogs:
    - enable: true
      apLogConf: "{{ nginx_plus.log_conf }}"
      logDest: "{{ nginx_plus.log_dest }}"
The nginx-plus policy files should be in deploy/templates/k8s/core/nginx-plus
MongoDB Atlas configuration
The configuration of MongoDB Atlas includes different parameters, which are fully explained below:
Selection of database
Currently, just MongoDB Atlas is supported.
To use Atlas, a subscription with an organization created in https://cloud.mongodb.com is required.
Atlas APIKeys
We use the MongoDB Atlas kubernetes operator to create a project, cluster and users. For this operator to work, an APIKey with project creator permissions is needed. This APIKey can be created in the organization access manager option from the Atlas webpage.
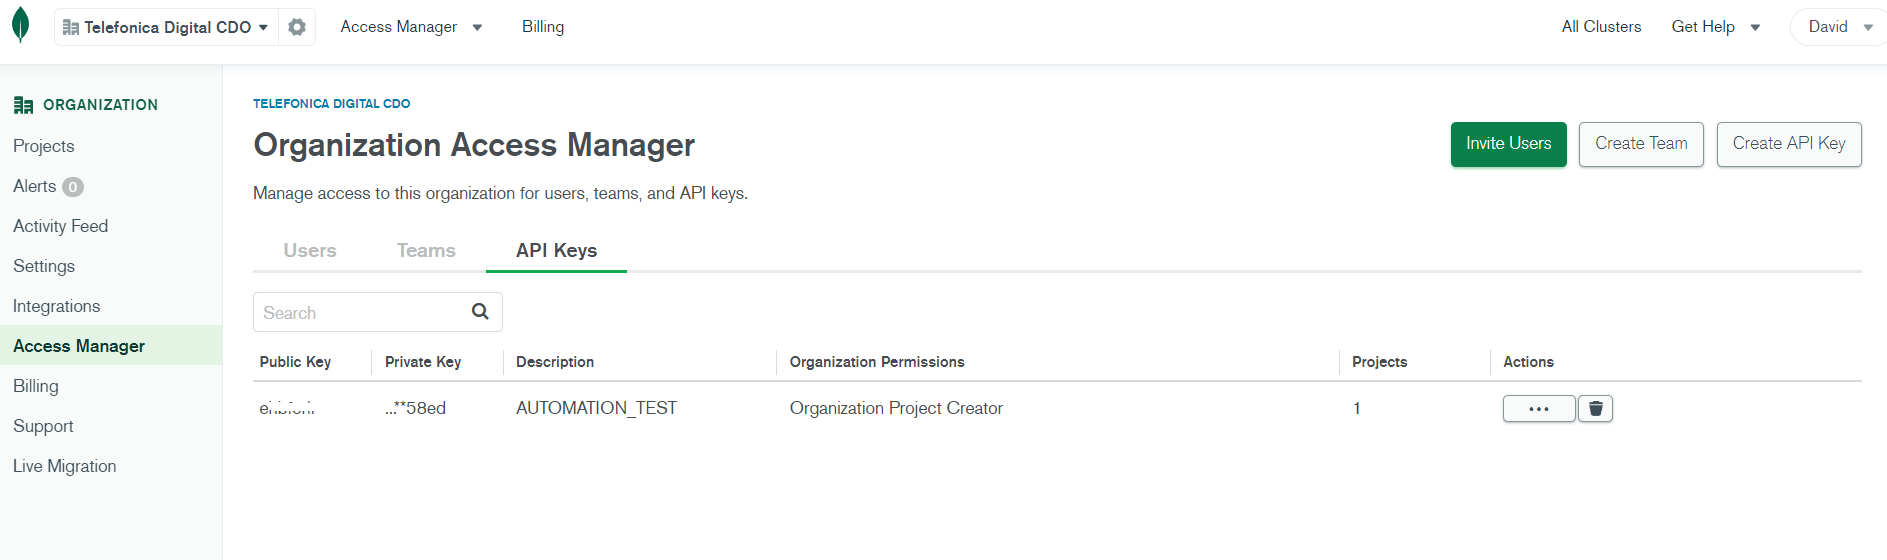
This will provide public and private keys. With these keys and the organization id retrieved from the organization settings, fill in the values below.
atlas_orgId: XXX

atlas_public_apikey: XXX

atlas_private_apikey: XXX
⚠️ APIKeys can have Access Control Lists (ACLs) configured. At least, it will be needed to add as allowed the IP/CIDR where the installer is running. The installer will add the AKS cluster outbound IP to the allowed networks to allow the operator to create the resources.
Configuration of project and cluster names
We can also configure the names used for the project and cluster name. By default, the values include the environment name as part of the names to isolate the resources between different environments but this behavior could be changed to share project or cluster between environments when they are not critical, such as development environments. The allowed values correspond to a lowercase RFC 1123 subdomain consisting on lower case alphanumeric characters, ‘-’ or ‘.’, that must start and end with an alphanumeric character.
atlas_project_name: "aura-project-{{ environment_name }}"
atlas_cluster_name: "{{ environment_name }}{{ atlas_mongo_major_version | replace('.', '') }}"
Configuration of MongoDB Atlas maintenance window schedule
The maintenance window schedule can be configured using the following variable. By default, is not configured and will use the default value from Atlas.
atlas_maintenance_windows:
  day_of_week: 2
  hour_of_day: 13
The allowed values match with the MongoDB Atlas Operator documentation.
Termination protection
Configure cluster termination protection which avoids the cluster deletion in Atlas after being removed in the kubernetes cluster. By default, it is enabled. If set as such, disabling it will need to be done through the Atlas webpage for now.
atlas_termination_protection_enabled: true
Configuration of cluster type
By default, the cluster created will be a replicaset, but a sharded cluster can be configured. Keep in mind that to take advantage from a sharded cluster, sharding has to be configured in the MongoDB collections. However currently, this configuration is not set globally.
Moreover, the number of shards of a sharded cluster can be configured. The default value for this is 2.
atlas_cluster_type: "REPLICASET" #REPLICASET or SHARDED are allowed
atlas_num_shards: 2
atlas_num_shards must not be set if atlas_cluster_type is set to REPLICASET.
Configuration of instance size
The instance size used in the cluster can be configured. Take a look to the Atlas MongoDB documentation to check the different sizes allowed:
The default value is M30 and this is the minimum size if a sharded cluster is configured.
atlas_instance_size: "M30"
Allowed networks
By default, we just add the outbound IP from the AKS cluster as allowed to access to the Atlas MongoDB cluster.
However, more IP/CIDR can be added with the configuration parameter described below.
The current configured IPs will be kept too, summarizing networks if possible. The default value is [].
atlas_network_allowed:
  - 195.235.92.0/23
Autoscale options for Atlas clusters
Atlas clusters have different autoscale options. The cluster can autoscale instance size or disk.
By default, the compute autoscale is disabled (false) and disk autoscale enabled (true). This can be changed with the configuration parameters included below.
atlas_autoscaling_compute: false
atlas_scaledown_compute: false

atlas_max_instance_size: "M40"
atlas_min_instance_size: "M30"
If autoscaling disk is true (which is the default value) the altas_disk_size variable will be ignored. When atlas_autoscaling_disk is false, the atlas_disk_size variable will be used to configure the disk size. The allowed values for the disk size are multiples of 8GB.
atlas_autoscaling_disk: true
atlas_disk_size: 512
Cluster backup
Atlas cluster backup can be enabled or disabled through the following variable.
By default, it is enabled (true).
atlas_backup_enabled: true
Integration with Prometheus
Prometheus integration can be enabled in the Atlas project using atlasprometheus as username and as password the value of:
atlas_prometheus_password: XXX
Modify Atlas configuration
As mentioned before, Atlas cluster is created using Mongodb Atlas kubernetes operator so it is possible to change certain cluster configurations as the instance or disk size or the allowed network ranges using kubectl command.
Six new CRDs (atlasdeployment.atlas.mongodb.com, atlasdatabaseusers.atlas.mongodb.com ,atlasprojects.atlas.mongodb.com, atlasteams.atlas.mongodb.com, atlasbackuppolicies.atlas.mongodb.com, atlasbackupschedules.atlas.mongodb.com) are added to the cluster and the environment resources are created in the aura-system namespace. However the installer is not providing a way to configure atlasteams.atlas.mongodb.com, atlasbackuppolicies.atlas.mongodb.com and atlasbackupschedules.atlas.mongodb.com yet.
Moreover, in order to avoid issues with these resources erased, the mongodb.com/atlas-resource-policy: keep annotation is added so this will make the operator avoid removing the resources.
Details about the annotations can be consulted in the MongoDB Atlas kubernetes operator github repository.
Confidential Computing
Aura supports the use of Confidential Computing in the Azure cloud. This feature is disabled by default in the installer. We enabled this in four ways:
- Ensuring Aura platform works under the set of VMs family that supports this feature.
- Allowing to configure the use of encrypted in transit traffic between the nodes of the cluster.
enable_encryption_in_transit: false
- Allowing to configure the use of customer managed keys for the encryption of the data at rest in storage accounts.
enable_customer_key_encryption: false
- Allowing to configure the use of customer managed keys for the encryption of the data at rest in the Atlas MongoDB database.
enable_customer_key_atlas_encryption: false
To handle the use of customer managed keys, an Azure Key Vault will be created during the common deployment step. The installer will use the same key vault for the different clusters and releases.
⚠️ The use of this feature will increase the cost of the infrastructure and the performance of Aura Platform could be affected.
Aura deployment process
The current section includes both the different types of deployment and the scenarios for updating an Aura release depending on the nature of changes from one version to another.
Types of deployment
Aura installation process is divided into four different steps:
- Common deployment: creation of common resources (Azure Storage Account, Azure Key Vault, etc.) for environment.
- Infra deployment: creation of the kubernetes cluster and related resources.
- System deployment: deployment of the system services (MongoDB, Grafana, Kibana, Elasticsearch, etc.) in top of this cluster in the
aura-systemnamespace. - Core deployment: deployment of Aura core, including:
- Creation of the required services (Bot Channel Registration, etc)
- Deployment of components (aura-bot, aura-nlp, nginx, etc.) on top of the kubernetes cluster.
The installation is fully automated and designed to be idempotent. This means that, if something goes wrong, it is safe to run the installer again.
At the end of the deployment process, the installer runs some basic healthchecks. You should also verify that the installation has been successful.
Aura installer also needs the credentials from the service principal created.
There are two different ways to provide these credentials:
- Exporting the environment variables as the output of the service principal creation
- As a JSON file selected with -c option as shown below:
```bash
  {
  "AZURE_CLIENT_ID": "xxxx",
  "AZURE_SECRET": "xxxx",
  "AZURE_SUBSCRIPTION_ID": "xxxx",
  "AZURE_TENANT": "xxxx"
  }
```
⚠️ The installation process has to be done as root.
Common Deployment
If Aura is already deployed, there is no need to run it, as the common resources were already created in the past by other steps of the installer.
This step will create a resource group, a common storage account and a keyvault (if Confidential Computing is enabled) that will be shared between the different clusters and releases. This step just has to be done once the first time the environment is created.
$ aura deploy_common [-c $PATH_TO_CREDENTIALS_FILE] --cfg $PATH_TO_CONFIG_FILE -v "$VAULT_PASSWORD"
Where:
VAULT_PASSWORD: secret needed to decrypt the vaulted configuration. It will be provided by Aura APE Team.PATH_TO_CREDENTIALS_FILE: path where the output file obtained during the service principal creation is stored. This parameter is optional as this info can be set as environment variables.PATH_TO_CONFIG_FILE: path where the configuration file is stored.
Infra Deployment
To deploy the infrastructure step that will create the kubernetes cluster, use the following commands:
$ aura deploy_infra [-c $PATH_TO_CREDENTIALS_FILE] --cfg $PATH_TO_CONFIG_FILE -v "$VAULT_PASSWORD" [-f $PATH_TO_PRIVATE_KEY ]
Where:
VAULT_PASSWORD: secret needed to decrypt the vaulted configuration. It will be provided by Aura APE Team.PATH_TO_CREDENTIALS_FILE: path where the output file obtained during the service principal creation is stored. This parameter is optional as this info can be set as environment variables.PATH_TO_CONFIG_FILE: path where the configuration file is stored.PATH_TO_PRIVATE_KEY: path where the private key file is stored. Aura installer expects a private key file in the same directory namedaura.pem, but -f option can be used to select it from another path.
If the key does not exist, the installer will create it during the infrastructure step.
⚠️ The virtual machines are associated with this key during the creation process so keep the key as it could be needed in the future.
As output of this step, the kubeconfig.json file is generated in the output_install directory, needed to interact with the kubernetes cluster.
System Deployment
To deploy the system step that will deploy the common services on top of the kubernetes cluster, use the following commands:
$ aura deploy_system [-c $PATH_TO_CREDENTIALS_FILE] --cfg $PATH_TO_CONFIG_FILE -v "$VAULT_PASSWORD"
Where:
VAULT_PASSWORD: secret needed to decrypt the vaulted configuration. It will be provided by Aura APE Team.PATH_TO_CREDENTIALS_FILE: path where the output file obtained during the service principal creation is stored. This parameter is optional as this info can be set as environment variables.PATH_TO_CONFIG_FILE: path where the configuration file is stored.
Core Deployment
To deploy Aura core, that will install the common services on top of the kubernetes cluster, use the following commands:
$ aura deploy_core [-c $PATH_TO_CREDENTIALS_FILE] --cfg $PATH_TO_CONFIG_FILE -v "$VAULT_PASSWORD"
Where:
VAULT_PASSWORD: secret needed to decrypt the vaulted configuration. It will be provided by Aura APE Team.PATH_TO_CREDENTIALS_FILE: path where the output file obtained during the service principal creation is stored. This parameter is optional as this info can be set as environment variables.PATH_TO_CONFIG_FILE: path where the configuration file is stored.
As output of this step, a JSON file with the details regarding the environment is generated in the output_install directory.
Scenarios for the update of an Aura version and related processes
We can face three different ways to upgrade an Aura version depending of the changes in the version to install compared with the current one. The different processes are:
New cluster
Process used when the kubernetes version changes in a release or there are changes in the system.
In this scenario, we should:
- Deploy a new Aura environment following the three steps for Infra deployment, System deployment and Core deployment.
- If the database used is Atlas, before the System deployment we have to disable the MongoDB Atlas operator in the current cluster to avoid having two different operators trying to set the cluster state at the same time.
- Before Oasis Aura Platform release, this can be easily done by scaling the
mongodb-atlas-operatordeployment to0. - Starting in Oasis release, we can use the mongodb.com/atlas-reconciliation-policy: skip annotation in the
atlasdeployment.atlas.mongodb.com,atlasprojects.atlas.mongodb.comandatlasdatabaseusers.atlas.mongodb.comobjects. - After that, use the migration script and DNS switch to point to this new environment.
Cluster migration
For this new cluster strategy, we need to migrate some data from the current production cluster.
To do this, a migration script is provided in the migrations/cluster directory from the installer.
To run this script, we just need the output files with the environment configuration info generated by the installer in the output_install directory from the source and destination environment. With this info, run the script as shown below, using the corresponding files names for the desired environment:
./migrate-cluster --source-file source-es-dev_info.json --dest-file ../../output_install/es-dev_info.json
The script will perform the following steps:
1.- Take a backup from the MongoDB and Redis databases and place it in the source environment aura-backups blob.
2.- Copy the source backups to the destination environment aura-backups blob in the path used for restore.
3.- Scale all the services in the destination cluster to 0 replicas to avoid modifications during the restore.
4.- Restore the backups cleaning the database from the destination environment first.
5.- Reindex data with the right indexes of the destination environment.
6.- Scale back the destination environment services.
This procedure can be done in working hours if the DNS change has not been changed before it. It is the recommended way if the users’ database is big enough, so it will take a long time.
To keep the database up to date with the latest changes, just before the DNS change we can export the users from a timeframe in the source environment and then restore in the new cluster avoiding data lost. To do this, we can use the kubectl command below to export the intended environment, MongoDB adminuser password and the right start date.
⚠️ Use the right environment and database name in the commands.
export ENVIRONMENT=es-dev
export ATLAS_DATABASE_NAME=aura-es-dev
export MONGODB_USER=$(kubectl get -n aura-system atlasdatabaseusers.atlas.mongodb.com mongodb-adminuser-password -o jsonpath='{.spec.username}')
export MONGODB_PASSWORD=$(kubectl get -n aura-system secret mongodb-adminuser-password -o go-template='{{ .data.password | base64decode }}')
export MONGODB_URI="$(kubectl -n aura-system get atlasdeployments.atlas.mongodb.com ${ATLAS_DATABASE_NAME} -o jsonpath='{.status.connectionStrings.standardSrv}'|sed "s|srv://|srv://$MONGODB_USER:$MONGODB_PASSWORD@|g")/aura-users-$ENVIRONMENT"

kubectl -n aura-system run delta-users -i -q --rm --restart=Never --overrides='{ "spec": { "imagePullSecrets": [{"name": "aura-registry"}] } }' --env="MONGODB_URI=${MONGODB_URI}" --image=auraregistry.azurecr.io/aura/tools/mongo-backup:8.0.0 -- mongoexport --uri "${MONGODB_URI}" -c users --pretty --quiet --query '{ "created": { "$gte": { "$date": "2023-10-10T06:22:47Z" }}}' > users.json
If the source environment was using an on premise MongoDB, we can use the following command to export the users:
kubectl --namespace=aura-system exec -it mongodb-0 -- mongoexport --uri "mongodb://adminuser:${MONGODB_PASSWORD}@mongodb-0.mongodb:27017,mongodb-1.mongodb:27017,mongodb-2.mongodb:27017/aura-users-${ENVIRONMENT}?replicaSet=aura_replicaset&authSource=admin" -c users --pretty --quiet --query '{ "created": { "$gte": { "$date": "2021-05-10T06:22:47Z" }}}' > users.json
In order to import those exported users, run the following command with the destination environment kubeconfig:
export ENVIRONMENT=es-dev
export ATLAS_DATABASE_NAME=aura-es-dev-70
export MONGODB_USER=$(kubectl get -n aura-system atlasdatabaseusers.atlas.mongodb.com mongodb-adminuser-password -o jsonpath='{.spec.username}')
export MONGODB_PASSWORD=$(kubectl get -n aura-system secret mongodb-adminuser-password -o go-template='{{ .data.password | base64decode }}')
export MONGODB_URI="$(kubectl -n aura-system get atlasdeployments.atlas.mongodb.com ${ATLAS_DATABASE_NAME} -o jsonpath='{.status.connectionStrings.standardSrv}'|sed "s|srv://|srv://$MONGODB_USER:$MONGODB_PASSWORD@|g")/aura-users-$ENVIRONMENT"

kubectl -n aura-system run delta-users --restart=Never --overrides='{ "spec": { "imagePullSecrets": [{"name": "aura-registry"}] } }' --env="MONGODB_URI=${MONGODB_URI}" --image=auraregistry.azurecr.io/aura/tools/mongo-backup:8.0.0 -- sleep 360000
kubectl -n aura-system exec -it delta-users -- mongoimport --uri "${MONGODB_URI}" -c users < users.json
kubectl -n aura-system delete pod delta-users
The migration script will evaluate which steps of the migration are needed in order to do just the required ones. For example, if the Atlas database migration is not needed as it is the same, the script will skip the Atlas backup and restore steps.
DNS switch
The DNS option is included in the installer to take advantage of a new cluster created in parallel to the existing one or for core namespace deployment.
With this option, we can point from one environment to another in an easy way. To migrate DNS to the new cluster or core namespace we just need to run:
$ aura dns [-c $PATH_TO_CREDENTIALS_FILE] --cfg $PATH_TO_CONFIG_FILE -v "$VAULT_PASSWORD"
This command updates DNS entries to point to the new environment and also takes a backup from the previous environment to make the rollback process trivial. To rollback the DNS change, just execute the same command adding the --rollback parameter:
$ aura dns [-c $PATH_TO_CREDENTIALS_FILE] --cfg $PATH_TO_CONFIG_FILE -v "$VAULT_PASSWORD" --rollback
Logs migration
To move the logs from a cluster to another, we provide a new script in the migrations/logs directory from the installer. This script leans on the common storage account. To run this script, we just need the output files with the environment configuration info generated by the installer in the output_install directory from the source and destination environment. With this info, run the script as shown below, using the corresponding files names for the desired environment:
./migrate-logs --source-file source-es-dev_info.json --dest-file ../../output_install/es-dev_info.json
The script will perform the following steps:
1.- Take a snapshot from the Elasticsearch in the source cluster and place it in the common storage account configured as Azure snapshot repository.
2.- Set the source snapshot repository cluster as read-only, as just one cluster can be read-write.
3.- Set the destination snapshot repository cluster as read-write.
4.- Restore the snapshot in the destination cluster.
This procedure should be run after the DNS switch.
New core namespace
Process used when the release changes are not related with infra or system deployment but with core deployment.
In this scenario, we can deploy the new release over the same existing cluster in a new core namespace using the --ns parameter in the deploy_core option from the installer.
This will create a new namespace with the same name as usual but adding the release number as a suffix.
Then, we can use the DNS switch process to point to the new namespace.
In place
Process used when we just deploy Aura core and update the components in the core namespace.
This is the preferred way for a fix release, where just a little set of components are changing and there are not big changes between one version and another.
Restore MongoDB backup
⚠️ Restore first will clean the database, so all data will be removed.
To restore a MongoDB backup:
-
Place the backup file in the folder mongodb/restore from the
aura-backupsblob container created in the cluster storage account (cluster resource group) -
Run the following command in the cluster:
kubectl create job --from=cronjob/mongodb-restore restore-backup -n aura-system
There are cloud backups too, but they are not used in the installer. To restore a cloud backup, follow the instructions in the MongoDB documentation.
Local modules deployment
Steps for the deployment of local use cases
OBs can develop their own experiences, the so-named local use cases, by building new dialogs (libraries) that will extend aura-bot behavior.
To do this, the installer provides two parameters:
build_local: to build a new docker image that will extend the global version with the developed libraries.deploy_local: to deploy the new image created using some output files created by the build_local.
Follow these steps in order to deploy local modules:
-
Create a local_modules directory in the same path as the Aura command
./aurafrom where the installer is. -
Place into this directory the packaged
.tgzfiles of the desired libraries to include. Check the process in package a developed use case.To build the new image, first you need to create a local_modules directory in the same path as the Aura command is. Place into this directory the bundle files of the desired libraries to include (To create this bundle please check the development documentation).
-
Run the following command:
aura build_local [-c $PATH_TO_CREDENTIALS_FILE] --cfg $PATH_TO_CONFIG_FILE -v "$VAULT_PASSWORD"VAULT_PASSWORD: secret needed to decrypt the vaulted configuration. It will be provided by APE Team.PATH_TO_CREDENTIALS_FILE: path where the output file obtained during the service principal creation is stored.PATH_TO_CONFIG_FILE: path where the configuration file is stored.
-
After running the command, a new docker image is created and published, including the new developed libraries. Moreover, two output files are generated, which are required in order to deploy this image:
output_install/plugin-config.jsonoutput_install/local_config.yml
-
Deploy the new docker image by running the following command:
aura deploy_local [-c $PATH_TO_CREDENTIALS_FILE] --cfg $PATH_TO_CONFIG_FILE -v "$VAULT_PASSWORD" -p output_install/plugin-config.json -l output_install/local_config.ymlVAULT_PASSWORD: secret needed to decrypt the vaulted configuration. It will be provided by APE Team.PATH_TO_CREDENTIALS_FILE: path where the output file obtained during the service principal creation is stored.PATH_TO_CONFIG_FILE: path where the configuration file is stored.
Scenario with several config files
Another option to use several config files (*.yml), is to create one directory (profile por example) and use the "--ecfg profile/{{env}}" option:
aura deploy_local [-c $PATH_TO_CREDENTIALS_FILE] --cfg $PATH_TO_CONFIG_FILE -v "$VAULT_PASSWORD" --ecfg profiles/${env} -p output_install/plugin-config.json -l output_install/local_config.yml
Note the output files as parameter: output_install/plugin-config.json and output_install/local_config.yml.
Undeployment of local use cases
If you want to undeploy the local image, run the global deployment with the parameter:
-t aura-bot
This will restore the global bot and the configuration.
Configuration Updater
A new functionality has been created when the command deploy_local is executed: the aura-configuration updater.
This is a job that merges the local cases with global cases in Aura (in aura-configuration-api server) and the new locales (if necessary).
For doing that, before executing deploy_local, upload some file following the info written in CreateFiles.
Once you have executed deploy_local, the process will do the merge (if the files with changes exist) and will restart all the necessary components. If this process ends wrongly, the setting in aura-configuration-api server and locales will not be modified and the bot version will be the same as before the deploy_local execution.
If deploy_local ends correctly, you can read one green message. Otherwise, you can read one read message like this (if the error is for the configuration updater):
      - "¡¡¡¡¡¡¡¡¡¡¡¡¡¡¡¡¡¡¡¡¡¡¡¡¡¡¡¡¡¡¡¡¡¡¡¡¡¡¡¡¡¡¡¡¡¡¡¡¡¡¡¡¡¡¡¡¡¡¡¡"
      - "¡¡¡¡¡¡¡¡FAILED EXECUTE LOCAL CHANGES IN GLOBAL CASES!!!!!!!!"
      - "!!!!!!!!!!!!!!!!!!!!!!!!!!!!!!!!!!!!!!!!!!!!!!!!!!!!!!!!!!!!"
      - "************************************************************"
      - "************************************************************"
      - "¡¡¡¡¡¡¡¡¡¡¡¡¡¡¡¡¡¡¡¡¡¡¡¡¡¡¡¡¡¡¡¡¡¡¡¡¡¡¡¡¡¡¡¡¡¡¡¡¡¡¡¡¡¡¡¡¡¡¡¡"
      - "¡¡¡¡¡¡¡¡¡¡¡¡¡¡¡¡¡¡¡¡¡¡¡DIDNT MAKE IT!!!!!!!!!!!!!!!!!!!!!!!!"
      - "!!!!!!!!!!!!!!!!!!!!!!!!!!!!!!!!!!!!!!!!!!!!!!!!!!!!!!!!!!!!"
      - "************************************************************"
      - "************************************************************"
      - "¡¡¡¡¡¡¡¡¡¡¡¡¡¡¡¡¡¡¡¡¡¡¡¡¡¡¡¡¡¡¡¡¡¡¡¡¡¡¡¡¡¡¡¡¡¡¡¡¡¡¡¡¡¡¡¡¡¡¡¡"
      - "¡¡¡¡¡¡¡¡¡¡¡¡¡¡¡¡¡¡¡¡PLEASE,REVIEW FILES!!!!!!!!!!!!!!!!!!!!!"
      - "!!!!!!!!!!!!!!!!!!!!!!!!!!!!!!!!!!!!!!!!!!!!!!!!!!!!!!!!!!!!"
Local NLP deployment
The deployment of new NLP trainings can be done in a easy way:
-
Modify the config file
config.yml, adding the new packages name and version:nlp_packages: resources_xxxx: 0.10.0 -
Run the installer as core deployment, adding -t nlp parameter.
$ aura deploy_core -c $PATH_TO_CREDENTIALS_FILE --cfg $PATH_TO_CONFIG_FILE -v "$VAULT_PASSWORD" -t nlp
PATH_TO_CREDENTIALS_FILE: path where the output file obtained during the service principal creation is stored.PATH_TO_CONFIG_FILE: path where the configuration file is stored.VAULT_PASSWORD: secret needed to decrypt the vaulted configuration. It will be provided by Aura APE Team.
NLP with several models
Similarly to local use cases, in order to update the NLP component with several models, use the same command but with “deploy_core”:
./aura deploy_core [-c $PATH_TO_CREDENTIALS_FILE] --cfg $PATH_TO_CONFIG_FILE -v "$VAULT_PASSWORD" --ecfg profiles/${env} -t nlp
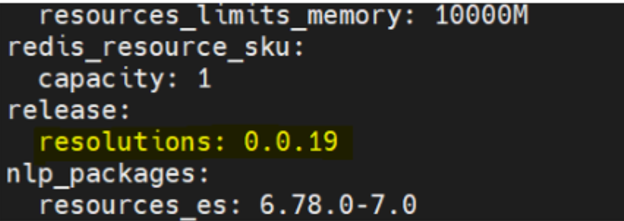
Local ResolutionResources deployment
The deployment of the ResolutionResources includes the following steps:
- Access the
config.ymlfile and edit the version of theresolutionsfield:
- Run the installer as core deployment with the parameters as follows:
./aura deploy_core -c $PATH_TO_CREDENTIALS_FILE --cfg $PATH_TO_CONFIG_FILE -v "$VAULT_PASSWORD" --ecfg profiles/${env} -t nlp user-helper
Where:
PATH_TO_CREDENTIALS_FILE: path where the output file obtained during the service principal creation is stored.PATH_TO_CONFIG_FILE: path where the configuration file is stored.VAULT_PASSWORD: secret needed to decrypt the vaulted configuration. It will be provided by Aura APE Team.
Stop and start Aura environment
The Aura environment can be stopped and started using the installer. This is useful for reducing costs when the environment is not in use.
When executing this operation, both AKS cluster and ATLAS cluster will stop/start.
-
To stop the Aura environment, the following command can be used:
./aura stop [-c $PATH_TO_CREDENTIALS_FILE] --cfg $PATH_TO_CONFIG_FILE -v "$VAULT_PASSWORD"If the environment was already stopped, the command will not do anything.
-
To start the Aura environment, the following command can be used:
./aura start [-c $PATH_TO_CREDENTIALS_FILE] --cfg $PATH_TO_CONFIG_FILE -v "$VAULT_PASSWORD"If the environment was already started, the command will not do anything.
Active listening deployment
The deployment of Active Listening in the Aura cluster is included in the installer. This will be done as part of the deploy_system step and will create the namespace active-listening and configure the cronjob to run the Active Listening process.
To enable the deployment, the variable below has to be set to true in the config file (UK and ES have this as default value):
active_listening_enabled: false
If Active Listening deployment is enabled, the following parameters must be configured in the config file:
active_listening_encryption_key: "XXXXX"
Which is the OB side encryption key used to encrypt the data sent to the Active Listening service.
The rest of the Active Listening configuration is set by the Global Team in the global vault and the Kernel related configuration is got from the fourth_platform.conversations configuration already set in the config file.
Aura Operator
The purpose of this operator, which is enabled by default in the installer, is to take some automation needed in Aura to its own cluster and handle Kubernetes resources by no need to use the installer.
Resources
Aura operator handles changes on the resources NlpTraining, ResolutionResources and Agents. Although they are managed in the same way by the operator, they are treated as different resources.
- ResolutionResources
In the case of ResolutionResources, these resources are originally stored in an Amazon S3 bucket by the Aura team.
What the operator does is to provision them, download the package from the S3 and then publish it to an Azure blob storage, so that the services that consume it can have access.
As part of this automation process, the operator edits some configmaps to make ResolutionResources aware of the new changes.
In the case of a hot swapping attempt, the ResolutionResources packages must include a version in their package name.
Go to section ResolutionResources for detailed information regarding this resource.
- NlpTraining
In the case of NlpTraining, the Aura operator works in the exact same way. The resources are also stored in an Amazon S3 bucket.
The S3 bucket is the main container to keep all resources versions centralized.
In the case of a hot swapping attempt, the NlpTraning packages must include a version in their package name.
Go to section NlpTraining for detailed information regarding this resource.
- Agents
In the case of Agents, the Aura operator manages a set of Kubernetes resources such as Deployments, Services, and ConfigMaps that together define the agent’s runtime environment.
By encapsulating these components, the operator simplifies the deployment and lifecycle management of agents, making it easier to provision, update, or remove them using the Kubernetes API or kubectl. This abstraction ensures consistent and streamlined management of agent instances across environments.
The agent resources will be deployed in a dedicated namespace following the format aura-agents-{environment}, allowing for clear separation and organization of agents across different environments.
Go to section Agents for detailed information regarding this resource.
Versioning strategy for NlpTraining and ResolutionResources
Depending on the scope of the changes, there are different options for the modification of these resources that will affect their version: Patch, Minor or Major:
In a version X.Y.Z:
- X ➡️
Major - Y ➡️
Minor - Z ➡️
Patch
For example, if the current version of an NLP package is 0.0.0:
- Using
Patchthe operator would update the NLP package to version 0.0.X. - Using
Minorthe operator would update the NLP package to version 0.X.X. - Using
Majorthe operator would update the NLP package to version X.X.X.
In a hot swapping process, if Patch, Minor or Major options are configured, we must force the execution of the operator if we want it to take action instantly. The cronjob to execute the operator every certain time is disabled by default. If we want the operator to execute every certain time, we must execute a patch command with the specified time for the cronjob, as explained in the next section.
How to force the operation execution
The operator automatically runs the reconciliation function every minute. However, if an immediate update is needed, there is a way to manually trigger the reconciliation process.
-
Force reconcile loop execution via annotation
In the context of Kubernetes, a reconcile loop is a continuous process executed by controllers to ensure that the current state of the system matches the desired state specified by the user through configurations. The operator controller repeatedly checks the current state of resources in the cluster, compares it against the desired state (that is, what the user has configured to be updated), and makes adjustments as needed to reconcile differences.
By executing any of the following commands depending on what is needed to be updated, the operator will detect the changes and execute the reconcile loop:
⚠️ The reconcile loop will only work if an update strategy (explained below) is set.
  kubectl annotate nlptrainings.auracognitive.com <NLP_TRAINING_NAME> last-check="$(date)" --overwrite -n <OB>
  kubectl annotate resolutionresources.auracognitive.com <RESOLUTION_RESOURCES_NAME> last-check="$(date)" --overwrite -n <OB>
  kubectl annotate agents.auracognitive.com <AGENT_NAME> last-check="$(date)" --overwrite -n <OB>
This Kubernetes command is used to add or update an annotation called last-check on a specific NLP training resource identified by
NLP_TRAINING_NAME,RESOLUTION_RESOURCES_NAMEandAGENT_NAME. If there is a modificaction in the resource, the operator will be triggered through an event.
Aura Operator configuration
In order to enable/disable Aura operator, this parameter must be used.
The default value is true.
aura_operator_enabled: true
Agents
This kind represents the deployment of an agent and its associated resources.
The purpose of this controller is to manage the deployments and associated resources of the agents, allowing them to be handled through the Kubernetes API and/or kubectl. This simplifies the process of deploying, updating, and maintaining the agents within the environment.
Some useful commands are:
List agents
kubectl get agents.auracognitive.com
Update agent version
kubectl patch agents.auracognitive.com <AGENT_NAME> -p '{"spec" : {"tag" : "1.1.0" }}' --type=merge
NlpTraining
This kind represents the different trainings NLP has, including the ones from the OBs.
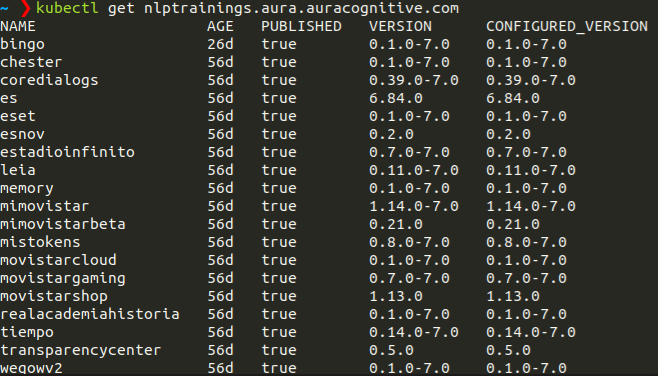
The purpose of this controller is to install those trainings in the environment and handle them through a kubernetes API and/or kubectl. This will make easier the process for their addition or updating.
Moreover, it allows trainings update in a smart way, by no need to use the installer.
Some useful commands are:
List NLP trainings
kubectl get nlptrainings.auracognitive.com
Update training version
kubectl patch nlptrainings.auracognitive.com <NLP_TRAINING_NAME> -p '{"spec" : {"version" : "1.1.0" }}' --type=merge
Change update strategies
The different options are Patch, Minor or Major.
kubectl patch nlptrainings.auracognitive.com <NLP_TRAINING_NAME> -p '{"spec" : {"update" : "Minor" }}' --type=merge
Remove configured update strategy to fix the version
kubectl patch --type=json nlptrainings.auracognitive.com <NLP_TRAINING_NAME> -p="[{ 'op': 'remove', 'path': '/spec/update' }]"
- Using
Patchthe operator would update the NLP package version 0.0.X. - Using
Minorthe operator would update the NLP package version 0.X.X. - Using
Majorthe operator would update the NLP package version X.X.X.
For doing that, it is only necessary to execute the first explained parameter with the latest version (installed and tested).
ResolutionResources
This kind represents the different resolution resources versions.

The purpose of this controller is to install different resolution resources versions in the environment and handle them through a kubernetes API and/or kubectl. This will make easier the process for their addition or update.
Moreover, it allows resolution resources update in a smart way, by no need to use the installer.
Some useful commands are:
List resolution resources
kubectl get resolutionresources.auracognitive.com
Update resolution resource version
kubectl patch resolutionresources.auracognitive.com resolutionresources -p '{"spec" : {"version" : "0.0.5" }}' --type=merge
Change update strategies
The different options are Patch, Minor or Major.
kubectl patch resolutionresources.auracognitive.com resolutionresources -p '{"spec" : {"update" : "Minor" }}' --type=merge
Remove configured update strategy to fix the version
kubectl patch --type=json resolutionresources.auracognitive.com resolutionresources -p="[{ 'op': 'remove', 'path': '/spec/update' }]"
- Using
Patchthe operator would update the resolution resource version 0.0.X. - Using
Minorthe operator would update the resolution resource version 0.X.X. - Using
Majorthe operator would update the resolution resource version X.X.X.
To go back to the default release configuration (this is, 0.0.0 version configured in user-helper), just apply the patch with this version. Removing the resolutionresources created will also set the 0.0.0 version in user-helper configuration.
For doing that, it is only necessary to execute the first explained parameter with the latest version (installed and tested).
⚠️ resolutionresources is a fixed name, as just one of this kind can be configured at the same time
Monitoring stack
During the deployment phase, the monitoring applications must be installed and configured. Afterwards, during Aura operation, a continuous monitoring of Aura system will take place.
Elasticsearch and Kibana are deployed using ECK (Elastic Cloud on Kubernetes).
Due to the modifications on how Kibana handles authentication (thanks to some free x-pack features), the way to configure the logs endpoint users has changed. An example is shown below:
backoffice_users:
  logs:
    - name: testuser
      password: mypass
      roles:
        - "superuser"
        - "kibana_admin"
        - "aura"
The admin user for Kibana and Elasticsearch will be “elastic”. To set the password, configure the following variable:
elastic_admin_password: "ROOT_PASSWD"
Undeployment
In case it is required to uninstall Aura, the resources that were created in the installation process can be removed.
The different steps used for Aura deployment must be executed but with the opposite command.
Core undeployment
$ aura delete_core [-c credentials.json] --cfg $PATH_TO_CONFIG_FILE -v "$VAULT_PASSWORD"
There are two ways of using this command:
- With the –full parameter, which will remove the whole core environment resources created such as Bot channel, DNS entries and the core namespace in Kubernetes.
- Without the –full parameter, which will remove just the resources from the current release as the Kubernetes namespace and release storage account.
System undeployment
$ aura delete_system [-c credentials.json] --cfg $PATH_TO_CONFIG_FILE -v "$VAULT_PASSWORD"
This process will remove the system namespace in kubernetes.
Infra undeployment
$ aura delete_infra [-c credentials.json] --cfg $PATH_TO_CONFIG_FILE -v "$VAULT_PASSWORD"
This process will remove the whole kubernetes cluster and the storage account created in the same resource group.
Common undeployment
$ aura delete_common [-c credentials.json] --cfg $PATH_TO_CONFIG_FILE -v "$VAULT_PASSWORD"
This process will remove the common resource group created in the installation process.
Data backup
In case of a total failure in Aura, the system carries out certain automatic backups in order to save data:
-
MongoDB backup: (daily at night). We are making a backup (using compression mode) from the MongoDB database which is stored in a blob called
aura-backups/mongodb, in the common account storage. This backup saved the users’ data. There are cloud backups too, but they are not used in the installer. To restore a cloud backup, follow the instructions in the MongoDB documentation. -
Redis backup: (daily at night). We are making a compressed backup from the Redis database which is stored in a blob called
aura-backups/redisin the same account storage. This backup store data in the context database.
⚠️ Azure Blob Storage is provided by Microsoft as a service, so they take care about the replication and the backup of this data. However, it is recommended to take this data outside Azure blobs to keep a copy in a different place.
Note: The default retention period is 7 days. If you want to change this value, modify the value of backup_retention_time variable.
Disaster recovery
The steps detailed in this document are valid as a disaster recovery procedure, considering as disaster the loss of every element of the environment.
-
Recovery Aura platform
For this purpose, deploy again the platform as a new platform or release.
To do that, only the installer used when the platform was installed/updated must be launched (Note: if any Aura data such as tokens, keys, etc. has been changed, please update the data in the installer) -
Restore data
All customer data is stored in MongoDB in compression mode; therefore, we need to recover this data which is stored in theaura-backupsblob container: - Put in the path mongodb/restore and in the same container the desired backup file
-
Run the following command:
kubectl create job --from=cronjob/mongodb-restore restore-backup -n aura-system
This will create a new job that will download the backup in the mentioned blob and restore it to MongoDB.
Currently, Redis context database is used; therefore, it is also needed to restore Redis database to save the context information:
-
Take the backup from the aura-backups/redis blob and put it in aura-backups/redis/restore
-
Run the command below:
kubectl create job --from=cronjob/redis-restore restore-redis-backup -n aura-system