Categories:
General guidelines for building an Aura Bot dialog
Orderly steps for building a dialog over Aura Bot in a common scenario
Create the dialog’s file
- The dialog is a
.tsfile that must be placed within thesrc/folder of its library.- Have you already created the library? Then, go ahead.
- If not, go to Build a new library section and create it.
- Developers must create one
.tsfile for each dialog of the use case. - All dialogs must include these two mandatory components:
| Parameter | Type | Comments |
|---|---|---|
| id | string | Dialog’s identifier |
| configuration | configuration | Global and specific dialog’s configuration is validated over aura-bot and passed to the dialog through the constructor, when instantiated. |
- The maximum size for an activity response may not exceed the maximum limit established by the Direct Line (MS) protocol under any circumstances. In case this happens, the answer is ignored and a generic text is returned to the user explaining that there are too many results.
📌 Best practices
- When generating a new dialog, a general recommendation for developers is to copy another working dialog and use it as a template.
- If the dialog’s code is too long or complex, it can be split into several files, in order to increase readability.
- It is also a good practice to create utility files with code shared between dialogs in the same library.
The following sections include certain features that are useful for the generation of a dialog within Aura’s framework.
Management of dialogs are waterfall dialogs
The interaction with the user can be based on a single stage back-and-forth dialog (this is, the user asks Aura and Aura provides the appropriate answer back to the user) or, on the contrary, a multiple stage dialog. Currently, although the dialog is based on a single stage, all dialogs are built as waterfall dialogs.
For this purpose, you should use the Microsoft tool botbuilder-dialogs package, that contains functions to assist with the formatting of a message activity containing a list of choices.
- Within its specific library, the dialog must implement the Microsoft Bot Framework 4
ComponentDialogclass. Libraries have to import the dependency on “botbuilder-dialogs: “~4.13.3`. To avoid conflict in the versions of this library, aura-bot specifies the concrete version.
/**
 * Aura Bot dialog implementation for any class.
 */
export default class NameClassAuraBotDialog extends ComponentDialog {
    ...
}
- As shown in the code below, the constructor must support the configuration, which includes both global and local variables (always validated variables) that the dialog can use.
Additionally, the constructor can include
auraDataAccessoras a second parameter. See details in Data saving in the same conversation.
    public static id: string = 'name-class-dialog';
    private configuration: Configuration;

    constructor(configuration: Configuration) {
        super(NameClassAuraBotDialog.id);
        this.configuration = configuration;
        // ID of child dialog that should be started anytime component is started.
        super.initialDialogId = NameClassAuraBotDialog.id;
        // Define the conversation flow using a waterfall model.
        super.addDialog(new WaterfallDialog(NameClassAuraBotDialog.id, [
            this.method1.bind(this),
            this.method2.bind(this)
            // ...
            this.methodN.bind(this)
        ]));
       }
- If the dialog requires the use of prompts, please read Prompts treatment section for its declaration within the dialog file.
Retrieving data from clients
If the dialog’s conversational flow requires to fetch user’s data, the dialog code must include the specific instructions to call an API (Kernel API or external API). Therefore, at library’s level, it is required to import the client of the corresponding API. In case of Kernel APIs, please read the section Create or update an API client.
Basic utilities for building a dialog
The current section extracts specific procedures based on Microsoft Bot Framework 4 functionalities that are of particular importance for the generation of a dialog within aura-bot.
Localized text
const correlator = ContextUtils.getCorrelator(stepContext.context);
const auraUser: AuraUserBaseModel<any> = ContextUtils.getAuraUser(stepContext.context);
const text = this.localizer.getText('common:common.greetings.main', auraUser, correlator)
Code for localizing this id:
common:common.greetings.main
Dialogs can include a localizer as an attribute that points to the single instance of the class that was initialized during aura-bot start-up.
this.localizer = LocaleManager.instance;
Alternatively, you can use the getLiteral method from @telefonica/aura-bot-utilities/lib/aura-bot-library-util library without having to obtain user or correlator as follows:
const text = getLiteral(context)('common:common.greetings.main')
Send a simple text
The example below shows how to send a simple localized text.
await stepContext.context.sendActivity(text);
return await stepContext.endDialog();
ℹ️ In BotBuilder v4, nothing is sent (text cannot be sent) in the endDialog, only that the current dialog is finished and the result of the dialog’s finalization.
Complex messages
There is big flexibility composing user’s messages. They can be built with MessageFactory using the Bot Framework, built by your own, combined, etc.
In this section, certain flags are included that can help the channel understand the conversation flow.
InputHint
InputHint allows building messages in different modes, indicating to the destination channel when it is waiting for new messages or not.
For more information, read InputHints enum Microsoft documentation.
AcceptingInput: bot is passively ready for input, but it is not waiting a response from the user. (Example: last message in the dialog)ExpectingInput: bot is waiting a response from the user. (Example: when a prompt is sent)IgnoringInput: bot is not ready to receive input. (Example: when several messages are sent together excepting the last one)
Add inputHint in the activity when it is necessary to change the default behavior:
messageOneOfFour.inputHint = InputHints.IgnoringInput
Be careful with the default value given in the activities, as it is not always the desired behavior.
When constructing a complex message to the user in which, for example, partial activities are joined with attachment cards for finally sending a prompt or some parts are built with Factory and others are not, it is necessary to make sure that the final message contains the desired InputHint. In this example, the result prompt has an invalid InputHint:
// Example with INVALID InputHint:
// the message variable will have acceptingInput as default.
const message: Partial<Activity> = MessageFactory.text('My text');
const cardActions: CardAction[] = options.map(q => ({
	type: ActionTypes.ImBack,
    value: q,
    title: q
}));
// the attachment variable will have acceptingInput as default
const attachment: Partial<Activity> = MessageFactory.attachment(
   CardFactory.heroCard(null, null, cardActions)
);
const promptOptions: PromptOptions = {
 	prompt: { ...message, ...attachment },
	choices: ChoiceFactory.toChoices(cardActions)
};
// Prompt will have acceptingInput. IT IS NOT VALID!
The example with a valid InputHint is shown below:
// Example with valid InputHint:
const message: Partial<Activity> = MessageFactory.text('My text');
message.inputHint = InputHints.ExpectingInput;
const cardActions: CardAction[] = options.map(q => ({
	type: ActionTypes.ImBack,
    value: q,
    title: q
}));
const attachment: Partial<Activity> = MessageFactory.attachment(
   CardFactory.heroCard(null, null, cardActions)
);
attachment.inputHint = InputHints.ExpectingInput;
const promptOptions: PromptOptions = {
 	prompt: { ...message, ...attachment },
	choices: ChoiceFactory.toChoices(cardActions)
};
// The prompt will have expectingInput as expected in a Prompt
HasMoreMessages flag
There is another legacy flag in channelData: hasMoreMessages (created in Aura) that indicates whether aura-bot will send more messages to the channel.
Currently, all channels should use batch-outgoing-message-middleware which stacks all the messages related to an incoming activity together with the Suggestions and automatically sets hasMoreMessages field to proper value (only when messages are processed in batch mode.
Note that even though the hasMoreMessages flag is sent in some cases (if in batch mode and channel is configured to do so), it is preferable to use the standard message property inputHint, that is always available and will be maintained in the future.
It is the recommended way to configure channels and aura-bot, so messages are properly marked up both with hasMoreMessages and the proper Microsoft Bot Framework field, inputHint.
Prompts treatment
ℹ️ Before facing this section, see how the special prompts recognition works in the prompt-check-recognizer-middleware.
The following list of prompt recognizers are available in Aura:
- Attachment prompt: it asks for one or more attachments, such as a document or image.
- Choice prompt: it asks for a choice among a set of options.
- Date-time prompt: it asks for a date-time.
- Number prompt: it asks for a number.
- Text prompt: it asks for a general text input.
- Custom prompt: prompt that can be personalized with different options.
Break prompt and NLP Recognition
When a dialog returns a prompt and thus is waiting for an action, then the user can choose one of the prompt answers or can decide to carry out another option.
In this second case, the prompt must be broken (if conditions are fulfilled) and the aura-bot main-dialog redirects to the new dialog.
By default, prompts have NLP recognition. When the user interacts with the prompt, the prompt-recognizer is executed and tries to recognize the user’s intention. But, also by default, if the None intent is recognized, it will not break the prompt.
To make the process of prompt breaking flexible, Aura provides a default behavior and offers flags that allow the default behavior to be changed. These flags should be added during the instantiation of the prompt:
disableRecognition: enabling this flag, NLP recognition is disabled, preventing to break the prompt. (It only affects to prompts without choices). Use: prompts without choices.enableNone: enabling this flag, if NLP recognizer has recognized theNoneintent, this intent is allowed to break the prompt (by default,Noneintent can never break a prompt). Use: all types of prompts with NLP recognition.useValueAsCommand: using this flag, the prompt choices are interpreted as text commands, and, when properly configured, the conversation flow is redirected to the intent defined by the command. Use: only with choice prompts.
These flags should be added in the validations attribute inside promptOptions.
For example, if a prompt wants to disable NLP recognition, it should be marked as follows:
const promptOptions: PromptOptions = {
	prompt: description,
	validations: { disableRecognition: true }
};
return await stepContext.prompt('ID_PROMPT', promptOptions);
Disable ordinals and numbers recognition in prompt choices
To avoid the recognition of ordinals and numbers in prompts, two steps should be followed:
- First, add the proper flags in
promptOptions:const promptOptions: PromptOptions = { ... validations: { findChoicesOptions: { recognizeNumbers: false, recognizeOrdinals: false } } }; - After that, a new validation method should be added to the prompt:
getRetriesValidatorAndOverwriteRecognizerResult
const connectPrompt = new ChoicePrompt('promptName', PromptUtils.getRetriesValidatorAndOverwriteRecognizerResult(0));
Retries handling in prompt choices
This section includes the procedure for managing prompt attempts. In the botbuilder-js code, the function continueDialog must include the following code in the Prompt class:
const recognized: PromptRecognizerResult<T> = await this.onRecognize(dc.context, state.state, state.options);
// Validate the return value
let isValid = false;
if (this.validator) {
    if (state.state['attemptCount'] === undefined) {
        state.state['attemptCount'] = 0;
    }
    isValid = await this.validator({
        context: dc.context,
        recognized: recognized,
        state: state.state,
        options: state.options,
        attemptCount: ++state.state['attemptCount']
    });
} else if (recognized.succeeded) {
    isValid = true;
}

// Return recognized value or re-prompt
if (isValid) {
    return await dc.endDialog(recognized.value);
} else {
    if (!dc.context.responded) {
        await this.onPrompt(dc.context, state.state, state.options, true);
    }

    return Dialog.EndOfTurn;
}
By default, the result of the internal recognition made by the prompt is the one that triggers the retry or the return of the result. In other words, if the recognition result fails, the prompt is shown N times.
To control the number of retries, it is required a validator function that allows to manage the attemptCount counter. For this purpose, aura-bot-common library provides a validator function: getRetriesValidator, to control the number of retries. For its use, it is necessary to send this function as a second parameters in the prompt:
// Create a prompt without retries:
const myPrompt = new ChoicePrompt(ID_PROMPT,PromptUtils.getRetriesValidator(0));
Note that this validation function (that the dialog developer can build on his own), gives total flexibility to modify parameters each time the user responds.
Choice prompts
The prompt type “choice” asks the user to choose from a list of options. In this situation, the prompt-recognizer tries to recognize the choice selected with the options provided. If there is no match, it executes the NLP recognition.
The process for executing a choice prompt is detailed below:
- Declare the name of prompts to be used within the current dialog.
private promptsNames = { ACCESS_PERMISSION: 'access-permission', TERMS_AND_CONDITIONS: 'terms-and-conditions' }; - Notify the parent dialog that a prompt (with a declared id) is to be used and set its style.
const connectPrompt = new ChoicePrompt(this.promptsNames.ACCESS_PERMISSION); connectPrompt.style = ListStyle.heroCard; super.addDialog(connectPrompt); - In a step of the waterfall dialog, define the prompt.
- Create Choices:
// Choice options. const choicesText: Choice[] = [ {value: text1}, {value: text2} ]; // Prompt with text. const message: Partial<Activity> = MessageFactory.text('message'); const promptOptions: PromptOptions = { prompt: message, choices: ChoiceFactory.toChoices(choicesText) }; - Execute the prompt:
return await stepContext.prompt(this.promptsNames.ACCESS_PERMISSION, promptOptions);
- Create Choices:
An example to handle the result of the user’s action is shown below:
if (stepContext.result && stepContext.result.index === 0 ) {
 	// Save data
 	return await stepContext.next();
 } else {
 	// Cancel option
 	return await stepContext.endDialog();
 }
Use prompt values as commands
If the target is to provide as prompt options a series of commands to redirect to other dialogs, we can use the useValueAsCommand flag.
// create a list of intent commands to be used with the prompt
const actions = [
// REMARK: In this case, the trigger condition points to the same dialog, but it could point to ANY INTENT known to the bot,
// making it a versatile feature.
{ intent: 'intent.fake.something', entities: [{ entity: CommandChoices.FIRST_OPT, type: 'suggestion' }] },
{ intent: 'intent.fake.something2', entities: [{ entity: CommandChoices.SECOND_OPT, type: 'suggestion' }] }
];
const cardActions = CardFactory.actions(actions.map(a => {
    return {
      type: ActionTypes.ImBack,
      title: a.entities[0].entity,
      value: JSON.stringify(a)
     };
}));
const promptOptions: PromptOptions = {
	choices: ChoiceFactory.toChoices(cardActions),
        prompt: 'This is an example of Choice prompt with command values',
	validations: { useValueAsCommand: true }
};
return await stepContext.prompt('ID_PROMPT', promptOptions);
Creating the prompt in this way, when the user selects one of the options, it automatically redirects to a new intent in the process of recognizing the user’s action, forcing the prompt dialog to be cleared when there is a match.
⚠️ If the option chosen is the None intent, the stack cleaning behavior remains the same as always with the non-default cases to break the prompt (See section Break prompt and NLP recognition) such as the flag of enableNone etc.
Use of prompts in bypass mode
In a dialog working in bypass mode, you can use prompts that can be created as usual in the dialog:
    public DEFAULT_RETRIES: number = 2;
    public promptsNames = {
        COMMAND_CHOICE_PROMPT: 'command-choice-prompt'
    };

    constructor(configuration: Configuration) {
        ....
        // adds the prompt dialog to the Dialogs Set
        this.customPrompt = new ChoicePrompt(this.promptsNames.COMMAND_CHOICE_PROMPT,
            PromptUtils.getRetriesValidator(this.DEFAULT_RETRIES));
        ...
    }
The prompt will be instantiated, when the bypass mode initializes.
    this.customPrompt = new ChoicePrompt(this.promptsNames.COMMAND_CHOICE_PROMPT, PromptUtils.getRetriesValidator(retries));
    // To change retries we need replace original dialog for prompt
    (this.dialogs as any).dialogs['command-choice-prompt'] = this.customPrompt;
    return await Bypass.initialize(
        context,
        parseFloat(timeoutMin),
        { value: '' },
        'test',
        BypassState.Bypass,
        closeWords
    );
The prompt can be sent to the user and its value retrieved in the dialog.
private async sendPrompt(stepContext: WaterfallStepContext): Promise<DialogTurnResult> {
        const choicesText: Choice[] = [
            { value: 'id-0001', action: { title: 'Option 1 (id-0001)', type: '', value: '' }, synonyms: [] },
            { value: 'id-0002', action: { title: 'Option 2 (id-0002)', type: '', value: '' }, synonyms: [] },
            { value: 'id-0003', action: { title: 'Option 3 (id-0003)', type: '', value: '' }, synonyms: [] },
            { value: 'id-0004', action: { title: 'Option 4 (id-0004)', type: '', value: '' }, synonyms: [] },
            { value: 'id-0005', action: { title: 'Option 5 (id-0005)', type: '', value: '' }, synonyms: [] }
        ];

        const promptOptions: PromptOptions = {
            prompt: 'Hello, select one option: write the number, cardinal, ordinal or text',
            choices: ChoiceFactory.toChoices(choicesText)
        };
        return await stepContext.prompt(this.promptsNames.COMMAND_CHOICE_PROMPT, promptOptions);
    }

    private async fallbackStep(stepContext: WaterfallStepContext): Promise<DialogTurnResult> {
        await stepContext.context.sendActivity(`Option selected: ${stepContext.result.value}`);
        return await stepContext.endDialog();
    }
Data saving between Waterfall steps
getDataActiveDialog and setDataActiveDialog from DialogUtil in the aura-bot-common library are used to keep data between steps of a waterfall.
⚠️ If it is required to send data to another dialog, this method cannot be used.
The following example saves data in DATA_KEY as key:
DialogUtils.setDataActiveDialog(stepContext, 'DATA_KEY', data);
In the dialog code, it should use the DialogUtils utility to recover those parameters with the key DATA_KEY:
const data: any = DialogUtils.getDataActiveDialog(stepContext, 'DATA_KEY');
(context.activeDialog.state[keyData] can be used as well directly.)
Read dialog settings
When in aura-bot flow the main-dialog has routed a dialog to be started, it is launched with dialogSetting parameters:
return await stepContext.beginDialog(idDialog, dialogSetting);
To receive configuration parameters when a dialog is started, the DialogUtils utility should be used to recover those parameters with the key options:
dialogSetting = DialogUtils.getDataActiveDialog(stepContext, 'options');
In the following example, the channel data is being routed:
{
   "name":"issues",
   "dialogs":[
      {
         "id":"issue-create",
         "suggestions":true,
         "triggerConditions":[
            {
               "intent":"intent.issue.repair",
               "contextFilters":[
                  {
                     "name":"Example redirect to greetings from issues",
                     "type":"type",
                     "conditions":"'1' eq '1'",
                     "true":{
                        "name":"Test",
                        "breakDialogExecution":true,
                        "breakFilterEval":true,
                        "redirectToIntent":"intent.common.greetings",
                        "suggestions":true
                     }
                  }
               ]
            }
         ]
      }
   ]
}
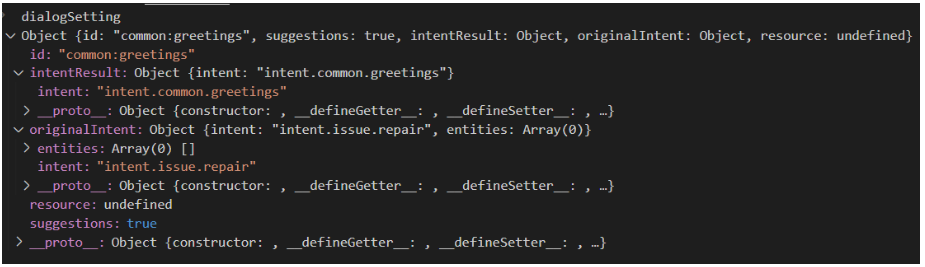
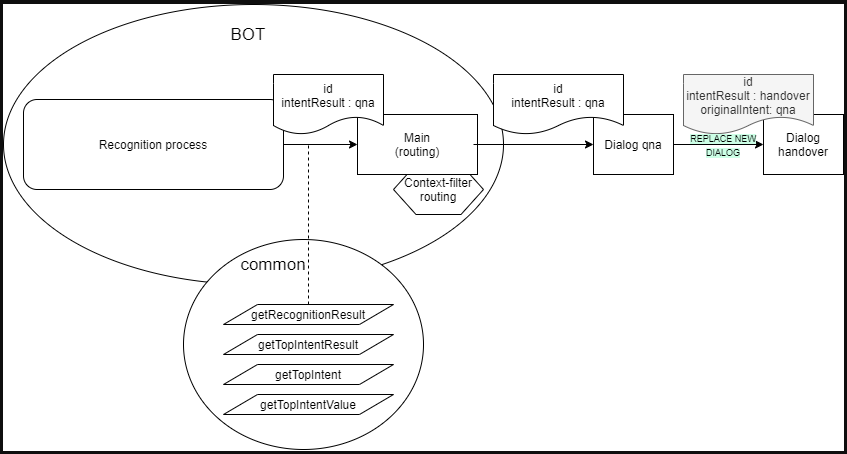
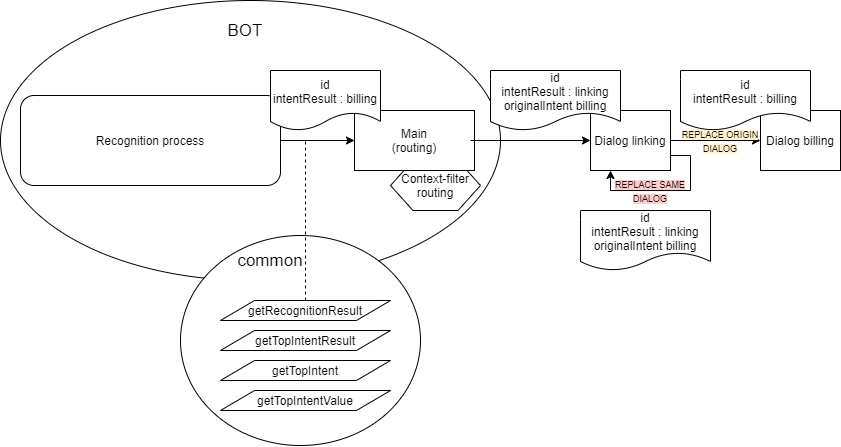
Conditions of contextFilter are always be fulfilled so intentResult will be “greetings” while originalIntent will be “issue” (if there is no contextFilter, intentResult would be “issue”). Therefore, this is the structure of dialogSetting:
Replacing a dialog
A dialog can replace another dialog by breaking its current flow. For this purpose, the command replaceDialog is used and it is necessary to know the identifier of the library and the dialog destination.
A basic example is shown below:
return await stepContext.replaceDialog(`${ID_LIBRARY}:${ID_DIALOG_DESTINATION}`);
If the destination dialog does not expect any dialogSettings, the above example would be valid.
If it is necessary for the destination dialog to receive data from the original dialog, the developer must include the appropriate instructions for sending and receiving the required parameters. However, in order to maintain consistency with the established protocol for sending dialogSettings from the main dialog, it is recommended to maintain id, originalIntent and intentResult structure.
Two case examples are shown below:
- Case A: Simple dialog replacement:
In this example,
const currentDialogSettigns = DialogUtils.getDataActiveDialog(stepContext, 'options'); const destinationDialogSettings = { id: ID_DIALOG_DESTINATION, originalIntent: currentDialogSettings.intentResult, intentResult: {intent: INTENT_DESTINATION}, ... others :? ... } return await stepContext.replaceDialog(`${ID_LIBRARY}:${ID_DIALOG_DESTINATION}`,destinationDialogSettigns );destinationDialogSettingscan be optional and is not sent to Handover (in fact, real Handover dialog is not using these settings).
- Case B: Replace a dialog where there is a
contextFilterIn this case, if the dialog needs to replace itself, it is necessary to send the samedialogSettingsthat was sent by the main dialog:const currentDialogSettings = DialogUtils.getDataActiveDialog(stepContext, 'options'); return await stepContext.replaceDialog(`${ID_LIBRARY}:${ID_DIALOG_DESTINATION}`,currentDialogSettings );
Data saving in the same conversation
auraDataAccessor can be the second parameter of the constructor. The command auraDataAccessor?: auraDataAccessor allows accessing to the conversation data, certain user data, etc.
auraDataAccessor has the following schema:
export interface AuraDataAccessor {
    conversationDataAccessor: StatePropertyAccessor;
    dialogStateAccessor: StatePropertyAccessor<DialogState>;
    userAuthDataAccessor: StatePropertyAccessor;
    userDataDataAccessor: StatePropertyAccessor;
Logs management
For a proper analysis of the code, it is very important to use logs correctly.
The field corr refers to the correlator, which has to be set in all cases in order to follow up the requests.
The correlator can be retrieved through a functionality of the commons library: ContextUtils.getCorrelator(context). It is necessary to send the current context (in a Waterfall step, it should be stepContext.context).
this.logger.info({
     msg: 'Message',
     corr: ContextUtils.getCorrelator(context)
});
There are cases in which the correlator does not exist because aura-bot is in start process, configuration, make-up, etc. In these cases, the assigned field is no-correlator. In debug and info mode, it can include new fields in order to organize and improve the data.
An example is shown below:
this.logger.debug({
     msg: 'Cognitive Services API response',
     corr: ContextUtils.getCorrelator(context),
     NEW_FIELD: value
});
The following example is useful to write error logs:
logger.error({
      corr: ContextUtils.getCorrelator(context),
      error: error.message,
      msg: 'Server cannot be closed',
      stck: error
});