Aura QA Tool execution guide
Guidelines for the configuration and execution of the QA global test set (QA Tool)
Configure the QA Tool
Four main steps are required for the QA Tool configuration, which are described in the following sections.
Test properties file encryption
Configuration of environment credentials
-
For the configuration of the QA Tool, certain credentials are required, which are included in a JSON file. Ask for this file to the team that carries out the deployment: Global Deployment Team or OB’s Local Deployment Team.
⚠️ The credentials file is confidential. If the Local QA Team needs to share it through GitHub, they can use git-crypt for file encryption, as a suggestion.
-
Unencrypt the credentials file, whose name is:
[country_code]-[env]_info.json
Otherwise, an error message will appear: “No JSON object could be decoded”. -
Place the file in the following folder:
~/[project_folder]/aura-tests/acceptance/settings/[country_code]/
Where:[country_code]: code of the corresponding countrybr,de,es,uk
Configuration of Kubernetes
-
Ask the corresponding Deployment Team for the kubernetes config file:
[env].yml -
Unencrypt the file. Otherwise, an error message will be shown:
“‘utf8’ codec can’t decode byte #xee: invalid continuation byte” -
Place the unencrypted file in the following path:
~/[project_folder]/aura-tests/acceptance/settings/[country_code]/[env].yml
ℹ️ After installing an Aura platform release, you will find these two files needed for running the QATool in the output_install folder:
- Once infrastructure is created, the kubeconfig file is generated.
- Once the full installation is finished, a
[country_code]-[environment]_info.jsonfile is found.
Please, check the Aura Deployment documentation for further details:
Users’ configuration
For the configuration of users, create a new file in the following path: ~/[project_folder]/aura-tests/acceptance/settings/[country_code]/[country_code]-[environment]-users.json
It is important to follow the above mentioned syntax: [country_code]-[environment], where:
[country_code]: code of the corresponding country:br,de,es,uk[environment]: environment name located in thepropertiesfile.
For example, for UK: (uk-dev-local-properties.json):
"environment": {
  "name": "uk-dev-local"
}
For the previous example, the path and file should be:
~/[project_folder]/aura-tests/acceptance/settings/uk/uk-dev-local-users.json
Afterwards, the file must be filled in with the different users’ configuration.
The detailed procedure is included in the document Configuration of users’ data.
This JSON file must include two differentiated sections:
users_definition: definition of the different type of users and their associated parameters:type,msisdn,userid,subscription, etc.user: different use cases attached to the users defined in the previous section.
An extract of this file for UK is shown below: uk-pre-users.json
Extract of `uk-pre-users.json` file
"users_definition": {
    "user1": {
       "subscription_type": "prepaid",
       "user_type": "monomsisdn",
       "msisdn": "+44xxxxxxxx",
       "userid": "42058633",
       "uid": "325851",
       "email": user1@GMAIL.COM,
       “password”: “****”
    },
    "user2": {
       "subscription_type": "postpaid",
        "user_type": "monomsisdn",
       "msisdn": "+ +44xxxxxxxx ",
        "userid": "126529396",
        "uid": "509652361",
       "email": user2@GMAIL.COM
       “password”: “****
    },
"users": {
"default": "user1",
"common":{
     "prepaid":"user1",
     "postpaid":"user2"
       },
       "data_usage":{
            "prepaid_monomsisdn_single":"user1",
            "prepaid_monomsisdn_multiple":"",
            "postpaid_monomsisdn_single":"user2",
            "prepaid_monomsisdn_multiple":"",
            "prepaid_multimsisdn_single":"",
            "postpaid_ multimsisdn _multiple":"",
            ….
       },
"billing":{
            "prepaid_one_bill":"user1",
            "postpaid_no_bills":"user2",
            ….
       },
"bundle":{
...
}
Moreover, some examples are included in the Github repository for the Local QA Teams that can be checked:
~/[project_folder]/aura-tests/acceptance/settings/[country_code]/[country_code]-[environment]-users.json
The mandatory authorization_id is supported by the QA Tool. This parameter is included in the properties file and can have the values optional or mandatory. The default value for authorization_id is optional.
"4p": {
  "authorization_id": "mandatory"
}
There are three different ways through which the user can authenticate:
- MSISDN
- Uid + password
- Email + password
Detailed information can be found in Configuration of users’ data.
Input yaml resources and translation of input sentences for each use case
The ~/[project_folder]/aura-tests/acceptance/resources/language/ path, contains yaml files with the texts of the resources used in the tests, depending on the configured language.
Each yaml file will contain a different section for each [language_code]: es-es, en-gb, pt-bror de-de. See the example below.
At this stage, it is required to check these resources (statements) and update them in case it is necessary.
As an example, for the data_usage resource, the file questions_novum.yaml placed in the above mentioned path contains the label for the country and the texts for each language:
data_usage:
  question:
    en-gb: why do i experience slower speed when i browse?
    pt-br: Quantos dados celulares tenho disponíveis?
    de-de: Zeig mir meinen Verbrauch vom Datenvolumen
    es-es: Consumo de datos actual
Find below two examples where this file should be updated:
- Test failure with result: “I can’t understand” or similar.
Check the text inside the
yamlfile and update it if it is not appropriate for the specific use case. - Test failure with result: “es-es do not exist”.
This means that the label for the country does not exist in the
yamlfile. Add the label and text for that resource.
Generate and export POEditor resources
The expected answers for a specific use case provided by aura-bot are generated in POEditor (both aura-bot resources and its associated texts).
At this stage, you should follow these steps:
-
Export from POEditor the JSON file containing resources and texts.
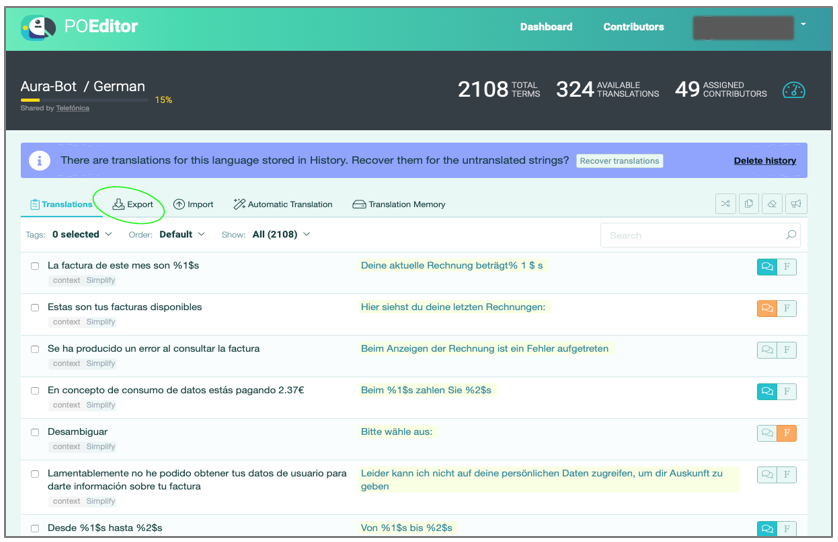
- Ask the Aura Platform Team or Delivery Team for the file exported from POEditor containing the above-mentioned resources and texts. However, if the OB has admin credentials, the file can be directly downloaded from POEditor.
- Select the “Export” option in the POEditor project.
-
Select the JSON icon and press “Export”.
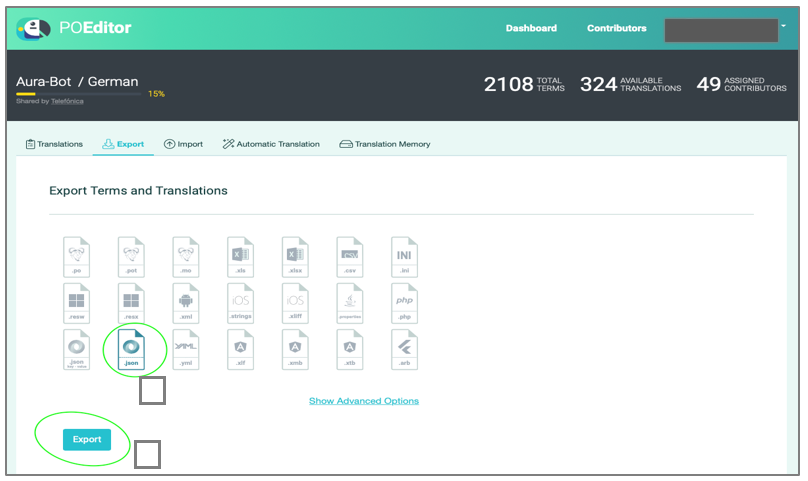
- Rename this file as
poeditor_terms.jsonand put it in the following path: ~/[project_folder]/aura-tests/acceptance/resources/poeditor/poeditor_terms[language_code].json_
Where[language_code]can be:es-es,en-gb,pt-br,de-de.
If you need to modify these resources or create new ones, do it directly in the JSON file.
An example of POEditor resource in poeditor_terms.json file is shown below:
   {
        ...
    },
    {
       "term": "Currently you do not have data services",
       "definition": "Currently you do not have data services",
       "context": "data_usage",
       "term_plural": "",
       "reference": "services:services.usage.noData",
       "comment": ""
    },
    {
        ...
    }
Execute the QA Tool
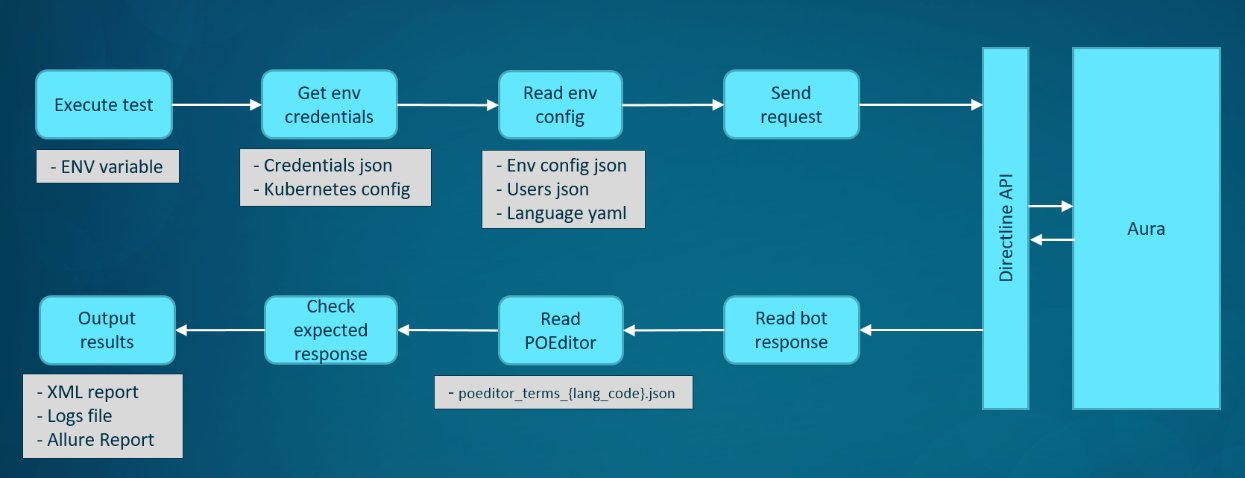
The current section includes the stages for the execution of the QA Tool from DEV-LOCAL, PRE and PRO environments.
⚠️ For the execution of tests, it is required to activate VPN full.
The following figure schematically shows this process for the execution of the QA test set:
Set and check global variables
Environment variables
Firstly, it is required to set ENV as global variable. The format depends on the specific environment:
- For
DEV-LOCALenvironments:[country_code]-dev-local-[channel] - For
PREenvironments:[country_code]-pre-[channel] - For
PROenvironments:[country_code]-pro
Where:
[country_code]: code of the corresponding country:br,de,es,uk.
For setting the ENV variable within the activated virtualenv, execute the following command:
$ export ENV=<country_code>-<environment>
For example, for Brazil and del DEV-LOCAL environment:
$ export ENV=br-dev-local
Properties file
The properties.json file is located in the following paths, depending on the environment.
- DEV-LOCAL environments:
~/[project_folder]/aura-tests/acceptance/settings/[country_code]/[country_code]-dev-local-[channel]-properties.json - PRE environments: ~/[project_folder]/aura-tests/acceptance/settings/[country_code]/[country_code]-pre-[channel]-properties.json
- PRO environments:
~/[project_folder]/aura-tests/acceptance/settings/[country_code]/[country_code]-pro-[channel]-properties.json
⚠️ Local QA Teams should not modify this file.
Execute QA Tool smoke tests
| Remember that smoke tests are a sub-set of tests from the QA Tool that can be executed in PRE / PRO environments |
|---|
Follow the instructions below for launching specific smoke tests.
$ cd <project_folder>/aura-tests
$ ./acceptance/scripts/run_tests_ob.sh -f <features> -t <feature_tag> -e ‘-D behave_additional_tags=@smoke’
Where:
-
-f [features]: parameter for the execution of an individual or a specific set of features. This set can be specified using the relative path to the folder that contains the desired feature files.
For example:-f features/end_to_end/novum/general
The features are allocated in this folder:
~/[project_folder]/aura-tests/acceptance/features/ -
-t [feature_tag]: optional parameter that can have different values for several subsets of tests. The list of current allowed values is:-t bugs: to execute the tests about bugs.
Some examples are shown below:
- Execution of smoke test cases for
data_usagefeature:./acceptance/scripts/run_tests_ob.sh -f features/end_to_end/novum/simplify/data_usage.feature -e ‘-D behave_additional_tags=@smoke’
⚠️ Check if the _output folder is not previously created. In the opposite case, it is necessary to ensure that this folder has the correct permissions:
$ ls -lrth <project_folder>/aura-tests/acceptance | grep _output
drwxr-xr-x  25 my_user  staff   800B 30 ene 13:30 _output
If the folder is returned in the previous command, set the correct permissions:
$ chmod –R 755 <project_folder>/aura-tests/acceptance/_output
Execute QA Tool end-to-end tests
Remember that E2E tests include a complete QA Tool test set and are executed in DEV-LOCAL environment. |
|---|
For the end-to-end test execution, launch the following commands:
$ cd <project_folder>/aura-tests
$ ./acceptance/scripts/run_tests_ob.sh -f [path to feature folder or file]
Where:
-f [features]: parameter for the execution of an individual or a specific set of features. This set can be specified using the relative path to the folder that contains the desired feature files.
For example:-f features/end_to_end/novum/general
The features are allocated in this folder:
~/[project_folder]/aura-tests/acceptance/features/
Each feature file can be launched alone using the its relative path. For example:
-f features/end_to_end/novum/general/alfred.feature
Different examples are shown below:
- Execution of end-to-end tests for Novum channel:
~/[project_folder]/aura-tests/acceptance/scripts/run_tests_ob.sh -f features/end_to_end/novum - Execution of data_usage feature:
~/[project_folder]/aura-tests/acceptance/scripts/run_tests_ob.sh -f features/end_to_end/novum/simplify/data_usage.feature