Learn how to build experiences in Aura Virtual Assistant and ATRIA
Scope: Practical guidelines for the development of experiences both in Aura Virtual Assistant and ATRIA.
Aura platforms offer a series of capabilities to create relevant experiences (use cases) of different types: AI-driven use cases, experiences based on FAQs or custom-made local use cases
From this point forward, mentions to Aura refers to both Aura Virtual Assistant and ATRIA
Navigate through the section
Types of Aura use cases
What is an Aura use case? Which are the different types of experiences that can be developed in Aura Virtual Assistant and ATRIA?
Learn what is a use case in Aura and which are the different types of experiences that can be developed
Introduction
Aura is offered as a platform to the business units to integrate it into their customer relationship channels and with a series of capabilities to create locally relevant experiences for the users. These experiences are called use cases.
A use case is a specific experience triggered by a direct request from the users that provides them with the most appropriate response to their requests due to Aura’s capability of understanding natural language, processing it and building personalized responses in real time.
Types of use cases in Aura
Use cases in Aura are divided into two main groups:
Generic questions use cases
Experiences based on frequently asked questions (FAQs), that is, the most common questions that customers can ask Aura in their interactions and that are most likely to remain constant over time. A great percentage of interactions with Aura is based on these questions.
✅ Examples of generic question use cases:
How can I get my IMEI number?
Use data abroad
Activate O2 wifi
Global use cases
Global use cases are already designed and developed by Aura Platform Team. You cannot modify their logic but use them as they are or get inspired for deploying your own experiences:
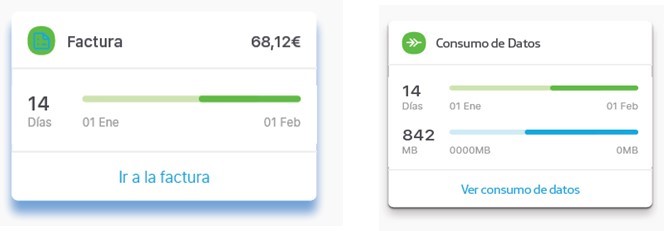
Custom-made experiences that provide specific answers to each customer based on her data and context.
✅ Examples of personalized use cases:
Show me my last bill
Check my data consumption
Status of my complaint A-330
Check my balance
Which devices are connected to my wifi?
They are classified into two categories:
Use cases managed by the generic-dialog
The generic-dialog allows the creation of personalized experiences easily, only by means of a simple configuration, with no code development. It is available for use cases in TV channels that imply direct actions (Switch off the TV; rewind the movie 10 seconds; etc.)
Interested in these use cases?
📃 Understand what is the generic-dialog and the conditions for its use here.
📃 Learn the detailed guidelines for the generation of a use case through the generic-dialoghere.
Local use cases
Custom-made experiences in Aura that can be built by constructors from scratch or inspired in a global use case.
Learn how to make the most of Aura global use cases, experiences already developed by Aura Platform Team at your disposal
Introduction
Aura global use cases are experiences already designed, developed and tested by the Aura Platform Team (i.e., check my bill; list my bundle; data allowance; etc.).
Take into account that global use cases cannot be modified by OBs, they must be used as they are. You only have to perform a mandatory task over them for the edition of texts to be included in the response to your users.
Optionally, you can install the use case in local environment to become aware of how it is designed and build as an inspiration source for the development of other local use cases.
Check the global use cases currently included in Aura Platform:
Experiences in video services related to play TV content, channels tuning, navigation and other use cases for TV-related channels.
Find the available experiences in Aura video use cases.
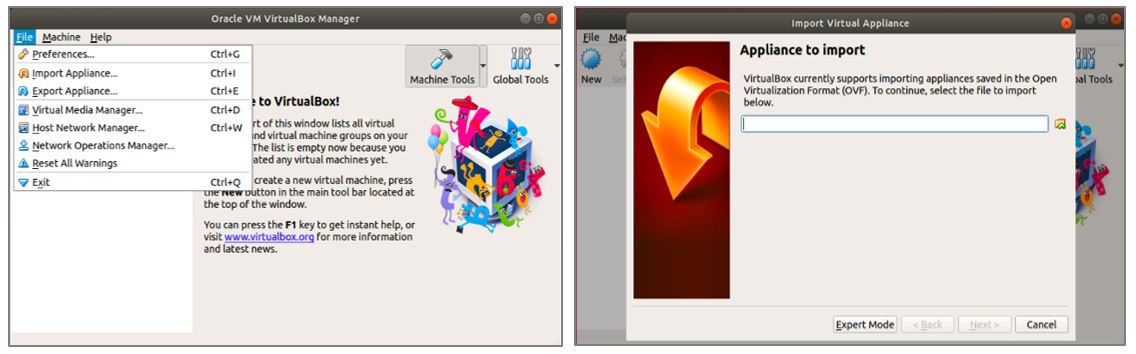
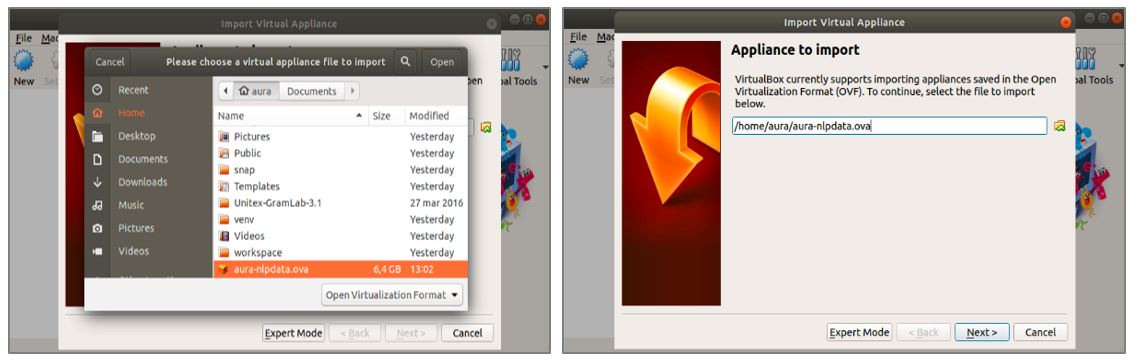
Interested in making a global use case available in your Aura system?
Once installed, if your goal is using the use case as is, you can personalize the texts that will be shown in the conversational flow with the user following the guidelines in Build Aura response: edit POEditor texts
Guidelines for the installation of Aura global use cases
Introduction
If you are interested in taking advantage of an Aura global use case, already developed by Aura Platform Team, follow these instructions for its installation.
Installation of global use cases
To install the global use cases, use the following command:
npm run local-dependencies:install
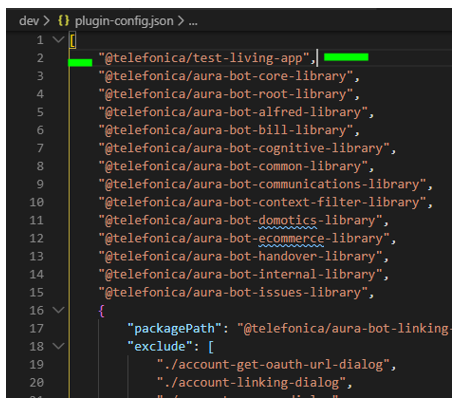
This command will add the dependencies of the global use case libraries in both the package.json and the plugin-config.json file and install them into the project.
In order to install the versions needed, please update the following file local-dependencies/libraries-list.json and set the corresponding versions of your libraries.
⚠️ Remember to add a new profile if checking a new version of the libraries. For instance:
To test aura-platform version killets:
[{"profile":"release/killers","description":"Use cases delivered in The Killets","disttags":["devkillers"],"libraries":[{"name":"@telefonica/aura-bot-alfred-library"},{"name":"@telefonica/aura-bot-bill-library"},{"name":"@telefonica/aura-bot-cognitive-library"},{"name":"@telefonica/aura-bot-common-library"},{"name":"@telefonica/aura-bot-disambiguation-library"},{"name":"@telefonica/aura-bot-generic-library"},{"name":"@telefonica/aura-bot-handover-library"},{"name":"@telefonica/aura-bot-issues-library"},{"name":"@telefonica/aura-bot-linking-library"},{"name":"@telefonica/aura-bot-miscellaneous-library"},{"name":"@telefonica/aura-bot-none-library"},{"name":"@telefonica/aura-bot-onboarding-library"},{"name":"@telefonica/aura-bot-recommender-library"},{"name":"@telefonica/aura-bot-services-library"},{"name":"@telefonica/aura-bot-tv-library"},{"name":"@telefonica/aura-bot-wakeup-library"},{"name":"@telefonica/aura-bot-wifi-library"}]}]
Uninstallation of global use cases
To uninstall the global use cases, use the following command:
npm run local-dependencies:uninstall
This command will uninstall all the dependencies of the global libraries you have previously installed, it will also clear the file package.json and plugin-config.json.
Learn how to make the most of Aura global use cases, experiences already developed by Aura Platform Team at your disposal
Introduction
In this section, two actions to be done over Aura global use cases are explained, both for the edition of texts in Aura response and for analyzing how the experience has been developed.
Build Aura response: edit POEditor texts
ℹ️ This section is intended for OBs’ content managers in charge of editing texts included in Aura response.
When a global use case is implemented, it is necessary to design Aura response for each step of the conversational flow. The different texts, in a specific language, shown to the user are designed through POEditor.
For global use cases, you should work over the POEditorAura-bot project, which is managed by the Aura Platform Team.
Resources are already created in aura-bot, so at this stage you only have to edit the copies (texts) of each resource.
Edit texts
In the POEditor global project, edit the texts (copies) of the existing resources associated with the use case under development or translate texts to one specific language.
Once imported, when a new version of the library is generated, they are automatically integrated during the make-up process.
Management of locales for intents canonical phrases
The management of canonical phrases for intents has been implemented in POEditor, as intents must have a canonical phrase to be able to disambiguate with them.
Moreover, OB product managers can be interested in analysing the global use cases in order to know how they are designed, their structure and files, associated dialog logic, etc. This can be an inspiration for building your own local experiences.
From the point of view of aura-bot, the OB should carry out the following tasks:
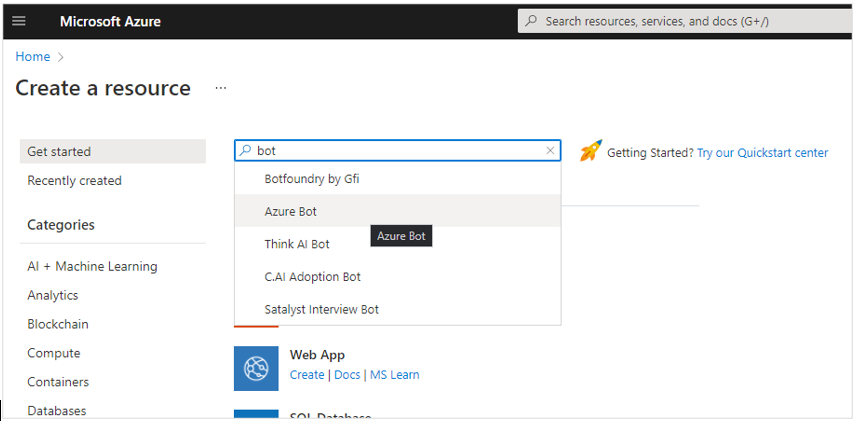
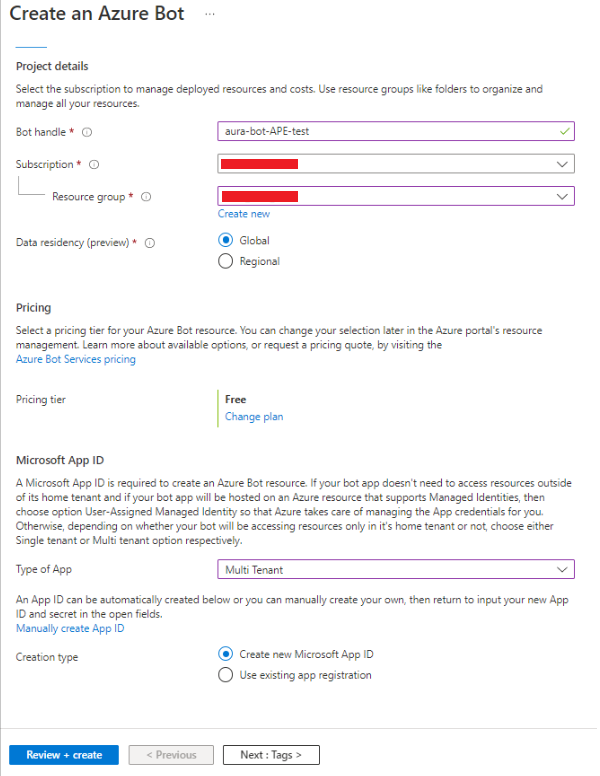
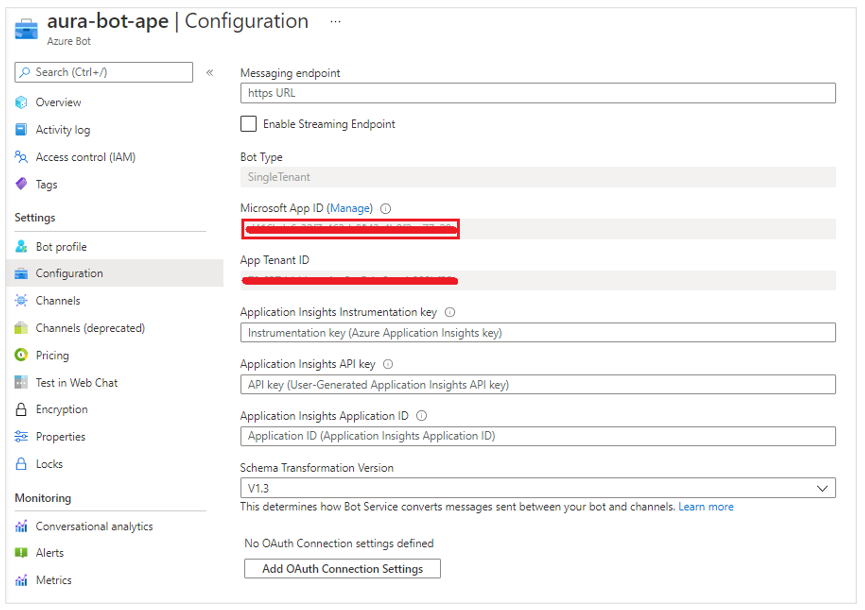
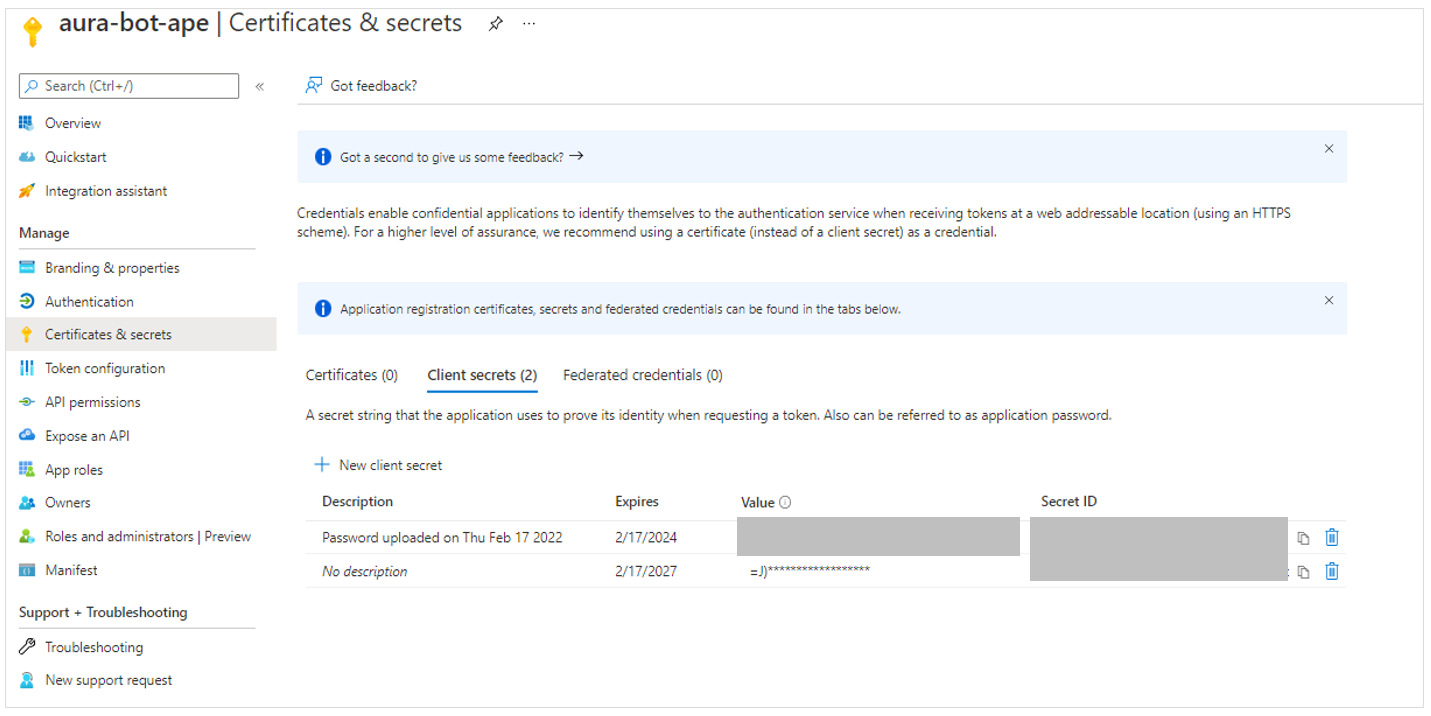
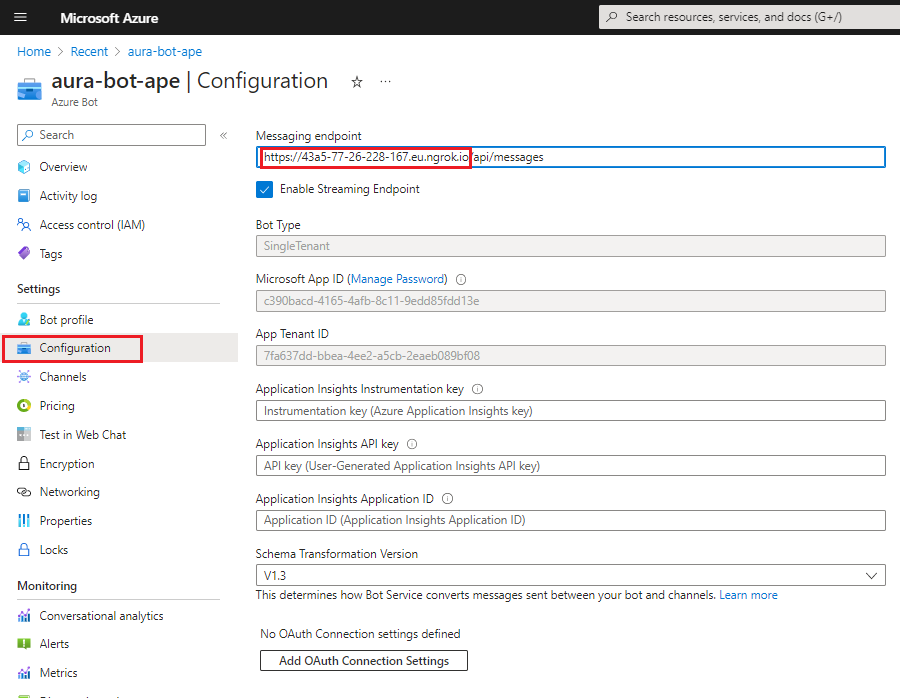
Get started and configure Aura Bot
This step is required only for developers that firstly face aura-bot and need the creation and configuration of a bot service in your local environment.
Install global use cases dependencies in local environment
In order to install the versions needed, update the file local-dependencies/libraries-list.json and set the corresponding versions of your libraries. Remember to add a new profile if checking a new version of the libraries.
The installation of the libraries must be carried out through the following command:
npm run local-dependencies:install
This command adds the dependencies of the global use case libraries both in package.json and plugin-config.json files and installs them into the project.
To uninstall libraries from global use cases, developers must use the following command:
npm run local-dependencies:uninstall
This command uninstalls all the dependencies of the global libraries previously installed, and also clears the file package.json and plugin-config.json.
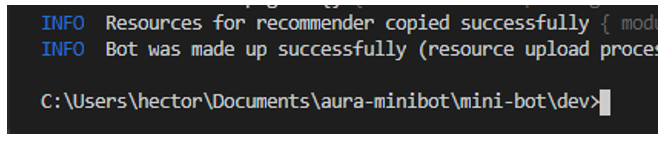
Bot running
Once the aura-bot instance is properly configured according to the guidelines established in the previous sections, the instance can be started using the following command for running the bot in local environment: npm start
The previous command can be enriched passing environment variables following the guidelines stated by the concrete operating system where the aura-bot instance is about to be started.
3 - Generic dialog
Develop experiences through the generic-dialog
Learn how to develop a use case through Aura bot generic-dialog, only by means of a simple configuration and with no code development.
The generic-dialog allows OBs to implement certain local use cases for Movistar Home, Movistar Plus and Set-top Box (STB) channels in an autonomous, agile and simple way with no code development, only by means of configuration.
First, we highly recommend you to read these documents:
Conditions for a use case in order to be built using the generic-dialog. Check these conditions here.
Use case development flowchart
The following flowchart schematically shows the process for the development of a local use case through the generic-dialog.
This process contains specific stages for the generic-dialog and other stages that are the same as for use cases developed with other uc-specific dialogs.
Guidelines for the development of a use case through the generic-dialog v3
1. Meet the generic library and dialog
The OB willing to develop a local use case managed by the generic-dialog will be provided with a Github repository: https://github.com/Telefonica/aura-bot-libraries-[OB]/tree/master/packages/generic-[OB]
You should copy the global generic-dialog structure: https://github.com/Telefonica/aura-bot-libraries/tree/master/packages/generic
When developing a local use case through the generic-dialog, OB developers may only modify the file dialog-config.json placed on the settings folder.
The library can contain specific files per language and OB: /generic-[OB]/settings/dialog-config.<AURA_DEFAULT_LOCALE>.json
Where AURA_DEFAULT_LOCALE is the culture code to be used by default in the current deployment: en-gb, es-es, pt-br, de-de.
The dialog-config.<AURA_DEFAULT_LOCALE>.json contains all the intents that the generic-dialog can trigger for a specific channel, each of them with their associated configuration.
2. Add and configure the new intent in the dialog-config.json file
Developing a local use case through the generic-dialog only requires to include a new intent and its configuration in the dialog-config.json file placed on the settings folder of the generic-[OB] library.
Follow the instructions below:
Access to your global library and enter the dialog-config.json file: https://github.com/Telefonica/aura-bot-libraries-[OB]/tree/master/packages/generic-[OB]/settings/dialog-config.<AURA_DEFAULT_LOCALE>.json
Include your use case intent in this file.
To add a new intent only means to include a new configuration managed by the generic-dialog. This extends the configuration of the dialog-config intents to include all the settings.
Remember that the intent name must be defined following the format: intent.[DOMAIN].[INTENT].
Add the specific configuration for this intent in the settings field.
Fields in the configuration belongs to two specific fields in the channel configuration model:
intentSettings model
IntentSettingsLocales model
Check the properties in these models and their associated fields and values in Channel model.
3. Specific case: intents/entities that require the application of a function on the dialog’s parameters
ℹ️ This scenario only applies to use cases with intents or entities that require the conversion of certain dialog parameters through a function in order to get the correct payload and the expected output in the channel.
A clear example is a use case that requires a certain conversion of entities, for example, move forwards: NLP recognizes a certain entity but it is required to create a function that converts minutes into hours:
Just in case it is required to apply a function on any dialog parameter, developers have to define the functions block on the dialog-config.json file. This consists on two fields params and algorithm, which are explained the following sections.
"functions":{"params":[…],"algorithm":"…"}
The utils folder of the generic library contains the generic-test-utils file for the parameterization of functions. This file includes the functionalities to make modifications to any parameter of the dialog if required due to the fact that the function is too complex to be added in the dialog-config.json
New functionalities must be added in an orderly and commented manner with a JSdoc including a description of the functionality and, at least, an enumeration of the parameters it uses.
The params attribute contains the parameters needed to execute the modification algorithm. The parameters must be already available in the generic-dialog variable functionVar within the generic-dialog.ts file.
Currently, there are three parameters: currentIntent, persistentData and context, explained below.
The input parameters for functionVars are described below:
currentIntent: it contains an object of type intentResult with the intent and entities attributes.
intent contains a string with the name of the intent.
entities is an array with the values returned by Aura NLP.
These values help us evaluate the intent and to be able to interact on the values returned in entities.
persistentData: it contains the dialog’s data developers want to persist. Data is passed as a parameter to the getMovistarMessage function where data is accessed, if necessary, to display in the payload.
context: it contains the TurnContext. This object is useful for accessing through functionalities most of the data that may be needed in case of parameterization. The utility that includes helper methods to manage Bot Framework TurnContext is context-utils.
Add the script directly in the dialog-config.<AURA_DEFAULT_LOCALE>.json file. In this case, developers have to take into account two limits:
The code must be included in Javascript.
The script must be on one line, so it cannot be too complex.
See the examples for the use case Move forwards.
Add the functionality in the utilities file: https://github.com/Telefonica/aura-bot-libraries-[OB]/tree/master/packages/generic-[OB]/src/utils/generic-dialog-utils.ts
and referencing the name of the functionality in the dialog-config.json file:
The function calculateSecondLevels is declared in the file generic-dialog-utils.ts.
The file dialog-config.json must reference this functionality: calculateSecondLevels (See the example for Move backwards.
4. Build response
For local use cases, this step is required to generate both the resources and their associated texts for every dialog across all channels in a local POEditor project and to include the new text resources in the corresponding locale file of the generic-[OB] library.
5. Validate the generic-dialog with unit tests
Bot Framework 4 provides a Test Adapter that allows launching unit tests for the validation of the dialog performance and to check that its performance is adequate in terms of the conversational flow between the user and aura-bot.
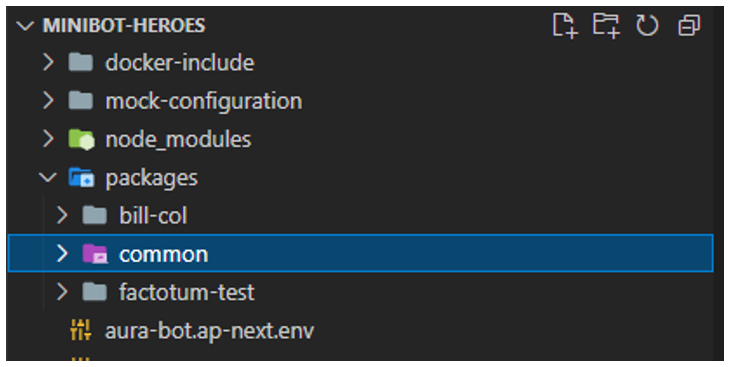
The tests of each use case included in the generic-dialog are located in the following path: https://github.com/Telefonica/aura-bot-libraries-[OB]/tree/master/packages/generic-[OB]/src/tests/
In this folder, tests should be organized by the use case domain, including one folder for each specific library. The library is included in the name of the intent that has this format: intent.{LIBRAY_NAME}.{INTENT_NAME}
As an example, the figure shows this organization for the global library generic, containing tests for use cases in the domains: communications, domotics, e-commerce, navigation, tv and wifi.
The folder also contains the file generic-test-utils.ts, that includes configurations and functionalities common to all tests. The purpose of this file is to avoid code duplication in each test.
It also contains the getDialogIntentConfig functionality needed to retrieve the settings and mock up the getIntentConfig function.
In case it is necessary to modify any attribute of the configuration, it can be modified in the corresponding test by accessing the attribute to modify its configuration but not creating a new configuration.
Once the previous stages are finished, now you can package the use case’s library as a .tgz file and test it in local environment.
If the local testing is satisfactory, your use case is ready for its deployment.
How channelData v3 is formatted in responses
IntentResult
intentResult contains fixed values obtained from a map intent-intentResult. intentResult also has information about the default actions associated to this intent.
Actions are formatted mixing all the information from:
Default actions by intent in intentResult
Configuration in the dialog’s settings
Parameters calculated on runtime by dynamic functions configured in settings
All this information is mixed in the above-described order. settings will overwrite default values by intent, and runtime parameters will overwrite parameters in settings.
Default actions by intentResult
Certain intents have associated actions in its intentResult.
For example: Volume up intent will have the SEND_KEY action associated to the VOL- key and the rest of the needed parameters. This action will only be added to the response if the volume up intent have configured the SEND_KEY action. If the action by default is not configured in settings, it will not be sent.
Dialog settings
In the settings field of the dialog’s triggerCondition, you can add inside a new field actions including all the actions and parameters needed for this intent.
Only set the action name and all the default params will be returned, for example:
For intent intent.tv.move_forwards, we will add this configuration:
As intent.tv.move_forwards has the default action SEND_KEY associated in its intentResult, these default values will be returned.
However, intent.tv.move_forwards does not have the action MAKE_SOUND associated, so the value returned will be the default for this action (by default, MAKE_SOUND will return a positive sound).
You can check actions associated to every intentResult in actions v3.
In order to overwrite these default values, you only have to configure them as shown below:
With this configuration, the levels of the SEND_KEY action will be overwritten to 10 (default is 60) and keyCode will be overwritten to MOVE_FORWARD (in this case, it is the same value as default).
In the MAKE_SOUND action, the sound value will be overwritten to negative (default is positive). The rest of the values will be the default ones (for example the target field).
In the generic-dialog, it is possible to add functions to change the behavior of the dialog. If you want to modify params from actions in runtime you need to set it in the following variable:
Values stored in runtime in persistentData.dialogData.actionParams.MAKE_SOUND will overwrite default values and configured values in settings.
Special parameters
deviceId is a special actions parameter that should be set in runtime. All the actions with target = stb will set this value in the action params by default.
Practical examples
TV remote actions
Use case with a direct transformation intent to action.
Use case that requires the generation of a conversion function. This function is applied to the dialog’s parameters in order to get the correct payload.
Use case that requires the generation of a conversion function. This function is applied to the dialog’s parameters in order to get the correct payload.
In this case, the field algorithm references to the function calculateSecondLevels, described in the file: packages\generic\src\utils\generic-dialog-util.
They should build the logic of the conversational flow with the user, make Aura resolve the user’s request and provide back the most appropriate response.
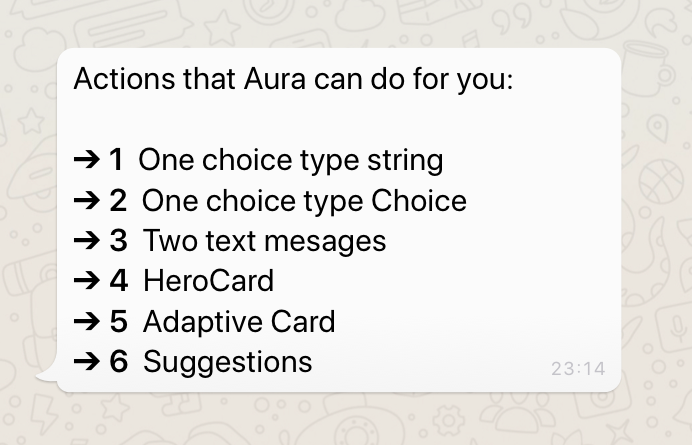
Apart from the key tasks listed above, there are certain optional activities that can be done when developing a local experience for its configuration, such as including the developed experience in Suggestions.
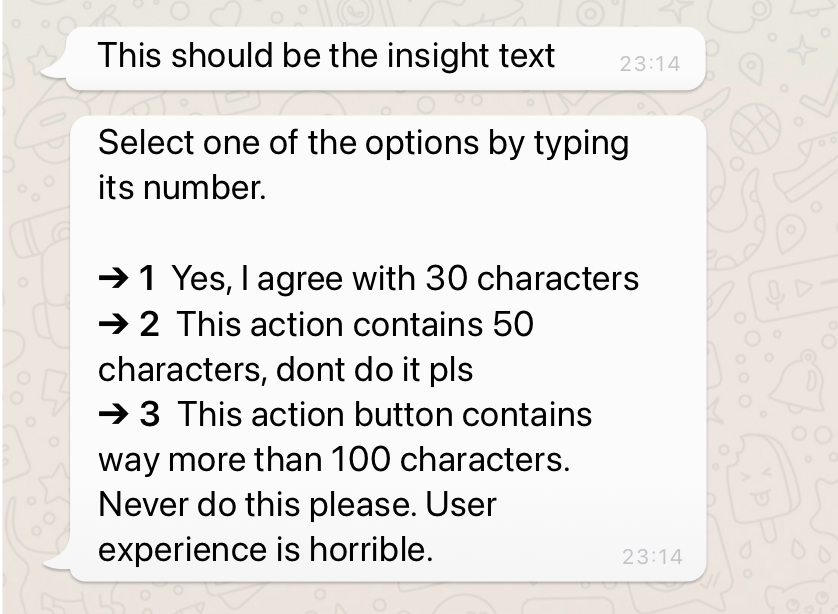
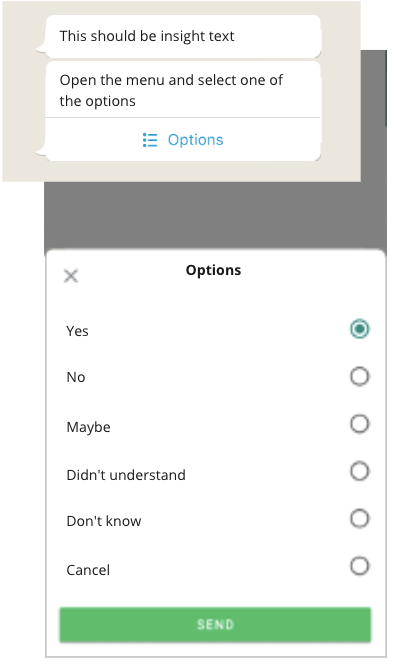
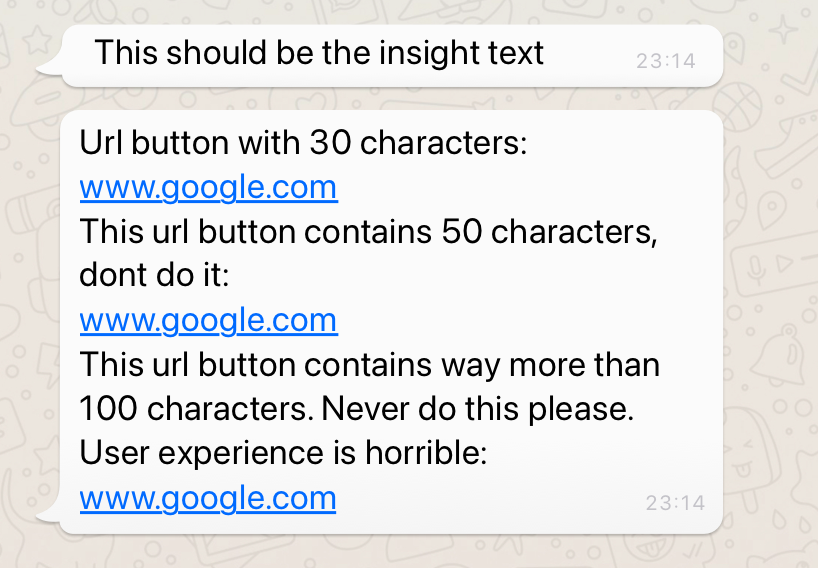
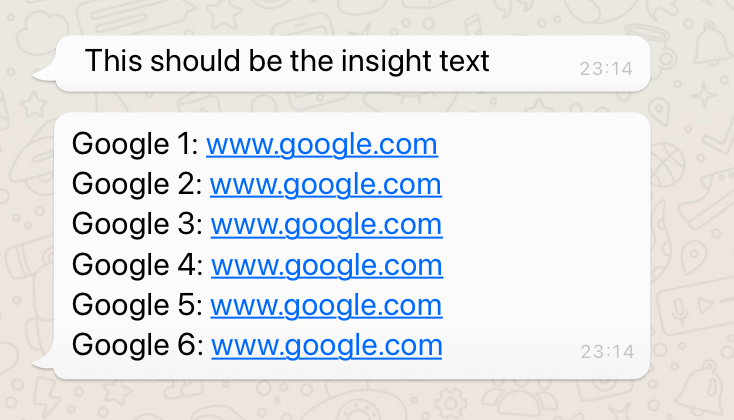
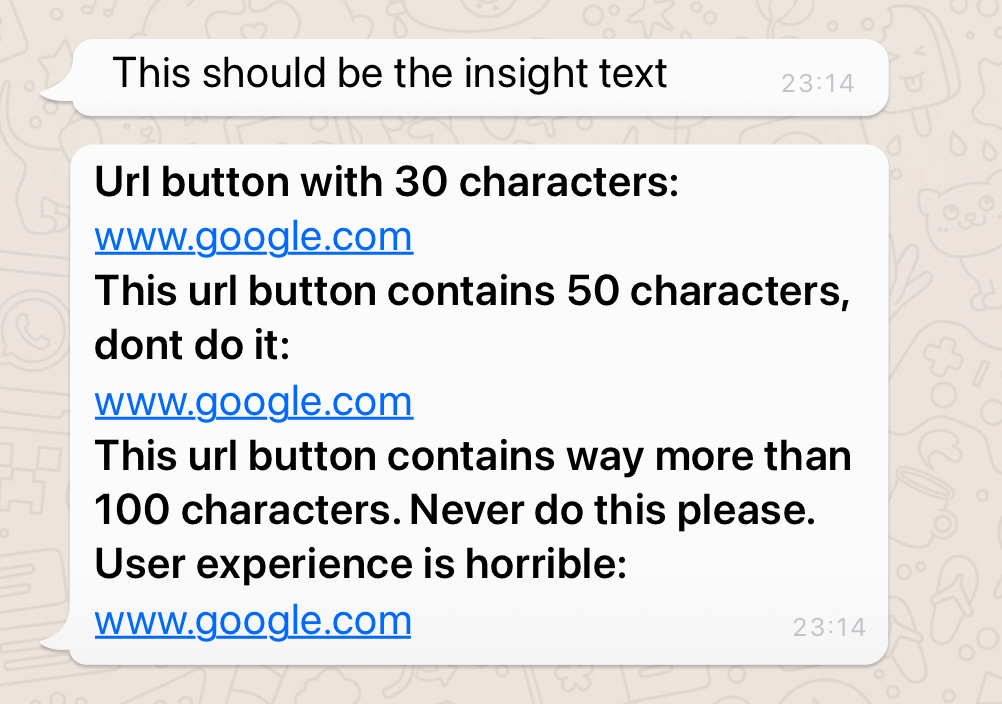
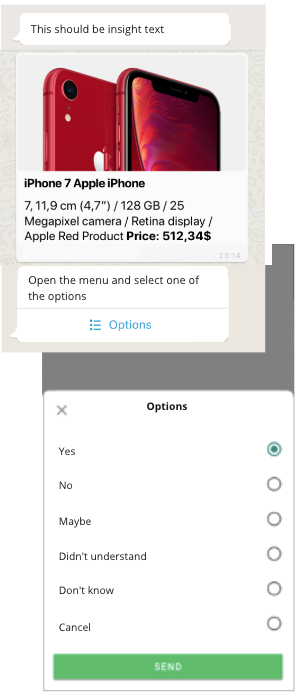
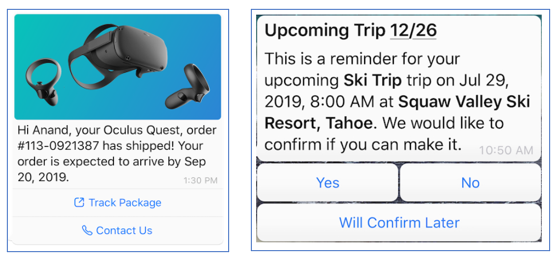
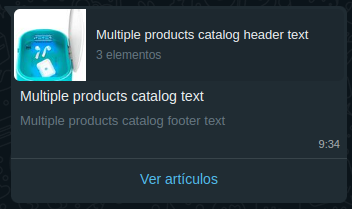
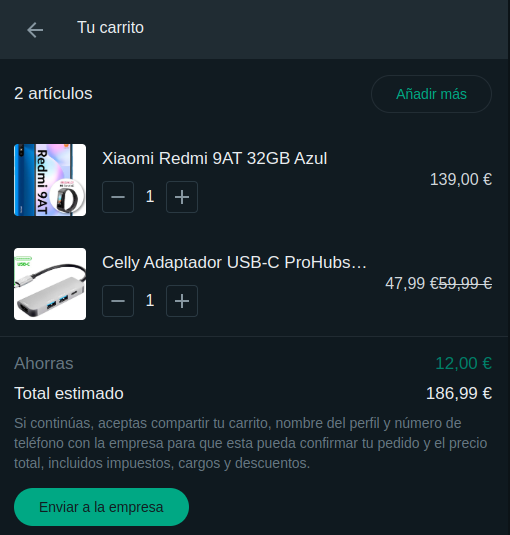
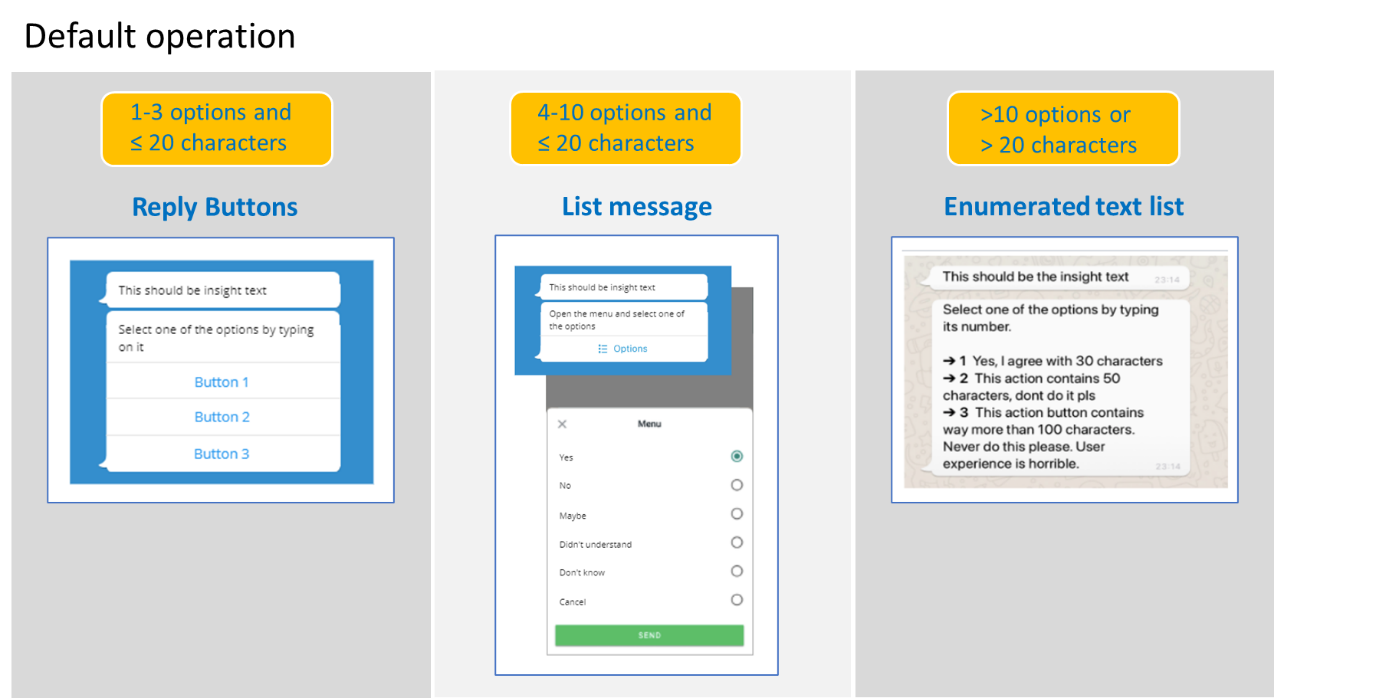
Specific scenario: Use case development in WhatsApp channel
When developing a use case in WhatsApp, the general procedure must be followed. However, certain extra steps must be carried out in these channels due to their limitations.
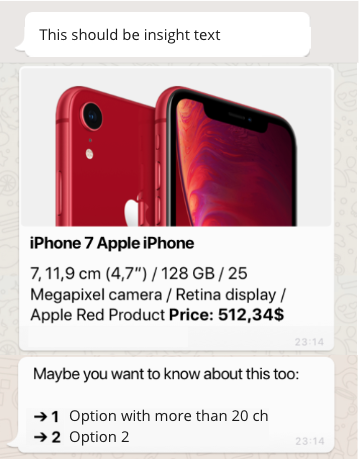
Specific scenario: Use case development in RCS channel
When developing a use case in RCS, the general procedure must be followed. However, certain extra steps must be carried out in these channels due to their limitations.
Build the use case logic: use cases development over Aura Bot
Guidelines for every step included in the development of a use case over Aura Bot, from building the dialog that models the conversational flow with the user and fetches the required data to its deployment in order to make the experience available for Aura users
The documents included in this section show the detailed processes for the development of use cases over aura-bot, with guidelines for all the feasible scenarios that can appear at this stage.
The following figure schematically shows the general workflow for the development of a use case over aura-bot.
4.1.1 - Build an Aura Bot dialog
Build an Aura Bot dialog
This section includes different processes for building an Aura bot dialog when developing a local use case, both general guidelines and specific ones for concrete scenarios
Introduction
Dialogs are software components that model conversations with the final users by interchanging messages with them. Currently, aura-bot supports the Microsoft Bot Framework SDK v4 for JavaScript as the internal bot engine.
When developing a local use case, that can be both an experience built from scratch or inspired in a global use case, the OB developers must build a new local dialog that includes the logic of the use case or modify an existing one.
The dialog will interact with the customer using a conversational interface, this is, interchanging messages back and forth and, if required, the dialog will summon Kernel or third-party APIs in order to fetch data to fulfil the user’s request.
Build a dialog that use async APIs, that is, APIs that do not provide the information back immediately, but with a certain standby time as they must perform a specific task derived from the user’s request.
Configure bypass mode to force sending any input message to aura-bot directly to a external service and vice versa.
Build an operation, which are a type of intents that can be used inside a dialog’s conversational flow.
Developers must create one .ts file for each dialog of the use case.
All dialogs must include these two mandatory components:
Parameter
Type
Comments
id
string
Dialog’s identifier
configuration
configuration
Global and specific dialog’s configuration is validated over aura-bot and passed to the dialog through the constructor, when instantiated.
The maximum size for an activity response may not exceed the maximum limit established by the Direct Line (MS) protocol under any circumstances. In case this happens, the answer is ignored and a generic text is returned to the user explaining that there are too many results.
📌 Best practices
When generating a new dialog, a general recommendation for developers is to copy another working dialog and use it as a template.
If the dialog’s code is too long or complex, it can be split into several files, in order to increase readability.
It is also a good practice to create utility files with code shared between dialogs in the same library.
The following sections include certain features that are useful for the generation of a dialog within Aura’s framework.
Management of dialogs are waterfall dialogs
The interaction with the user can be based on a single stage back-and-forth dialog (this is, the user asks Aura and Aura provides the appropriate answer back to the user) or, on the contrary, a multiple stage dialog.
Currently, although the dialog is based on a single stage, all dialogs are built as waterfall dialogs.
For this purpose, you should use the Microsoft tool botbuilder-dialogs package, that contains functions to assist with the formatting of a message activity containing a list of choices.
Within its specific library, the dialog must implement the Microsoft Bot Framework 4 ComponentDialog class. Libraries have to import the dependency on “botbuilder-dialogs: “~4.13.3`. To avoid conflict in the versions of this library, aura-bot specifies the concrete version.
/**
* Aura Bot dialog implementation for any class.
*/exportdefaultclassNameClassAuraBotDialogextendsComponentDialog{...}
As shown in the code below, the constructor must support the configuration, which includes both global and local variables (always validated variables) that the dialog can use.
Additionally, the constructor can include auraDataAccessor as a second parameter. See details in Data saving in the same conversation.
publicstaticid: string='name-class-dialog';privateconfiguration: Configuration;constructor(configuration: Configuration){super(NameClassAuraBotDialog.id);this.configuration=configuration;// ID of child dialog that should be started anytime component is started.
super.initialDialogId=NameClassAuraBotDialog.id;// Define the conversation flow using a waterfall model.
super.addDialog(newWaterfallDialog(NameClassAuraBotDialog.id,[this.method1.bind(this),this.method2.bind(this)// ...
this.methodN.bind(this)]));}
If the dialog requires the use of prompts, please read Prompts treatment section for its declaration within the dialog file.
Retrieving data from clients
If the dialog’s conversational flow requires to fetch user’s data, the dialog code must include the specific instructions to call an API (Kernel API or external API).
Therefore, at library’s level, it is required to import the client of the corresponding API.
In case of Kernel APIs, please read the section Create or update an API client.
Basic utilities for building a dialog
The current section extracts specific procedures based on Microsoft Bot Framework 4 functionalities that are of particular importance for the generation of a dialog within aura-bot.
Code for localizing this id:
common:common.greetings.main
Dialogs can include a localizer as an attribute that points to the single instance of the class that was initialized during aura-bot start-up.
this.localizer = LocaleManager.instance;
Alternatively, you can use the getLiteral method from @telefonica/aura-bot-utilities/lib/aura-bot-library-util library without having to obtain user or correlator as follows:
const text = getLiteral(context)('common:common.greetings.main')
Send a simple text
The example below shows how to send a simple localized text.
ℹ️ In BotBuilder v4, nothing is sent (text cannot be sent) in the endDialog, only that the current dialog is finished and the result of the dialog’s finalization.
Complex messages
There is big flexibility composing user’s messages. They can be built with MessageFactory using the Bot Framework, built by your own, combined, etc.
In this section, certain flags are included that can help the channel understand the conversation flow.
InputHint
InputHint allows building messages in different modes, indicating to the destination channel when it is waiting for new messages or not.
For more information, read InputHints enum Microsoft documentation.
AcceptingInput: bot is passively ready for input, but it is not waiting a response from the user. (Example: last message in the dialog)
ExpectingInput: bot is waiting a response from the user. (Example: when a prompt is sent)
IgnoringInput: bot is not ready to receive input. (Example: when several messages are sent together excepting the last one)
Add inputHint in the activity when it is necessary to change the default behavior: messageOneOfFour.inputHint = InputHints.IgnoringInput
Be careful with the default value given in the activities, as it is not always the desired behavior.
When constructing a complex message to the user in which, for example, partial activities are joined with attachment cards for finally sending a prompt or some parts are built with Factory and others are not, it is necessary to make sure that the final message contains the desired InputHint. In this example, the result prompt has an invalid InputHint:
// Example with INVALID InputHint:
// the message variable will have acceptingInput as default.
constmessage: Partial<Activity>=MessageFactory.text('My text');constcardActions: CardAction[]=options.map(q=>({type:ActionTypes.ImBack,value: q,title: q}));// the attachment variable will have acceptingInput as default
constattachment: Partial<Activity>=MessageFactory.attachment(CardFactory.heroCard(null,null,cardActions));constpromptOptions: PromptOptions={prompt:{...message,...attachment},choices: ChoiceFactory.toChoices(cardActions)};// Prompt will have acceptingInput. IT IS NOT VALID!
The example with a valid InputHint is shown below:
// Example with valid InputHint:
constmessage: Partial<Activity>=MessageFactory.text('My text');message.inputHint=InputHints.ExpectingInput;constcardActions: CardAction[]=options.map(q=>({type:ActionTypes.ImBack,value: q,title: q}));constattachment: Partial<Activity>=MessageFactory.attachment(CardFactory.heroCard(null,null,cardActions));attachment.inputHint=InputHints.ExpectingInput;constpromptOptions: PromptOptions={prompt:{...message,...attachment},choices: ChoiceFactory.toChoices(cardActions)};// The prompt will have expectingInput as expected in a Prompt
HasMoreMessages flag
There is another legacy flag in channelData: hasMoreMessages (created in Aura) that indicates whether aura-bot will send more messages to the channel.
Currently, all channels should use batch-outgoing-message-middleware which stacks all the messages related to an incoming activity together with the Suggestions and automatically sets hasMoreMessages field to proper value (only when messages are processed in batch mode.
Note that even though the hasMoreMessages flag is sent in some cases (if in batch mode and channel is configured to do so), it is preferable to use the standard message property inputHint, that is always available and will be maintained in the future.
It is the recommended way to configure channels and aura-bot, so messages are properly marked up both with hasMoreMessages and the proper Microsoft Bot Framework field, inputHint.
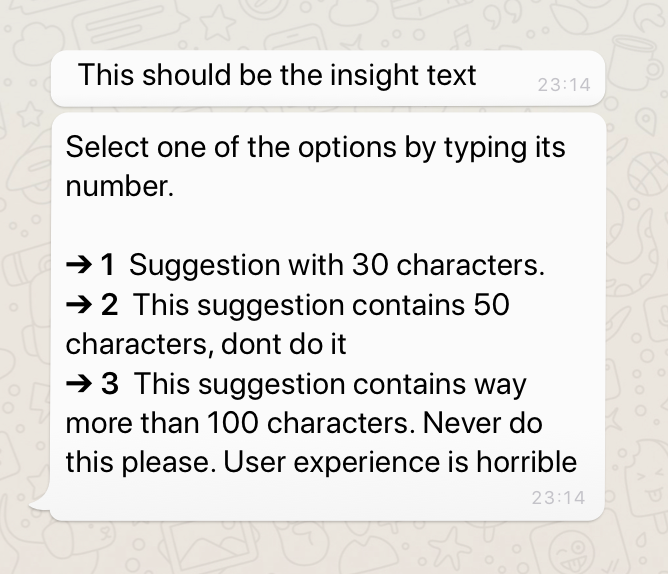
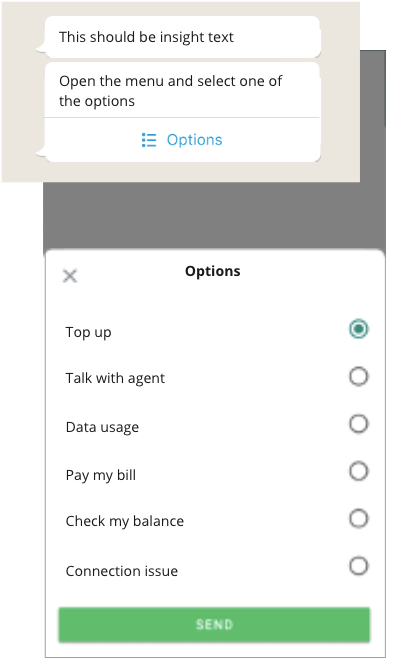
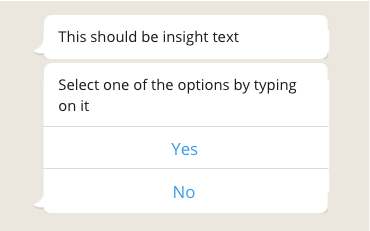
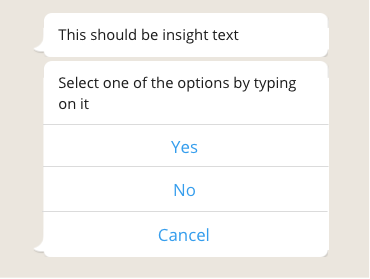
The following list of prompt recognizers are available in Aura:
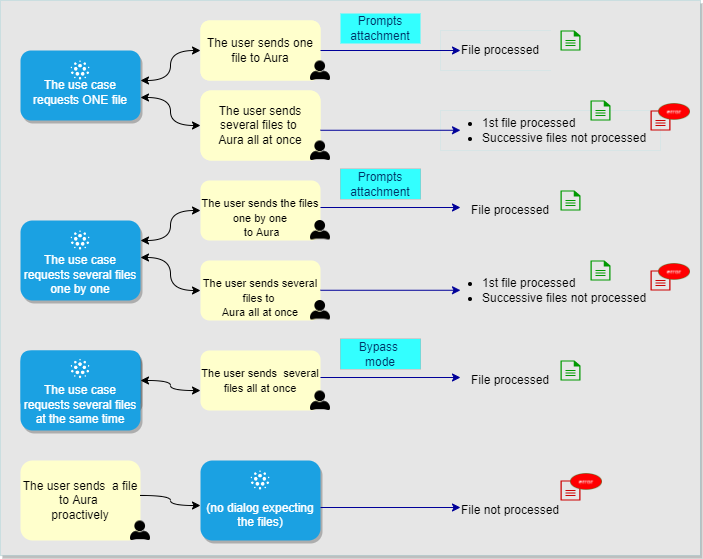
Attachment prompt: it asks for one or more attachments, such as a document or image.
Choice prompt: it asks for a choice among a set of options.
Date-time prompt: it asks for a date-time.
Number prompt: it asks for a number.
Text prompt: it asks for a general text input.
Custom prompt: prompt that can be personalized with different options.
Break prompt and NLP Recognition
When a dialog returns a prompt and thus is waiting for an action, then the user can choose one of the prompt answers or can decide to carry out another option.
In this second case, the prompt must be broken (if conditions are fulfilled) and the aura-botmain-dialog redirects to the new dialog.
By default, prompts have NLP recognition. When the user interacts with the prompt, the prompt-recognizer is executed and tries to recognize the user’s intention. But, also by default, if the None intent is recognized, it will not break the prompt.
To make the process of prompt breaking flexible, Aura provides a default behavior and offers flags that allow the default behavior to be changed. These flags should be added during the instantiation of the prompt:
disableRecognition: enabling this flag, NLP recognition is disabled, preventing to break the prompt. (It only affects to prompts without choices).
Use: prompts without choices.
enableNone: enabling this flag, if NLP recognizer has recognized the None intent, this intent is allowed to break the prompt (by default, None intent can never break a prompt).
Use: all types of prompts with NLP recognition.
useValueAsCommand: using this flag, the prompt choices are interpreted as text commands, and, when properly configured, the conversation flow is redirected to the intent defined by the command.
Use: only with choice prompts.
These flags should be added in the validations attribute inside promptOptions.
For example, if a prompt wants to disable NLP recognition, it should be marked as follows:
This section includes the procedure for managing prompt attempts. In the botbuilder-js code, the function continueDialog must include the following code in the Prompt class:
constrecognized: PromptRecognizerResult<T>=awaitthis.onRecognize(dc.context,state.state,state.options);// Validate the return value
letisValid=false;if(this.validator){if(state.state['attemptCount']===undefined){state.state['attemptCount']=0;}isValid=awaitthis.validator({context: dc.context,recognized: recognized,state: state.state,options: state.options,attemptCount:++state.state['attemptCount']});}elseif(recognized.succeeded){isValid=true;}// Return recognized value or re-prompt
if(isValid){returnawaitdc.endDialog(recognized.value);}else{if(!dc.context.responded){awaitthis.onPrompt(dc.context,state.state,state.options,true);}returnDialog.EndOfTurn;}
By default, the result of the internal recognition made by the prompt is the one that triggers the retry or the return of the result. In other words, if the recognition result fails, the prompt is shown N times.
To control the number of retries, it is required a validator function that allows to manage the attemptCount counter. For this purpose, aura-bot-common library provides a validator function: getRetriesValidator, to control the number of retries. For its use, it is necessary to send this function as a second parameters in the prompt:
// Create a prompt without retries:
constmyPrompt=newChoicePrompt(ID_PROMPT,PromptUtils.getRetriesValidator(0));
Note that this validation function (that the dialog developer can build on his own), gives total flexibility to modify parameters each time the user responds.
Choice prompts
The prompt type “choice” asks the user to choose from a list of options. In this situation, the prompt-recognizer tries to recognize the choice selected with the options provided. If there is no match, it executes the NLP recognition.
The process for executing a choice prompt is detailed below:
Declare the name of prompts to be used within the current dialog.
An example to handle the result of the user’s action is shown below:
if(stepContext.result&&stepContext.result.index===0){// Save data
returnawaitstepContext.next();}else{// Cancel option
returnawaitstepContext.endDialog();}
Use prompt values as commands
If the target is to provide as prompt options a series of commands to redirect to other dialogs, we can use the useValueAsCommand flag.
// create a list of intent commands to be used with the prompt
constactions=[// REMARK: In this case, the trigger condition points to the same dialog, but it could point to ANY INTENT known to the bot,
// making it a versatile feature.
{intent:'intent.fake.something',entities:[{entity: CommandChoices.FIRST_OPT,type:'suggestion'}]},{intent:'intent.fake.something2',entities:[{entity: CommandChoices.SECOND_OPT,type:'suggestion'}]}];constcardActions=CardFactory.actions(actions.map(a=>{return{type:ActionTypes.ImBack,title: a.entities[0].entity,value: JSON.stringify(a)};}));constpromptOptions: PromptOptions={choices: ChoiceFactory.toChoices(cardActions),prompt:'This is an example of Choice prompt with command values',validations:{useValueAsCommand: true}};returnawaitstepContext.prompt('ID_PROMPT',promptOptions);
Creating the prompt in this way, when the user selects one of the options, it automatically redirects to a new intent in the process of recognizing the user’s action, forcing the prompt dialog to be cleared when there is a match.
⚠️ If the option chosen is the None intent, the stack cleaning behavior remains the same as always with the non-default cases to break the prompt (See section Break prompt and NLP recognition) such as the flag of enableNone etc.
Use of prompts in bypass mode
In a dialog working in bypass mode, you can use prompts that can be created as usual in the dialog:
publicDEFAULT_RETRIES: number=2;publicpromptsNames={COMMAND_CHOICE_PROMPT:'command-choice-prompt'};constructor(configuration: Configuration){....// adds the prompt dialog to the Dialogs Set
this.customPrompt=newChoicePrompt(this.promptsNames.COMMAND_CHOICE_PROMPT,PromptUtils.getRetriesValidator(this.DEFAULT_RETRIES));...}
The prompt will be instantiated, when the bypass mode initializes.
this.customPrompt=newChoicePrompt(this.promptsNames.COMMAND_CHOICE_PROMPT,PromptUtils.getRetriesValidator(retries));// To change retries we need replace original dialog for prompt
(this.dialogsasany).dialogs['command-choice-prompt']=this.customPrompt;returnawaitBypass.initialize(context,parseFloat(timeoutMin),{value:''},'test',BypassState.Bypass,closeWords);
The prompt can be sent to the user and its value retrieved in the dialog.
privateasyncsendPrompt(stepContext: WaterfallStepContext):Promise<DialogTurnResult>{constchoicesText: Choice[]=[{value:'id-0001',action:{title:'Option 1 (id-0001)',type:'',value:''},synonyms:[]},{value:'id-0002',action:{title:'Option 2 (id-0002)',type:'',value:''},synonyms:[]},{value:'id-0003',action:{title:'Option 3 (id-0003)',type:'',value:''},synonyms:[]},{value:'id-0004',action:{title:'Option 4 (id-0004)',type:'',value:''},synonyms:[]},{value:'id-0005',action:{title:'Option 5 (id-0005)',type:'',value:''},synonyms:[]}];constpromptOptions: PromptOptions={prompt:'Hello, select one option: write the number, cardinal, ordinal or text',choices: ChoiceFactory.toChoices(choicesText)};returnawaitstepContext.prompt(this.promptsNames.COMMAND_CHOICE_PROMPT,promptOptions);}privateasyncfallbackStep(stepContext: WaterfallStepContext):Promise<DialogTurnResult>{awaitstepContext.context.sendActivity(`Option selected: ${stepContext.result.value}`);returnawaitstepContext.endDialog();}
⚠️ If it is required to send data to another dialog, this method cannot be used.
The following example saves data in DATA_KEY as key:
DialogUtils.setDataActiveDialog(stepContext, 'DATA_KEY', data);
In the dialog code, it should use the DialogUtils utility to recover those parameters with the key DATA_KEY:
const data: any = DialogUtils.getDataActiveDialog(stepContext, 'DATA_KEY');
(context.activeDialog.state[keyData] can be used as well directly.)
Read dialog settings
When in aura-bot flow the main-dialog has routed a dialog to be started, it is launched with dialogSetting parameters: return await stepContext.beginDialog(idDialog, dialogSetting);
To receive configuration parameters when a dialog is started, the DialogUtils utility should be used to recover those parameters with the key options: dialogSetting = DialogUtils.getDataActiveDialog(stepContext, 'options');
In the following example, the channel data is being routed:
{"name":"issues","dialogs":[{"id":"issue-create","suggestions":true,"triggerConditions":[{"intent":"intent.issue.repair","contextFilters":[{"name":"Example redirect to greetings from issues","type":"type","conditions":"'1' eq '1'","true":{"name":"Test","breakDialogExecution":true,"breakFilterEval":true,"redirectToIntent":"intent.common.greetings","suggestions":true}}]}]}]}
Conditions of contextFilter are always be fulfilled so intentResult will be “greetings” while originalIntent will be “issue” (if there is no contextFilter, intentResult would be “issue”). Therefore, this is the structure of dialogSetting:
Replacing a dialog
A dialog can replace another dialog by breaking its current flow. For this purpose, the command replaceDialog is used and it is necessary to know the identifier of the library and the dialog destination.
If the destination dialog does not expect any dialogSettings, the above example would be valid.
If it is necessary for the destination dialog to receive data from the original dialog, the developer must include the appropriate instructions for sending and receiving the required parameters. However, in order to maintain consistency with the established protocol for sending dialogSettings from the main dialog, it is recommended to maintain id, originalIntent and intentResult structure.
In this example, destinationDialogSettings can be optional and is not sent to Handover (in fact, real Handover dialog is not using these settings).
Case B: Replace a dialog where there is a contextFilter
In this case, if the dialog needs to replace itself, it is necessary to send the same dialogSettings that was sent by the main dialog:
auraDataAccessor can be the second parameter of the constructor. The command auraDataAccessor?: auraDataAccessor allows accessing to the conversation data, certain user data, etc.
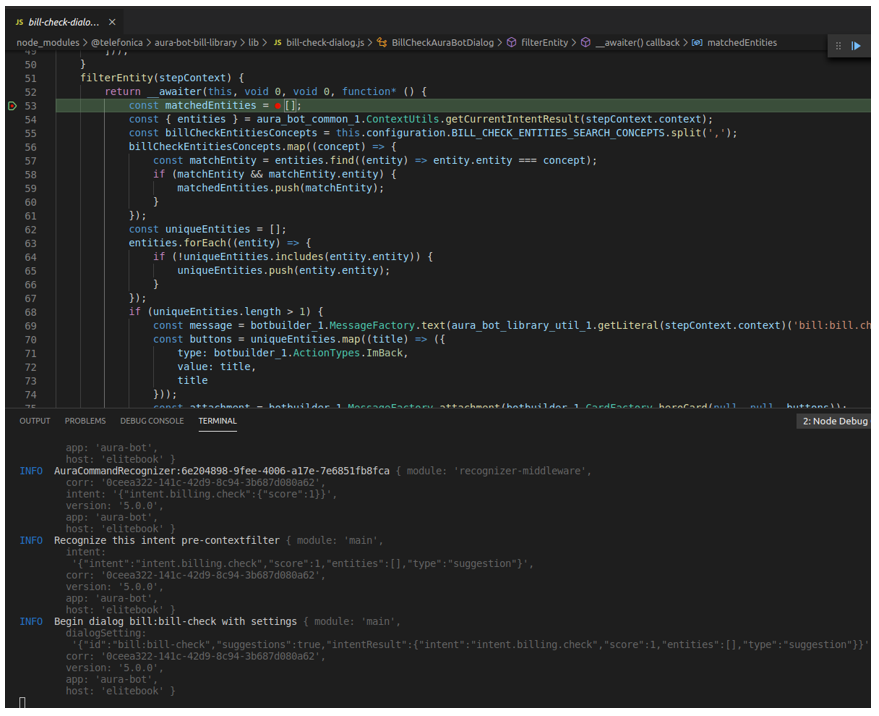
For a proper analysis of the code, it is very important to use logs correctly.
The field corr refers to the correlator, which has to be set in all cases in order to follow up the requests.
The correlator can be retrieved through a functionality of the commons library: ContextUtils.getCorrelator(context). It is necessary to send the current context (in a Waterfall step, it should be stepContext.context).
There are cases in which the correlator does not exist because aura-bot is in start process, configuration, make-up, etc. In these cases, the assigned field is no-correlator. In debug and info mode, it can include new fields in order to organize and improve the data.
An example is shown below:
this.logger.debug({msg:'Cognitive Services API response',corr: ContextUtils.getCorrelator(context),NEW_FIELD: value});
The following example is useful to write error logs:
logger.error({corr: ContextUtils.getCorrelator(context),error: error.message,msg:'Server cannot be closed',stck: error});
4.1.1.2 - Build a library
Guidelines for building an Aura Bot library
Orderly steps for building a library in Aura Bot when developing a use case
Introduction
The customization of aura-bot is done through libraries: libraries in aura-bot are node.js packages, with a particular structure of folders and files that contain one or several dialogs, plus i18n strings, environment variables, configuration files and graphical resources. Libraries are deployed in the bot as plugins.
Within these libraries’ structure, developers are able to build extensions over aura-bot global components (dialogs) to be deployed in concrete scenarios where customized capabilities and functionalities are required, such as the development of a new use case.
The following sections include the detailed steps for building or modifying a library over aura-bot.
Build an Aura Bot library
When developing a local use case in Aura, you should:
✅ For local use cases generated from scratch: develop a new use case library
✅ For local use cases based on the customization of a global use case: modify existing use case library
We can have one or several libraries in one repository:
If the repository only contains one library, the root/ folder can be used. In this case, the folders of the library can be created directly from the root/ folder.
For example, for the src/ folder: [repository_name]/src
If the repository contains more than one library, a folder hierarchy is required. The working directory is:
For example, for the src/ folder: [repository_name]/[library name]/src
# Optional, only with multiple libraries in same repository (replace newlibrary with library name)$ mkdir -p packages/newlibrary
$ cd packages/newlibrary
# Creates the src folder and move the dialog files inside$ mkdir src
⚠️ The names of Aura global libraries are reserved. Therefore, both for the creation of a new local library or a customization of a global one, constructors must use a different name in order to avoid overlapping. We recommend to use the following structure for local libraries’ names: [local_library_name]-[OB]
⚠️ The library name must be exactly the same in all its associated files.
Copy in the root of the library the generic required files as identical copies:
.gitignore, .npmignore, tsconfig.json and tslint.json.
Create a package.json containing a plugin block with the name of the service this plugin will provide.
ℹ️ Detailed guidelines: Section package.json
A README.md file will be also desirable, explaining the library.
Create one file within src/ folder for each dialog (parts common to several dialogs could share utility clases, as usual).
ℹ️ Detailed guidelines: Use case dialogs
Now, copy here your dialog or code the it as explained in General guidelines for building an Aura Bot dialog.
Create an index.ts file, that will register all the dialogs when loading the plugin.
ℹ️ Detailed guidelines: index.ts
After publishing or npm linking the package (or npm packing), this plugin could be loaded from aura-bot by declaring the package name in the plugin configuration array. Additionally, any of the dialogs could be excluded from the load. A simple plugin configuration file could be:
Note that the object format (with packagePath) is optional. When no options are passed to the plugin, we could just use a string with the name of the package. When there are more options (like exclude array), the object format must be used. So, these two configuration files are equivalent:
- <dialog-name>.ts files: Files containing the dialogs logic - index.ts file: Registration of dialogs in the library. Declaration of locale, config and .env files of the library. - configuration-schema.ts: schema for library-specific configuration variables - Unit tests for each dialog: <dialog-name>.spec.ts
- locale folder: Definition of text resources for Aura response - dialog-config.json: Mapping of intents with dialogs within the library; definition of context filters - .env files: Definition of environment variables associated with the library
Dialogs are .ts files containing the dialog logic.
Bot developers must generate the associated dialog(s) for their use case following the guidelines defined in General guidelines for building an Aura Bot dialog.
Afterwards, remember that all the developed dialogs must be tested.
index.ts file
index.ts file registers all the dialogs in the library.
Once the use case dialog is developed, edit this file with the corresponding values for each field explained below:
let dialogNames: names of all the dialogs included in the library.
register:
<libraryName>: library name.
dialogs: it points to the dialogs declared in let dialogNames.
locale: the locale files must be exposed in the locale property when registering the plugin in order to be merged (during the make-up process).
env: the .env files must be exposed in the env property when registering the plugin in order to be merged (during the make-up process).
config: the config files must be exposed in the config property when registering the plugin in order to be merged (during the make-up process).
configSchema: declaration of specific variables for the use case included in the configuration-schema.ts file.
resources: it indicates the path (__dirname) where the resources folder, containing the resources used in the use case, is included:
resources: path.resolve(__dirname, '..', 'resources')
A complete example can be found below for the library generic:
import*aspathfrom'path';import*aslibraryUtilfrom'@telefonica/aura-bot-utilities/lib/aura-bot-library-util';importconfigurationSchemafrom'./configuration-schema';export=functionsetup(options: any,imports: any,register:(err: Error,result: any)=>void){letdialogNames=['./generic-dialog'];// If there is an array of dialogs to disable, remove from dialog array
libraryUtil.excludeDialogs(dialogNames,options);// Register that this plugin has been fully loaded
constsettingsPath=path.resolve(__dirname,'..','settings');register(null,{resources: path.resolve(__dirname,'..','resources')generic:{dialogs: dialogNames.map(dialogName=>require(dialogName)),locale: libraryUtil.readLocaleFolder(path.resolve(settingsPath,'locale')),env: libraryUtil.readEnv(settingsPath),config: libraryUtil.readDialogConfig(settingsPath),configSchema: configurationSchema,resources: path.resolve(__dirname,'..','resources')}});};
configuration-schema.ts
Optional file for the validation of schemas from the library-specific configuration variables required for the use case.
When the bot loads all the plugins, it verifies that the schemas provided by the library fulfil the conditions established in the current file.
The orderly process for editing this file is defined below:
Declare the library-specific configuration variables in the .env configuration file starting with the library name: [library_name]_[variable_name]. This file includes the values of these variables.
For these variables, include in the configuration-schema.ts restrictions, default values, checking, etc. in order to validate them.
During the during the make-up process, the content of the different configuration-schema.ts files for each library will be automatically uploaded into a .env.libraries file.
You can create a schema (using @hapi/joi) and specify the name of the library-specific variable as shown in the following example:
Each library may contain (optionally) a settings/locale folder, with one or more locale files with the format:
settings/locale/dialog-config.<culture_code>.json
The content of this file corresponds to the text resources, both from aura-bot core or text of Aura response for a specific use case. This content can be generated using POEditor, which handles the different messages that the bot shows to the customer and to adapt them to a specific language.
⚠️ These files must be generated during the building up of a dialog, as they must be included in the unit tests for the dialogs.
An example of this file is shown below:
["common:common.goodbyes.main":["See you soon.","See you soon."],"common:common.greetings.main":["Hello. How can I help?"],"common:common.thankyous.main":["Happy to help","Happy to help."]}
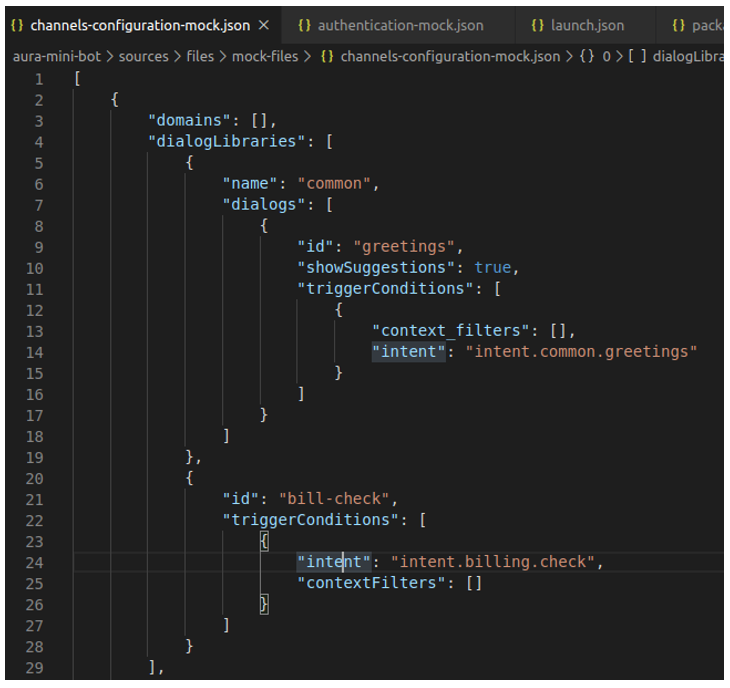
dialog-config.json
dialog-config.json is a mandatory file that maps each intent with a dialog from the library. Therefore, the dialog is launched if the intent is recognized.
Moreover, the file defines the suitability of the use case and allows the definition of context filters.
Each library must contain a dialog-config.json file that can be general or defined per language and OB.
This general configuration could be merged (with higher priority) with a specific file per language and OB:
dialog-config.<AURA_DEFAULT_LOCALE>.json
where AURA_DEFAULT_LOCALE contains the culture code to be used by default in the current deployment: en-gb, es-es, etc.
The dialog-config.json file follows the DialogLibrary model, excepting for the field onlyIn which is described below.
onlyIn property
The OnlyIn field is an optional field that indicates to which channels the dialog will be added.
If it is not present, it means that the dialog will be added to all the channels of the environment.
Configure it, if required, including an array of channels names.
contextFilters
A contextFilter allows to configure the behavior of a dialog depending on the fulfilment of specific conditions. You can define contextFilters in the dialog-config.json file for a specific intent.
Currently, the conditions that can be established correspond to the user’s subscription type (for example, prepaid or postpaid) and the type of contract (monomsisdn or multimsisdn). Depending on the fulfilment of the established condition (true or false), the behavior of the dialog is different.
For including contextFilters, edit the fields included in the ContextFilter model.
An example is shown below with authorization at library level, only a dialog, without contextFilters, that is returned without suggestions and that applies to all channels.
The following example includes authorization at library level, only a dialog, without contextFilters, that is returned without suggestions and that applies only to Novum and Movistar Home.
When developing a use case, you must include in this file the values for the library-specific configuration variables required for the use case.
These variables must be formatted as follows: [library_name]_[variable_name].
There can be multiple .env files corresponding to different libraries, environments, etc. All of them are automatically uploaded into a .env.libraries file during the make-up process.
A simple example of .env variables is shown below:
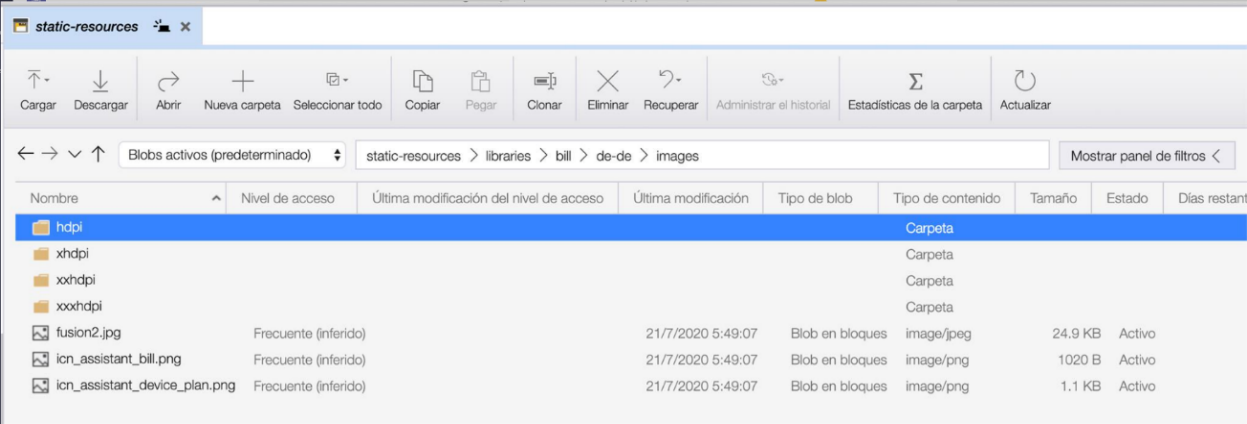
The resource folder is optional and, if existing, is placed on the directory:
[repository_name]/resources/ or [repository_name]/[library name]/resources/
It includes different folders with images or any other binary files (such as JSON files) required by the use case.
Resources in this directory can be organized in different sub-folders: a default folder and locale folders for different culture codes.
Declare in this folder the graphic resources of your use case, if existing.
Inside each folder /images, if required, resources may be organized in sub-folders depending on the image resolution.
If existing, the files in the resources/ folder are uploaded to Azure container pointed by the AURA_STATIC_RESOURCE_ENDPOINT and the AURA_STATIC_RESOURCE_SAS_TOKEN environment variables, during the during the make-up process.
package.json file
The package.json is a mandatory file and is placed on the directory:
[repository_name]/package.json or [repository_name]/[library name]/package.json
This file contains a plugin block, with the name of the service this plugin provides.
For including your use case, follow the structure shown below changing “newlibrary” with the name of your library:
"plugin":{"provides":["newlibrary"]},
The package.json can contain different dependencies. Useful ones for libraries are:
@telefonica/aura-bot-utilities/lib/aura-bot-common: common library shared among aura-bot Platform and the corresponding library for global use cases.
@telefonica/aura-bot-utilities/lib/aura-bot-library-util: library with specific utilities for libraries, such as resource loading, currencies, etc.
@telefonica/aura-logging: recommended for Aura logs tracking.
botbuilder-dialogs: dialogs classes.
4.1.1.3 - Build a dialog that uses async APIs
Guidelines for building a dialog that uses async APIs
Orderly steps for building an Aura Bot dialog that require to call asynchronous APIs
Introduction to asynchronous APIs
Asynchronous APIs are defined as APIs that do not provide the information back immediately, but with a certain standby time as they must perform a specific task derived from the user’s request. When the execution of this task is finished, these APIs invoke a callback and pass to the dialog the result of the task accomplishment.
The call to an asynchronous API must be included in the use case dialog and the payload from the API will be sent to aura-bridge, which is in charge of delivering it to the dialog that invoked this API.
This functionality can be useful, for example, in use cases that need to call to self-diagnostics APIs.
ℹ️ Current requisites:
This functionality only applies to Kernel APIs.
The correct operation implies that the dialog is in bypass mode.
An example of the usefulness of asynchronous APIs is shown below:
The user asks Aura: “Test my optical fiber connection”
aura-bot recognizes this request and triggers a specific dialog. The dialog, that must be configured in bypass mode, calls an asynchronous API.
The API takes T seconds in answering as Aura has to perform certain verification tests.
After that time, the API sends a callback to the dialog with a text that include the result of the verification tests and offers different solutions for the user to choose.
The user selects one of the options and the intended answer is provided to her.
How to call asynchronous APIs in a dialog
Follow these guidelines in order to make your dialog call an asynchronous API.
1. Check purposes and scopes
Firstly, you should add in the channel configuration (aura-configuration-api) all the necessary purposes and scopes in order to invoke the APIs.
⚠️ It must be done for all the intended channels* that will use the dialog.
2. Call asynchronous APIs in the dialog
For including asynchronous APIs in the dialog, it must work in bypass mode. This bypass mode must be started when the first call to the asynchronous API is made.
constcallbackId=stepContext.context.activity.id;constbypass: Bypass<BypassModelData>=awaitBypass.initialize(stepContext.context,this.timeout,{callbackId},'asyncCallback',BypassState.Init,getLiteral(stepContext?.context)('factotum:bypass.close.words'));constmessage=this.message4pCreate;message.diagnosis_callback_url=getAsyncCallbackUrl(stepContext.context,this.configuration,callbackId);constresponse=awaitthis.sendMessageTo4p(stepContext,this.url4p,message,corr);// Update bypassmode (if connection is ok)
bypass.state=BypassState.Bypass;bypass.data.tecnicalProblemId=response?.body?.id;awaitbypass.updateBypass(stepContext?.context,false);
This API has a parameter to send the callback where the response is received, in this case aura-bridge. To build this URL, there is a getAsyncCallbackUrl(@telefonica/aura-bot-common) method, belonging to the bridge-utils utility. This will return the callback URL based on the context, the configuration and an identifier that will be sent in the answer.
In each execution of the dialog, this must be finished (as bypass mode requires closing the dialog in each execution), so that it is reactivated by aura-bot when it finds the bypass mode.
Communication flow
The following diagram shows the request flow of a message to a dialog invoking an asynchronous API:
sequenceDiagram
    actor User
    participant Whatsapp
    participant 4P
    participant Bridge
    participant Bot
    participant Dialog
    User ->> Whatsapp: message
    Whatsapp ->> 4P: message
    4P ->> Bridge: message + apiKey + channelId
    Bridge ->> 4P: response 200
    Bridge ->> Bot: message + channelId
    Bot ->> Dialog: message
    Dialog ->> 4P: request async + callback bridge
    4P ->> Dialog: response 200
    Note right of 4P: when 4p finishes the request sends the response to the indicated callback (bridge)
    4P ->> Bridge: response request async
    Bridge ->> 4P: response 200
    Bridge ->> Bot: response request async
    Note right of Bridge: the response is sent as payload
    Bot ->> Bridge: response 200
    Bot ->> Dialog: response request async
Example of a dialog calling an asynchronous API
This is a dialog’s example that makes calls to an asynchronous API.
Firstly, the dialog checks in which bypass state is:
If bypass mode is not started, the asynchronous API call will be sent and the bypass mode will be initialized.
privateasynconInit(stepContext: WaterfallStepContext,corr: string){try{constcallbackId=stepContext.context.activity.id;constbypass: Bypass<BypassModelData>=awaitBypass.initialize(stepContext.context,this.timeout,{callbackId},'asyncCallback',BypassState.Init,getLiteral(stepContext?.context)('factotum: bypass.close.words'));constmessage=this.message4pCreate;message.diagnosis_callback_url=getAsyncCallbackUrl(stepContext.context,this.configuration,callbackId);constresponse=awaitthis.sendMessageTo4p(stepContext,this.url4p,message,corr);// Update bypassmode (if connection is ok)
bypass.state=BypassState.Bypass;bypass.data.tecnicalProblemId=response?.body?.id;awaitbypass.updateBypass(stepContext?.context,false);this.logger.info({msg:`Bypass initializated`,corr});}catch(err){awaitBypass.closeBypass(stepContext.context);awaitstepContext.context.sendActivity('Error call async api 4p');this.logger.error({msg:'Error call async api 4p',error: err.message,stck: err,corr});}}
If aura-bot is in bypass mode, the dialog could receive users’ messages. In the example, messages are ignored, but at this point the dialog can receive the response of the asynchronous API. If the sent identifier matches, the content will be sent to the user, thus ending the bypass mode.
In the bypass.data element, information can be stored in order to be used between different bypass cycles.
If the bypass has ended, the bypass time has expired or the user has used one of the closing terms, the dialog must close the bypass mode and perform the appropriate operations.
In the following example, a message is sent to the user.
Orderly steps for the configuration of Aura Bot in bypass mode
Introduction
The main functionality of bypass mode, is that once we are in this mode within a conversation, any input message to aura-bot will be directly sent to the external service. Likewise, any message from the external service will be shown to the user without going through the bot recognition system.
In section bypass-mode-middleware you can find detailed information regarding the middleware that manages the bypass mode and the bypass mode model.
How to configure Aura Bot in bypass mode
The configuration of aura-bot in bypass mode implies three steps that are shown below.
Initialize bypass mode
To use bypass mode, the dialog must initialize the bypass object.
Params Bypass.initialize method:
Property
Description
BypassState
Current bypass state
context
Current context of dialog
duration
Bypass life time in minutes
initialData
Initial data of bypass
payloadName
Name of the property in the channelData.payload used to send data to bypass.ex: 'handover'. For asynchronous APIs, it must be asyncCallback.
closeString
Comma-separated string or array of string with the words that directly close the bypass
Once the bypass mode is initialized, all user’s messages will be redirected to the dialog.
In bypass mode, when the dialog finishes all the actions of the use case logic, the dialog must be closed.
returnawaitstepContext.endDialog();
Execute bypass mode
Bypass information can be loaded into the dialog by calling the Bypass.loadBypass method.
Bypass data field is used to exchange information between bypass interations, it is an any object.
To update the information in the bypass object, the bypass object is modified to invoke updateBypass.
At any time the dialog can close the bypass mode by using the Bypass.closeBypass method.
awaitBypass.closeBypass(stepContext.context);
The bypass may also be closed because of its expiration or because the user has said any of the closing words.
In these cases, when the control returns to the dialog, the state of the bypass will change to BypassState.Closed and the closeReason field will indicate the reason for the closing.
Example of dialog with Aura Bot in bypass mode
exportdefaultclassAuraBotTestBypassextendsComponentDialog{/**
* Dialog id for the base Aura Bot app dialog.
*/publicstaticreadonlyid: string='test-bypass';publicTTL_BYPASS_MIN: number=0.25;// 15 seconds
/**
* logger
*/publicreadonlylogger=newAuraLogger.AuraBusEmitter('AuraTestBypass');publicreadonlyautoRegister: boolean=true;protectedconfiguration: Configuration;/**
* Constructor for Bypass Handover.
*
* @param {Configuration} configuration The configuration joi schema.
*/constructor(configuration: Configuration){super(AuraBotTestBypass.id);super.initialDialogId=AuraBotTestBypass.id;this.configuration=configuration;super.addDialog(newWaterfallDialog(AuraBotTestBypass.id,[this.handoverStart.bind(this),this.handoverContinue.bind(this)]));}/**
* Check Bypass Status
* INIT: Start Bypass Mode and create Bypass model into userData.
* BYPASS: Execute handoverContinue step dialog.
* CLOSE: Remove Bypass Model from userData and close Dialog.
*
* @param {WaterfallStepContext} stepContext The current step context.
*/privateasynchandoverStart(stepContext: WaterfallStepContext):Promise<DialogTurnResult>{constcorr=ContextUtils.getCorrelator(stepContext.context);try{letbypass=awaitBypass.loadBypass(stepContext.context);switch(bypass.state){caseBypassState.Off:
caseBypassState.Init:
bypass=awaitBypass.initialize(stepContext.context,this.TTL_BYPASS_MIN,{value:''},'test',BypassState.Bypass,['exit','disconnect','disable']);this.logger.info({msg:`Bypass for: ${bypass.intent.intent} initialized`,corr});awaitstepContext.context.sendActivity('Welcome to the CONCATENATOR, type "exit" to finish.');returnawaitstepContext.endDialog();caseBypassState.Bypass:
this.logger.info({msg:`Bypass for: ${bypass.intent.intent} continue`,corr});returnawaitstepContext.next(bypass);caseBypassState.Closed:
awaitBypass.closeBypass(stepContext.context);this.logger.info({msg:`Bypass for: ${bypass.intent.intent} closed`,corr});if(bypass.closeReason===BypassCloseReason.BypassExpired){awaitstepContext.context.sendActivity('The CONCATENATOR has expired!');}awaitstepContext.context.sendActivity('The final result was: [ '+bypass.data.value+']');returnawaitstepContext.endDialog();}}catch(reason){this.logger.error({corr,msg:'Error handover bypass',error: reason.message,stck: reason.stack});awaitstepContext.context.sendActivity(reason.message);returnawaitstepContext.endDialog();}}/**
* Executes the logic for Bypass
*
* @param {WaterfallStepContext} stepContext The current step context.
*/privateasynchandoverContinue(stepContext: WaterfallStepContext):Promise<DialogTurnResult>{constbypass=stepContext.result;bypass.data.value=bypass.data.value+stepContext.context.activity.text+' ';awaitbypass.updateBypass(stepContext.context,false);awaitstepContext.context.sendActivity(bypass.data.value);returnawaitstepContext.endDialog();}}
How to use prompts in bypass mode
Prompts can be used within a dialog working in bypass mode.
publicDEFAULT_RETRIES: number=2;publicpromptsNames={COMMAND_CHOICE_PROMPT:'command-choice-prompt'};constructor(configuration: Configuration){....// adds the prompt dialog to the Dialogs Set
this.customPrompt=newChoicePrompt(this.promptsNames.COMMAND_CHOICE_PROMPT,PromptUtils.getRetriesValidator(this.DEFAULT_RETRIES));...}
The prompt will be instantiated, when the bypass mode is initialized.
this.customPrompt=newChoicePrompt(this.promptsNames.COMMAND_CHOICE_PROMPT,PromptUtils.getRetriesValidator(retries));// To change retries we need replace original dialog for prompt
(this.dialogsasany).dialogs['command-choice-prompt']=this.customPrompt;returnawaitBypass.initialize(context,parseFloat(timeoutMin),{value:''},'test',BypassState.Bypass,closeWords);
The prompt can be sent to the user and and the returned value can be collected in the dialog.
privateasyncsendPrompt(stepContext: WaterfallStepContext):Promise<DialogTurnResult>{constchoicesText: Choice[]=[{value:'id-0001',action:{title:'Option 1 (id-0001)',type:'',value:''},synonyms:[]},{value:'id-0002',action:{title:'Option 2 (id-0002)',type:'',value:''},synonyms:[]},{value:'id-0003',action:{title:'Option 3 (id-0003)',type:'',value:''},synonyms:[]},{value:'id-0004',action:{title:'Option 4 (id-0004)',type:'',value:''},synonyms:[]},{value:'id-0005',action:{title:'Option 5 (id-0005)',type:'',value:''},synonyms:[]}];constpromptOptions: PromptOptions={prompt:'Hello, select one option: write the number, cardinal, ordinal or text',choices: ChoiceFactory.toChoices(choicesText)};returnawaitstepContext.prompt(this.promptsNames.COMMAND_CHOICE_PROMPT,promptOptions);}privateasyncfallbackStep(stepContext: WaterfallStepContext):Promise<DialogTurnResult>{awaitstepContext.context.sendActivity(`Option selected: ${stepContext.result.value}`);returnawaitstepContext.endDialog();}
4.1.1.5 - Build an operation
Build an operation in a developed dialog
Guidelines for building an operation within an already developed dialog.
Introduction
Besides first-level intents in Aura, that are associated to the execution of a dialog and have the following format: intent.[intent_name], there is another type of intents called Operations that do not have to be associated to a dialog.
An operation is an intention that makes sense within a context, that is, within a specific dialog conversational flow and when the dialog is waiting for an interaction with the user.
Operations are not recognized by Aura NLP but through a direct auraCommand or through a dialogContext.
Operations have the following format: operation.[operation_name].
How to build an operation
It is recommended to build a specific .ts file for each operation and place it in the following folder together with the use case dialogs’ files: [repository_name]/src/ or [repository_name]/[library name]/src/
An example is shown below:
If we want to select the seat for a flight and we say to Aura: “I want the seat 24A”. Then, the recognizer will choose an intention, but this intention only makes sense if it is within a sub-process, which in this case would be “buying tickets”.
In the following example, we have already opened a session in Air Europe and we have sent the intention to buy tickets:
Secondly, in the “buy tickets” section of the App interface, when the user chooses a seat, the App will send the following operation to select the seat:
Guidelines for creating/migrating a dialog to channelData v3
Orderly steps for building or migrating a dialog to be compatible with channelData normalized model (version 3)
Introduction
If you want your use case to be compatible with the new channelData normalized model (v3), both for a new developed use case or for migrating an existing one, you should:
Regarding the dialog’s configuration, which is found in the dialog-config.json file, inside settings/ folder, the channelData v3 dialog configuration must include a new property called channelDataVersion.
This property should be filled with the dialog’s version, in our use case v3.
If no version is specified, it is understood that the dialog works in v1 mode (for classic use cases).
As shown in the example, the format for intents in channelData version 3 only changes internally. Therefore, when defining an intent, it is not necessary to specify its version, as the dialog loading system will do it internally.
Dialog implementation
Building a dialog in channelData v3 is quite similar to legacy channelData dialogs, whose process is fully explained in Building an Aura Bot dialog.The main difference is in the dialog’s output, which should be compatible with the channelData version’s schema.
For this case, the utility ChannelDataResponseMapper.formatChannelDataV3() creates a valid channelData v3 response and can be used with properties obtained from the Bot Framework’s context:
There is another important utility in this code snippet, ContextUtils.getIntentConfig(). It is used if there are configurations that refer to the same intent but have different implementations regarding channelData versions. This utility will obtain the dialog’s configuration based on this version.
To avoid code repetition, you can reuse the code of existing v1 dialogs and extend it to be reused in v3 dialogs. To do this, follow these simple steps:
Modify your original v1 dialog to receive the dialogId as a param:
exportdefaultclassExampleDialogextendsComponentDialog{publicstaticid:string='example-dialog';privateconfiguration:Configuration;privatelogger:AuraLog;// Dialog id is received as a param or set to the original v1 value as default
constructor(configuration:Configuration,id:string=ExampleDialog.id){super(id);this.initialDialogId=id;this.logger=newAuraLog(id);this.configuration=configuration;super.addDialog(newWaterfallDialog(id,[this.examplePrompt.bind(this),this.exampleResult.bind(this),]));constconfirmCurrentPrompt=newChoicePrompt(this.promptsNames.CONFIRM_CURRENT,PromptUtils.getRetriesValidator(0));confirmCurrentPrompt.style=ListStyle.heroCard;super.addDialog(confirmCurrentPrompt);}...
Create your v3 dialog extending your v1 dialog:
import{Configuration}from'@telefonica/aura-bot-utilities/lib/aura-bot-common';importExampleDialogfrom'../../whatsapp/otp-confirm-user-phone-number-dialog';importOtpPhoneNumberV3Dialogfrom'./otp-phone-number-v3-dialog';/**
* Aura bot dialog implementation for otp phone number TODO
*/exportdefaultclassExampleV3DialogextendsExampleDialog{/**
* The id of the dialog.
*/publicstaticid:string='otp-confirm-user-phone-number-v3-dialog';/**
* Constructor dialog
*
* @param {Configuration} configuration configuration dialog
*/constructor(configuration:Configuration){super(configuration,ExampleV3Dialog.id);}}
If your dialog does not modify the response channelData, the process is finished.
But if your original v1 dialog modifies some channelData values, you need to use auxiliary methods to create this channelData and overwrite them in the v3 dialog:
Guidelines for the migration of use cases to Bot Framework 4.19, which is the version used by Aura’s upcoming architecture based on Microsoft skills protocol
Therefore, local use cases must be migrated in order to be compatible with this version.
The guidelines for the migration of use cases are summarized in the current document.
:warning:
The upgrade to Microsoft Bot Framework 4.19.0. comes together with the upgrade of node and other aura-bot dependencies in order to make Aura work properly.
In this section, a list of mandatory and recommended changes are explained, but consider applying them both, as it will prevent future incompatibilities.
Mandatory changes
Bot Framework version
The following dependencies must be included in the package.json file and set to 4.19.0 version:
In this section, changes which have been applied in the base code of aura-bot components are included.
⚠️ We highly encourage applying them, in addition to the mandatory changes.
aura-clients
There has been a big overhaul in client generation, using superagent 8, and in its auto-generation. In the document create/update an API client, the guidelines to use and generate them are included.
Our recommendation is to generate clients using these tools and use the already generated ones into your new developments.
eslint
We are migrating from tslint to eslint, due to its deprecation.
For this purpose, we recommend using our unified set of rules, which are defined in @telefonica/eslint-config-aura which can be found in npmjs.
Here is an example of how to apply this configuration to a project:
Create a .eslintrc.js with the following configuration:
We are migrating from Mocha to Jest, which is our testing library.
We encourage developers to use it in new implementations.
Making HTTP/HTTPS requests
As a reminder, request and request-promise libraries have reached End Of Life and were deprecated 3 years ago.
The use of an alternative such as superagent 8 is highly recommended, as keeping using request and request-promise can expose vulnerabilities.
AuraLogging
The library @telefonica/aura-logging was modified internally, to increase performance and enhance usability. Minor modifications are required, in order to use the new interfaces, which simplify the instantiation process. Note that even though the new interface was added, and is the recommended way to use logging, the legacy system also works by now (it is deprecated, and legacy code will be removed in next versions).
We have to replace the old code, shown in the following snippet:
4.1.1.8 - Migrate a use case to Evanescence 9.0.0 release
Migrate a use case to Evanescence 9.0.0 release
Evanescence 9.0.0 includes key modifications in aura-bot in order to keep Aura Platform up to date and improve its operation. For this reason, use cases dialogs created in previous releases must be migrated to be compatible with this version.
This document includes the guidelines for the migration of local use cases.
Introduction
Evanescence 9.0.0 release includes certain modifications and upgrades in botBuilder, nodejs version, Aura channels configuration, repos and libraries, etc. Due to these changes, use cases must be adapted in order to be aligned with the Aura Platform changes through the execution of mandatory and recommended modifications.
The modifications in aura-bot are summarized below, together with the required changes to execute in local use cases, which are fully detailed in succeeding sections:
Update of Node.js to version 20.0.0, to keep Aura platform up to date.
Update Aura channel data model (information about channels stored in the platform) to eliminate the extra effort of maintaining the platform internal components using different channel data models.
Update use cases dialogs to replace the references to the old data model with the new one:
All the imports of import {AuraChannel} from '@telefonica/aura-bot-common' should be changed to import { ChannelConfiguration } from '@telefonica/aura-clients/lib/aura-configuration-api-client'.
Also, all channel models imported from channel-models.ts in @telefonica/aura-bot-common should be imported from @telefonica/aura-clients/lib/aura-configuration-api-client.
The use of request and request-promise is deprecated.
The recommended dependency to use is superagent, but also got and axios are validated.
Further information: Making HTTP/HTTPS requests.
The use of zlib as a external library is deprecated.
The recommendation is to use the one included in node.js directly.
AuraLogger
Some releases ago, the version of AuraLogger was updated and, although the old version has been maintained until Dire Straits release, it will be removed in Evanescence release.
Please, follow the instructions for the new logger:
How to use aura-logging utility in Aura for controlling the login processes: aura-logging utility.
Migration from the old library @telefonica/aura-logging to the new one: AuraLogging.
4.1.2 - Test a dialog
Test an Aura Bot dialog
Guidelines for the design and execution of unit tests for the validation of an Aura Bot dialog
Introduction
When developing a use case, and once the use case dialog is built, it is required to test the dialog in order to verify its proper performance in terms of the conversational flow between the user and aura-bot
.
This step is mandatory for the OB developers in order to merge their Pull Requests.
This task comprises three main steps:
Generate the unit tests and place them on the use case library.
Execute the unit tests through the Test Adapter that simulates sending messages from the user to the bot.
Validate the dialog with the unit tests within an iterative process: if results are not satisfactory, the required modifications must be done in the dialog .ts file.
Generate the unit tests files
Within the use case library, it is recommended that the unit tests files are placed in the folder src/ folder.
They should be named with the same name as the correponding dialog, which must be also included in this folder:
Dialog: <dialog-name>.ts ➡ Test file: <dialog-name>.spec.ts
Moreover, if auxiliary files are required for the tests, they can be optionally placed in a folder named /test.
📌 For a proper understanding of the unit tests for dialogs, it is recommended that developers check the source code of the Aura dialog greetings from the library common and its associated unit tests, as an example.
The code of these unit tests can be also used as a template for designing your own tests.
Guidelines for a use case packaging, previous to its deployment
Instructions for packaging a use case
Once a use case is developed, and previous to its deployment, the use case must be packaged.
The use case’s library should be packed as a .tgz file executing the following command from the library root folder:
$ npm pack
The outcome of the command is a .tgz file with the deployable code of the library.
Although the library was not published in npm registry, it is recommendable to update the package.json version field with every change, to be able to track the specific version being deployed in all the environments.
This package is the one that will be installed and tested in the minibot or delivered to the Local Operation Team to be deployed.
4.1.4 - Test a use case locally
Test a developed use case locally
Once the use case is developed, and prior to its deployment, it is required to test it in local environment. Learn how to do it in this document
Test a developed use case
There are two different options to test your brand-new use case:
Using Aura Minibot locally, the recommended method.
Through full bot local deployment.
Test a use case using Aura minibot
It is highly recommended to use Aura minibot for testing the use case in your local environment.
For this purpose, read the Aura minibot guidelines to know firstly how to install and run Aura minibot.
Now, test your use case following these instructions:
Deploy the library to be tested. There are two options:
Add the library .tgz file to the file plugin-config.json (placed in the aura-bot-platform Github repository).
Note that manual addition of libraries to plugin-config.json file requires manual installation too: npm install <library>
Use the automatic script: npm run import-libraries
This process will install any .tgz in aura-bot-platform/local_modules folder.
The previous command will add the library in package.json and plugin-config.json files and will install them into the project.
If a further configuration of the library is required (for example, disabling some dialogs), this must be done manually by editing plugin-config.json available at the root of the aura-bot-platform folder.
In the simplest case, plugin-config.json is an array of strings, each of them containing the name of the npm package of a library. It is the way used by aura-bot to configure the plugins that are going to be deployed in the runtime of each instance and is the format defined by the library used internally by aura-botarchitect.
However, every element from this array can also be an object containing more information.
Note that the following two examples are totally equivalent:
When a package name is included in the plugin-config.json file, it is loaded when running the bot, and all the dialogs specified in the use case library file index.ts are loaded.
If for any reason, it is required to exclude one or more dialogs from the library, in order to not be loaded, they can be specified with the exclude property of the library, for example:
In the previous example, all the dialogs from aura-bot-bill-library and aura-bot-common-library are loaded, as well as all the dialogs from aura-bot-other-library.
However, the dialog ./first-dialog is excluded (relative path, as specified within the index.ts file).
Max response times due to graceful shutdown policy (Recommendation)
Due to the infrastructure configuration, we recommend that the response time for the developed use cases should be less than the time configured in the AURA_SHUTDOWN_GRACEFUL_TTLaura-bot environment variable. If the message takes longer than the configured time, it could be lost due to aura-bot’s graceful shutdown policy, resulting in the user not receiving a response.
4.1.5 - Deploy a use case
Deploy a developed use case
Guidelines for the deployment of a new use case in Aura, in order to make it available for Aura users and the recommended checks to be done before deployment
Check points before use case deployment
Once the use case is developed and tested, and before its deployment, it is required to make certain verifications to assure its proper performance in the intended channel.
Check that the intended channel is enabled
aura-configuration-api must include an entry for each one of the desired channels the Aura users are going to use to interact with the aura-bot instance.
For example, if the Novum application is the intended channel, an entry such as the following one should be included in aura-configuration-api:
At this stage, developers should validate with the local DevOps team that the channel name, prefix and identifier are the right ones. This channel identifier should be unique for the specific channel in Aura.
In case other channels are supported, additional entries such as the one provided in the example should be included.
Check that the required scopes and purposes are included
aura-configuration-api must include the Kernel scopes and the purposes granted for the user which are needed to cover all the enabled use cases (dialogs).
These scopes and purposes should include:
The ones needed to get the user’s access token
The ones needed to inject user’s information into the messages reaching the aura-bot instance
The ones needed for the functionality implemented by each enabled use case.
The information regarding which scopes and purposes are needed can be located in the Kernel documentation website](https://developers.baikalplatform.com/) and, more concretely, in the specific sections for each Kernel installation made in every available environment for each specific country.
For example, in case of the Kernel User Profile API, for the production environment in Spain, the scopes and purposes information can be located at the Authentication section in User Profile (3.5.1). Notice the sections highlighted in bold on the previous URL to infer the specific URL to use for each concrete country and environment.
It is important to note that if the scope information is omitted, the requested access token is issued for all the scopes declared when the client application was created in the Kernel infrastructure.
An example of the scopes and purposes to be included into the concrete channel configuration to be able to invoke the previous APIs is the following one:
Two examples, for the Kernel User Profile API and the Subscribed Products API, are shown below, where scopes and purposes are found:
The following snippet shows how to indicate the scopes and purposes needed by an Aura user to execute all the dialogs within a library (if authorization setting is set at library level) or one of the dialogs (if set at dialog level), which are included in the dialog configuration (dialog-config.json.
These scopes and purposes are validated before making the correspondent API request to Kernel, to handle permissions errors beforehand and avoiding making a request that will fail in the end.
Once your developed use case is successfully tested in your local environment, provide the library’s .tgz file to your Local DevOps Team, which is responsible for the use case deployment.
This process will include the publication of the use case library and aura-botmake-up and running.
4.2 - Train Aura to understand
Train Aura to understand: Use cases development over Aura NLP
Guidelines for every step in the process for personalized use cases development over Aura NLP, in order to make Aura understand the users’ requests.
This section includes the detailed process for the development of use cases over aura-nlp together with all the complementary stages that linguists and NLP experts need for this purpose.
The following figure schematically shows the workflow for the development of a use case over Aura NLP, where every stage is fully described in succeeding sections.
Firstly, get sure you fulfil all the prerequisites for the configuration of the NLP development environment.
Complementary processes: processes that may be carried out over external software when developing a use case and procedures followed by the Aura NLP Global Team.
4.2.1 - Prerequisites
Prerequisites for working with Aura NLP
Key requirements that are essential to configure the Aura NLP development environment, prior to the generation and training of an understanding model
Introduction
Before starting the development of use cases over Aura NLP, there are certain tasks that must be carried out in order to install and configure this component:
Local NLP experts must work over a local branch, thus cloning the intended global repository, following the steps in section Generate a local branch.
In the continuous process for Aura NLP optimization, Aura Global Team offers the possibility of splitting the NLP repository into different repos, for a more efficient way of working. Find the details in section Split Aura NLP repository.
The following sections show the content of each folder and file in the Aura NLP repository, for use cases.
Auxiliar script used by other scripts. This script must not be executed by the user.
no
…
ℹ️ Now, all the scripts need to connect with the centralized repository in Github aura-nlp-tools, so it is necessary that your Github user have read access to it. Ask the APE Team to get this permission.
catalogs
Folder required just in case the Aura NLP uses manual catalogs.
Config file containing files to be ignored by the version control system.
CODEOWNERS
Config file indicating which user or group is the code owner responsible for merging the code.
⚠️ This file must not be modified.
config.txt
File containing branch name of current working release, used in different scripts.
⚠️ This file must not be modified.
requirements.txt
File containing Python module dependencies. These dependencies are installed automatically during the training process.
⚠️ This file must not be modified.
Generate a local branch
The GitHub interaction allows the generation of local branches from the master branch.
Local NLP experts must carry out the NLP customization over the local branch, that is a clone of the NLP GitHub repository and, afterwards, create a Pull Request (PR) to push the local branch to master or release branch of the corresponding Aura release.
For this purpose, follow these steps:
Create the working directory:
mkdir-p~/Telefonicacd~/Telefonica
In order to clone the Aura NLP data project (Step 3), generate an SSH key and add it to your Github account.
For this purpose, follow the instructions in Github documentation or access to the document SSH configuration guidelines.
Where [country_code] is the acronym of a specific country, for example: es, br, de, gb
In order to clone the repository, it is possible to use some git client as GitKraken or it can be done directly from a console running the command: git clone <url_repo>
The project should be cloned in the folder where the above command was executed and the folder should have the same name as the repository: git clone git@github.com:Telefonica/aura-nlpdata-[country_code].git
Once the repository is cloned in the local machine, create a new git branch every time modifications need to be made concerning new use cases implementation, bug fixing, etc.
The name of the branch should start with one of the next reserved words, depending on the modification purpose, followed by a slash and a brief description:
feat/: new functionalities (for example, feat/weather_forecast_UC_#56624)
fix/: bugs or non-relevant modifications (for example: fix/balance_light_on_#117076)
release/: release synchronization
The command to create this new branch must follow this pattern:
As a recommendation, the OB’s aura-nlpdata repository can be split by groups of channels with similar uses cases. This provides a greater flexibility and independence to constructors.
At the same time, this functionality allows optimizing the training times, as only the pipelines of the repositories that undergo modifications will be retrained.
In this scenario, the format of the repository name must be: aura-nlpdata-[country_code]-[repo_name]
If OBs want to organize their NLP repo in this way, they must contact with Aura Global Team.
Finally, it is possible to allocate dedicated processing capacity of the C.I, system, if necessary, but only after a joint analysis with Aura Global Team.
4.2.2 - Development process
Stages in use cases development over Aura NLP
Guidelines that describe the orderly steps required for the development of a use case over Aura NLP, with the objective of making Aura understand the users’ utterances.
Introduction
These steps correspond to 3 main overall stages:
Build the understanding model and train it, that is, teach Aura to understand
Test the model through an ongoing and cyclical process until the accuracy in terms of intents and entities recognition is good enough
Certify the model and publish it
Prerequisites
Firstly, check that all the prerequisites are fulfilled:
Technical resources are available
Aura NLP Virtual Machine is installed and working
NLP data repository local branch is generated
1. Build up the NLP dynamic pipeline
For the development of a new use case, you must design a dynamic pipeline (pipeline.json file) through the most appropriate combination of stages and connectors for the recognition of intents and entities in the use case.
For this purpose, follow the guidelines in the succeeding sections.
1.1. Select the elements composing your NLP pipeline
Select the elements composing the pipeline (stages, connectors, normalization pipelines) depending on the recognition process required for the use case and its associated channel, and combine them for the design of the NLP pipeline.
The base file for the dynamic pipeline is pipeline.json, that must be generated in the following path from the NLP repository: aura-nlpdata-[country_code]/data/[language]/[channel]/pipeline.json
Edit this file including the required fields from all your selected stages and connectors and indicating the hierarchy between them:
name: Unique string that identifies the pipeline.
initial_node_id: Key of the element where the pipeline starts. It must appear as the first one also in the fields elements and links.
elements: Include in this field each element composing the pipeline (stages and connectors) and characterize them with two attributes:
type: Two feasible values:
stage: pipeline stage.
joint: connector between pipeline stages.
classpath: Class path of the specific element, that is, Python class reference from the root directory that must be included in order to use this stage.
To obtain the classpath of each element of your pipeline:
links: This field includes the hierarchy of the pipeline and connections between its elements.
Each link item contains the connectors (as keys) and their children are the stages or other connectors they deal with.
Each key in links must be of joint type.
See below a practical examples of the pipeline.json file:
Example 1. Garua pipeline.json file
The pipeline hierarchy can be seen in the boxes that contain other elements (PygrapeCanlaonPipeline and AcotangoNothresholdPipeline). Diamond boxes represent joint stages in the pipeline.
At this stage, it is recommended to validate the generated pipeline.json file in order to assure that it is consistent and that all stages and joint operations are correctly related.
For this purpose, the following verifications are recommended:
Each item of links includes dicts, where the key is a name and the values are lists of class names.
Each item of elements has type and classpath.
initial_node_id is a key in links.
Each key in links is a joint stage (by having type equals to joint in elements).
Each class belonging to the values of a links item is present in elements.
Different examples of invalid pipeline.json files
Invalid pipeline as WrongPipeline key does not have a list of class names in links section:
It is required to configure every element composing the NLP pipeline:
All NLP stages (excepting Length Adapter) and normalization pipelines are configured in the file nlp.json file for each language and channel placed in the [NLP repository]: aura-nlpdata-[country_code]/config/etc/nlp_config/nlp.json
As an exception, Length Adapter stage, Domain Selector connector and Disambiguation connector need a specific configuration in the file pipeline.json(args field) placed in the [NLP repository]: aura-nlpdata-[country_code]/data/[language]/[channel]/pipeline.json
To obtain the configuration of each element of your pipeline:
Every NLP stage needs particular resources for its training and testing that must be generated through the edition of a specific file for each of them.
3.1. Generate the files for each NLP stage
Generate the specific file for each stage composing your NLP pipeline and for each language and channel.
Find in the Files section the specific files required for this stage
Edit them
Place these files in: aura-nlpdata-[country_code]/data/[language]/[channel], where:
language corresponds to the culture code of all the languages supported by Aura (e.g., es-es, en-gb, de-de, pt-br).
The channel variable in the pattern is the channel code used to identify the specific channel (for example, mh (Movistar Home), mp (Movistar Plus)).
3.2. Generate dictionaries
If your NLP pipeline contains entities recognition stages (Entity Tagger Adapter; Standard NER and Gazetteer NER), it is needed to use the dictionaries sdict_items.json and sdict_aliases.json which are automatically generated from two sources: manual catalogs and/or URM data.
E2E test files perform the evaluation of accuracy in the recognition of domains, intents and entities, with two approaches:
Measurement of the overall accuracy of the pipeline (mandatory)
Measurement of the accuracy of the different stages of the pipeline (optional)
Once generated, when running the corresponding pipeline with the user’s utterance as the pipeline input, the system will compare the result provided by the pipeline with the expected values declared in the file (intent, entities and domain) to calculate the pipeline accuracy.
4.1. Define E2E test set files
You must define a file for the end-to-end evaluation of the system as well as regression tests: testset.json and regression.json. They both are dictionaries with the same structure:
phrase: Statement (sentence, phrase or isolated word) to be tested.
domain: Inferred domain for the user’s utterance. Possible values:
<domain_name>: name of the identified domain.
null: when domain is not of application.
default: in case there is only one domain or in case the grammar engine recognizes the whole utterance.
⚠️ The value for the field domain must be included using quotation marks for every value excepting for null.
intent: Expected intent.
options: List of .json containing certain packages of intents and entities to disambiguate (optional field).
entities: Expected entities. It is a list of json with the following fields:
value: entity value to be recognized.
e_type: entity type expected.
start_index: Initial position of the entity in the filled phrase.
end_index: final position of the entity in the filled phrase.
canon: expected canon for a given entity. If canon is deactivated or the entity recognizer does not work with canon, this field must be completed with the same value of the field value but normalized (e.g., “Film”, value: Film; canon: film).
This field is currently used in Spain for those use cases related to TV content searches (e.g., “search for films”) in which there are specific codes (labels) for searching particular content types that the API needs to find in the corresponding catalogs to resolve the petition.
For instance, in the utterance “I want to watch an action movie”, “movie” is the value of the entity whereas “movies” may be its canon and “MV” the label the API needs to find this type of content in the catalogs. The same could be applied to the genre “action”.
label: expected label. It can have the value null. The same use as canon is currently applied.
4.1.1. testset.json
At this stage, you should define the testset.json file in:
pipeline_eval/ob/[country_code]/resources/[language]/[channel]/testset.json
It must include the testing statements for the E2E evaluation of the system’s accuracy (sentences or isolated words) and in order to identify potential problems (e.g., unmatching, low confidence/score).
You can generate different testset.json files for different purposes, for instance, for evaluation of metrics or to carry out regression tests at a later stage. To calculate the metrics, all the different files are considered as a unique one.
Example of testset.json file:
[{"phrase":"put the film Coco","domain":"default","intent":"intent.tv.search","entities":[{"value":"Coco","e_type":"ent.audiovisual_film_title","start_index":13,"end_index":17,"canon":"coco","label":null}],"options":[]},{"phrase":"show me my bill","domain":"default","intent":"intent.billing.check","entities":[{"value":"bill","e_type":"ent.bill","start_index":12,"end_index":15,"canon":"bill","label":null}],"options":[]}]
4.1.2. regression.json
Define your regression.json file in the path:
pipeline_eval/ob/[country_code]/resources/[language]/[channel]/regression.json
It may include crucial functionalities that must work in the system or other key checks that are not included in testset.json. The purpose is to verify that modifications do not impact in existing features and to prevent the system from bugs.
Previously executed test cases are re-executed in order to verify the impact of a change.
4.2. Define stage-specific E2E test set files
ℹ️ This is an optional step if you want to include specific E2E tests for the evaluation of an isolated stage in the testing batch.
You can create specific E2E testsets files for the evaluation of an isolated stage.
It is done adding phrases that must be solved by this specific stage in order to ensure that the end-to-end evaluation is representative for that stage and avoid tests that do not evaluate it.
For the definition of specific E2E tests for this stage, follow these instructions:
Define specific phrases to be resolved by the OpenAI embeddings recognizer stage.
Execute the script build_local_testset.sh in: aura-nlpdata-[country_code]/tools/build_local_testset.sh
Once executed, it creates a stage-specific testset.json file in the path:
tmp_testsets/[country_code]/resources/[language]/[channel]/
Although the name of the file can never be modified, it is possible to modify its content, as long as its structure is respected, adding new test sentences or eliminating them.
To be able to use these E2E test, copy it in the following path for it to be packaged with the general testset.json file:
pipeline_eval/ob/[country_code]/resources/[language]/[channel]/
4.3. Best practices for the definition of E2E test set files
All intents should be represented within all the existing test testset.json files.
Firstly, generate a battery of statements for the use case, taking into account its semantic complexity. After that, divide all the generated statements into three groups in the way that statements in the training set are not included in the test sets and vice versa:
Training set
Specific NLP stage test set
E2E test set
Follow this pre-established ratio between training and testing statements: each intent must satisfy that the number of test statements is, at least, 20% of the total statements (training and test statements).
Depending on the specific NLP stages, the number of recommended testing statements must be representative. In general terms, and only as a guidance, the number of testing statements can be as follows:
Only CLU: 20% of statements in CLU training
CLU + Grammar: 20% of statements in CLU training
Only Grammar: 3 statements
More than 1 use case on an intent: 30 statements per use case.
The testing statements provided by the Product Team and/or UX Team must be included, as prototypical of a given use case.
The statements must include different variations (for example, with/without entities, etc.).
Keys of the testset.json file should be ordered from generic to specific ones:
{"phrase":"Search the film Frozen","domain":"domain.tv","intent":"intent.tv.search","entities":[],"options":[]},
The end-to-end test set is specific for each of the potential channels, as some use cases can be implemented in certain channels but not in others.
The field options is optional and only included when disambiguation is considered.
In case that, due to non-satisfactory results during the evaluation process, a re-training is required, linguists should check that all the modifications are included in the E2E tests.
In case roles are defined in entities for their recognition through the Grammar stage, they do not affect to the E2E tests (See more information regarding roles in Grammars in recognition of utterances with several entities in Grammars.
5. Train your understanding model
Once all the resources for each stage of the pipeline have been generated, you have to launch the training process in order to compare the testing batch against the training model.
For this purpose, the aura-nlpdata-[country_code]/tools folder of the NLP repository includes bash scripts, described in the following sections.
It is important to mention that the NLP system can be locally trained in an intelligent way, meaning that only the stages that have been modified (from a last training) are trained again, thus making the process much more efficient.
5.1. Set up configuration properties
Go the the path:
aura-nlpdata-[country_code]/tools/build_local_variables.sh.tpl
This file is a template used for configuration purposes, specifically for defining CLU connection parameters. To setup these properties, copy this file to a new one named build_local_variables.sh, removing the .tpl extension.
Fill in the config variables included in this file with the local credentials, as explained below.
This file is automatically ignored by git because it has been included in the .gitignore file, thus it must not be included manually.
The parameters to fill in the build_local_variables.sh script are shown below:
AZURE_NLP_MODELS_URL: URL for the Azure NLP models container.
GITHUB_TOKEN: Variable only required for ABACUS. Personal token provided by GitHub for secure authentication.
GITHUB_USER: Variable only required for ABACUS. Name of Github user.
REPO_OWNER: Variable only required for ABACUS. Name of the owner of the repository. Value: Telefonica.
TRAINING_WEB_AZURE_BASE_URL: Variable only required for ABACUS. URL base to get web package. It is provided by APE Team.
TRAINING_WEB_AZURE_SAS_TOKEN: Variable only required for ABACUS. SAS token with the required permission granted. It is provided by APE Team.
OAI_ID_SUBSCRIPTION: Azure OpenAI subscription ID. It can be obtained from the subscription website.
OAI_RESOURCE_GROUP: Name of resource group in Azure where the OpenAI applications are created.
OAI_ACCOUNT_NAME: Name of OpenAI resource to be used.
OAI_AZURE_TOKEN_CLIENT_ID: Client ID of Azure Portal – App registration page assigned to your app.
OAI_AZURE_TOKEN_CLIENT_SECRET: Application secret created in the app registration portal.
OAI_AZURE_TOKEN_TENANT: Value that indicates who can sign into the application.
OAI_USER: Parameter to identify the user of OpenAI application. It is unique for each developer in order not to overlap the OpenAI trainings. This value is used to create database collections.
RESOURCE_NAME_OPENAI: Name of resource to be used.
QDRANT_URL: URL of Qdrant service. In the virtual machine, it is http://localhost:6333.
QDRANT_API_KEY: APIkey of Qdrant service. In the virtual machine, it is void.
CLU_SUBSCRIPTION_KEYS: Parameter provided by CLU to create applications.
CLU_RESOURCE_NAME: Name of resource to be used.
CLU_USER: Parameter to identify the user of CLU application. It is unique for each developer in order not to overlap the CLU trainings.
CLU_STORAGE_RESOURCE_NAME: Name of shared resource to be used as library of applications.
CLU_STORAGE_SUBSCRIPTION_KEYS: Parameter provided by CLU to import and copy applications in CLU shared resources.
From this point on, linguists or NLP experts have two options to continue with the process:
OPTION A
OPTION B
Use our web tool ABACUS 1.0.0. following the guidelines in ABACUS documentation. (*) After using ABACUS, continue with the process for the NLP model deployment in section Certify NLP model accuracy
Execute the training script, following the guidelines below
Execute the training script:
aura-nlpdata-[country_code]/tools/build_local.sh
The script automatically creates a Python virtual environment to ensure the training and evaluation processes are being carried out in an isolated and encapsulated way.
All dependencies included in requirements.txt are installed in the virtual environment.
This script also validates the format of the involved files to ensure they match the specifications.
Once this script is executed, a tmp folder is created in the root repository. In this folder, you can find some temporary files corresponding to the resources, as well as the results and metrics obtained from the training process.
This directory is ignored by the git version control system because it has been included in the .gitignore file and it must not be included manually.
Intelligent training
The NLP system is trained in an intelligent way, so that the training of certain stages can be skipped, if they were previously trained, making the process more agile and efficient. This feature is based on the verification of an internal hash table and hash index generated after training.
The default behavior of the intelligent training is:
On one hand, only the stages that have been modified from a previous retraining in a specific channel are trained again. For this purpose, the system keeps a hash table in the tmp/ folder to detect changes.
On the other hand, if the configuration and the model generated to train a stage are the same as those of a previous stage but of a different channel, the last do not need to be trained and it will use the model trained before, making the process much more efficient.
To achieve this, an internal hash index is generated in the tmp/trained_models folder. It is important that the training files in every channel are exactly the same, with similar name and similar content.
However, the hash table and hash index can be managed manually in order to modify this behavior:
Management of the hash index to force the training of a stage in a specific channel
The hash table is included in the tmp/ folder after training. This folder must not be deleted when tests are executed, unless all the stages are to be re-trained again.
If you want to force the training of a specific stage, its corresponding file can be deleted in the specific channel.
For instance, if there are no modifications on a stage within the mh channel, but you want to force its retraining, then go to the tmp/ folder and delete the file saved_training_hashes.json in the path: tmp/recognizer/ob/ES/es-es/mh/resources/saved_training_hashes.json
Management of the hash index to force the training of a stage in different channels
The hash index identifies similar training files from stages of the same type that belong to different channels. It is included in the following folder:
tmp/trained_models/[stage]/[hash]/
[stage]: name of a stage.
[hash]: it is resulting from the content of the training files used for that stage and its specific configuration.
Each sub-tree contains the necessary files that were used during the training phase for that specific stage.
By default, if the same stage with the same training files exists in different channels, only the first one found is retrained.
If you want to force the training for a specific stage, in addition to eliminating the hash tables seen in the previous section, delete the tmp/trained_models/[stage] for this stage.
5.3. Generation of results from the training process
When the training process is finished, certain temporary files are created in the tmp/ directory in the root repository.
This folder contains the resources of the NLP model and results and metrics from the training process obtained from launching the testing batch against the training model.
Files generated in the tmp/ directory are organized as shown in the following tables:
Input resources for the NLP model
The input resources for the NLP training are placed on:
If you have defined stage-specific E2E testset files, then after the execution of the script build_local_testset.sh, some temporary files are created in the tmp_testsets/ folder:
Each channel folder contains the end-to-end test files for each stage (currently, only for OpenAI embeddings recognizer). These files are used for the evaluation of the pipeline in future trainings and can be extended with as many tests as desired.
Hash index including the modified training and test set files for a specific stage
tmp/trained_models/[stage]/[hash]/
6. Evaluate E2E accuracy locally
With all the results from the training process, saved in the tmp/results/ folders as explained before, now these results must be analyzed in order to evaluate if the NLP process is accurate enough for the recognition of intents and entities.
✅ If the local analysis of results is satisfactory at this stage, linguists can proceed to create the Pull Request.
⛔ If the analysis shows that the metrics are not good enough, meaning that the recognition is less accurate than required, then linguists must work again on the resources data to increase the performance and repeat the training process to re-calculate the metrics.
The analysis of results can be carried out from two different points of view, as explained in the following sections:
Focusing on each stage composing the pipeline
Or treating the pipeline as a single component to measure the end-to-end performance.
6.1. Evaluate NLP stages accuracy
For this purpose, analyze the following file, generated after training in the tmp/results/ folder:
This file is generated per each pipeline stage, country, language and channel in the above-mentioned path and contains the metrics of the stage performance:
However, these metrics depend on the specific stages of the pipeline as, for example, the normalizer stage requires no evaluation and others such as Domain Classifier, NER or the intent recognizers can use all or some specific metrics among the four previously defined.
Moreover, depending on the stage, it is possible to find other files such as:
cv_results.txt that includes metrics regarding cross-validation
fitted-params.txt with information about the algorithm and parameters used to train the model.
Below, an example of test_results.txt file is shown, that corresponds to the Domain Classifier stage evaluation. The values for precision, recall, f1-score and support for each domain classified are calculated, as well as the total average.
precision
recall
f1-score
support
None
0.40
0.84
0.54
32
intent.tv.search
0.97
0.89
0.93
122
intent.common.greetings
0.99
0.99
0.99
715
intent.billing.check
1.00
1.00
1.00
53
avg / total
0.84
0.93
0.86
922
6.2. Evaluate the overall pipeline accuracy
For the evaluation of the accuracy of the complete pipeline, you should analyze the files generated in the tmp/results/ folder after training:
In both folders, the files are shown below, both generated from launching the testset filestestset.json and regression.json:
- results.json
- details_[language]_[channel].csv
- test_results_by_intent_[language]_[channel].json
- test_results_by_intent_[language]_[channel].txt
- test_results_by_entity_[language]_[channel].json
- test_results_by_entity_[language]_[channel].txt
At this point, you are expected to analyse the results of the metrics included in these files in terms of accuracy and precision of intents and entities recognition. The files provide a detailed description about the testing statements that have obtained an unexpected result, as well as useful information for debugging purposes.
⚠️ If you use ABACUS, take into account that, currently, the tool only shows two test files:
results.json and details_[language]_[channel].csv
results.json
General file that includes the results of the overall pipeline performance through statistics regarding the number of entries misclassified in the test set and their relative scores.
The metrics that contain this file are defined below:
Accuracy intent: Percentage of successful intents.
Accuracy overall: Percentage of successful inputs.
Accuracy perfect in options: Percentage of successful inputs included when the first option is right.
Entity error: Number of inputs in which entity recognition has failed.
Intent error: Number of inputs in which intent recognition has failed.
Option error: Number of inputs in which options recognition has failed.
Missing entities overall: Ratio of training statements (sentences, phrases or isolated words) in which entity recognition is failed to the total number of statements.
Missing entities right intent: Ratio of training statements in which entity recognition is failed but intent recognition is successful to the total number of statements with the intent recognized.
Missing options overall: Ratio of training statements in which options recognition is failed to the total number of statements.
Missing options right intent: Ratio of training statements in which options recognition is failed but intent recognition is successful to the total number of statements with option recognized.
Perfect: Total number of inputs without errors.
Perfect in options: Total number of inputs without errors where the first option is right.
Test size: Total number of inputs in test set file.
Additionally, each time a Pull Request (PR) is generated, a comment appears automatically in the results.json content in the GitHub repository to ease the reviewing task.
An example of the results.json file is included below:
One file is generated per each pair language/channel, containing the original training statement, the expected values versus the obtained values for intents, entities and domains after the pipeline execution as well as an additional column with a tag summarizing the error type, with five possible values:
D: error when recognizing the domain.
I: error when recognizing the intent.
E: error when recognizing the entity.
O: error when recognizing the options.
W: special tag used when result expected is the first option in recognized result.
This additional column is able to have more than one of these values.
In detail, fields contained in the .csv file are:
phrase: Original statement (sentence, phrase, or isolated word) evaluated.
different: Summary of errors. It could have from one to three letters depending on the errors found. Suitable letters are D (domain), E (entities), and I (intent).
intent_obtained: Intent obtained by the pipeline.
intent_expected: Intent expected as defined in the test set.
entities_obtained: Entities obtained by the pipeline.
entities_expected: Entities expected as defined in the test set.
options_obtained: Options obtained by the pipeline.
options_expected: Options expected as defined in the test set.
domain_obtained: Domain obtained by the pipeline.
domain_expected: Domain expected as defined in the test set.
An example is shown below:
phrase
different
intent_obtained
intent_expected
entities_obtained
entities_expected
domain_obtained
domain_expected
options_obtained
options_expected
test_results by intent and by channel
They are both .txt and .json files containing the results of the pipeline performance per each pair language/channel and per intent, with the following format:
test_results_by_intent_[language]_[channel].json
The metrics that contain this file are defined below:
n: Number of successful statements.
total: Total number of statements by intent.
overall: Total accuracy by intent.
intent: Accuracy of intents by intent.
entities: Accuracy of entities by intent.
options: Accuracy of options by intent.
domain: Accuracy of domains by intent.
perfect_in_options: Number of successful statements recognized in the first option by intent.
Example of test_results_by_intent_[language]_[channel].json:
They are both .txt and .json files containing the results of the pipeline performance per each pair language/channel and per entity, with the following format:
test_results_by_entity_[language]_[channel].json
The metrics that contain this file are defined below:
n: Number of successful statements.
total: Total number of statements by entity.
overall: Total accuracy by entity.
intent: Accuracy of intents by entity.
entities: Accuracy of entities by entity.
options: Accuracy of options by entity.
domain: Accuracy of domains by entity.
perfect_in_options: Number of successful statements recognized in the first option by entity.
6.3. Analyze compatibility between global grammars and local grammars
⚠️ The current section only applies if both global and local grammars are implemented in the NLP recognition process.
As explained in Grammars management the two types of grammars defined in Aura NLP recognition process, global and local, must be aligned. For checking the compatibility between both grammars, you must generate two test set files:
data/[language]/[channel]/test_grammar/commons/testset.json
Test set with statements that must be recognized by both grammars (with identical results).
data/[language]/[channel]/test_grammar/disjoints/testset.json
Test set with statements that must be only recognized by the global grammar (as the local grammar is a subset of the global grammar).
Both tests are JSON files including a list of test phrases, as shown in the example:
["push play again","turn on the light"]
These tests run through an automatic process and, if some error is detected, it is reported. In this scenario, linguists must check the errors and fix them:
Errors in disjoints testset
Local grammar recognizes a global phrase
This error occurs when a disjoint testset statement is recognized by the local grammar. An example of this error message for the language es-es, channel mh and the statement “push play again”:
Localgrammarrecognizedaglobalphrase"push play again"forlanguagees-esandchannelmh
To resolve this problem, carry out the required modifications over the local grammar in order not to recognize the statement.
Global grammar does not recognize a test statement
This error occurs when a disjoint test set statement is not recognized by the global grammar.
Errorrecognizingphrase:" push play again "bypipelinegrammarforlanguagees-esandchannelmh
To resolve this problem, carry out the required modifications over the global grammar in order to recognize the statement.
Errors in the commons testset
Local grammar does not recognize the statement but global grammar does. The program logs the following error message:
Errorrecognizingphrase:"turn on the light"bylocalgrammarforlanguagees-esandchannelmh
In order to fix this error, improve the local grammar.
Global and local grammars recognize different intents
The program logs the following error message:
Recognizedphrase"turn on the"bybothgrammarwithdifferentintents.Pipelineintent: intent.domotics.light_off,Localgrammarintent: intent.domotics.light_on
In order to fix this error, improve both grammars to make them recognize the same intents.
Global grammar does not recognize the statement but local grammar does
The program logs the following error message:
Errorrecognizingphrase:"turn on the light"bypipelinegrammarforlanguagees-esandchannelmh
In order to fix this error, improve the global grammar.
6.4. Launch and test your pipeline locally (live mode)
Another useful functionality for a quick a real-time evaluation of the accuracy of the NLP model is running the pipeline in live mode in local environment.
To use this interactive execution approach:
Execute the script: aura-nlpdata-[country_code]/tools/run_local_pipeline.sh
Once the script is run, select manually both channel and language.
After that, insert testing statements representing potential users’ utterances through the command line in a responsive way.
Evaluate the response in real time to the input statement: the associated intents, entities and score provided by the system.
⚠️ It is important to run this script after the build_local.sh (that is, after training the model) to ensure the system has been trained and all the resources have been generated.
This script neither generates temporary files nor directories and it can be run from the IDE or the OS terminal.
7. Pull Request to release branch
All the steps in previous sections are developed in a local branch, cloning the NLP master branch.
Once the NLP model is validated locally, now you must create a Pull Request (PR) to your release branch in order to upload your files and apply for validation to the NLP Global Team.
Follow the steps explained hereunder to create a Pull Request in the GitHub web application:
Verify current working branch and files to be included in the Pull Request: git status
If, when executing this command, there are files that should not be uploaded, remove them using git checkout and the path of the corresponding file that appears in status.
Add the local files: git add <file_name>
Use git add -A to upload all files in your local branch.
Use git rm <file1> <file2> <file3> if you need to remove certain modified files.
Commit changes with the command git commit -a "[[<feat>]] change description"
Execute the command git pull as an optional step to check if, during the execution of these commands, there are modifications in the same path that can produce further errors.
Push local branch: git push origin <branch_name>
Create a Pull Request to release branch:
Access to the corresponding directory:
aura-nlpdata-[country_code]/
And create a Pull Request from this branch to master or to the current release branch.
The title of the PR should start with [[feat]], [[fix]], or [[release]] and contain a representative description of the modifications.
⚠️ REMEMBER… If you have used the tool ABACUS for the local training, testing and publication of your NLP model, now you must continue here with the process for its deployment.
When the Pull Request is launched, a validation process starts for the evaluation of the NLP recognition process: the so-named Continuous Integration (CI), defined as a process for the integration of code into a shared repository and its validation.
The validation comprises the execution of the training script build_local.sh by the NLP Global Team, that launches two processes:
An automatic validation process.
A manual review of results by the NLP Global Team.
Automatic generation of the NLP metrics
The system automatically generates certain metrics files for checking:
Accuracy of the whole pipeline
Accuracy of specific intents
Ratio of test set
Valid format of files
Modification without permission or by mistake of certain tasks
Complementary, the NLP Global Team carries out a review of results and report the existing problems.
The setting of an adequate threshold for the NLP system accuracy depends on the use case. Therefore, for a specific use case, the minimum accuracy should be agreed by L-CDO and the NLP Global Team.
After the Pull Request approval by Aura Global Team, the modifications are ready to be merged.
It can be very useful for Local Teams to know the process and criteria used by the NLP Global Team to validate the NLP model in order to focus on the critical points.
Discover all this information in Validation process by the NLP Global Team.
9. Merge and generate your understanding package
At this stage, after the Pull Request approval, you are ready to merge the Pull Request in GitHub. Modifications are then included in the NLP release branch.
The system automatically initiates the process for the generation of the new version of the understanding package (artifact): a new Debian package with the version and name of the corresponding Platform release. This process can last a few hours.
When the new understanding package is generated, an e-mail is sent to PMOs, communicating that there is a new version available.
The APE Team is in charge of communicating the OB the name of the new package.
Now, the Local DevOps Team is responsible of the deployment of the understanding package.
10. Deploy the new understanding package
Once the previous stages are completed, the Local DevOps Team should deploy the NLP artifact with the new or updated trainings.
Remember that OBs are able to deploy NLP packages through a hot swapping process.
Current catalog of stages, connectors and normalization pipelines existing in the Aura Platform release that can be used to compose the NLP pipeline
Aura NLP pipelines are the basis for the generation of an understanding model.
Linguists must design their pipeline through the most appropriate combination of stages for the recognition of intents and entities in the use case and join these stages through different types of connectors in order to set a specific behavior in the pipeline flow. They can also use nested normalization pipelines in order to homogenize the input request.
Afterwards, aura-bot will receive the recognized intent and the entity ID as an output from the NLP stage.
Review that all the included IDs in this file are existing in the corresponding sources and the matching between the intents and entities for this ID.
Review that the intent name is previously defined.
Include the intents in alphabetical order.
It is recommended to include in the E2E tests phrases to validate that the mapping is correctly done.
Configuration
This stage requires the following configuration in the nlp.json configuration file, in which the field intent_template should point to the use case intent.
As an example, if Exact match is the intent recognizer stage, it can be:
"intent_template":"intent.exact-match.faq"}
Intent Entity Mapper
Description
It can be used in:
Personalized experiences to configure a particular entity based on a specific intent.
In both scenarios:
An intent recognition stage (CLU, Exact match, Grammars, etc.) recognizes the user’s intent.
Intent Entity Mapper adapter is trained to map the intent with an entity name and label.
Aura NLP provides as an output the recognized intent and entity.
None Handler is a stage used when the intent recognized by the pipeline stages is None.
It modifies the None intent by the intent predefined in the file none_mapper.json for the specific domain. You can select any intent defined in the system to be pointed in this adapter.
None Handler requires one file: none_mapper.json that indicates, within a specific domain, which intent must be set if the recognized intent is None.
Therefore, if the domain is already defined and the system recognizes the intent None, then the intent is replaced by the value indicated in the file.
In this file:
Keys: different domains
Values: value for each key is the intent mapped with this domain.
Developers can select any intent defined in the system to be pointed in this adapter.
In the example, if the domain is domain.tv_content and the system recognizes the intent None, then this intent is replaced by intent.tv.none.
Configuration
This stage does not require any configuration.
Standard Threshold
Description
Standard Threshold allows the establishment of a threshold for the scores provided by preceding pipeline stages.
If the score obtained by the previous stages is lower than the established threshold, the Standard Threshold provides score 0 and the intent is replaced by the default value set in the configuration.
This stage is useful to prevent false positives and can be included in any place of the pipeline. The NLP Global Team recommends to set this threshold to 0.6.
threshold: value between 0 and 1 indicating the limit that triggers the action of the adapter.
This field can be defined per intent, thus having a different threshold for each intent.
The default intent must be always specified and, additionally, you can define a different threshold for other specific intent in order to improve the recognition process.
The NLP Global Team recommends to set this threshold to 0.6.
intent: this field contains an internal string identifier, that is associated if the score value is lower than the threshold.
In the previous example, the default config applies to every intent, with accuracy 0.1 and intent intent.default. But, specifically for the intent intent.test, the applied configuration has accuracy 0.8 and the associated intent is None.
Entity Tagger Adapter
Description
Entity Tagger Adapter is a stage that allows entities tagging through the definition of aliases and labels on them.
Where default represents the default value if the entity type is not included in the dictionary. The default field is not mandatory if all the entity types are defined in the file.
When a new entity is added, it must be included in the ner_entity_translation.json file with the expected behavior for the canon and label. Likewise, if the behavior for canon and label of an entity changes, it is required to update this file.
As best practices, entities should be ordered alphabetically.
ner_aliases.json
ner_aliases.json is an optional file required if you need to match/map the canon value to some other value requested by an API or search engine (currently, it is used by Spain to search content in the M+ database).
It is a JSON dictionary that must be generated manually, where:
Keys: entity types.
The value of each key includes another key-value pair:
Keys: labels
Value for each key: list of values contemplating just the canonical form(s) of the entity label
When adding a new entity, in case the entity should have a label, the label has to be assigned to the canons that we want to be identified by this label.
An example of ner_aliases dictionary is shown below:
The following example shows the mapping between alias-canon-label and their corresponding files:
docu (`sdict_aliases`) -> documentary (`sdict_items`)-> DC (`ner_aliases`)
Best practices for the edition of ner_aliases.json
Canon names should be expressed as in sdict_items.json, including capitalization, diacritic marks and punctuation.
Entities should be ordered alphabetically.
Labels inside entities should be ordered alphabetically.
Configuration
No configuration is required.
Description
If the disambiguation process cannot discern between multiple entities, then the intent returned by Aura NLP to the bot will be a disambiguation intent as a top intent at first level. In this intent, each option is composed of the original top intent and one entity per option. These options will be presented to the user for him to choose the most appropriate one.
The input for this stage includes: a list of intents; 1 top intent (intent recognized with the higher score); a list of entities.
The output from this stage includes: the top intent and different options (options in the data model) of recognized entities.
Here is an example of the input and output data models for the disambiguation by entities stage, where entities are IDs.
The fields determine how the disambiguation process is carried out:
intent_template: This field contains an internal string identifier corresponding to the intent resulting from this stage if no disambiguation can be carried out.
exact_match: value between 0 and 1. This value is used to check if any recognized entity score is above this value.
disambiguation_margin: value between 0 and 1 used to set an interval.
The combination of these two last parameters provides different scenarios:
The score of certain entities is equal or higher than exact_match (left graphic).
Only the entity with the best score is considered.
In case of tie (more than one entity with the highest score), all of them are returned.
The score of all entities is below the exact_match (right graphic).
Only those entities whose score is in the interval:
([top score], [top score - disambiguation_margin]) (both included) are considered.
Intent Disambiguation Adapter
Description
The goal of this stage is to disambiguate when, in an utterance, several intents are recognized.
If the disambiguation process cannot discern between multiple intents, then the intent returned by this stage will be a disambiguation intent as a top intent at first level. In this intent, each option is composed of one intent (that fulfils the conditions to be disambiguated) and a list of entities. These options will be presented to the user to choose the most appropriate one.
The general behavior of this stage is explained below:
The input for this stage includes: a list of intents and a list of entities.
The output for this stage includes: the different options for intents recognized during the disambiguation (options in the data model) and the original list of entities.
However, if black lists are defined, the behavior is explained in the following sub-section.
Intent disambiguation with a blacklist of intents
Aura NLP allows the integration of configurable blacklists of intents for a custom behavior of disambiguation.
In this case, the disambiguation mechanisms will not apply for the intents included in the blacklist. The use case constructors can edit a blacklist of intents in the nlp.json configuration file, filling the parameter intent_blacklist.
When there is a blacklist of intents, the disambiguation process behaves as explained below:
a. If the top scored intent is included in the intent_blacklist, the pipeline will return this unique intent (no disambiguation is launched).
b. If the top scored intent is not included in the intent_blacklist, then the predefined values of the configuration parameters come into play:
If the score of the top scored intent is higher than exact_match, then this intent is returned. In case of tie (more than one intent with the highest score), all of them are returned.
If the score of the top scored intent is lower than exact_match, then all the intents whose score is in the interval between the top score and the disambiguation_margin and are not in the intent_blacklist are returned.
In this case, the final intent will be the one described in intent_template (with a score of 1.0) and the selected intents will be placed in the options of the result.
This stage requires the following configuration in the nlp.json file for each country and channel, within the key intent_disambiguation.
The following parameters are required for this stage:
exact_match: Float number, value between 0 and 1. If the intent with the highest score is greater than this value, the result is this intent (if this intent is not included in the intent_blacklist).
disambiguation_margin: Float number. Margin between the highest score and the lower score considered for the response.
intent_template: String. Name of the intent that the stage returns when there are multiple options as response.
intent_blacklist: List of intents for which the disambiguation mechanisms will not apply. This parameter is mandatory. If there are no blacklisted intents, it will have to be an empty list.
⚠️ none intent must always be included in the blacklist, as it is not going to be offered as an option to disambiguate.
See an example of nlp.json file configuration for this stage:
General behavior of intent disambiguation stage (with no blacklist of intents)
Here is an example of the input and output data models for the intent disambiguation stage, belonging to the OpenAI embeddings stage, where the disambiguation margin is 0.2:
Output data model: the top intent is not included in the blacklist and more than one intent fulfil the condition for disambiguation » The options in the blacklist are ignored and the remaining intents are disambiguated.
The objective of this stage is to control the maximum and minimum length of a phrase in order to avoid it to be too short or too long. The maximum/minimum number of characters is configurable.
The stage discards the out-of-range phrases, as they are not recognized properly by Aura NLP, thus saving time and resources in the recognition process.
The Length Adapter returns a configurable intent template if the length of the received phrase in the pipeline message is higher than the maximum number of configurable characters or lower than the minimum one. The intent template is also configurable.
This stage requires a specific configuration in the pipeline configuration file pipeline.json, within the args section of this file, that contains the following fields:
max: maximum number of characters in the phrase of the received pipeline message.
min: minimum number of characters in the phrase of the received pipeline message.
intent_template: intent name to be returned if the number of characters is lower than the min value or higher than max value.
You can also configure more than one stage of the Length Adapter to return different intents for max or min length characters.
4.2.3.1.2 - Normalizers
Aura NLP normalizers
What are Aura NLP normalizers
Text normalization is the process of transforming an Aura user’s utterance (expressed in natural language) into a standardized one to be more easily recognized by Aura NLP.
During the normalization process, certain characters are replaced/removed in order to reduce the input diversity that does not provide relevant information to Aura, such as replacing uppercase by lowercase letters, removal of punctuation marks, etc.
Within Aura NLP, there are different normalization stages which are handled as simple stages, taking part of a pipeline. Additionally, it is possible to define pipelines composed only by normalization stages suitable to be nested into another pipeline.
The following sections show the Aura NLP normalizers included in the current catalog.
Cardinality
The cardinality normalizer replaces ordinal or cardinal numbers expressed in text characters by digits. It cannot be used for percentages. For this purpose, the normalizer uses a fork of the library Microsoft.Recognizers.Text.
Example: “Put the second $” –> “Put the 2$”; “$Give me ten results” –> “$ Give me 10 results”.
This normalizer does not require any file or configuration.
This normalizer provides an appropriate format to the amount and currency in an utterance, separating the currency symbol from the amount with a single space. The implementation of this normalizer can be consulted in
https://github.com/Telefonica/Recognizers-Text.
It is able to read the following currencies: $, € and £.
Split Punct normalizer tokenizes the utterance splitting by words and punctuation marks using the NLTK framework. This framework uses NLTK recommended word tokenizer (currently an improved TreebankWordTokenizer that uses regular expressions to tokenize the text, together with PunktSentenceTokenizer that builds a model for abbreviations, collocations and words starting sentences.
The model is used to find sentence boundaries. The result is the utterance split by words separated by single spaces.
Example: “Please!!, get out now… right?” –> “Please ! ! , get out now … right ?”.
This normalizer does not require any file or configuration.
The stop words normalizer removes stop words, defined as commonly used words such as “the”, “is”, “at”, “which”, or “on” from the user’s utterance. This normalizer is able to recognize stop words from different languages using the NLTK framework.
Example: “its ok, I prefer the first or second option too” –> “ok prefer first second option”
This normalizer does not require any file or configuration.
While the previous normalizer identifies predefined stop words from a database, the current normalizer allows the generation of a customized list of stop words, leading to a more accurate recognition of the user’s utterance.
The stop words from file normalizer requires the edition of the stop_words.json file to define a list of personalized stop words for each language and channel. This file must be placed at: aura-nlpdata-[country_code]/data/[language]/[channel]/stop_words.json
The stop_words.json file performs the following tasks during the training process:
- Transforms each word to lowercase
- Removes repeated words
This normalized file is saved in a new file normalized_stop_words.json, in a temporary directory.
When Aura receives a request from the user, the behavior of the stop words from file normalizer is shown below for a specific example:
Utterance: “its ok, I prefer the first or second option too” –> “ok prefer first second option too”
⚠️ When this normalizer is used, the words to be included in the stop_words.json file must be already normalized.
⚠️ The normalization does not validate if the defined “stop word” in the file is composed by only one word. Therefore, a “stop word” could be composed by more than one word.
The Word replacer from file normalizer allows the exchange of words in the utterance.
The word replacer from file normalizer requires the edition of the word_replacer_mapper.json file to define a mapper containing the final words as a key and the list of words to replace as a value for each language and channel. This file must be placed at: aura-nlpdata-[country_code]/data/[language]/[channel]/word_replacer_mapper.json
The word_replacer_mapper.json file performs the following tasks during the training process:
- Transforms each word to lowercase
- Removes repeated words in word values
This normalized file is saved in a new file normalized_word_replacer_mapper.json, in a temporary directory.
When Aura receives a request from the user, the behavior of the word replacer from file normalizer is shown below for a specific example:
Utterance: “howdy, i want the second alternative” –> “hello, i want the second option”
⚠️ When this normalizer is used, the words to be included in the word_replacer_mapper.json file must be already normalized.
⚠️ All values should be only composed by one word. If a value contains more than one word, the normalizer raises an error in the training process. If multiple words are allowed, the normalization process is not idempotent.
Aura NLP can include the Domain Classifier stage preceding CLU.
The Domain Classifier stage has the objective of providing a coarse and probabilistic classification of intents per pre-defined service domains (TV services, telecom services, etc.).
Including a Domain Classifier just before the CLU stage allows to have several apps, each of them expert on a specific domain (domain-restricted CLU). Once the user’s query is classified in its corresponding domain, it will be finely recognized by the CLU app pointed out by the Domain Classifier.
The Domain Classifier requires one training file called dispatcher.tef.json.
This file has the following fields:
metadata: metainformation such as name, modification date, domain or country of the linguistic model under consideration.
intents: dictionary, where:
Keys: domain name
Values: list of all the training statements (sentences, phrases or isolated words) under that particular domain.
The defined domains and statements must be the same as the ones used to train CLU in different instances. However, whereas each domain is trained in a different CLU app, the training for the Domain Classifier consists of all the training examples condensed in a single file and, instead of having the intent names as dictionary keys, it will have the domain names as dictionary keys.
To add a new domain, it is necessary to append it in the instance_map property of CLU configuration.
In addition, the training and test set files for the CLU stage must be generated including the new domain and this domain must be included, together with the statements, in the dispatcher.tef.json file.
It is recommendable to add comments (using double hash ‘## intent_name ##’) with the intent name, instead of removing it. In this way, it would be easier to know where the training statements of a given intent start from.
Put intents and utterances in the same order as in the CLU training. In that way, it would be easier to control changes.
Update the date of the file in order to know when the last modification was made.
Configuration
This stage requires the following configuration in the nlp.json file:
model_name: name of the algorithm used to train the model. NBayes, Rlogistica and RandomForest are the only values allowed.
apply_cv: this field indicates if the training uses cross-validation or not through true/false values.
n_cv_folds: number of folds for cross-validation.
fit_params: this field can have true/false values. If true, at the end of the training a file is created with the params used.
model_params: used as optional arguments for the algorithm selected.
tv_ratio: value between 0 and 1 indicating the percentage of test statements (sentences, phrases or isolated words) that composes the test set file.
pseudo_seed: value to initialize the seed in order to split training/test sets.
ngram_min: minimum ngrams used for internal term frequency.
ngram_max: maximum ngrams used for internal term frequency.
4.2.3.1.4 - Grammars
Grammars stage
Description of Grammars
Grammars provide an exact and lightweight utterance’s recognition method that offers a deterministic approach: specific utterances from the users are recognized if they are included in Grammars.
This approach makes Grammars interesting for Aura NLP, due to the existence of specific utterances from Aura users that must be recognized by Aura (such as common utterances from users or difficult ones that are hardly recognized by an intent recognition stage such as CLU).
This stage needs the following training files for each language and channel:
Dico: .dic files. These files include standardized content and must not be modified.
Grammar: .grf files, generated by Unitex.
[entity_extraction_mapper.json]
In addition, if local grammars are used, you must generate two additional files in order to evaluate the compatibility between the global and the local grammars. These two files are placed in the test_grammar folder:
commons/testset.json. This file is used for checking that both grammars, global and local, recognize the same test set statements. You must fill in the test set with key statements, as shown in the following example:
["call 600586375","turn on the light"]
disjoints/testset.json. This file is used for checking that the test set statements are only recognized by the global grammar (if the statements do not apply to the local grammar scope). You must fill in the test set with key statements, as shown in the following example:
["watch coco on tv"]
Configuration
This stage requires one of the following configurations per channel in the nlp.json file:
Use this configuration to define a single intent prefix with a pre-defined string.
In this example, the string intent is defined as the intent prefix in the mp channel.
Use this configuration to define a list of possible intent prefixes for the intent name.
The items passed inside the list intent_matches can be explicit strings or regular expressions written in string
format that the intent name must start with, according to the pattern passed in the regex. In order to define a regex
for the intent prefix, start the string with the keyword regex: and then add the regular expression.
In this example, the strings tef.int. or intent. are the two possible intent prefixes that the intent name must
start with in the mp channel.
There are two mutually exclusive allowed parameters per channel in the configuration file. They are defined below:
intent_prefix: prefix to be added to the intent determined by the grammar.
intent_matches: a list of strings with possible prefixes to be added to the intent determined by the grammar.
The strings passed can be explicit strings or regex written in string format. If a regex is passed, it must contain
the keyword regex: at the beginning of the string to be processed as a regular expression.
4.2.3.1.5 - Standard NER
Standard NER stage
What is Standard NER?
Standard Named Entity Recognition (Standard NER) is a process based on machine learning for information extraction that seeks to locate and classify named entities in a text into pre-defined categories.
The input for Standard NER is the normalized user’s utterance. It searches for entities in the utterance and categorizes the recognized words in pre-defined categories (labelling).
The first step when using Standard NER is the creation of dictionaries of entities that are knowledge bases (KB) used to train the NER to recognize, extract and label entities from the user’s utterance. Once the NER is properly trained, it will act as an intelligent system able to think by itself and recognize entities not previously existing in the dictionaries.
Moreover, Standard NER takes into account the entity context (considering not only the analysis of the isolated word but also the left and right words).
Which movies do you have with Clint Eastwood as actor?
Which movies do you have with Clint Eastwood as director?
Standard NER training flow
The training process for Standard NER is schematically shown in the figure below.
Aura Standard NER uses the BILOU tagging scheme for encoding information in a set of labels. BILOU encodes the Beginning, Inside and Last token of multi-token chunks while differentiates them from unit-length chunks.
The feature extraction phase extracts features from tokens, therefore helping their characterization and recognition. This process uses diverse ways to discriminate tokens with the purpose of extracting named entities: Cases; Numbers; Part of speech (PoS); Dictionary entries; Word itself. The feature extraction can also use features from adjacent words in order to take into account the entity context in the decision-making.
When the tokens are recognized as pre-defined entities, Standard NER replaces these tokens by labels. Therefore, the output generated is the user’s utterance tagged in the following way:
Standard NER input
Standard NER output
I want to watch the movie The Matrix
I want to watch the [ent.audiovisual_genre] [ent.audiovisual_film_title]
Standard NER is also capable of recognizing multi-token entities. (i.e., “Out of Africa”). However, Standard NER has a limitation: It can recognize an entity composed of a maximum of 6 tokens.
In the previous example the format indicates that, in the NLP recognition process, four stages are in charge of the entity extraction: Standard NER, Grammar, CLU and Gazetteer NER. But for a specific entity type, ent.audiovisual_film_title, the entity extraction is only done by CLU, and the stages Standard NER, Gazetteer NER and Grammar ignore it.
The name of the corresponding stage must be defined as shown in the example above.
The default key is not mandatory. If a specific entity type is not declared specifically or there is no default key within the entity_extraction_mapper.json file, then every entity of this type is discarded.
Configuration
This stage requires the following configuration in the nlp.json file.
The Standard NER config is distributed between the training-sner section (config fields for the training stage) and the ner section (fields for the production phase), with the following fields:
apply_cv: this field indicates if the training uses cross-validation or not through (true/false).
n_cv_folds: number of folds for cross-validation.
fit_params: this field can have true/false values. If true, at the end of the training a file is created with the params used.
model_params: used as optional arguments for the algorithm selected.
algorithm: name of the training algorithm, with the next allowed values:
lbfgs: gradient descent using the L-BFGS method
l2sgd: stochastic Gradient Descent with L2 regularization term
ap: averaged Perceptron
pa: passive Aggressive (PA)
arow: adaptive Regularization of Weight Vector (AROW)
verbose: boolean value to enable trainer verbose mode.
max_iterations: integer value with the maximum number of iterations for optimization algorithms.
tv_ratio: value between 0 and 1 indicating the percentage of statements (sentences, phrases or isolated words) that composes the test set file.
pseudo_seed: value to initialize the seed in order to split training/test sets.
explore_n_features: parameter used for the model evaluation.
repeat: parameter of BILOU algorithm that defines the number of repetitions for each value.
n_context_words: number of context words used in the BILOU algorithm.
phone_number_entity_type: type of entity to be assigned to an entity recognizer as phone number.
Additionally, for the configuration of dictionaries, two aditional fields can be included optionally:
urm_type_entities: from all the URM entities, in this section developers should indicate which ones they want to be downloaded.
headers_ignore: list with all the headers to be ignored.
4.2.3.1.6 - Gazetteer NER
Gazetteer NER stage
What is Gazetteer NER?
Gazetteer NER is a stage defined in the NLP recognition process as an alternative engine to NER for entities recognition. This stage is based on deterministic entity detection: it recognizes entities only based on their presence in the dictionaries, matching terms in the dictionaries with a user’s utterance.
Moreover, Gazetteer NER has been designed with entity-level discrimination capabilities, therefore enhancing its selectiveness by allowing it to detect only instances for a given entity type.
Gazetteer NER stage can appear in a pipeline in parallel to Standard NER (merging both results according to a fixed criteria) or sequentially (letting one engine detect entities not covered by the previous NER engine).
This stage is also capable of recognizing multi-token entities. (i.e “Out of Africa”). However, it has a limitation, as Gazetteer NER can recognize an entity composed of a maximum of 6 tokens.
No configuration is required for the Gazetteer NER in the nlp.json file.
4.2.3.1.7 - Full Entity
Full entity stage
What is Full Entity?
Full Entity is defined as a token or a multi-token that univocally corresponds to a specific Aura entity, this is the case when an entire utterance corresponds to a unique entity.
An example of Full Entity is the case of a user’s utterance as “Frozen” or “Ice Age”.
When part of an NLP pipeline, the Full Entity stage develops the following process:
The pipeline searches in the EntityMapper, that is, a database where Aura Full Entities are pre-defined.
If the utterance is recognized as a “full entity”, then the score is 1.0.
If the utterance is not recognized as a “full entity”, then the score is 0 and the pipeline proceeds through another path for the entity recognition.
The Full Entity Recognition is always preceded by NER, meaning that the input to Full Entity is a normalized user’s utterance, with labelled and classified entities.
Moreover, the Full Entity recognizer is able to identify the user’s intent, if the entity is associated to an established domain of intents (i.e., if the recognized entity is a film title, Full Entity identifies the intent as search). This process is done through a mapping file mapper_entities_intent.json which is defined in the correspondent configuration section.
Full entity stage requires the file mapper_entities_intent.json. It is a dictionary where:
Keys: entity types
Values: intent mapped with this entity type in case the user’s input corresponds to the entity at issue.
There can be four situations in which Full Entity is not be able to map the entity with an intent. Therefore, the pipeline flow continues to the next stage for the recognition of the intent:
Value is an empty string "" (entity with no intent assigned)
Value is null
Value is false
Entity type is not declared in file
Any other value, including the intent None, is recognized with score 1.0.
NLP Global Team recommends including always all entity types and being consistent when assigning the option.
If an entity should map None, declare it by adding None to ensure that there are no wrong potential recognitions.
OpenAI embeddings is a stage capable of recognizing the user’s statement and finding the one that most resembles it.
This stage allows using semantic search technology based on OpenAI capabilities, thus improving clearly Aura recognition capabilities.
This semantic search uses embeddings, which are real-valued vectors of numbers that represent the meaning and the context of tokens (in the case of Aura, text blocks) in such a way that words with similar meaning are expected to have similar vector representation. Embeddings work with concepts rather than with keywords. The information structured in these vectors allows OpenAI algorithms to make an optimized semantic recognition of the input texts.
To do so, it is necessary to use the embeddings method of OpenAI, a Microsoft service in charge of working with Machine Learning models and to use the Qdrant database to be able to feed all the frequently asked questions (FAQs).
The user’s utterance recognition through OpenAI embeddings has two major steps:
Training: Sets of structured questions and answers are extracted from data sources such as FAQs; afterwards, the OpenAI embeddings process is performed on those questions and, finally, the Qdrant knowledge base is fed with all of them.
Matching: Once the knowledge base has been loaded, it is necessary to publish it. This enables an endpoint to the Qdrant knowledge base, which can be used in the client application. This endpoint accepts a user’s question, performs the OpenAI embedding process and queries within Qdrant responding with the best answer from the knowledge base, along with a confidence score of the match.
⚠️ In the current release, this stage must not compete in parallel with other NLP recognition stages (CLU, Exact match, etc.) in the pipeline, in the way that the scores of each stage are compared.
⚠️ In order to use the OpenAI embeddings stage, it has to be previously enabled in the aurak8s installer, following the guidelines in the document Enable OpenAI deployment.
In terms of time, obtaining the embeddings through OpenAI and storing them in the Qdrant database is fast. Note that when training from the package, embeddings are not recalculated.
⚠️ In order to use the OpenAI embeddings stage, OpenAI has to be previously enabled in the aurak8s installer, following the guidelines in the document Enable OpenAI deployment.
On the other hand, if new training files are uploaded to Azure, all the embeddings are recalculated.
For OpenAI embeddings recognizer, two kinds of files are required: training and testing ones:
On one hand, training files placed in folder: aura-nlpdata-[country_code]/data/[language]/[channel]/openai-embeddings/training/ with extension .xlsx or .xls are used for training.
On the other hand, test files placed in folder: aura-nlpdata-[country_code]/data/[language]/[channel]/openai-embeddings/test/ with extension .xlsx or .xls are used for testing.
Configuration
This stage requires the following configuration in the nlp.json file:
openai_embeddings_recognizer: This field is used to configure the OpenAI embeddings recognizer stage.
openai: Specifies the OpenAI model to be used. This variable supports the following values:
model_base: Base model to be used. Check azure documentation to know more about values supported.
model_version: Version of the model to be used.
subscription_key: This value is replace automatically in training process.
deployment_name: This value is replace automatically in training process.
search_params: Specifies the parameters to be used in the database search process.
knn: Number of nearest neighbors to return.
exact: If set to true, will perform exact search, which will be slower but more accurate.
distance: Type of distance to calculate between vectors. This variable supports the following values: Cosine, Euclid, Dot.
database: Database to be used. This variable supports the following values: qdrant.
dataset_name: Dataset to be used. This value will change automatically.
intent_template: Intent name to return the response.
entity_label_template: Entity label to return the response.
entity_type_template: Entity type to return the response.
score_factor: Parameter used to weight the score of the response returned by OpenAI to be used during the winning response selection.
4.2.3.1.9 - Exact Match
Exact Match stage
What is Exact Match?
Exact match is a deterministic stage. Its purpose is to recognize the users’ requests with a 100% accuracy so as to match them with a specific and unequivocal intent.
When part of an NLP pipeline, the Exact Match stage develops the following process:
The pipeline loads the exact_match.json file, that defines certain intents and their associated utterances.
If the utterance is recognized as an “exact match”, then the score will be 1.
If the utterance is not recognized as an “exact match”, then the score will be 0 and the pipeline will proceed through another path.
As explained in the Exact Match description, this stage requires the file exact_match.json, that must include:
Specific intents.
Utterances that we want to be recognized as these specific intents.
An example of exact_match.json is shown below, for the case of several specific utterances such as “more information regarding control plans” or “discover control plans in Vivo” that we want Aura to recognize as the intent.plans.portability intent.
{'intents':{'intent.plans.portability':['more information regarding control plans','discover control plans','discover control plans in Vivo']'intent.tracking.waterfall':['intelipost eco berrini']}}
Configuration
No configuration is required.
4.2.3.1.10 - CLU
Conversational Language Understanding (CLU) stage
What is Microsoft CLU?
Intent recognizers are defined as specific NLP stages used to detect the intent in a user’s utterance.
Conversational Language Understanding (CLU) is a cloud-based API service that applies custom machine-learning intelligence to a user’s conversational and natural language text to predict the overall meaning and pull out relevant and detailed information.
CLU interprets the user’s goals (intents) and extracts valuable information from the utterance (entities),
for a high quality, nuanced language model.
Currently, Aura NLP includes two CLU features to recognize the user’s intent and associated entities:
Intent recognition: statistical recognition.
Entity recognition: declared CLU entities.
Therefore, from the user’s utterance, CLU returns the user’s intent and entities as an output, as well as the score
(number between 0 and 1 that shows the accuracy of the recognition process).
Regarding the stage training, the duration depends on the specific project, although in certain scenarios in can take up to four hours.
On the other hand, in CLU allows:
- Training all domains in parallel, so the maximum training time corresponds to the time taken by the “slowest” project.
- Reuse trainings, so if only one domain is changed, the rest are not retrained.
Specific CLU behavior of CLU with entities
CLU Azure services are able to recognize differents entities over the same part of the utterance or share parts of a utterance between
differents entities but for consistency, CLU stage applies the following rules in these cases:
When an entity is completely a substring of another entity, that is removed and the longest entity is preserved.
When any entity has partial collisions (share parts of utterance or similar), preserve both entities.
When two entities have exactly the same text but different types, preserve both entities.
When two entities have exactly the same text and same type, preserve the entity with more info (the one that has different canon that text/name).
intent_confidence_threshold: Float between 0.0 (by default) and 1.0 used by CLU to set a score threshold to determine the validity of a recognized intent.
domain: Domain name of this training file.
intents: JSON dictionary, where:
Keys: Intents.
Values: List with statements (sentences, phrases, words) to train the model.
These statements could contain entities, using 2 formats:
If an external entity extractor is used: [entity_type]
If CLU is used to extract entities using learned entities: [entity_value:entity_type]. This way of adding entities, build a set of entities of learned type.
entities: JSON dictionary, where:
Keys: Entities.
Values: Dict entities parameters to train the model. The feasible values (combination, lists, regex, prebuilts, learned) correspond to entity types for CLU and are described below:
lists: Dict field to include entities of list component type.
required: Boolean field to indicate if it is necessary to recognize an entity using this component. By default, is false, so in this case it is not necessary to include it.
values: Dict with canon as key and aliases as values.
regex: Dict field to include entities of regex component type.
required: Boolean field to indicate if it is necessary to recognize an entity using this component. By default, is false, so in this case it is not necessary to include it.
values: Dict with all regex components used to recognize this entity.
required: Boolean field to indicate if it is necessary to recognize an entity using this component. By default, is false, so in this case it is not necessary to include it.
values: List with all prebuilt components used to recognize this entity.
required: Boolean field to indicate if it is necessary to recognize an entity using this component. By default, is false, so in this case it is not necessary to include it.
The entities defined as learned are not necessarily defined as list, regex or prebuilts and vice versa.
Example of clu_trainingset.[domain].tef.json:
{"metadata":{"language":"es-es","description":"CLU trainingset for test domain","version":"dev","date":"2023-10-11","intent_confidence_threshold":0,"domain":"domain.default"},"intents":{"intent.common.greetings":["Hi","Hi, how are you?","Hello, what is up?"]},"entities":{"ent.audiovisual_sports_circuit":{"combination":true,"lists":{"values":{"names":["Le Mans","Misano"]}},"regex":{"values":{"expression-1":"circuito de [a-zA-Zãéíó]+( [a-zA-Zãéíó]+)*"}}}}}
Complete example of clu_trainingset.[domain].tef.json
{"metadata":{"language":"es-es","description":"CLU trainingset for test domain","version":"dev","date":"2023-10-11","intent_confidence_threshold":0,"domain":"domain.default"},"intents":{"intent.default.test1":["## comment","# Lanza este canal,","Esta [película:ent.audiovisual_genre] lánzala a la [tele:ent.device_tv] [ahora:ent.time_instant]","Quiero que me lances este [capítulo:ent.audiovisual_tv_episode_number] de la [temporada 3:ent.audiovisual_tv_season_number] a mi [tv:ent.device_tv]","¿Puedes lanzarme la [etapa:ent.audiovisual_sports_unit] del [Dakar:ent.audiovisual_sports_season_motor] a la [tele:ent.device_tv]?"],"intent.default.test2":["[ent.audiovisual_best]","Busca algún [ent.audiovisual_genre]","Dime alguna [ent.audiovisual_subgenre] por favor","Me gustaría ver una [ent.audiovisual_genre] que protagonice [ent.audiovisual_actor]","Ponme algún [ent.audiovisual_genre]","Quiero una [ent.audiovisual_genre] chula entre las de [ent.audiovisual_releases]","[ent.audiovisual_genre] sobre [ent.audiovisual_subgenre] y poder","¿Puedo ver [ent.audiovisual_actor]?","¿Tienes algo de [ent.audiovisual_subgenre] por favor?","Nos apetecería ver [ent.audiovisual_tvseries_title] [ent.audiovisual_tv_season_number] [ent.audiovisual_tv_episode_number]","¿Me puedes encontrar de la [ent.audiovisual_tv_season_number] el [ent.audiovisual_tv_episode_number] de [ent.audiovisual_tvseries_title]?","Busca la de [ent.audiovisual_sports_circuit]","Me gustaría ver algún [ent.audiovisual_sports_unit] de [ent.audiovisual_sports_unit], ¿cuál puedo ver?","Quería ver los [ent.audiovisual_sports_unit]","[ent.audiovisual_sports_player_driver] [ent.audiovisual_sports_circuit]","Hazme alguna recomendación con [ent.audiovisual_actor]","¿Qué [ent.audiovisual_genre] recomiendas?","Recomiéndame una [ent.audiovisual_sports_unit] de [ent.audiovisual_sports] o [ent.audiovisual_sports] para ver en la [ent.device_tv]","Recomiéndanos una [ent.audiovisual_subgenre] para [ent.time_interval]","¿Puedes recomendarme algo de [ent.audiovisual_genre] de [ent.audiovisual_subgenre] del [ent.time_interval_future]?"],"intent.default.test3":["Comenzar a reproducir","Aura vete al [ent.audiovisual_channel]","¿Podrías ponerme [ent.audiovisual_channel]?","Déjame ver de la [ent.audiovisual_tv_season_number] el [ent.audiovisual_tv_episode_number] de [ent.audiovisual_tvseries_title]","Necesito que me pases el [ent.audiovisual_tv_episode_number] de la [ent.audiovisual_tv_season_number] de [ent.audiovisual_tvseries_title] al [ent.device_tv]","Prefiero la [ent.audiovisual_subgenre] [ent.audiovisual_film_title]","Ver el [ent.audiovisual_genre] de [ent.audiovisual_documental_title]","¿Puedo ver [ent.audiovisual_film_title]?","Estoy interesado en ver esta [ent.audiovisual_tv_season_number]","Preferiríamos la [ent.audiovisual_tv_season_number] de esta [ent.audiovisual_genre]","Ver la [ent.audiovisual_tv_season_number]","Dame la que es en [ent.audiovisual_sports_circuit]","Pon a reproducir el [ent.audiovisual_sports_unit] del [ent.audiovisual_sports_team]","Quiero que reproduzcas la [ent.audiovisual_sports_unit] de [ent.audiovisual_sports_team]","¿Puedo ver la [ent.audiovisual_sports_unit]?","Que pongas la [ent.audiovisual_sports_season] [ent.time_instant]","Quiero que pongas la [ent.audiovisual_sports_unit] del [ent.time_interval]","¿Se puede ver la [ent.audiovisual_sports_unit] de [ent.audiovisual_sports_player_rider] de la [ent.time_interval_past]?"],"intent.default.test4":["Afín a [ent.audiovisual_tvshow_title]","Del estilo [ent.audiovisual_tvshow_title]","[ent.audiovisual_genre] que sean iguales a [ent.audiovisual_tvshow_title]"],"intent.default.test5":["Empieza de nuevo en el [ent.device_mobile]","Ponme el principio en la [ent.device_tv]","Ponme esta [ent.audiovisual_tv_season_number] desde el comienzo","Reproducir desde el principio la [ent.audiovisual_genre]","Inicia la reproducción de [ent.audiovisual_documental_title] desde el comienzo","Quiero que reinicies de [ent.audiovisual_documental_title]","Volver al principio de [ent.audiovisual_tvshow_title]","Vuelve a poner el [ent.audiovisual_sports_unit] de [ent.audiovisual_sports_season]"],"None":["6587234578164589234729878432874624","Pillata micropoliz gusta","gracioso y lento","graciosa y lenta","gracisa lenta","graciso lento","gtgt","gustan y gusy gusanillo di"]},"entities":{"ent.audiovisual_sports":{"combination":true,"lists":{"values":{"teamed":["baloncesto","fútbol"],"individual":["golf","tenis"]}}},"ent.audiovisual_sports_circuit":{"combination":true,"lists":{"values":{"names":["Le Mans","Misano"]}},"regex":{"values":{"expression-1":"circuito de [a-zA-Zãéíó]+( [a-zA-Zãéíó]+)*"}}},"ent.audiovisual_tv_episode_number":{"combination":true,"regex":{"required":false,"values":{"expression-1":"[0-9]+ capítulo","expression-2":"[a-z]*(último)* capítulo"}}},"ent.time_interval":{"combination":false,"prebuilts":{"required":true,"values":["DateTime"]}}}}
clu_testset.[domain].tef.json
JSON file where the statements for testing CLU must be included when the training_kind property in CLU configuration
is set to manual.
The extension .tef.json identifies these files as both JSON files and TEF format.
If there is only one domain, the file is named as: clu_testset.default.tef.json
The test set is a JSON file where:
Keys: Intents.
Values: List with testing utterances.
The testing statements must not be part of the training set, they should include linguistic variations of the training phrases and as authentic as possible (user’s logs).
Each domain declared in this file must be defined in the instance_map property of CLU configuration.
CLU testset should be saved in the same directory as the training file(s).
All intents must be represented in the testset, including the None intent.
Example of clu_testset.[domain].json:
{"intent.common.greetings":["Hello","What is up?","Hola","Good morning","Hello there"]}
Configuration
This stage requires the following configuration in the nlp.json file.
fetch_entities: It indicates whether you want to receive the entities from CLU or not.
score_factor: Parameter used to weight the score of the response returned by CLU to be used during the winning response selection. For example, if score_factor = 0,5 and the score returned by CLU is 1, the final score is 1*0,5=0,5.
n_clu_responses: Number of recognized intents that CLU can provide. By default, it is 1. It is used in the intent disambiguation stage, where CLU offers more than one intent that can be disambiguated afterward.
training_kind: Kind of evaluation training. Values manual and percentage are defined below:
percentage: a percent (defined in test_split_percentage field) of training set will be used to test train.
test_split_percentage: If we set training_kind as percentage, it is required to fill this field to set the percentage of training phrases that will be used to test this stage.
This field accepts an integer between 0 and 100.
instance_map: It replaces the project_name and subscription_key with the appropriate value of the CLU service. This replacement process is performed automatically.
project_name: Name of the project that contains CLU application. This field is automatically generated.
subscription_key: key needed to connect to CLU. This field is automatically generated.
4.2.3.1.11 - Embeddings Domain Classifier
Embeddings Domain Classifier stage
What is Embeddings Domain Classifier?
The Embeddings Domain Classifier stage is capable of classifying an input request into specific service domains (TV services, telecom services, etc.) from the ones pre-defined in Aura. This will help Aura NLP better understand the user’s requests and, ultimately, to more accurately resolve each received utterance.
A use case can include the Embeddings Domain Classifier stage at the beginning of an Aura NLP pipeline, before an intent recognition stage, so a user’s request (i.e., “I have problems with my wifi”) is firstly classified as belonging to a specific domain (in the example, “wifi”). Once classified as described, it can be precisely recognized by the most appropriate intent recognition stage for that domain.
The Embeddings Domain Classifier is based on OpenAI semantic search technology for the recognition of the domain in the user’s request. This semantic search uses embeddings, which are real-valued vectors of numbers that represent the meaning and the context of tokens (in the case of Aura, text blocks) in such a way that words with similar meaning are expected to have similar vector representation. Embeddings work with concepts rather than with keywords. The information structured in these vectors allows OpenAI algorithms to make an optimized semantic recognition of the input texts.
The process is schematically shown in the figure below and explained afterwards:
The Embeddings Domain Classifier stage is trained to map utterances with domains.
The Azure OpenAI embeddings model text-embedding-ada-002 generates embeddings (vectors) from the training statements.
If Aura receives a request from the user, Azure OpenAI generates an embedding from the input utterance.
This embedding is sent to Qdrant and returns the k-nearest neighbors (KNN). A search is done for the identification of the embedding (domain) more closely aligned with the user’s utterance embedding, together with its score. Different ways can be used to calculate the distance between vectors, which are defined in the configuration.
The output from Qdrant is the identified domain and the associated score.
⚠️ In order to use the Embeddings domain classifier, OpenAI has to be previously enabled in the aurak8s installer, following the guidelines in the document Enable OpenAI deployment.
The following sections include the necessary path and configuration for the Embeddings Domain Classifier stage, as well as the files required to train it.
The Embeddings Domain Classifier stage requires one training file called dce_training.json and one testing file called dce_testset.json.
These files have the following fields:
metadata: metainformation such as name, modification date, domain or country of the linguistic model under consideration.
intents: dictionary, where:
Keys: domain name
Values: list of all the training statements (sentences, phrases or isolated words) under that particular domain.
These files placed in folder: aura-nlpdata-[country_code]/data/[language]/[channel]/domain_classifier_embeddings.
The defined domains and statements must be the same as the ones used to train CLU in different instances. However, whereas each domain is trained in a different CLU app, the training for the Embeddings Domain Classifier consists of all the training examples condensed in a single file and, instead of having the intent names as dictionary keys, it will have the domain names as dictionary keys.
To add a new domain, it is necessary to append it in the instance_map property of CLU configuration.
In addition, the training and test set files for the CLU stage must be generated including the new domain and this domain must be included, together with the statements, in the dce_training.json file.
It is recommendable to add comments (using double hash ‘## intent_name ##’) with the intent name, instead of removing it. In this way, it would be easier to know where the training statements of a given intent start from.
Put intents and utterances in the same order as in the CLU training. In that way, it would be easier to control changes.
Update the date of the file in order to know when the last modification was made.
It is recommended to avoid writing duplicate intents in the same domain and also to avoid duplicate intents after normalisation. In case this happens, one of the intents shall be omitted.
It is important not to write the same intent for different domains and also to avoid duplicate intents after normalisation. In this case an error will occur and the training stage will fail.
Configuration
This stage requires the following configuration in the nlp.json file:
openai_embeddings_domain_classifier: This field is used to configure the Embeddings Domain Classifier stage.
openai: Specifies the OpenAI model to be used. This variable supports the following values:
model_base: Base model to be used. Check Azure documentation to know more about supported values.
model_version: Version of the model to be used.
subscription_key: This value is replaced automatically in the training process.
deployment_name: This value is replaced automatically in the training process.
search_params: Parameters to be used in the database search process.
knn: Number of nearest neighbors to return.
exact: If set to true, it will perform an exact search, which will be slower but more accurate.
distance: Type of distance to calculate between vectors. This variable supports the following values: Cosine, Euclid, Dot.
database: Database to be used. This variable supports the following values: qdrant.
dataset_name: Dataset to be used. This value will change automatically.
4.2.3.2 - NLP connectors
Catalog of NLP connectors
NLP connectors to compose the NLP pipeline
Aura Platform Team has implemented different types connectors to join NLP stages in order to configure the pipeline.
Select your intended connector in the left menu. Each of them is characterized by its description, path, files and configuration.
Section
Content
Role in the NLP process
Description
Identification and objective of the stage in the recognition process
Descriptive purpose of the stage in the recognition process
Path
Class path (Python class) of an element (stage or connector)
The path of each stage of the pipeline must be included in the file pipeline.json for building up the NLP dynamic pipeline
File
Specific training files and test set files for the NLP stage required to train and validate the NLP model
Linguists must generate these files for the training and the validation of the NLP model during the data resources definition
Configuration
Required configuration for each NLP stage
Configuration of each stage of the NLP model
4.2.3.2.1 - Logical connectors
Logical connectors
Introduction
Connectors are components that connect different NLP stages and control the flow of the pipeline. Specifically, logical connectors use the logical connectives to combine different stages.
The purpose of this connector is to execute in sequential order the stages that the connector contains and to return the status false.
This connector ignores the status of the different stages which are contained.
The purpose of this connector is to execute in sequential order the stages that the connector contains and to return the status true.
This connector ignores the status of the different stages which are contained.
These connectors work as follows: Stage B input is the output of its preceding stage A, with stage B output the result of summing both stages result.
The way the different stages are connected defines how the interactions between them are carried out. For example, two or more stages can run in a simultaneous competitive way, in which the winner is the stage with higher score or stages can be executed in a sequentially way in which a first stage generates information used by the succeeding stage.
BasePipeline
Description
BasePipeline is the simplest connector in charge of the sequential execution of the different stages composing the pipeline. These stages are executed in the specified order.
Path
auracog_pipelines.pipelines.base.BasePipeline
Configuration
No configuration is required
4.2.3.2.2 - Selection connectors
Selection connectors
Introduction
Selector connectors allow, when included on a pipeline, to specify which path of the pipeline is applied depending on a certain parameter.
Currently, only one selection connector is developed in Aura NLP: Domain selector connector.
Domain selector connector
Description
The domain selector connector allows specifying which path of the pipeline is applied depending on the recognized domain. Therefore, it has to be preceded by a domain classifier step.
In this example, once the Domain Classifier has recognized the domain, the Domain Selector stage comes into play. In case the recognized domain is “domain1”, the flow continues to “Pipeline1”. Otherwise, if domain is “domain2” or “domain3”, “Pipeline2” or “Pipeline 3” are selected respectively as the following stage.
If domain is 1, then pipeline continues with element defined in position 0.
If domain is 2, then pipeline continues with element defined in position 1.
4.2.3.2.3 - Disambiguation connector
Disambiguation connector
Description
The disambiguation connector is a joint stage that allows disambiguation between different pipelines (therefore, between different recognizers).
The general behavior of this connector is shown as follows:
It executes in parallel the different pipelines.
When the execution of all the pipelines is finished, the connector will carry out a disambiguation by intents, comparing the top results from the execution of the pipelines.
However, take into account that, if there is a blacklist of intents, this behavior changes, as explained in the following section.
Disambiguation connector with a blacklist of intents
Aura NLP allows the integration of configurable blacklists of intents for a custom behavior of disambiguation.
In this case, the disambiguation mechanisms will not apply for the intents included in the blacklist.
The use case constructors can edit a blacklist of intents in the nlp.json configuration file, filling the parameter intent_blacklist.
When there is a blacklist of intents, the disambiguation connector behaves as explained below:
It executes in parallel the different pipelines, with their corresponding stages.
The recognized intents from each pipeline are extracted (unless they have a None intent).
If the top scored intent of these pipelines is included in the intent_blacklist or its score is greater than the exact_match threshold, then this intent is returned.
If the top intent is not included in the intent_blacklist, then the predefined values of the configuration parameters come into play:
All the intents between the disambiguation_margin and the top score, and not present in the intent_blacklist, are selected.
If there is only one intent, it will be returned in a pipeline message.
If there is more than one intent, a pipeline message with the intent intent_template and a score of 1.0 is assigned. This pipeline message will contain nor entities, neither domains, but it will contain all the selected intents in pipeline messages as options.
This stage requires a specific configuration in the dynamic NLP pipeline pipeline.json.
The following parameters are required for this stage:
elements: definition of every element composing the pipeline (stages and joints). It must include:
Element name. In this case, JointDisambiguation
type: It must be set to joint
classpath: path to be included in order to use this stage:
auracog_pipelines.pipelines.joint.disambiguation.DisambiguationPipeline
args section: dictionary with the following fields:
exact_match: If the intent with the highest score is greater than this value, the result is this intent. Float number.
disambiguation_margin: Margin between the highest score and the lower score considered for the response. Float number.
intent_template: Name of the intent that the stage returns when there are multiple options as response. String.
intent_blacklist: list of intents that will be removed in case there are other options. If there are no blacklisted intents it will have to be an empty list. List of strings.
See two examples of configuration for the disambiguation connector:
Catalog of NLP normalization pipelines to compose the NLP pipeline
Aura Platform Team has implemented a set of normalization pipelines in order to be nested in the NLP model pipeline. They are built joining different normalization stages (normalizers).
In every use case, it is necessary to choose the most adequate normalization pipeline.
For example, if numbers are expected to be expressed with text characters (i.e., “one”), it is useful to include the normalization stage CardinalityNormalizer to turn them into digits (“1”).
Another example refers to the fact that written requests are required. In this situation, it can be important to include a normalization stage that reduces transcription mistakes.
Select your intended normalization pipeline in the left menu. Each of them is characterized by its description and configuration.
Section
Content
Role in the NLP process
Description
Identification and objective of the stage in the recognition process
Descriptive purpose of the stage in the recognition process
Configuration
Required configuration for each NLP stage
Configuration of each stage of the NLP model
4.2.3.3.1 - Nabro
Nabro normalization pipeline
Description and stages
Nabro is a pipeline used for the normalization of the user’s utterance through the execution of the following normalizers:
For the specific language and channel, in the nlp field of this JSON file, the key normalizer_pipeline_class must be filled in with the value:
auracog_pipelines.pipelines.normalization.nabro.NabroPipeline
For the specific language and channel, in the nlp field of this JSON file, the key normalizer_pipeline_class must be filled in with the value:
auracog_pipelines.pipelines.normalization.narugo.NarugoPipeline
For the specific language and channel, in the nlp field of this JSON file, the key normalizer_pipeline_class must be filled in with the value:
auracog_pipelines.pipelines.normalization.naeba.NaebaPipeline
For the specific language and channel, in the nlp field of this JSON file, the key normalizer_pipeline_class must be filled in with the value:
auracog_pipelines.pipelines.normalization.nikko.NikkoPipeline
For the specific language and channel, in the nlp field of this JSON file, the key normalizer_pipeline_class must be filled in with the value:
auracog_pipelines.pipelines.normalization.niseko.NisekoPipeline
For the specific language and channel, in the nlp field of this JSON file, the key normalizer_pipeline_class must be filled in with the value:
auracog_pipelines.pipelines.normalization.norikura.NorikuraPipeline
For the specific language and channel, in the nlp field of this JSON file, the key normalizer_pipeline_class must be filled in with the value: auracog_pipelines.pipelines.normalization.noro.NoroPipeline
Entities catalogs are the input for the Aura NLP dictionaries, used to recognize entities from the users’ utterances.
Introduction
Catalogs in Aura are knowledge bases of entities. These catalogs are the input for the generation of Aura NLP dictionaries to be included in an NLP model.
Telefonica Kernel URM is a database that includes data from different key content such as film title, documental title, TV series title, TV shows, actors’ name, directors’ name, etc.
Aura can connect to the URM and automatically download the URM content when the NLP dictionaries (sdict files) are generated. You can indicate in the configuration whether to take data from Azure or AWS.
Data that can be downloaded from the URM correspond to the section urm_type_entities in the nlp.json configuration file:
audiovisual_director
audiovisual_actor
audiovisual_documental_title
audiovisual_film_title
audiovisual_tvshow_title
audiovisual_tvseries_title
The URM database should be continuously updated, in order to show the most recent content and scheduled programs (for instance, new films or series in Movistar + catalog).
As NLP dictionaries automatically include the data from the URM database, two situations are found that can lead to the generation of manual catalogs:
The URM must be completed with the very latest content that can be offered to the user and must be recognized by Aura. In case a relevant entity is missing, the catalog must be updated manually.
Linguists can detect mistakes in URM data: wrong formats, typos, missing aliases, etc. To overcome this problem, the manual updating of catalogs is required.
Manual catalogs
Catalogs can be updated manually in the catalogs/ folder, included in Aura NLP data directory: aura-nlpdata-[country_code]
This folder contains, categorized by language and channel, all the files required for the manual updating of entities.
The final goal is to complete the dictionaries with entities that should be recognized by the NLP system (when a NER stage is used) and to complete and/or refine data from URM (in case this source is used).
Guidelines for the generation or update of manual catalogs
As explained before, apart from automatic catalogs, that provides data from Kernel URM database, manual catalogs can be also generated to complete the automatic ones with new entities or correct mistakes.
The following sections include the orderly guidelines for the generation or update of manual entities catalogs.
1. Identify content
Identify content to be updated in dictionaries: very latest content that must be included in dictionaries and recognized by Aura (for instance, new films or series in Movistar+ catalog).
Check if this content (entities) are included in the URM database:
These specific entities are missing
Any mistake is detected in URM data regarding these entities (wrong formats, typos, missing aliases, etc.)
2. Access the catalogs/ folder and edit it
Access the catalogs/ folder in:
aura-nlpdata-[country_code]/catalogs
Now, you should edit the different files, each one with its corresponding data as shown in the following sections.
2.1. auth/ folder
Working directory:
aura-nlpdata-[country_code]/catalogs/[language]/[channel]/auth/
auth/ folder contains multiple JSON files including prioritized content that are added to the sdict_item.json and sdict_aliases.json dictionaries.
Follow these steps to edit the auth/ folder:
Organize data into different JSON files by entity types (for example, one file for time entities and another for tv entities).
It is mandatory that files names have the format:
<file_name>.ent.json
Add a file named most_relevant_content.ent.json for those key entities that must be recognized with 100% accuracy related to these fields:
Film title > ent.audiovisual_film_title
Documental title > ent.audiovisual_documental_title
TV series title > ent.audiovisual_tvseries_title
TV shows > ent.audiovisual_tvshows_title
Add a JSON file for organizing any other entity type or topic (for example, movistar+_sports.ent.json.
Edit each JSON file:
metadata field should include the following fields:
format: specification of format used in file.
name: representative name to identify the content of the file.
version: this should be updated when changing the file.
Keys: entity types
Values: list of entities
If the item is a string, it is considered a canon and deleted from the rest of the entity types where it is found.
If it is a list, the first element of the list is considered a canon and the rest of values are aliases for this canon. The canon is deleted from the rest of the entity types where it is found and aliases are removed from the sdict_aliases.json dictionary.
Example
{"metadata":{"format":"tef:dict:entity","name":"AURA Movistar XXX","version":"1.0"},"ent.audiovisual_sports_team":[["Real Madrid","el Real Madrid|comment","##el Real Madrid","Madrid"],["Sevilla|comment","el Sevilla","Sevilla club de fútbol","Sevilla futbol club"]]}
Best practices
Comments can be added, since the script ignores them:
Adding “##” before a value. ("## Spanish Football Teams")
Adding “|” in a value or entity type, the text after this symbol is not considered as part of the entity (“el Real Madrid|comment”)
Maintain correct indentation to ease catalogs reading.
Declared entities, canons and aliases should be ordered alphabetically.
Capitalize: first letter for proper nouns, titles, teams, companies, etc. (“The Wedding Date”); acronyms (“Chelsea FC”).
Write punctuation correctly within values. For example, “Chelsea F C” could be written also as “Chelsea F.C.”. Do not include both forms because it could cause a duplicate due to normalization process.
If the language includes words with diacritical marks, write values correctly.
Check that the canon is the expected in case the API expects a specific one.
Compare canon/alias included in catalogs to avoid overlaps and conflicts.
Avoid duplicates.
2.2. add/ folder
Working directory:
aura-nlpdata-[country_code]/catalogs/[language]/[channel]/add/
add/ folder contains multiple JSON files including additional or non-prioritized content to be added to the sdict_item.json and sdict_aliases.json dictionaries. It is used to complement information in dictionaries.
In case there is non-prioritized content, this folder will be empty.
Follow these steps to edit the add/ folder:
Organize data into different JSON files by entity types (for example, one file for time entities and another for tv entities).
It is mandatory that files names have the format:
<file_name>.ent.json
Edit each JSON file:
metadata field should include the following fields:
format: specification of format used in file.
name: representative name to identify the content of the file.
version: this should be updated when changing the file.
Keys: entity types
Values: list of entities
If the item is a string, it is considered a canon and added to sdict_items.
If it is a list:
The first element of the list is considered a canon and added to sdict_items.json.
The rest of values are aliases and are included in sdict_aliases.
Best practices for the auth/ folder also apply to add/ folder.
2.3. precedence.json file
Working directory:
aura-nlpdata-[country_code]/catalogs/[language]/[channel]/precedence.json
precedence.json file establishes the priority of an entity type over the rest in the sdict_items.json dictionary.
Follow these steps to edit the precedence.json file:
Edit the file including:
Keys: entity type
Values: list of entity types over which the key prevails.
Example
If the entity “Real Madrid” is present in both ent.audiovisual_documental_title and ent.audiovisual_sports_team, and we want soccer teams to have priority over documentaries, it has to be defined in precedence.json like this:
Entities declared should be ordered alphabetically.
Values inside entities should be ordered alphabetically.
Be careful to maintain the required JSON format.
Include values as they are found in dictionaries, respecting capitalization, diacritical marks, etc. The system deletes not only these values but also their normalized version.
4.2.5 - Aura NLP dictionaries
Generation of Aura NLP dictionaries
Aura NLP dictionaries are knowledge bases used to recognize entities from the users’ utterances.
Process at a glance
Update catalogs
. Firstly, check if catalogs must be updated to include the latest content.
. If required, update catalogs manually.
The recognition of entities in the Aura NLP model is based on dictionaries: knowledge bases of entities that are included in the NLP model as part of stages for the recognition of entities in the user’s utterance.
There are two types of dictionaries defined in Aura:
Items dictionary: it includes all the different values in its canonical form for each entity type. The canonical question is defined as the most common way to mention a specific entity. This file distinguishes by entity types.
Alias dictionary: it includes the canonical value of a given concept (those found in items dictionary) and its list of aliases, that is, the most significant alternative names of an entity canon. This file does not distinguish by entity types.
For example, a TV use case can include the following dictionaries:
Items dictionary: ent.audiovisual_actor: [Robert de Niro, Dustin Hoffman; Al Pacino, …]
Alias dictionary: Robert de Niro: [De Niro, Robert Niro, Robert Deniro, …]
Aura NLP uses two dictionaries for entities recognition:
Items dictionary: sdict_items.json
Alias dictionary: sdict_aliases.json
Items dictionary
sdict_items.json consists of a dictionary whose keys are the names of all the entity types and the value of each key includes a list with the canonical values of those entities. All canonical forms should be contemplated in this file.
This file is automatically generated based on the data from manual catalogs and data from URM.
An example of sdict_items.json dictionary is shown below:
sdict_aliases.json contains all the possible values (aliases) for an entity. These aliases are different ways to refer to the same value.
The dictionary keys are the canonical value of a given concept (those found in the sdict_items.json file) and their value is a list of aliases, meaning all the potential ways of referring to that concept. This file does not distinguish by entity types.
The alias dictionary is automatically generated based on the data from manual catalogs and data from URM.
Examples of the sdict_aliases.json dictionary are shown below:
In these stages, as part of the step for defining data resources, where all the training files required for every specific stage must be generated, the sdict dictionaries must be included.
For this purpose, follow these steps:
1. Check if content in catalogs is updated and complete
Manual catalogs are one of the inputs for NLP dictionaries.
At this stage, you have to check if their content is totally updated or if it is required to generate a newer version to include the very latest content (for instance, new films or series in Movistar+).
⚠️ If the catalogs content is identical in different channels, the dictionaries can be generated just for one channel and then copied to the rest of them.
2. Configure the NLP model to use dictionaries
Dictionaries require a specific configuration, that must be set during the configuration of the NLP model, with two differentiated stages:
2.1. Dictionaries configuration in nlp.json file
If dictionaries are used, specific sections must be included in the nlp.json file, placed in the path:
aura-nlpdata-[country_code]/config/etc/nlp_config/nlp.json
urm_type_entities: from all the URM entities in the catalogs, it indicates which ones must be downloaded.
headers_ignore: list with all the headers to be ignored.
ner: this section is required as the StandardNer class is instantiated when building the catalogs:
n_context_words: number of context words used in the BILOU algorithm.
phone_number_entity_type: type of entity to be assigned to an entity recognizer as phone number.
2.2. Dictionaries configuration in build_catalogs.cfg.tpl
The file build_catalogs_cfg.tpl is only required if the dictionaries sdict_item.json and sdict_aliases.json are generated from the manual catalogs in three specific stages: Standard NER, Gazetteer NER, and Entity Tagger Adapter.
It is placed on the path: aura-nlpdata-[country_code]/config/etc/build_catalogs.cfg.tpl
Edit this file to indicate, for each language and channel, if URM data is to be downloaded and used as source for the generation of dictionaries.
For this purpose, the following fields must be filled, depending on the script used for the generation of dictionaries:
If the new global scriptbuild_local_catalogs_etl.sh is used, the following parameters must be filled: Recommended method
urm_mapper: dictionary that indicates, for each language and channel, if it has to download the URM.
To connect to API URM:
$API_URM_ENDPOINT
$USER_KERNEL_ACCESS_TOKEN
$PASSWORD_KERNEL_ACCESS_TOKEN
If the original scriptbuild_local_catalogs.sh is used, the following parameters must be filled:
urm_mapper: dictionary that indicates, for each language and channel, if it has to download the URM.
resources_provider: provider, that can be aws or azure.
container: folder that includes the data to be downloaded. It can be $AWS_S3_BUCKET or $AZURE_CONTAINER.
key and secret: these fields correspond to provider credentials.
3. Set up specific configuration variables for dictionaries
Before training your understanding model, it is required to set up the configuration properties. Check the general process in the previous link.
If dictionaries are included in the model, there are certain additional variables required for the execution of the dictionaries script, which are enumerated below.
Moreover, the last six variables must only be defined when data from URM is included for the generation of the dictionaries.
Remember that you need to indicate the name of the CATALOGS_RESOURCES_PROVIDER provider and the container where the data is. Then, you only need the credentials of the chosen provider:
export CHANNEL_LIST: list of channels where dictionaries are generated. For example: export CHANNEL_LIST="la_global mh mp"
export LANGUAGE: language for the generation of files. For example: export LANGUAGE=“es-es”
export AZURE_CATALOGS_ACCOUNT_NAME: Azure account name where the data is.
4. Run the script for the generation of dictionaries
There are two alternatives to generate dictionaries:
Use the new global script that makes use of the URM content datasets uploaded to the Kernel platform: Recommended method
Run the global script build_local_catalogs_etl.sh, located at: aura-nlpdata-[country_code]/tools/build_local_catalogs_etl.sh
Use the original script that downloaded the information from the previously chosen URM containers:
Run the original script build_local_catalogs.sh, located at: aura-nlpdata-[country_code]/tools/build_local_catalogs.sh
After the script execution, the NLP dictionaries sdict_items.json and sdict_aliases.json are automatically generated in: /aura-nlpdata-[country_code]/data/[language]/[channel]
You can create a Pull Request directly and see changes in comparison with the previous files.
Complementary, they are also placed in the temporary folder tmp_catalogs:
You can also check the downloaded data from URM in the urm_bucket folder inside tmp_catalogs.
5. Best practices for checking dictionaries
Once the dictionaries are generated, there are certain checks that should be done:
Check that values that have been added and removed from catalogs are updated in sdict_items.json and sdict_aliases.json.
Check that all the canons that have been included in the catalogs appear in sdict_items.json and all the aliases appear in sdict_aliases.json with its corresponding canon.
Check that, at least, all the aliases of a canon that have been included in the catalogs appear in sdict_aliases.json under the expected canon.
Check that there are no unwanted duplicates. It is highly recommendable to check that the same canon (or normalized one) does not appear in different entities to avoid possible overlaps. For these situations, use the catalogs’ skip.json file for skipping values from dicts and use the precedence.json file to prioritize an entity type.
Once both sdict_items.json and sdict_aliases.json have been generated, all the values that were added to the catalogs should be tested in your local environment to check that they retrieve their corresponding canon, entity type and label. In case there is an error, check what it is due to and make the necessary modifications. This step should be repeated until the result is the expected one.
5. Add new entities in dictionaries to the Grammars stage
⚠️ Of application just in case Grammars stage is included in the NLP model.
If you want to assure that new entities included in dictionaries are recognized with 100% accuracy, they must be included in the Grammar stage.
Take into account that input data for the Grammars stage should be normalized first.
4.2.6 - Aura NLP tutorials
Aura NLP tutorials
Tutorials for the development of a use case over aura-nlp
Index of tutorials
COMING SOON
4.2.7 - Grammars
Use of Grammars in Aura NLP
This section includes the description of Grammars, a deterministic recognition method used in Aura NLP for the recognition of the users’ utterances, their role in the NLP model and practical processes regarding how to use this stage in the understanding process
What are Grammars?
Grammars are a tool that provides an exact and lightweight utterance’s recognition method through a deterministic approach. Grammar uses probabilistic formalisms to recognize specific utterances from the users and to identify how to interpret them.
Aura NLP include Grammars as a stage that can be included in the NLP pipeline. It use has key limitations due to the large burden of building the language model, as Grammars are only able to recognize exact utterances. However, because of it, they constitute an interesting segment within Aura NLP, due to the existence of specific utterances produced by Aura’s users that must be recognized by Aura (such as common utterances from users or difficult ones that are hardly recognized by CLU).
GrapeNLP is used by Aura NLP for intent recognition and entity extraction using grammars. This grammar engine is based on handcrafted grammars which describe in an exact manner the sentences that are to be recognized and the output information that is to be generated for each one, in our case, the intent the sentence corresponds to and the entities to extract.
Linguists should develop by hand the grammar that exactly recognizes the required sentences. Just in the case of ambiguity (multiple interpretations defined in the grammar for the same sentence), GrapeNLP uses a heuristic approach in order to choose one of the interpretations: the one that in the grammar uses more restrictive linguistic conditions.
The core of GrapeNLP is implemented in C++ and includes a Python module to facilitate its integration with Python programs. It can analyse around 2700 sentences per second in an average computer and can be run in Ubuntu, Alpine, MacOS and Android. Moreover, it is open source and LPGL licensed, thus it can be used in commercial products.
GrapeNLP does not include a grammar editor. Instead, we use the editor included in the Unitex / GramLab platform.
Unitex / GramLab is also LGPL licensed and can be installed in Windows, Linux and MacOs machines.
The grammars created with Unitex are represented with graphs organized in connected boxes that linguists can easily create and update manually. Each box contains a set of possibilities for each token from the user’s utterance. The combination of different connected boxes provides a full variability of sentences to be recognized. The system also allows the generation of sub-grammars for specific Aura domains or for certain intents.
Once the grammars have been developed in Unitex, the grammar engine goes through all the graph paths from the beginning (left side) and compares box by box the user’s utterance with the grammar to evaluate the matching.
At the end of each path, a score is specified corresponding to the highest score among all the feasible paths. The output is a set of labels together with a start and end index and a score. The output is presented as a .json format.
It is important to bear in mind that, currently, grammars are used in Aura mainly for intents recognition. The grammar engine only provides recognized entities that have previously been labelled in the graphs.
As another example of Grammars, the utterance “I would like to watch the film Frozen” provides the following output:
PipelineMessage:-OriginalMessage:-phrase:'I would like to watch the film Frozen'-normalized_phrase:'i would like to watch the film frozen'-normalized_presentable_phrase:'I would like to watch the film Frozen'-annotated_phrase:' i would like to watch the film frozen'-intent: intent.tv.search'-score: 1.0-entities:
Entity:Frozen,Type: ent.audiovisual_film_title,Score: 1.0,Startindex: 31,Endindex: 37,Canon: frozen,Label: None,DeepLinks: None
Note that, even though GrapeNLP does not make use of statistical methods or probabilities, the resulting .json includes a score field. This has been added for homogeneity with the machine learning workflow, but it is always hardcoded to 1.0 (since GrapeNLP performs exact matching, the probability is 100%). The machine learning pipeline never returns a score of 1.0, thus this field can be used for knowing whether the sentence was recognized by GrapeNLP or by an intent recognition stage (CLU, etc.).
📄 For more information regarding the use of Grammars for language recognition, please check the Unitex User Manual.
Global and local grammars
There are two types of grammars defined in Aura NLP recognition process, both based on the Grammars engine that offer a different performance depending on the location where they are executed:
Global grammars: defined and executed in Aura back-end.
Local grammars: they are a subset of the Global grammar.
The understanding process is carried out locally, in the channel side, for an agile resolution of the process, therefore allowing a significant latency reduction. It is available for a selected set of use cases.
Global and local grammars must be aligned, so there are no differences in the E2E understanding process (for instance, the same user input must provide the same result in terms of NLP recognition both global and local grammars).
Channels can automatically update their local grammars based on the grammar backend information. Moreover, the channel needs to be able to share the information with the global backend in terms of logs and KPIs.
4.2.7.1 - Grammars generation guidelines
Guidelines for the generation of Grammars in Unitex
Guidelines and best practices for working with Unitex for the generation of the Grammars to be included in the NLP model.
General guidelines
Grammars is an Aura NLP stage that has its own path, files and configuration required to be included in the NLP model.
Firstly, if your pipeline contains the Grammar stage, you need to work with Unitex Gramlab and Grape NLP, which are included in the NLP Virtual Machine.
After that, linguists can proceed to create the grammars associated to the new use case. This process will be similar for global and local grammars.
The intent, entities and utterances defined for the new use case must be considered. A representative set of utterances will be selected and represented in Unitex through the creation of connected boxes that will contain, from left to right, different options for expressing each token of the selected utterances. The combination of different connected boxes provides a full variability of utterances to be recognized.
It is necessary to bear in mind that grammar engine only provides an exact recognition of utterances previously integrated in the model. Therefore, it is necessary to build up a rich and realistic utterance database to cover all the representative users’ utterances for a given use case.
Once the grammars have been developed in Unitex, the grammar engine Grape NLP goes through the grammar from the beginning (left side of the graph) and compares box by box the user’s utterance with the grammar to evaluate the matching.
The output will be a set of labels together with a start and end index.
Intents and entities tagging
Tag an intent in the grammar interface
In order to tag an intent in a grammar graph, a box previous to the closing box of the graph should be created with the following information and format:
<E>/<intent.[intent_name]/>
Tag an entity in the grammar interface
Two separate boxes need to be created: one before and one after the entity values.
We need two entity tags because we need to wrap the entity values in order to know its position in the user’s utterance.
Opening entity tag should have the following information and format:
<E>/<ent.[entity_name]>
Closing entity tag requires the following information and format:
<E>/</ent.[entity_name]>
Consider the difference between the opening and closing entity tag and remember that the entity tags need to be included within the entity graph and not outside of it.
The verbal graphs should be vertically aligned and the arrows connecting boxes should be horizontally aligned.
Be careful when using too much optionality (“Epsilon” symbol), this may lead the grammar to recognize unwanted strings, collisions between UCs, etc.
All graphs should have an appropriate size not to leave info/boxes out of the them.
Try not to repeat the same box structure several times. Try to reuse it for different paths or to create a subgraph that can be reused anywhere in the intent axiom. Hence, avoid creating two or more paths recognizing the same input.
Use comments if needed to clarify, for instance, if a path has some limitations due to potential conflicts with other UCs or just as explanatory notes of what a path is contemplating. For creating a comment within a graph, create a box and do not connect it to any other box. This way, you will see that the characters of comment message appear in red colour.
Avoid leaving empty boxes in any graph.
Avoid typos within the boxes info.
The opening and closing entity tags used for wrapping the entity values should be contemplated in the entity graph and not outside of it.
Make sure the intent and entity tags have been properly included.
When adding prepositions and articles in boxes, put them separately. That is, create a box for the prepositions and another one for the articles.
The circumstantial complements (e.g., time, location, manner…) are optional on many occasions regardless of whether they are in initial, middle or final position.
No graph must recognize the “Epsilon” symbol:
<E>
So in case of optional subgraphs, the optionality should be in the graph where it is called and not in the subgraph.
If the grammar makes use of the NER dictionaries to do the matching value > canon > label, the values contemplated in the different dictionaries should be also contemplated in the entity graphs of the grammar for the matching process to be successful.
It is crucial to consider here that the grammar values contemplated in the entity graph should be normalized (same process as the normalization pipeline carries out except for the normalization of upper-case characters) in order to be recognized.
That is, if a value in the dictionaries is ‘Mr. Robot’, since the normalization pipeline erases punctuation marks, the value that should be included in the entity graph should be ‘Mr Robot’.
There are special symbols that have specific meaning for the grammar and should be escaped (to check these symbols go to “Encoding of special characters in the graph editor” section of the Unitex Gram Lab official documentation).
An example of a special character would be “+” that needs to be escaped by using ““ (See figure below).
It is highly recommendable to compile the grammar before pushing changes into the Pull Request. This way, the NLP developer will see if there is any error in the call to the subgraphs, if the grammar recognizes an empty path (the grammar recognizes: " “) or if there is any corrupt file.
When compiling the grammar, some files are generated. These files have different extensions (.fst2, .snt, .diff) and should be avoided. Thus, the NLP developer should erase them locally before committing further changes into the PR.
For main verbs or list of keywords, create another graph.
Try to reuse basic structures (grammar block) from one graph to another.
Try to avoid ungrammatical paths if possible.
If one graph gets too complex, try to split it into smaller blocks/subgraphs.
Best practices for the generation of .grf files
Create as many folders as existing domains/intents.
Graphs
Call axiom.grf to the main graph of the whole grammar (general graph that calls to the different domains).
Generate another axiom.grf file in the subfolder of each specific domain, which will be the main graph for this domain (graph that calls to the UCs related to that domain).
Generate another axiom.grf file for each use case/intent. Remember that, if different subgraphs are created to contemplate different structures or entity combinations for a given UC, the intent tag should be found in this general UC/intent axiom and not in the individual subgraphs.
Domain folder
The name of the domain folder should be identical to the name of the corresponding domain.
This way, when opening the main graph of the whole grammar, one could quickly see the domains that have, at least, some UC developed through the grammar engine. Make sure when including a new domain to make the proper call to it in the main axiom of the whole grammar.
Intent folder
The name of the intent folder should contemplate the name of the corresponding intent.
For example: If the intent name is intent.common.greetings, the intent folder name would be greetings.
If a given intent has different sub-use cases or the intent is divided into different graphs according to different linguistic structures/entities combination, the intent tag should be only tagged once in the main axiom of the use case and not in each of the different subgraphs.
Make sure when including a new intent to make the proper call to it in the domain axiom.
Entity graphs
The entity graphs should have the name of the corresponding entity name, that is, if an entity name is ent.device_tv, the name of the graph in the grammar folder should be ent.device_tv.grf.
If an entity is only used in one use case/intent, the entity graph should be located in the intent folder.
Otherwise, if an entity is used in different intents/UCs of the same domain, the entity graph should be located in the main folder of the domain.
If an entity is used in different domains, the entity graph should be in the main folder of the whole grammar.
Verbal structure and nomenclature
Introduction
Verbal graphs need to be adapted based on the target language the NLP developer is working with.
The following verbal forms and tenses have been provided in Spanish as illustrative examples because the Spanish language varies morphologically depending on the person/number and tense info.
Nomenclature of auxiliary verbs:
Auxiliary verbs: They serve, among other things, to form the compound tenses, the progressive forms, the passive voice, as well as negations and questions (e.g., “I would like to eat an apple”).
Main/Full verbs: They add meaning to the sentence and are essential for understanding the statement (e.g., “I eat two apples every morning”).
To this end, the NLP team has been working on an efficient structure and nomenclature to have them contemplated in the grammar.
Auxiliary verbs
aux_W: auxiliary verb + infinitive tense
It contemplates all the possible auxiliary verbs that can be found before a verb in infinitive tense.
This graph should be always optional since the infinitive tense without the auxiliary verb is also acceptable in linguistic terms (e.g., “I want to check my agenda” & “Check my agenda” are both linguistically correct).
aux_Y2s: second person singular in imperative tense.
aux_Y3s: third person singular in imperative tense.
aux_Y2p: second person plural in imperative tense.
aux_Y3p: third person plural in imperative tense.
All these graphs contain possible auxiliary expressions that may be found before verbs in imperative tense.
These graphs should be also optional as the verbs in this tense can be also found in isolation (e.g., “Go and bring me some water” & “Bring me some water”). All these graphs should be found within the graph containing all imperative tenses of a given verb (e.g., verb_Y.grf -> buy_Y.grf).
It contains all possible expressions that can be found before a verb in present imperfect subjunctive tense (S) and past imperfect subjunctive tense (QT).
This graph should be always mandatory in these two tenses as the structure “I would like you to bring me some water” vs. “I like you to bring me some water” would be agrammatical without the modal verb.
Main verbs
This graph is used for ambivalent verbs that could work both as auxiliary and main/full verbs.
When this graph is used, all these verbs are conceived as being main/full verbs and thus do not need to be accompanied by another verb but by a complement in the form of a noun (e.g., “I want some water” vs. “I want to drink some water”).
Verbal graphs
The names of the verbal graphs should be in English. This also applies to the name of the domain, intent, keywords and complement graphs.
Before creating any verbal graph, make sure it is not repeated, that is, it is not already contemplated in any other of the grammar UCs. If a given verb is only used in a particular UC, place the verbal graphs within the folder of the UC. If a verb is shared by several UCs of the same domain, place the verbal graph at the domain folder level.
If, on the other hand, a given verb is used by UCs belonging to different domains, place the verbal graphs in the folder of the whole grammar.
If you create different verbal subgraphs for different verbal tenses, make sure you include all the verbs in each tense.
The basic verbal tenses included for each verb are:
In case the developer needs to contemplate more verbal tenses, please consult the section “Common inflectional codes” in Unitex Gram Lab official documentation.
[verb]_main_graph structure
To ease the grammar development process, we propose a common structure for all verbs.
The name of the verbal graph would be [verb]_main_graph.grf and would have the following structure:
As it can be appreciated in the example, some pronouns have been added between aux_SQT and the verbal boxes for those tenses. This also happens before P3s/p, P2s and C2s verbal boxes.
These pronouns are needed for sentences such as: “Quiero que me compres este vuelo” (“I want you to buy me this flight”). Besides, the interrogative particle “cómo” has been added before aux_W and before P1s/p tenses for questions such as “¿Cómo puedo comprar este ticket?” (“How can I buy this ticket”) and “¿Cómo compro este ticket?” (“How do I buy this ticket”).
In case the clitic forms of verbs are needed, create a separate graph for them.
For this, create a verbal graph called [verb]_clitic_forms.grf.
As in the previous example, some pronouns have been included in some of the paths, but the main difference here would be that the boxes containing the clitic pronouns have been included in a mandatory way.
As seen in the figure, this graph would recognize sentences such as: “Quiero que me lo compres” (“I want you to buy it for me”).
Guidelines for testing Grammars in Unitex
There are two alternative ways of testing the grammars generated with Unitex:
1. Testing grammars using the Unitex interface
Useful for checking the potential overlaps among the different use cases developed through the grammar engine.
For this purpose, a .txt file should be created with the testing statements (sentences, phrases or isolated words) to be tested (each one on a different text line).
Keep in mind that when testing the grammar in the Unitex interface, the testing statements are not going to be processed with the normalization pipeline and, thus, must consider capitalization, accentuation marks, etc.
Afterwards, the following instructions should be carried out:
Open the Unitex interface and go to the menu found in the upper section of the interface.
Click on “Text > Open” and open the .txt previously created (say “OK” to Process Text).
Once the .txt file is selected, go to “Text > Locate Pattern” and a window will pop up in which it is required to select the graph to be used to process the testing examples. The “Merge with input text option” should be also selected to see the intent and entity tags.
Besides, we need to select the “Activate debug mode option” to see the paths activated in each of the testing examples as well as the “Longest matches option” to replicate how the system works.
Click on “Search” and another window will pop up with the results.
If all the provided examples have obtained the expected intent, that means that the grammar engine has the expected behaviour.
2. Testing grammars through run_local_pipeline.sh scripts
The second option would be to launch queries through the run_local_pipeline.sh script to validate their intent assignment (remember that you must previously execute the build_local.sh script in order to train the pipeline).
Since the grammar engine is deterministic, based on the score (confidence) obtained, it is possible to know whether an utterance has been solved by CLU or by the grammar engine:
Utterances detected by the grammar module obtain a score of 1.0
The scores of utterances detected by CLU are float numbers between 0 and 1 (e.g. 0.98, 0.65…).
This testing option is the most recommendable one since this way we can see the faithful output of how the system works end-to-end.
4.2.7.2 - Recognition of several entities
Recognition of utterances with several entities in Grammars
Specific guidelines in the scenario when the user’s utterance includes several entities to be recognized by Grammars through the use of roles
Use of roles for the recognition of utterances with several entities
If the user’s utterance contains several entities of the same type, it is required to add a role tag to the entity identifier, following the format:
[entity_name:rol_value]
The role tag is used by the system to identify that there are two entities of the same type but with different roles.
This process will not affect the final output of the Grammars.
That is, if the entity with the role is ent.audiovisual_sports_team:visitor, the system will only retrieve the tag ent.audiovisual_sports_team.
A practical example of Grammars that use this functionality is shown below:
The utterance “I would like to see Madrid against Barsa” contains two entities of the same type: [ent.audiovisual_sports_team]
For both entities to be detected correctly, it will be necessary to add the role when defining the name of the entities. For example, the roles of local and visitor could be assigned, resulting [ent.audiovisual_sports_team:local] and [ent.audiovisual_sports_team:visitor]
Certain considerations must be considered:
In order to recognize two entities of the same type in sequence, there is no need to create two entity graphs with the role tag but one, since the system is capable of discerning between the tagged entity and the untagged one.
Entity values should be the same in both graphs.
For better understanding purposes, we suggest using digits to name the entity graph having the role with the name of the role itself. For example:
ent.audiovisual_sports_team:1 -> ent.audiovisual_sports_team_1.grf
This can be also done using non-digit characters. That is, if the entity ent.audiovisual_sports_team has the role “visitor” (ent.audiovisual_sports_team:visitor), the name of the graph should be ent.audiovisual_sports_team_visitor.grf.
4.2.8 - Kernel configuration for URM Global script
Kernel configuration for URM Global script
Guidelines for the configuration of the script URM Global in Kernel
In order to have a correct behavior for the URM data extraction used in the global script, it is necessary to execute the tasks defined in the following sections, that are a particularization of the general guidelines “Kernel configuration: General steps”.
A Kernel application with the name aura-cognitive-trainings must be created and configured with specific scopes.
Ask the Kernel Team to create the new application in Kernel:
"id": "aura-cognitive-trainings"
Once the app is created, two parameters will be provided for securely accessing:
- client_id: unique identifier of the consuming app acting as Kernel API client.
- client_secret: password.
4. Assign purpose/scopes to the application
No purpose is required, as datasets do not include personal information.
Ask the Kernel Team to assign the following scopes to the application:
data:Video_Content:read
data:Video_Content_Staff_Rel:read
data:D_Video_Staff:read
data:D_Video_Content_Category:read
data:D_Video_Staff_Role:read
data:D_Video_Age_Rating:read
data:D_Gbl_Video_Content_Category:read
data:D_Gbl_Video_Staff_Role:read
data:D_Gbl_Video_Content_Type:read
data:D_Gbl_Video_Age_Rating:read
directsql:query
5. Add other required fields
Provide the Kernel Team with other necessary fields, as shown in the code snippet.
The final file for the configuration of the application, including all the above-mentioned parameters, is shown below:
{"name":"Data consumption for Aura Cognitive Trainings","grant_types":[{"authentication":"client_credentials""scopes":["data:Video_Content:read","data:Video_Content_Staff_Rel:read","data:D_Video_Staff:read","data:D_Video_Content_Category:read","data:D_Video_Staff_Role:read","data:D_Video_Age_Rating:read","data:D_Gbl_Video_Content_Category:read","data:D_Gbl_Video_Staff_Role:read","data:D_Gbl_Video_Content_Type:read","data:D_Gbl_Video_Age_Rating:read","directsql:query"]"purposes":[]"api":"directsql:query"}],"description":"Aura cognitive application to consumption data of the kernel","raw_dataset_read":true,"tags":{},"encrypt_access_tokens":true,"id":"aura-cognitive-trainings","requires_authorization_id":true,"client_type":"CONFIDENTIAL","legal_entity_id":"telefonica","redirect_uris":[]}
4.2.9 - Complementary processes
Complementary processes in the development process
Processes over external software that may be required when developing a use case over Aura NLP and best practices
Introduction
This section includes certain processes that may be carried out over external software when developing a use case in order to obtain credentials from these software, best practices for the generation of Pull Requests and procedures followed by the Aura NLP Global Team.
Sign in with your account credentials in the browser.
You will obtain the different subscriptions within Azure corresponding to the logged account.
Select the specific subscription to be used, with its corresponding field id, and execute the following command to switch to this subscription (documentation):
az account set --subscription <subscription_id>
<subscription_id> is the id of the selected subscription
Create a resource group (documentation):
az group create --name <name_resource_group> --location <location>
<name_resource_group>: name of the resource group
<location>: one location available for Azure (i.e., northeurope)
Create app (documentation):
az ad app create --display-name <display_name>
<display_name>: name of the service principal
From the output of az ad app create, we can obtain the field appId. This value is used for the variable OAI_AZURE_TOKEN_CLIENT_ID.
Create password for app (documentation):
az ad app credential reset --id <app_id>
<app_id>: app_id obtained from previous app creation
From the output of az ad app credential reset, we can obtain the field password. This value is used for the variable OAI_AZURE_TOKEN_CLIENT_SECRET.
From the output of az ad app credential reset, we can obtain the field tenant. This value is used for the variable OAI_AZURE_TOKEN_TENANT.
Create service principal (documentation):
az ad sp create --id <app_id>
- AppId: app_id obtained from previous app creation
Assign role contributor (documentation):
az role assignment create --assignee <appId> --role Contributor --scope <scope>
- <app_id>: app_id obtained from previous app creation
- <Scope>: scope of the role assignment. Read more in (documentation). A possible value is the of the resource group, you can obtain it with the command az group show --name <name_resource_group> | jq .id(documentation).
Create the OpenAI application (documentation):
az cognitiveservices account create --kind "OpenAI" --name <name_openai> -g <name_resource_group> --sku s0 -l <location>
<name_openai>: resource name
<name_resource_group>: name of resource group (previously generated)
<location>: location available for Azure (i.e., northeurope)
The values for the parameters required to fill in the build_local_variables.sh script for OpenAI execution must be obtained from the above-defined steps:
exportOAI_ID_SUBSCRIPTION="$(az account show | jq -r .id)"exportOAI_RESOURCE_GROUP="<name_resource_group>"exportOAI_ACCOUNT_NAME="<name_openai>"exportOAI_AZURE_TOKEN_CLIENT_ID="<app_id>"exportOAI_AZURE_TOKEN_CLIENT_SECRET="<password>"exportOAI_AZURE_TOKEN_TENANT="$(az account show | jq -r .tenantId)"
Best practices for the generation of a Pull Request
This process is required once the NLP model is fully developed and tested in local environment and it’s time to create a Pull Request to the corresponding release branch : Pull Request to release branch.
Best practices
When creating a Pull Request, include the NLP Global Team as reviewers of the process and, likewise, notify the APE Team.
It is mandatory to create reduced PRs (per use case, per bug, etc.) in order to speed up the validation process.
Do not modify configuration files during the Pull Request, excepting in case the pipeline has been changed or if any configuration adjustment is required for the system’s proper performance. If configuration files have been modified locally for testing purposes, get sure that they are not uploaded in the PR in order to avoid conflicts.
It is recommended to specify different tasks in the PR, so the review progress can be marked:
It is recommended to make a backup for those PRs modifying files that may conflict with other ones, or for large Pull Requests.
If the use case is going to be available in different channels, check that the content and order of the training files is the same.
4.2.9.4 - Review by NLP Global Team
Review of a Pull Request by NLP Global Team
Procedure followed by the NLP Global Team in order to validate the Pull Request including the NLP model
The review of the Pull Request including the NLP model carried out by the NLP Global Team includes the processes explained in the following sections.
It can be very useful for Local Teams to know these processes and criteria used by the NLP Global Team in order to focus on the critical points.
Categories of errors and problems
Detected errors are classified into three categories:
BLOCK: Blocking task. It must be resolved in order to approve and merge the PR.
In case there are certain blockers to be modified, the system dismisses the GitHub Pull Request and publishes a comment describing the problem and indicating the procedure to resolve it. This case requires re-training the NLP model.
NON-BLOCK: Mandatory but non-blocking task. It must be resolved following the guidelines and best practices in the current or in further PRs.
SUGG: Not mandatory but recommended modifications that should be taken into account even for subsequent PRs. For them, it is recommended to inform the NLP Global Team whether the suggestion is taken into account or not.
The setting of an adequate threshold for the NLP system accuracy depends on the use case. Therefore, for a specific use case, the minimum accuracy should be agreed by L-CDO and the NLP Global Team.
Best practices for the Pull Request validation
These best practices should be followed both by the NLP Global Team and the local linguists, if they participate in the validation process.
Take into account the following icons that indicate different status to reviewers:
👍 It indicates that the reported problem has been visualized and will be included in further commits.
👀 It indicates that linguists have gone over the comment but it is not resolved yet. In this situation, linguists must include an explanatory text with the justification of this status (for example, to be resolved later; disagreement; etc.)
Comments should be launched from the corresponding file or from the general screen (conversation). For its resolution, click Resolve conversation or select Hide from the drop-down menu. Afterwards, select the option Resolved.
If the comment cannot be resolved, it is edited and substituted by “OK”.
In general, reviewers are in charge of changing the comment status to Resolved.
Comments should be as clarifying as possible by including screenshots or other references.
In case a comment resolution is pending, the local developer must be informed and it is recommended to change the status to still pending.
If the answer to a comment by the reviewer is not clearly understood, the local team can contact him.
If modifications affect to several channels, changes can be uploaded to one channel and, afterwards, copied to the other channels.
Comparation of branches:
In case of merging of a large PR, it is recommended to compare the corresponding branches to avoid information to be lost. For this purpose, Pycharm can be useful.
The tool compare allows this comparison, just by selecting the folder/file with the right bottom, selecting the option Git and compare with branch and then clicking on the branch to be compared.
The different files appear in different colors: existing files in blue, added files in green and deleted ones in grey. By clicking on a file, a new window is opened showing the differences between branches.
For the PR review, it is recommended the use of REGEX. Some examples are included below:
Finding duplicates: ^(.?)$\s+?^(?=.^\1$)
No space after an entity: [ent.[a-z_]+][a-z]+
No space before an entity: [a-z]+[ent.[a-z_]+]
No extra spaces after values: \h+$
Sentences missing: "\¿[a-záéíóúñ _[].]+"
Sentences missing: "[a-záéíóúñ _[].]+?"
The PR is reviewed by different members of the team, within an ongoing process.
Most frequent comments in the review process
The following table includes some of the most frequent comments that are reported during the review of the Pull Requests by the NLP Global Team, organized by category.
⚠️ Please, take the following tables as merely indicative in terms of the category where each comment is included as, depending on the specific scenario and the use case specifications, a comment can be moved from one category (“block”, “non-block” or “sugg”) to another.
Review of CLU training and testset
The following best practices are valid for the CLU intent recognition stage.
Entities
Block
non-block
Sugg
Ill-formed (incorrect name, missing ‘[‘, blank space missing before/after the entity; blank space before ‘:’ in the entity name)
Alphabetic order missing (by type and by value)
Structuring of training and test set files in blocks (for example, verbs, use cases, entities, etc.)
Value declared in phraselist but not tagged in training set
Suggestions on phrases for training and test set files
Repeated values in two entities
Suggestions on new entities
Repeated values for a specific entity
Suggestions on patterns for the test set file
Value tagged but not declared in a phraselist
Typographical errors (if not on purpose), missing words
Values representativeness: as far as possible, the training set must contain all the different values of entities. At least, it must include a representative list of them
Intents
Block
non-block
Sugg
Intent name not agreed by the Global Team
Alphabetic order missing (by type and by value)
Structuring of training and test set files in blocks (for example, verbs, use cases, entities, etc.)
All intents not represented in the training set and testset files
Structuring of training and test set files in blocks (for example, verbs, use cases, entities, etc.)
Wrong position of entities
Lack of representativeness of the different structures
New values for entities
Incorrect tags
Alphabetic order missing (by domain, intent & utterance)
Suggestions on phrases for training and test set files
Not represented intent
“Default” domain
Suggestions on new entities
Wrong order for keys: phrase, domain, intent, entities
Suggestions on patterns for the test set file
Typographical errors (if not on purpose), missing words
Accuracy lower than 80% (by default value set by Aura Global Team)
Result validation: Review of results from the PR, identification of errors and improvement suggestions
Regression file: Bugs or specific phrases not included in the testset.json file that must be recognized
Canonical phrase not included in E2E testset
Unfulfillment for recommended number of testing statements in the E2E test set: - 20 statements (CLU); - 30 statements (CLU + Grammar); - 3 statements (Grammar)
4.3 - Build Aura response
Build Aura response
When developing a use case, a crucial step is to design the response that Aura provides to its users.
Learn how to generate it using the most appropriate texts and elements.
Introduction
Aura must be able to deal with messages from different partners in several languages and, moreover, from different communication channels.
Considering a user request to Aura through a specific communication channel, Aura must provide the appropriate answer to his/her utterance through a precise message expressed in the user’s language and in natural language.
The response to the user can be provided through three different interfaces, depending on the communication channel:
Custom interface: Interface with screen, voice and text interaction. This is the main Aura interface.
Voice interface: Interface for devices without screen, where the interaction is only done through voice.
Chat interface: Message interface where the text is the main interaction mode, based on a conversational model with bubbles and historic data.
Depending on the channel and its rendering capabilities, the response can include different elements: text, cards, graphic resources, deeplinks, suggestions and actions.
The following documents include the guidelines for the generation of three key elements in Aura response:
Texts: how to generate or update Aura response texts in POEditor.
Cards: different types of cards that can be included in Aura response as visual elements.
Graphic resources: static or dynamic graphic resources that can be included in the response to the user.
4.3.1 - Aura response errors
Aura response error messages
Sometimes, Aura could return some errors due to authentication or other APIs errors. This document describes the most common errors and how
clients should handle them.
Unauthenticated error
In some channels that require authentication, Aura could return an unauthenticated error if the auraId is invalid. In this cases, the client should
authenticate the user again and create a new auraId.
ChannelData v3 example:
{"type":"message","id":"4VJyNMnfcQLHuvOAbXMLAK-fr|0000005","timestamp":"2024-06-27T14:01:24.9377437Z","channelId":"directline","from":{"id":"aura-bot-x","name":"aura-bot-x"},"conversation":{"id":"4VJyNMnfcQLHuvOAbXMLAK-fr"},"text":"Desculpe, não consegui verificar suas informações. Por favor, reinicie o aplicativo e tente novamente.","inputHint":"acceptingInput","channelData":{"correlator":"5b25cd4a-aa57-420d-9fb3-8db437df01cf","version":"3","status":{"code":"ERROR.USER.UNAUTHENTICATED","message":"Invalid aura user","params":{"auraId":"asdf"}}},"replyToId":"4VJyNMnfcQLHuvOAbXMLAK-fr|0000004"}
ChannelData v1 example:
{"type":"message","id":"4VJyNMnfcQLHuvOAbXMLAK-fr|0000003","timestamp":"2024-06-27T14:01:07.7998256Z","channelId":"directline","from":{"id":"aura-bot-x","name":"aura-bot-x"},"conversation":{"id":"4VJyNMnfcQLHuvOAbXMLAK-fr"},"text":"Desculpe, não consegui verificar suas informações. Por favor, reinicie o aplicativo e tente novamente.","speak":"Desculpe, não consegui verificar suas informações. Por favor, reinicie o aplicativo e tente novamente.","inputHint":"acceptingInput","channelData":{"hasMoreMessages":false,"correlator":"593a44ac-3974-472b-a7e4-610b3c760679","Error":{"code":"UNAUTHENTICATED","data":"invalidAuraId","message":"Invalid auraId"}},"replyToId":"4VJyNMnfcQLHuvOAbXMLAK-fr|0000002"}
Too many requests error
In some cases, certain APIs could return an error 429 due to quota limits or other reasons. In these scenarios, the client should wait the returned
value of the parameter retryAfter and try again after this time.
ChannelData v3 example:
{"type":"message","id":"H2JRTbQW25d6Jyccs7PfEb-fr|0000007","timestamp":"2024-06-27T14:08:26.8101993Z","channelId":"directline","from":{"id":"aura-bot-x","name":"aura-bot-x"},"conversation":{"id":"H2JRTbQW25d6Jyccs7PfEb-fr"},"text":"Lo sentimos, ha ocurrido un error inesperado.","inputHint":"acceptingInput","channelData":{"correlator":"9df5cb1b-966c-4db4-9df8-e269c682a58b","version":"3","status":{"code":"ERROR.API.TOO_MANY_REQUESTS","message":"Too many requests","params":{"retryAfter":"10"}}},"replyToId":"H2JRTbQW25d6Jyccs7PfEb-fr|0000006"}
ChannelData v1 example:
{"type":"message","id":"H2JRTbQW25d6Jyccs7PfEb-fr|0000009","timestamp":"2024-06-27T14:08:45.5260908Z","channelId":"directline","from":{"id":"aura-bot-x","name":"aura-bot-x"},"conversation":{"id":"H2JRTbQW25d6Jyccs7PfEb-fr"},"text":"Lo sentimos, ha ocurrido un error inesperado.","speak":"Lo sentimos, ha ocurrido un error inesperado.","inputHint":"acceptingInput","channelData":{"hasMoreMessages":false,"correlator":"cd06e100-7783-46e8-8051-ee99e8b72f43","Error":{"code":"TOO_MANY_REQUESTS","data":{"retryAfter":"10"},"message":"Too many requests"}},"replyToId":"H2JRTbQW25d6Jyccs7PfEb-fr|0000008"}
4.3.2 - Build Aura response texts
Guidelines for building Aura response texts
When developing a use case, discover how to generate the texts included in each element of the response that Aura provides to its users. Texts are generated with POEditor and imported into Aura Bot.
Process at a glance
Enter POEditor
. Log in POEditor
. Access your local POEditor project or create one
Generate resources
. If required, generate a new resource, element associated with an specific text, for importing it into the bot
Edit texts
. Search the specific text by library or resource name
. Edit the text with the message to be shown to the user
Import locale files
. Install aura-locale-importer tool
. Upload locales to Aura Bot through this tool
Hot swapping
. Make modifications available in between two releases through a hot swapping process
Introduction
When a new use case is developed, it is necessary to design Aura response for each step of the use case conversational flow. The answer, depending on the channel, can include text, cards, graphic resources, deeplinks, suggestions and actions.
The current section focuses on the text included in each element of the use case response.
Basic concepts
Get familiar with these basic concepts when designing your Aura response:
POEditor
For the generation of the text included in each response element, Aura relies on POEditor.
POEditor offers a centralized localization tool to handle the different messages that the bot shows to the customer and to adapt them to a specific language.
POEditor project
Global project (for global use cases) or local project (for local use cases) to work in.
Term
Prototypical phrase of the resource to be able to locate it easily.
It is composed of a reference (resource), a context and n texts (translations).
Reference (resource)
It is the resource ID. Mandatory field for the subsequent importation of the term into the locales.
A resource is an aura-bot element for the generation of the required text in every component of Aura response.
aura-bot resources are organized in libraries of dialogs. Each resource is associated to a copy.
References must not contain spaces, they should be written all together or use kebab-case in the resource name.
Translations
Texts containing the translations of each language where the resource is to be used.
They correspond to the texts that Aura shows to the user in a specific field of Aura response in the selected channel containing the answer to the user’s request.
Depending on the use case type, different projects and tasks must be carried out:
Global use cases
Local use cases
POEditor project
Aura POEditor global project (Owned by Global Team)
Aura POEditor local project (Owned by LCDO Team)
Scope
- Edition of texts (copies)
- Edition of texts (copies) - Generation of resources (references)
Content managers should edit texts in POEditor both for global and local use cases. Meanwhile, the generation of new resources is only required in local use cases.
Once texts or resources are modified, they are automatically imported to aura-bot during the make-up process into the settings/locale folder of the use case library.
Enter POEditor
In order to use POEditor, a license is required. Therefore, the first step is the registration of a POEditor account, if not existing, in the POEditor website.
Once registered, access your local POEditor project.
Generation of resources in POEditor
A resource is an aura-bot element needed for the generation of the required text in every component of Aura response and its subsequent importation into Aura locales.
In this particular case, for local use cases, OBs are able to generate their own resources.
Resources naming conventions
The general format for Aura resources (references in POEditor) is composed of the mandatory name of the library followed by different prefixes:
[library]: mandatory field. Name of aura-bot library where the resource is contained.
The library name must be the same as the name of the library that is being exported and must be configured in the locale-update script of the package.json file where the library is declared.
[ENVIRONMENT]:name of the environment. This is an optional field for the aura-bot resource that can be used in case it is required to show the user a different text in different environments.
If this field is not existing, the same resource is used for every environment.
The field must include the prefix of the environment (in uppercase): PRE or PRO. DEV show the same texts than PRO.
[CHANNEL]:name of the channel. This is an optional field for the aura-bot resource that can be used in case it is required to show the user a different text in different channels.
This field must include the prefix of the channel (in uppercase): NOV, MH, MP,STB, STBH.
If this field is not existing, the same resource is used for every channel.
[subscriptionType]: optional field. Different texts can be defined for each user’s subscriptionType, particularly: POSTPAID, PREPAID, CONTROL.
They must be included in uppercase.
If this field is not existing, the same resource is used for every subscription type.
[resourcename]: Name of the intended resource. It can include as many parts as needed to describe the resource. It can be expressed in a single word with lowercase (resourcename) or using kebab-case (resource-name).
For example: services:services.usage.summary.
The following table shows some examples of bot resources and their associated copies in Aura:
Aura domain
Resource name (reference)
Description
Example of copy
Bundle
services:services.find.oneservices
Text associated to this resource is shown for every environment, channel and subscription type.
You´ve got %1$s contracted
Bundle
services:PRE.POSTPAID.services.usage.summary
Text associated to this resource is shown to users with subscription type postpaid in PRE environment
Let’s take a look. You’ve got %1$0.2f %2$s of data left, from your %4$0.2f %5$s allowance on %3$s, until %6$s.
Billing
bill:bill.check.genericCardText
Text associated to this resource is shown for every environment, channel and subscription type.
Let’s take a look. You’ve got one bill. It´s 2f%1$s.%2$0
Billing
bill:billing.topup.voucherincomplete
Text associated to this resource is shown for users in every environment and for every subscription type.
Top-up is not done
For each resource, there are certain pre-defined constraints (for example, the maximum number of characters) and determined variables which are common to every defined resource. The following table shows an example of these concepts.
Resource
Variables
Copy (response text)
services:services.usage.summary
%1$0.2f = Real Number, available data %2$s = Text, measuring unit for data %3$s = Text, name of bonus or plan %4$0.2f = Number, total data of bonus or plan %5$s = Text, date
Let’s take a look. You’ve got 5.5 GB of data left, from your 20 GB allowance on Custom plan, until 07-05-2019.
Precedence of prefixes
Resources are managed using a resolution matrix based on “from general to specific”. This means we will always have a generic resource in order to provide an answer to the user and, once we got it, Aura looks for a specific one if exists.
The order in the format reference is important to make the resolution matrix works properly. In this framework, the precedence of the prefixes is (from higher to lower):
SubscriptionType
Channel
Environment
The order in which the different combinations of prefixes must be checked for strings depends on the specificity (the number of matched prefixes) and the previously defined precedence order.
For example, given:
library = “services”
subscriptionType = “POSTPAID”
channel = “TEST”
Environment = “PRE”
key = “title”
The order of checking for matching terms must be the following (choosing the first existing translation):
⚠️ Remember that, for adding a new resource in the POEditor project, you need admin grants.
Follow the next steps:
Access the main page of POEditor and enter the username and password to access to the Local projects and choose the project to work on.
Select your POEditor local project and access the “Terms” option. You can see all the existing resources or search by library or name.
Note that you should access “Terms” at project level (aura-bot in the example below), not for a specific language.
Click on the “Add Term” button. In this field, the new resource must be added.
Optionally, you can add a context in the “context” field for the categorization of the resource. It is useful for further searching purposes to include the name of the library here.
Save the resource, so it is created and added to the project.
Now, use the buttons in the right to fill in other fields:
“Reference”: it can be added by clicking on the gear icon placed on the right hand side of the term. It should be the same as the name of the resource. It is important to fill in the “Reference”, as Aura uses it to import the resource into aura-bot.
“Translations”: text for each different language.
“Comments”
In order to check and modify references, please click the “R button” to the right of each term.
In order to check or edit all translations, please click the “T box”.
Resources for context filters and errors
There are special resources corresponding to errors or context filters that can be shared between libraries.
The recommended way to add these resources is to duplicate them in every library that uses them.
For example, if we want a new error message to be sent when an API fails in two libraries (my-lib-1 & my-lib-2), we will add 2 resources:
my-lib-1:errors.api-error
my-lib-2:errors.api-error
In the case of context-filters, the format of the references will be, for example:
my-lib-1:context-filters.annonymous.not.allowed
my-lib-2:context-filters.annonymous.not.allowed
There is another way to add these resources:
Sharing the same resource BY adding it to a general [library] like:
Importing it in every use case library that uses it.
However, this last method has certain problems, because you need to add the new [library] to the aura-locale-importer command with the flag –b like this:
And it must be updated every time it changes in all libraries that use it to avoid conflicts during the make-up process.
Edition of texts in POEditor
At this stage, you have to edit the text (copy) of the existing resources associated with the use case under development or to translate the text to one specific language.
For this purpose, follow the instructions below:
Enter your local POEditor project and then click in the desired language. All the resources and its associated texts are shown.
To find the text to be edited, there is a search box in the top-right corner of the POEditor interface.
It is possible to search by key or part of a key of the resource (spanish translation of the term), or full or partial reference (key used in aura-bot for that term).
In case it is required to edit, for example, all strings concerning to account linking, search “account.linking”, which is the leading part of those strings.
Each text can be edited just by clicking on the translation and modifying the text afterwards.
To find a term in a specific library, use the pattern “library_name”:
The edited texts are uploaded to aura-bot when deploying the corresponding Aura release.
Random alternative texts
aura-bot is able to show several alternative options of the same resource randomly. This behavior is provided as a platform feature and it only depends on the way the locales are defined in POEditor.
The main idea is to add as many terms as alternative texts needed, keeping the same reference, as can be seen in the following picture.
When the locales are read from POEditor API to be handled by aura-bot, an array of alternatives for the given reference are stored in the locale files of the use case:
"common:common.greetings.main":["Hello""Hello, I am here for helping your"],
Then, when building the response, aura-bot will return one of the options randomly.
Sorted texts
aura-bot is able to export sorted options of the same resource. If you want to guarantee the order in which the resources will be exported you have to define the resources in POEditor with numerical names(terms) starting at 0 and the same reference.
For example
-l <language-country>: country translation e.g., en-gb. If this field is empty, the system imports every translation file.
-j <POEditor project>: POEditor project to be used: . For global use cases: Aura-Bot project (global project) . For local use cases: name of the OB’s local project
-b <my-library>: all the libraries to be uploaded by aura-bot. For example: context-filter, core, errors, suggestions, etc.
-d <local-directory>: local directory where result files are uploaded.
-f: this parameter forces the files overwriting.
-m library: it indicates the way of working. For the current release, it must be library.
-t <token>: read-only API token to access to POEditor.
For local use cases, the local responsible of the POEditor website must, at this stage, provide you with the API token:
- Once you have the token, you can follow two different processes:
- Define it in the environment variable $POEDITOR_TOKEN in the host running the process. In this case, this command should not be included here.
- Add it in the current command within -t <token>
An example for a local use case in Germany is shown below:
This command generates the locale files for the “bill” library that fulfil the conditions established in the parameters above: $ aura-locale-importer -u -l de-de -j Aura-Bot-De -b bill -d ./locale -m library -f –t f9023005c8792e57d3593511b69c300e
This command lists the content of the locale folder in the aura-bot project:
$ ls .locale
The output can be one of these:
de-de.json en-gb.json es-es.json pt-br.json
Once the texts and resources are imported following the process above, when a new version of the library is generated, they are automatically integrated during the make-up process.
Management of locales for intents’ canonical phrases
The management of canonical phrases for CLU intents has been implemented in POEditor, as intents must have a canonical phrase to be able to disambiguate with them.
Hot swapping process for the update of POEditor texts
It is possible for aura-bot to load new text locale files through a hot swapping process without service outage in order to have the updated texts available in the period between one release and the consecutive one.
For this purpose, the aura-configuration-updater allows making these modifications by providing the updated locales to your local DevOps Team.
In case developers have the need of making modifications to locales belonging to aura-bridge or aura-configuration-api because of the requirements of their use cases, they can follow the process specified in the document locales-managing.
4.3.3 - Build Aura response cards
Guidelines for the design of cards in Aura response
Discover how to design different types of Microsoft cards and include them in the response that Aura provides to its users
Introduction
A card is a visual element that brings context to the answer in Aura response. It can contain images, graphic resources, texts and buttons and, through these elements, acts as a useful tool to summarize the information and present it in a structured and friendly-user way.
The design of the card in Aura response can be done through different tools, depending on the specific channel and its rendering capabilities.
Two types of cards can be rendered by the most common Aura channels:
Microsoft Adaptive Cards: tool that provides developers an open card exchange format for the design of a customizable card content in a consistent way.
Hero Cards: they typically contain a single large image, one or more buttons and text, providing a flexible layout.
Moreover, there are other different data exchange formats in Aura such as custom JSON model, JSON response model or ZIP response model.
The procedure for declaring Adaptive Cards and Hero cards in a use case’s dialog is fully explained in the following sections.
There is a set of new utilities that you can use when working with these two types of Cards, included in the Microsoft Documentation: CardFactory class.
Microsoft Adaptive Cards
Microsoft Adaptive Cards is a tool that provides developers an open card exchange format for the design of a customizable card content in a consistent way.
For the generation of an Adaptive Card and its inclusion into aura-bot when developing a use case, developers should follow the steps shown below:
Design the Adaptive Card through the Adaptive Cards designer, that includes a simple drag and drop interface as shown in the following figure.
ℹ️ Developers in charge of building Aura response are kindly requested to read the Adaptive Cards documentation in order to understand how to design a card.
Once the card is designed, automatically, the design parameters and texts are loaded in a JSON file.
Copy the generated JSON file in the Adaptive Card designer and paste it in the source code of the use case dialog.
It is recommended to copy it in [dialog-name]-util.ts for a proper readability of the dialog files.
An example is shown below, where:
contentType: this field must be filled in with the following value:
'application/vnd.microsoft.card.adaptive'
content: the JSON object generated in Microsoft Adaptive Cards card payload editor must be included in this field.
4.3. In order to get a complete URL, including device screen resolution, invoke getImageUrl from the library aura-bot-library-utils if the image has got several resolutions (instead of getResourcePath).
Microsoft Hero Cards
Hero Cards typically contain a single large image, one or more buttons and text, providing a flexible layout.
For the generation of a Hero Card and its inclusion into aura-bot when developing a use case, follow the steps below:
Design the Hero Card. For this purpose, developers are kindly requested to read the Hero Cards documentation for acquiring the required knowledge regarding this type of cards.
Declare the Hero card in the use case dialog.
For efficiency purposes, it is recommended to include them in the [dialog-name]-util.ts.
An example of the source code for including the Hero Card in the dialog is shown below. The last line indicates how the Hero Card is sent to the bot.
3.3. In order to get a complete URL, including device screen resolution, invoke getImageUrl from the library aura-bot-library-utils if the image has got several resolutions (instead of getResourcePath).
4.3.4 - Build Aura response graphic resources
Guidelines for the design of graphic resources in Aura response
Learn how to design of different types of graphic resources and include them in the response that Aura provides to its users
Introduction
You can design your own graphic resources inside the visual components of Aura response (mainly, in the card), always depending on the rendering capability of the channel.
They are categorized into two main groups:
Static graphic resources: icons, images, diagrams, etc.
Dynamic graphic resources: graphics that include users’ data and change depending on them (for instance, new plot for data usage use case per country).
These graphics can fetch data from Kernel or from external services (for instance, images from smartphone models that can be shown to the user).
The following sections define the procedure for including both a static and dynamic graphic resource in Aura response.
Include static resources by library
The static resource must be previously defined in the resources/ folder of the use case library.
In the use case dialog (.ts file), each resource must be declared as shown in the following snippet:
config: configuration object that should contain the environment variablesAURA_STATIC_RESOURCE_ENDPOINT and AURA_STATIC_RESOURCE_SAS_TOKEN.
'my_library': library name
'icon.png': name of the image
In order to get a complete URL, including device screen resolution, invoke getImageUrl from the library aura-bot-library-utils.
In the index.ts file of your use case library, the resources path must be exposed in the resources property when registering the plugin, as shown in the following example:
'resources': name of the folder where the resources are defined, within the library.
Just after it, the resource must be uploaded to Microsoft Azure Storage Explorer, in the images/ folder of the corresponding library. Doing so, Azure generates an URL for the defined resource.
Hot swapping of static resources
Once a static resource is created through the above defined steps, the OB can follow a hot swapping process for the modification of the resource:
The name of the icon must not be modified: it has to be the same as the name in the code.
However, it must be taken into account that, during the make-up process, the bot overwrites it, so the updating process should be repeated by the OB. For example, this process can be executed when publishing a local use case.
It is not necessary to restart the bot, as the method which is invoked internally already fetches the icon from Azure Storage.
Include a dynamic graphic resource
The inclusion of dynamic graphic resources in Aura involves two main stages:
Data recovery from a Kernel API or from an external API
For Kernel APIs, follow the process in the document Create / update an API client.
Generation of dynamic graphic resources:
Developers must implement their own dynamic graphic resources generator. After generating the resource, the process of uploading the resource into Azure must be done manually.
If the dynamic resource is integrated into the card of Aura response, follow the instructions in Build Aura response: cards.
4.4 - Configure a use case
Configure a developed use case
Optional actions in order to configure the use case, such as including it into Aura suggestions
Introduction
This section encloses optional tasks that may be carried out for the configuration of a developed use case, in the following scenarios:
Guidelines for the integration of a use case into Aura suggestions
Discover how to integrate a developed use case into Aura suggestions, so it can be recommended to the users in order to enrich their experience in Aura
Introduction
Aura suggests options based on an AI algorithm to provide additional information to the users, proposing new use cases always aligned with the initial user’s request.
The objective of the suggestions is to foster the users’ engagement with Aura, letting them go on with the conversation with two objectives:
Discover new functionalities: suggestions can help the users discover what Aura can offer.
Interaction follow-up: suggestions simplify and (somehow) predict the follow-up messages from the user. In some scenarios, the user wants to dig deeper in a set of actions given the context of the conversation. Suggestions can help to make the interaction easier and faster.
The suggestions-dialog is in charge of requesting suggestions to the Aura Suggestions API and preparing the corresponding activity with the format handled by the user channel.
Aura suggestions response model is used in every channel where Aura is available, and its visual components are adapted to the different constraints of the different channels.
How to integrate a use case into Aura suggestions
If, when developing a use case, you want it to be suggested by Aura, you have to set the property suggestions to true in the use case dialog, as shown in the following example for the balance-topup dialog (bill):
However, due to the distinctive features and limitations for each channel, if the use case is to be developed for RCS, then certain extra steps must be carried out, which are described in the following documents:
The OB must previously register Aura’s agent and configure the channel in Aura. This should be done by OB, not by use case.
4.5.1 - Build Aura response
Building Aura response in RCS channel
Building Aura response for a use case in the RCS channel has certain particularities due to the limitations of this channel
Introduction
When developing a use case, you should follow the general guidelines for building Aura response, which are common for all channels.
However, for RCS channel, certain specific steps must be carried out regarding rendering limitation of this channel and the configuration of the necessary attachments.
Sending messages to clients
Due to the special format of RCS messages and to avoid the extra complexity and maintainability of a transformation in aura-bridge between Directline messages and RCS messages, a new attachment type has been defined to send directly the payload of RCS messages in the activity. This payload will be sent directly to RCS by aura-bridge without any transformation.
In the previous example, the text “Hello, world!” will be sent to te user. The text inside the activity’s text field will be ignored.
There is only one special case when the text field of the activity is used to create the message: when the attachment with type application/vnd.telefonica.aura.rcs.message does not exist in a message of an RCS channel. But this case is reserved for error messages or other special situations. By default, text messages should be created with the necessary attachment.
Sending actions
You can send multiple types of actions to the user. All are defined in RCS Documentation.
All these actions have the field postbackData that will be returned to the bot as a text message when the user interacts and the dialog should know how to handle it.
You can set postbackData as a text auraCommand to handle it in a different dialog.
awaitstepContext.context.sendActivity({text:'Text doesn\'t matter',channelData:ChannelDataResponseMapper.formatChannelDataV3(intentResult,corr),attachments:[{contentType:'application/vnd.telefonica.aura.rcs.message',content:{'contentMessage':{'text':'Location message','suggestions':[{'action':{'text':'View map','postbackData':'{"intent": "intent.factotum-test.rcs-formats","entities":[{"type":"type","entity":"postback"},{"type":"data","entity":"location"}]}','fallbackUrl':'https://www.google.com/maps/place/40%C2%B021\'39.5%22N+4%C2%B020\'01.8%22W/@40.3609722,-4.3338333,17z','viewLocationAction':{'latLong':{'latitude':'40.36085110','longitude':'-4.33394257'},'label':'Pelayos de la presa, pedacito de cielo'}}}]}}}]});
Here is an example of how to send a prompt to the user in RCS.
Due to the characteristics of this channel, you need to define the prompt options twice: as choices of the prompt and as suggestion buttons for the user.
As you can see, the choices values are set in choices and also
as suggestions in the attachment. The value in the postbackData must be the same as the one set in the choices, because it will be the value
returned when the button is clicked. The text field of the reply object is the text showed to the user and can have any value.
constdialogSettings=DialogUtils.getDataActiveDialog(stepContext,'options');constintentResult=dialogSettings?.intentResult;constchoicesText:Choice[]=[{value:'Accept',synonyms:['ok','yes']},{value:'Deny',synonyms:['no']}];constpromptOptions:PromptOptions={prompt:{text:'Text doesn\'t matter',channelData:ChannelDataResponseMapper.formatChannelDataV3(intentResult,corr),attachments:[{contentType:'application/vnd.telefonica.aura.rcs.message',content:{'contentMessage':{'text':'Hello, write one option or write the associated number','suggestions':[]}}}]},choices:ChoiceFactory.toChoices(choicesText)};choicesText.forEach((choice,index)=>{(promptOptions.promptasPartial<Activity>).attachments[0].content.contentMessage.suggestions.push({'reply':{'text':choice.value,'postbackData':choice.value}});});returnawaitstepContext.prompt(this.promptsNames.COMMAND_CHOICE_PROMPT,promptOptions);
Sending rich cards
Rich cards allows you to send more complex messages to the user. All the info about rich cards in RCS can be found here
Carousels are a special type of rich cards. You can find more info here
awaitstepContext.context.sendActivity({text:'Text doesn\'t matter',channelData:ChannelDataResponseMapper.formatChannelDataV3(intentResult,corr),attachments:[{contentType:'application/vnd.telefonica.aura.rcs.message',content:{'contentMessage':{'richCard':{'carouselCard':{'cardWidth':'MEDIUM','cardContents':[{'title':'Card #1','description':'The description for card #1','suggestions':[{'reply':{'text':'Card #1','postbackData':'{"intent": "intent.factotum-test.rcs-formats","entities":[{"type":"type","entity":"postback"},{"type":"data","entity":"card 1"}]}',}}],'media':{'height':'MEDIUM','contentInfo':{'fileUrl':'https://storage.googleapis.com/kitchen-sink-sample-images/cute-dog.jpg','forceRefresh':'false'}}},{'title':'Card #2','description':'The description for card #2','suggestions':[{'reply':{'text':'Card #2','postbackData':'{"intent": "intent.factotum-test.rcs-formats","entities":[{"type":"type","entity":"postback"},{"type":"data","entity":"card 2"}]}',}}],'media':{'height':'MEDIUM','contentInfo':{'fileUrl':'https://storage.googleapis.com/kitchen-sink-sample-images/elephant.jpg','forceRefresh':'false'}}}]}}}}}]});
4.5.2 - Handling user messages in RCS channel
Handling user messages in RCS channel
The current document includes the guidelines for handling different types of messages in the RSC channel.
Handling user button responses
Some messages received from RCS channels have a particular behavior and some data is returned to the dialog in a new field of the
channelData: channelData.payload.suggestionResponse.
Here is an example of a user response of this type:
If prompts are created as specified in building Aura response,
they will be handled properly without any extra steps, because postbackData will be the text field of the activity and will be recognized by the prompt as an option.
Handling actions responses
Actions return an ACTION response as the following ones:
And this postbackData will be returned as a message to aura-bot when the user clicks the button. If you want to ignore this message or only write a log, you should implement a specific dialog to handle these actions and send every action response to this dialog with an aura-command:
{contentType:'application/vnd.telefonica.aura.rcs.message',content:{'contentMessage':{'text':'Location message','suggestions':[{'action':{'text':'View map','postbackData':'{"intent": "intent.ignore-user-postback.example-dialog","entities":[]}','fallbackUrl':'https://www.google.com/maps/place/40%C2%B021\'39.5%22N+4%C2%B020\'01.8%22W/@40.3609722,-4.3338333,17z','viewLocationAction':{'latLong':{'latitude':'40.36085110','longitude':'-4.33394257'},'label':'Pelayos de la presa, pedacito de cielo'}}}]}}}
4.5.3 - Start a conversation
Start a conversation in RCS channel
Sending messages through aura push
Introduction
Due to the design of the RCS protocol, the conversation with the user must be started by the server, who always sends the first message. To send this first message or other
messages without being in a conversation, the plugin aura push is used.
Sending text messages to the user
To send a simple text message to the user, a body like the following should be sent to the aura push endpoint:
If you need to send a more complex RCS message to the user, like a file, a card or any other type of RCS message, you need to add the rcsContentMessage field, that corresponds
with the contentMessage field of RCS messages:
{"url":"https://svc-ap-next.auracognitive.com/aura-services/v1/aurapush/messages?channelId=f7fd1021-41cd-588a-a461-387cc24be225&apikey=XXX","channelId":"f7fd1021-41cd-588a-a461-387cc24be225","from":"34666666666","id":"a1be40d0-b8de-4c2a-8a26-8740a739675e","text":"This text will be ignored","type":"rcs","notificationId":"a1be40d0-b8de-4c2a-8a26-8740a739675e","notificationType":"not declared","checkContact":true,"rcsContentMessage":{"contentInfo":{"fileUrl":"https://media.tenor.com/3VSWB_GIkqwAAAAe/wololo-age-of-empires.png","forceRefresh":"false"}}}
Also, if you want to send all the messages in the same way, text messages can be sent with this format:
{"url":"https://svc-ap-next.auracognitive.com/aura-services/v1/aurapush/messages?channelId=f7fd1021-41cd-588a-a461-387cc24be225&apikey=XXX","channelId":"f7fd1021-41cd-588a-a461-387cc24be225","from":"34666666666","id":"a1be40d0-b8de-4c2a-8a26-8740a739675e","text":"This text will be ignored","type":"rcs","notificationId":"a1be40d0-b8de-4c2a-8a26-8740a739675e","notificationType":"not declared","checkContact":true,"rcsContentMessage":{"text":"Hi! I'm Aura"}}
Sending messages through aura-bot
The previous messages are sent directly from aura-bridge to the user, but if you need to send a more complex message with data that can only be accessed by a bot dialog, you
can send a message to a bot dialog setting the type field to directline-rcs like this:
{"url":"https://svc-ap-next.auracognitive.com/aura-services/v1/aurapush/messages?channelId=f7fd1021-41cd-588a-a461-387cc24be225&apikey=XXX","channelId":"f7fd1021-41cd-588a-a461-387cc24be225","from":"34666666666","id":"a1be40d0-b8de-4c2a-8a26-8740a739675e","text":"{\"intent\": \"intent.rcs.template\"}","type":"directline-rcs","notificationData":{"brand":"Vivo","anotherCustomParam":"anotherCustomValue"},"notificationId":"a1be40d0-b8de-4c2a-8a26-8740a739675e","notificationType":"not declared","checkContact":true,"rcsContentMessage":{"text":"Hi {{customerName}}! I'm Aura, the AI assistant from {{brand}}"}}
Sending a message like the previous example, the bot will receive an activity like this, with the fields notificationData,
rcsContentMessage, uuid, notificationType and notificationId forwarded inside the channelData.payload.bridge.customData
field of the activity:
{"type":"message","id":"d152aee9-1aaa-5b54-95a5-79352eee2e45|a1be40d0-b8de-4c2a-8a26-8740a739675e","channelId":"f7fd1021-41cd-588a-a461-387cc24be225","from":{"id":"34666666666","name":"javiagent_crbwyhqz_agent"},"conversation":{"id":"1f6b5e0e-a5e1-4567-a39d-ba239d7d6d14"},"channelData":{"version":"3","appContext":{"channel":{"modality":"text","id":"f7fd1021-41cd-588a-a461-387cc24be225"},"timestamp":"2024-10-14T13:40:54+02:00","timezone":"Europe/Madrid"},"payload":{"bridge":{"customData":{"uuid":"a1be40d0-b8de-4c2a-8a26-8740a739675e","notificationType":"not declared","notificationId":"a1be40d0-b8de-4c2a-8a26-8740a739675e","notificationData":{"brand":"Vivo","anotherCustomParam":"anotherCustomValue"},"rcsContentMessage":{"text":"Hi {{customerName}}! I'm Aura, the AI assistant from {{brand}}"}}},"auraGroot":{"channelConversationId":"d152aee9-1aaa-5b54-95a5-79352eee2e45","channelId":"f7fd1021-41cd-588a-a461-387cc24be225"}},"correlator":"078ee5cf-2b9d-4fb6-9268-c9c5685232f8"},"text":"{\\"intent\\": \\"intent.rcs.template\\"}","serviceUrl":"http://localhost:8080/api/skills","relatesTo":{"serviceUrl":"http://localhost:8045/aura-services/javiagent","activityId":"d152aee9-1aaa-5b54-95a5-79352eee2e45|a1be40d0-b8de-4c2a-8a26-8740a739675e","channelId":"f7fd1021-41cd-588a-a461-387cc24be225","conversation":{"id":"d152aee9-1aaa-5b54-95a5-79352eee2e45"},"bot":null},"recipient":{"role":"skill"},"callerId":"urn:botframework:aadappid:3837ac07-50e0-4d4e-993b-1bda1349f25a","locale":"es-cr"}
With this data you can create your custom dialog. The easiest way to reach your dialog is sending an aura-command with the desired intent in the text field as you have seen in the previous example.
In the rcsContentMessage you can send your pre-formated RCS body to be filled by the bot, and if you need more extra params can be sent in the notificationData field.
Checking the contact availability
RCS is enabled in Android since version 5, and in iOS since version 18, but some customers couldn’t have it disabled or not available in their phones. To avoid errors
sending messages to phones that doesn’t allow RCS, you can check with the api if this phone is available, and then, send the message. To do this check, the field checkContact
should be sent to true. Take into account that this extra call consumes time, so if you have a list of already available RCS phones, you can skip this step.
If checkContact is set to true and the api returns an error because this phone doesn’t allow RCS, an error 403 will be returned.
Aura line api
You can send a text message directly to the user using the aura push endpoint /aura-services/v1/aurapush/messages.
All the information about the aura push endpoint could be found in the bridge swagger file:
4.6 - Use cases in WhatsApp
Use cases development in WhatsApp
Discover the specific extra steps for the development of a use case in Whatsapp channel
However, due to the distinctive features and limitations for each channel, if the use case is to be developed for WhatsApp, then certain extra steps must be carried out, which are described in the following documents:
Build Aura response taking into account the rendering limitations of WhatsApp.
Redirect the login dialog: how to redirect certain intents that need authentication when the user is anonymous and requires to be authenticated through SMS-OTP.
Error management: guidelines for the resolution of error in WhatsApp channel.
Use of emoticons: how to create a prompt to render emoticons properly.
The OB must previously register Aura’s number in WhatsApp (Kernel procedure) and configure the channel in Aura. This should be done by OB, not by use case.
4.6.1 - Build Aura response
Building Aura response in WhatsApp channel
Building Aura response for a use case in the WhatsApp channel has certain particularities due to the limitations of WhatsApp channels
Introduction
When developing a use case, you should follow the general guidelines for building Aura response, which are common for all channels.
However, for WhatsApp channel, certain specific steps must be carried out regarding POEditor resources, rendering limitation of WhatsApp channels and the configuration of the Markdown type to be used in the response.
Specific POEditor resources for WhatsApp channel
Take into account that the WhatsApp channel requires specific POEditor resources corresponding to aura-bridge errors and to the onboarding, authentication and handover dialogs.
Therefore, you should edit the texts corresponding to these resources.
WhatsApp is configured in Aura as "output_message_format": "simple".
That means that aura-bot can only return text or Hero Cards components.
Aura and WhatsApp speak different languages, so they cannot communicate directly and the bridge acts as a translator between them. Therefore, at this stage, it is required to render all the components to be included in Aura response taking into account the limitations and constraints for this channel.
Rendering Aura response components
For every component of Aura response, check the document Rendering Aura response components in WhatsApp to know how aura-bridge converts them to be shown in WhatsApp and the limitations and constraints for this channel.
Configuration of Markdown type in the response
By default, use cases in WhatsApp build the response using WhatsApp-specific markdown as aura-bridge converts the standard Markdown (Direct Line messages) into WhatsApp markdown when a use case sends an answer containing this language.
However, OBs can decide if the conversion should or should not take place, so aura-bridge would/would not make the conversion before sending the message to the channel.
This modification in the Markdown format is available for WhatsApp-type channels (currently, WhatsApp) and can be done at two levels:
a. Channel level
b. Use case dialog level
The succeeding sections show the specific processes for this configuration.
Modifications of Markdown format at channel level
The default configuration of aura-bridge, that converts the standard Markdown (text received from Direct Line message) into WA-specific Markdown, can be modified at channel level, so the response to the user will be provided in WhatsApp Markdown format for a specific channel.
For this purpose, constructors must use the whatsapp field in the channels’ configuration file.
The interface is as follows:
exportinterfaceWhatsAppModel{.../**
* Indicates whether the texts of each of the messages received must be converted to the WhatsApp markdown format.
* Default: true
*/textConvert?: boolean;}
It is possible to disable text conversion to WhatsApp markdown format setting the value of the whatsapp.textConvert to false (by default, it is true):
{"name":"whatsapp",..."whatsapp":{"textConvert":false// Do not convert
},}
⚠️ Be aware of the behavior:
In this case, the dialog will follow the channel’s behavior.
However, if the dialog is also configured not to do the conversion (see next section), then this configuration will take precedence over the channel configuration.
Modification of Markdown format at dialog level
The default configuration of aura-bridge, that converts the standard Markdown Markdown (text received from Direct Line message) into WA-specific Markdown, can be modified at use case (dialog) level, so the response to the user will be provided in WhatsApp Markdown format for a specific use case.
For this purpose, constructors may change the activity using the payload model > textConvert field.
The interface is as follows:
exportinterfaceWhatsapp{.../**
* Indicates whether the texts of each of the messages received must be converted to the WhatsApp markdown format.
* Default: true
*/textConvert?: boolean;}
To avoid the text conversion to WhatsApp markdown format, constructors can set the value of the textConvert field to false (by default, it is true):
{type:'message',...channelData:{payload:{bridge:{whatsapp:{textConvert: false// Do not convert
}}}}}
⚠️ Remember that the dialog configuration will take precedence over the channel configuration.
4.6.2 - Rendering Aura response
Rendering Aura response components in WhatsApp
Rendering capabilities of WhatsApp channels for every component of Aura response
Introduction
The current document identifies, for every component of Aura response, how aura-bridge converts it to be shown in WhatsApp and the limitations and constraints for this channel.
⚠️
Make sure the channel you are working with is not configured to force a particular list type. Otherwise, you may get unwanted results.
You can find this option in the WhatsApp model, which is part of Aura channel model.
Please go to the aura-configuration-api for further information regarding how to check the current configuration for the channels.
Texts
Users’ utterance
The user’s utterance is not an element to be included in Aura response but, likewise, the channel must render it.
ID
Description
JSON response
Rendering in WhatsApp
text.utterance.01
The user inserts a basic sentence
“What data plan do you recommend me?”
text.utterance.03
The user inserts a long request
“Lorem ipsum dolor sit amet, consectetuer adipiscing elit, sed diam nonummy nibh euismod tincidunt ut laoreet dolore magna aliquam erat volutpat. Ut wisi enim ad minim veniam, quis nostrud exerci tation ullamcorper suscipit lobortis nisl ut aliquip ex ea commodo consequat”
Template containing: - Header including text with parameters - Body with parameters - Footers without parameters - Deeplink button - CTA (call-to-action)
According to default configuration. The use case or channel can change this configuration and use lists or numbered messages in suggestions. Remember that, currently, options in cards are not compatible with list messages or reply buttons.
Mix.message.02
message 1: Insight message 2: Herocards message 3: suggestions with 4-10 options and less than 20 characters
According to default configuration. The use case or channel can change this configuration and use numbered messages in suggestions. Remember that, currently, options in cards are not compatible with list messages or reply buttons.
Mix.message.03
message 1: Insight message 2: Herocards message 3: suggestions with more than 10 options and/or more than 20 characters
According to default configuration, depending on the number of suggestions (options) and the character. For less than 3 options and less than 20 characters, we use reply buttons. The use case or channel can change this configuration and use lists or numbered messages in suggestions. Currently, options in cards are not compatible with list messages or reply buttons.
Restrictions in the response from WhatsApp channel
There are certain components that are not allowed by WhatsApp channel. Thus, if they are sent as part of the response, WhatsApp will show an error to the user.
The error message is configurable by POEditor, as explained in the document Error management in WhatsApp channel.
Aura response component
Aura response sub-component
Behaviors not allowed by WhatsApp
Texts
Insight
Generation of an insight including blank text.
Texts
Insight
Generation of an insight with long text of more than 4096 characters.
Cards
Adaptive Cards
WhatsApp channel does not support Adaptive Cards.
Cards
Hero Cards
Hero card including an image with format different from jpeg and png.
Cards
Hero Cards
Hero card with an empty list of images.
Cards
Hero Cards
Hero card including a list of images with wrong URLs formats.
JSON components
Insights
Insight 01 JSON file
{"text":"I'm here to **help** you, if you want to see more _examples_ of ~~consultation~~, ```click``` the question +mark+."}
Insight 02 JSON file
{"text":"https://ver.movistarplus.es"}
Insight 03 JSON file
{"text":"www.movistar.es/particulares/Aura"}
Insight 04 JSON file
{"text":"Aura can answers with texts that can also contain [markdown links](https://ver.movistarplus.es/)\n\nLet's [see](www.google.es) [how](www.yahoo.com) they are rendered in the different channels."}
Insight 05 JSON file
{"text":"",}
Insight 06 JSON file
{"text":"Lorem ipsum dolor sit amet, consectetur adipiscing elit. Cras nunc elit, auctor ut lectus vel, blandit eleifend turpis. Nam malesuada cursus arcu. Pellentesque eu magna non lectus eleifend mattis in nec libero. Quisque lacinia eget ligula aliquam accumsan. Mauris elementum, leo sed commodo convallis, risus purus mollis erat, vel tristique ex sapien nec nunc. Proin venenatis leo id enim tempus porttitor. Vestibulum ante ipsum primis in faucibus orci luctus et ultrices posuere cubilia curae; Ut sit amet mi sed eros molestie varius. Vivamus at purus neque. Suspendisse malesuada mi at interdum consectetur. Nulla facilisi. Curabitur eros enim, ornare in diam quis, auctor aliquet felis.\n\nPellentesque cursus sapien ut lorem vehicula vestibulum. Suspendisse convallis malesuada vehicula. Nulla ut leo sit amet risus congue facilisis ut at tellus. Quisque erat metus, consequat id leo non, vulputate auctor est. Ut nec viverra felis. Interdum et malesuada fames ac ante ipsum primis in faucibus. Vivamus leo ante, dictum vitae ornare et, mattis vitae neque. Integer sit amet auctor eros. Sed at erat mauris. Phasellus quis commodo quam. Phasellus vel mattis felis. In quis eleifend lacus. Phasellus in felis leo. Mauris ultricies nec eros eget pulvinar. Nulla pellentesque hendrerit elementum. Donec cursus scelerisque sem, at."}
{"text":"This is a bodycopy to test different scenarios and the channel behaviour for this scenarios."}
Insight 10 JSON file
{"text":"This is a bodycopy to test different scenarios and the channel behaviour for this scenarios. This test try to understand how the channel render different links included in the message. https://ver.movistarplus.es"}
Insight 11 JSON file
{"text":"This is a bodycopy to test different scenarios and the channel behaviour for this scenarios. This test try to understand how the channel render different links included in the message. https://www.movistar.es/particulares/Aura"}
Insight 12 JSON file
{"text":"This is a bodycopy to test different scenarios and the channel behaviour for this scenarios. This test try to understand how the channel render different links included in the message. https://www.movistar.es/particulares/Aura, La nueva URL seria esta http://ver.movistarplus.es/"}
Insight 13 JSON file
{"text":"Sample response including order characters:\n\n• Service-Hotline [0176 888 55 282](tel:+4917688855282). Talk on the phone!.\n\n• Talk with our online chat [Live-Chat](https://g.o2.de/aura-chat-service)\n\n• Send us an email to [our email](mailto:pallete@telefonica.es)"}
Insight 14 JSON file
{"text":"This is a bodycopy to test different scenarios and the channel behaviour for this scenarios. This test try to understand how the channel render different links included in the message. https://youtu.be/7RHRRdaqExY"}
Insight 15 JSON file
{"text":"Actions that Aura can do for you:\n\n**1.**\t One choice type string\r\n**2.**\t One choice type Choice\r\n**3.**\t Two text messages\n**4.**\t HeroCard\n**5.**\t AdaptiveCard\n**6.**\t Suggestions"}
Hero Cards
Hero Card 01 JSON file
{"card":{"hero":{"type":"message","attachmentLayout":"list","attachments":[{"contentType":"application/vnd.microsoft.card.hero","content":{"title":"**iPhone 7 Apple iPhone**","subtitle":"**Price:**","text":"**Description**: \n7,11,9 cm (4,7) / 128 GB / 25\n Megapixel camera / Retina display / Apple red Product","images":[{"url":"iphone_red.png"}]}}],"inputHint":"acceptingInput"}}}
Hero Card 02 JSON file
{"card":{"hero":{"type":"message","attachmentLayout":"list","attachments":[{"contentType":"application/vnd.microsoft.card.hero","content":{"title":"**iPhone 7 Apple iPhone**","subtitle":"**Price**:","text":"**Description**: \n7,11,9 cm (4,7) / 128 GB / 25\n Megapixel camera / Retina display / Apple red Product","images":[{"url":"https://jira.tid.es/secure/attachment/1778109/Group%2043%403x.png"}],"buttons":[{"type":"openUrl","value":"https://www.movistar.es/","title":"Check Movistar app for more details"}]}}],"inputHint":"acceptingInput"}}}
Hero Card 03 JSON file
{"card":{"hero":{"type":"message","attachmentLayout":"list","attachments":[{"contentType":"application/vnd.microsoft.card.hero","content":{"title":"**iPhone 7 Apple iPhone**","text":"**Description**: \n7,11,9 cm (4,7) / 128 GB / 25\n Megapixel camera / Retina display / Apple red Product","images":[{"url":"https://jira.tid.es/secure/attachment/1778109/Group%2043%403x.png"}],"buttons":[{"type":"openUrl","value":"https://www.movistar.es/","title":"Check Movistar app for more details"}]}}],"inputHint":"acceptingInput"}}}
Hero Card 04 JSON file
{"card":{"hero":{"type":"message","attachmentLayout":"list","attachments":[{"contentType":"application/vnd.microsoft.card.hero","content":{"title":"_Fusion Plan_","subtitle":"**Activated on the 12/11/2020**","buttons":[{"type":"openUrl","value":"https://www.movistar.es/bundle_details.html","title":"Check Movistar app for more details"}]}}],"inputHint":"acceptingInput"}}}
Hero Card 05 JSON file
{"card":{"hero":{"type":"message","attachmentLayout":"list","attachments":[{"contentType":"application/vnd.microsoft.card.hero","content":{"title":"_Fusion Plan_","subtitle":"**Activated on the 12/11/2020**:","text":"**$35,00 Monthly fee**\n**$25,00 Comsumption**\n**$5,00 Taxes","buttons":[{"type":"openUrl","value":"https://www.movistar.es/bundle_details.html","title":"Check Movistar app for more details"}]}}],"inputHint":"acceptingInput"}}}
Hero Card 06 JSON file
{"card":{"hero":{"type":"message","attachmentLayout":"list","attachments":[{"contentType":"application/vnd.microsoft.card.hero","content":{"title":"_Fusion Plan_","text":"Unlimited calls on landline and mobile 25GB data on mobile"}}],"inputHint":"acceptingInput"}}}
Hero Card 07 JSON file
{"card":{"hero":{"type":"message","attachmentLayout":"list","attachments":[{"contentType":"application/vnd.microsoft.card.hero","content":{"text":"This is a bodycopy to test different scenarios and the channel behaviour for this scenarios. This test try to understand how the channel render different links included in the message. https://aura.telefonica.com/es/","images":[{"url":"https://jira.tid.es/secure/attachment/1778109/Group%2043%403x.png"}]}}],"inputHint":"acceptingInput"}}}
Hero Card 08 JSON file
{"card":{"hero":{"type":"message","attachmentLayout":"list","attachments":[{"contentType":"application/vnd.microsoft.card.hero","content":{"text":"This is a bodycopy to test different scenarios and the channel behaviour for this scenarios.","images":[{"url":"https://jira.tid.es/secure/attachment/1778109/Group%2043%403x.png"}]}}],"inputHint":"acceptingInput"}}}
Hero Card 09 JSON file
{"card":{"hero":{"type":"message","attachmentLayout":"list","attachments":[{"contentType":"application/vnd.microsoft.card.hero","content":{"text":"This is a bodycopy to test different scenarios and the channel behaviour for this scenarios.","images":[{"url":"https://media.tenor.com/images/c51500433e6f6fff5a8c362335bc8242/tenor.gif"}]}}],"inputHint":"acceptingInput"}}}
Hero Card 10 JSON file
{"card":{"hero":{"type":"message","attachmentLayout":"list","attachments":[{"contentType":"application/vnd.microsoft.card.hero","content":{"text":"This is a bodycopy to test different scenarios and the channel behaviour for this scenarios","images":[{"url":""}]}}],"inputHint":"acceptingInput"}}}
Hero Card 11 JSON file
{"card":{"hero":{"type":"message","attachmentLayout":"list","attachments":[{"contentType":"application/vnd.microsoft.card.hero","content":{"text":"This is a bodycopy to test different scenarios and the channel behaviour for this scenarios","images":[{"url":"https://www.telefoa"}]}}],"inputHint":"acceptingInput"}}}
Hero Card 12 JSON file
{"card":{"hero":{"type":"message","attachmentLayout":"list","attachments":[{"contentType":"application/vnd.microsoft.card.hero","content":{"text":"This is a bodycopy to test different scenarios and the channel behaviour for this scenarios. This test try to understand how the channel render different links included in the message. https://aura.telefonica.com/es/","images":[{"url":"https://www.telefonica.com/documents/23283/145847600/Movistar-azul-horizontal-thumbnail.jpg/fe991fa4-368f-72fe-ae8a-39f1db7ad638?t=1587395483934","url":"https://www.telefonica.com/documents/153952/154445/lgo_o2_at.png/3d0e2966-1cd5-49e2-8ac8-59ce69768bc4?t=1438154882691","url":"https://www.telefonica.com/documents/23283/139117659/Vivo-logo-thumbnail.jpg/e311e281-9c90-0a79-6531-aa357740a63f?version=1.1&t=1577957654404"}]}}],"inputHint":"acceptingInput"}}}
Hero Card 13 JSON file
{"card":{"hero":{"type":"message","attachmentLayout":"list","attachments":[{"contentType":"application/vnd.microsoft.card.hero","content":{"title":"**iPhone 7 Apple iPhone**","text":"**Description**: \n7,11,9 cm (4,7) / 128 GB / 25\n Megapixel camera / Retina display / Apple red Product\n\n\n**Price: 512,34$**","images":[{"url":"https://jira.tid.es/secure/attachment/1778109/Group%2043%403x.png"}]}}],"inputHint":"acceptingInput"}}}
{"card":{"hero":{"type":"message","attachmentLayout":"list","attachments":[{"contentType":"application/vnd.microsoft.card.hero","content":{"title":"**Samsung Galaxy S21 Ultra 5G**","text":"**Description**: \n7,11,9 cm (4,7) / 128 GB / 25\n Megapixel camera / Retina display / Apple red Product\n\n\n**Price: 405,50$**","images":[{"url":"https://images.samsung.com/my/smartphones/galaxy-s21/buy/s21_family_kv_pc_img.jpg?imwidth=2560"}]}}],"inputHint":"acceptingInput"}}}
{"card":{"hero":{"type":"message","attachmentLayout":"list","attachments":[{"contentType":"application/vnd.microsoft.card.hero","content":{"title":"**Apple iPhone 12 Pro Max 5G**","text":"**Description**: \n7,11,9 cm (4,7) / 128 GB / 25\n Megapixel camera / Retina display / Apple red Product\n\n\n**Price: 905,50$**","images":[{"url":"https://www.apple.com/newsroom/images/product/iphone/standard/Apple_iphone12pro-pacific-blue_10132020_Full-Bleed-Image.jpg.large_2x.jpg"}]}}],"inputHint":"acceptingInput"}}}
Hero Card 14 JSON file
"attachments":[{"contentType":"application/vnd.microsoft.card.hero","content":{"title":"**iPhone 7 Apple iPhone**","text":"**Description**: \n7,11,9 cm (4,7) / 128 GB / 25\n Megapixel camera / Retina display / Apple red Product","buttons":[{"type":"openUrl","value":"https://www.movistar.es/","title":"Check Movistar app for more details"}]}}]
Hero Card 15 JSON file
{"card":{"hero":{"type":"message","attachmentLayout":"list","attachments":[{"contentType":"application/vnd.microsoft.card.hero","content":{"title":"**iPhone 7 Apple iPhone**","subtitle":"**Price**:","text":"**Description**: \n7,11,9 cm (4,7) / 128 GB / 25\n Megapixel camera / Retina display / Apple red Product"}}],"inputHint":"acceptingInput"}}}
Hero Card 16 JSON file
{"text":"This is a bodycopy to test different scenarios and the channel behaviour for this scenarios.","attachments":[{"contentType":"application/vnd.microsoft.card.hero","content":{"text":"This is a bodycopy to test different scenarios and the channel behaviour for this scenarios.","images":[{"url":"https://jira.tid.es/secure/attachment/1778109/Group%2043%403x.png"}]}}]}
{"card":{"hero":{"type":"message","attachmentLayout":"list","attachments":[{"contentType":"application/vnd.microsoft.card.hero","content":{"title":"**iPhone Apple iPhone**","text":"**Description:** \n128 GB / Retina display / Apple red Product","buttons":[{"type":"postBack","title":"Reserve iPhone 1","value":{"name":"Reserve iPhone 1","text":"Reserve iPhone 1","intent":"intent.factotum-test.hero-card-custom-dialog","inputIntent":"intent.factotum-test.hero-card-custom-dialog","entities":[{"entity":"buy-iphone1","type":"ent.dialog-context"}]}},{"type":"postBack","title":"Reserve iPhone 2","value":{"name":"Reserve iPhone 2","text":"Reserve iPhone 2","intent":"intent.factotum-test.hero-card-custom-dialog","inputIntent":"intent.factotum-test.hero-card-custom-dialog","entities":[{"entity":"buy-iphone2","type":"ent.dialog-context"}]}}]}}]}}}
Custom card 05 JSON file
{"card":{"hero":{"type":"message","attachmentLayout":"list","attachments":[{"contentType":"application/vnd.microsoft.card.hero","content":{"subtitle":"**Price**: 999$","title":"**iPhone Apple iPhone**","text":"**Description:** \n128 GB / Retina display / Apple red Product","images":[{"url":"https://auraapnext8b2fe33b24.blob.core.windows.net/static-resources/libraries/factotum/default/images/iphone_red.png?sv=2018-11-09&si=static-resources-policy-ap-next&sr=c&sig=wtTBj9PX85%2BZiaJZIB4UqjnZh9BoU1acXcy8RyLp5kA%3D"}],"buttons":[{"type":"postBack","title":"Reserve iPhone 1","value":{"name":"Reserve iPhone 1","text":"Reserve iPhone 1","intent":"intent.factotum-test.hero-card-custom-dialog","inputIntent":"intent.factotum-test.hero-card-custom-dialog","entities":[{"entity":"buy-iphone1","type":"ent.dialog-context"}]}},{"type":"postBack","title":"Reserve iPhone 2","value":{"name":"Reserve iPhone 2","text":"Reserve iPhone 2","intent":"intent.factotum-test.hero-card-custom-dialog","inputIntent":"intent.factotum-test.hero-card-custom-dialog","entities":[{"entity":"buy-iphone2","type":"ent.dialog-context"}]}}]}}]}}}
Templates
Template 01 Curl file
curl -X POST \
'https://graph.facebook.com/v3.3/your-whatsapp-business-account-id/message_templates'\
-d 'category=AUTO_REPLY'\
-d 'components: [{"type":"BODY","text":"Hi, I'm Aura.\nYour virtual assistant fom O2. Get personalised support, Get personalised support, view your bills and find out how much data you've got left. I am here to help!"}]'\
-d 'name=test_global_aura_plain_text_no_header'\
-d 'access_token=<your-access-token>'\
-d 'language=en_US'
Template 01 JSON file
{"name":"test_global_aura_plain_text_no_header","components":[{"type":"BODY","text":"Hola, soy Aura.\nTu asistente virtual de O2. Obtén asistencia personalizada, consulta tus facturas y averigua cuántos datos te quedan. Estoy aquí para ayudarte."}],"language":"es_ES","status":"APPROVED","category":"AUTO_REPLY","id":"160734422709987"}
Template 02 Curl file
curl -X POST \
'https://graph.facebook.com/v3.3/your-whatsapp-business-account-id/message_templates'\
-d 'category=AUTO_REPLY'\
-d 'components: [{"type":"BODY","text":"Before we carry on, I want you to know that your privacy is very important to me and I'm committed to look after your personal data."},{"type":"HEADER","format":"TEXT","text":"Your privacy matters"},{"type":"BUTTONS","buttons":[{"type":"URL","text":"Review terms and conditions","url":"https://www.movistar.es/particulares/centro-de-privacidad/"}]}]' \
-d 'name=test_global_aura_plain_text_with_header_and_deeplink' \
-d 'access_token=<your-access-token>' \
-d 'language=en_US'
Template 02 JSON file
{"name":"test_global_aura_plain_text_with_header_and_deeplink","components":[{"type":"HEADER","format":"TEXT","text":"Tu privacidad es importante"},{"type":"BODY","text":"Antes de continuar, quiero que sepas que tu privacidad es muy importante para mí y me comprometo a cuidar tus datos personales."},{"type":"BUTTONS","buttons":[{"type":"URL","text":"Términos y condiciones","url":"https://www.movistar.es/particulares/centro-de-privacidad/"}]}],"language":"es_ES","status":"APPROVED","category":"AUTO_REPLY","id":"394312125348217"}
Template 03 Curl file
curl -X POST \
'https://graph.facebook.com/v3.3/your-whatsapp-business-account-id/message_templates'\
-d 'category=AUTO_REPLY'\
-d 'components: [{"type":"BODY","text":"Hello, I'm Aura.\nYour virtual assistant from O2.\nI am contacting you to resolve the query *{{1}}* that you have made *{{2}}*.","example":{"body_text":[["about your bill","your call to 1004"]]}},{"type":"HEADER","format":"IMAGE","text":"https://{{1}}.blob.core.windows.net/static-resources/libraries/factotum/default/images/{{2}}?sv=2018-11-09&si={{3}}&sr=c&sig={{4}}","example":{"header_text":["auraapnext8b81ad27c3","iphone-12.png","aura-configuration-policy-ap-next","X53fPBD3fLZ4LqPVb8aeNJtTnj2O1nNfkyUVF3G/tMA%3D"]}},{"type":"BUTTONS","buttons":[{"type":"QUICK_REPLY","text":"Continue","example":"{\"intent\": \"intent.common.greetings\"}"}]}]' \
-d 'name=header_imagen_body_quick_reply' \
-d 'access_token=<your-access-token>' \
-d 'language=en_US'
Template 04 Curl file
curl -X POST \
'https://graph.facebook.com/v3.3/your-whatsapp-business-account-id/message_templates'\
-d 'category=ACCOUNT_UPDATE'\
-d 'components=[{"type":"BODY","text":"*Number: {{1}}*\nHey! You have {{2}} left from your {{3}} data allowance valid until {{4}}","example":{"body_text":[["+34 619866335","500 Mb","5 Gb","20/07/21"]]}},{"type":"FOOTER","text":"Type \"Next\" if you want to see more of your lines"},{"type":"BUTTONS","buttons":[{"type":"PHONE_NUMBER","text":"Call us","phone_number":"+34 619866335"},{"type":"URL","text":"More details","url":"https://www.movistar.es"}]}]'\
-d 'name=test_global_aura_account_update_body_two_buttons'\
-d 'access_token=<your-access-token>'\
-d 'language=en_US'
Template 05 Curl file
curl -X POST \
'https://graph.facebook.com/v3.3/your-whatsapp-business-account-id/message_templates'\
-d 'category=AUTO_REPLY'\
-d 'components: [{"type":"BODY","text":"Your last bill is *{{1}}€*.\nClick to download and see the details.","example":{"body_text":[["58"]]}},{"type":"HEADER","format":"DOCUMENT","text":"https://{{1}}.blob.core.windows.net/static-resources/libraries/factotum/default/whatsapp-files/{{2}}?sv=2018-11-09&si={{3}}&sr=c&sig={{4}}","example":{"header_text":["auraapnext8b81ad27c3","PDF_Vertical.pdf","aura-configuration-policy-ap-next","X53fPBD3fLZ4LqPVb8aeNJtTnj2O1nNfkyUVF3G/tMA%3D"]}}]'\
-d 'name=test_global_aura_header_document_body'\
-d 'access_token=<your-access-token>'\
-d 'language=en_US'
Template 06 Curl file
curl -X POST \
'https://graph.facebook.com/v3.3/your-whatsapp-business-account-id/message_templates'\
-d 'category=ISSUE_RESOLUTION'\
-d 'components=[{"type":"BODY","text":"If you have problems with your internet connection, follow the steps explained in the video.\n\nHas the problem been solved?"},{"type":"HEADER","format":"VIDEO"},{"type":"FOOTER","text":"Only for UHD decos"},{"type":"BUTTONS","buttons":[{"type":"QUICK_REPLY","text":"Yes"},{"type":"QUICK_REPLY","text":"Not yet"},{"type":"QUICK_REPLY","text":"Talk to an agent"}]}]'\
-d 'name=test_global_aura_header_video_body_footer_tree_buttons'\
-d 'access_token=<your-access-token>'\
-d 'language=en_US'
Template 05 JSON file
{"name":"pnuevo_ofrecimiento_sinvincular_v6","components":[{"type":"BODY","text":"El producto que te propongo es {{1}} que incluye:\n\n- Fijo: {{2}}\n- Móvil: {{3}}\n- Internet: {{4}}\n- Televisión: {{5}}\n- Smartphone gama {{6}}\n\nY todo esto por {{7}}€/mes (IVA incluido).\n\n¿Te interesa este producto?"},{"type":"BUTTONS","buttons":[{"type":"QUICK_REPLY","text":"Sí"},{"type":"QUICK_REPLY","text":"No, quiero ver otros"}]}],"language":"es_ES","status":"APPROVED","category":"ACCOUNT_UPDATE","id":"323717239403265"}
Template 06 JSON file
{"name":"pnuevo_aceptacion_sinvincular_v2","components":[{"type":"BODY","text":"{{1}} a {{2}} y NIF{{3}}, solicitas el cambio a:\n\nFijo: {{4}}\nMóvil: {{5}}\nInternet: {{6}}\nTV: {{7}}\n\nArrendamiento a 36 meses de un terminal nivel {{8}}. En caso de devolución o baja anticipada se aplican las Condiciones Generales de Arrendamiento de Terminal Móvil en Fusión. Consulta los modelos en {{9}}\n\nPrecio: {{10}}€/mes (Precios con IVA)\n\nAceptas recibir tus facturas en formato electrónico. Puedes solicitar cambio a papel cuando desees. \n\nCondiciones del servicio y política de privacidad: movistar.es/contratos y movistar.es/privacidad. \n\nAutorizas a hacer los cargos en tu cuenta bancaria.\n\nSi estás conforme pulsa “Acepto”"},{"type":"BUTTONS","buttons":[{"type":"QUICK_REPLY","text":"Acepto"},{"type":"QUICK_REPLY","text":"Consultar a agente"}]}],"language":"es_ES","status":"APPROVED","category":"ACCOUNT_UPDATE","id":"4208428555858233"}
Suggestions
Suggestion 01 JSON file
{"type":"message","text":"This is button.suggestion.01.","attachmentLayout":"SUGGESTIONS","attachments":[{"contentType":"application/vnd.microsoft.card.hero","content":{"text":"This is button.suggestion.01.","buttons":[{"type":"imBack","title":"Top up"},{"type":"imBack","title":"Talk with agent"},{"type":"imBack","title":"My invoice"}]}}],"inputHint":"expectingInput"}
Suggestion 02 JSON file
{"button.suggestion.02":{"type":"message","text":"This is button.suggestion.02.","attachmentLayout":"SUGGESTIONS","attachments":[{"contentType":"application/vnd.microsoft.card.hero","content":{"buttons":[{"type":"postBack","title":"Suggestion with 30 characters."},{"type":"postBack","title":"This suggestion contains 50 characters, dont do it"},{"type":"postBack","title":"This suggestion contains way more than 100 characters. Never do this please. User experience is horrible"}]}}],"inputHint":"expectingInput"}}
Suggestion 03 JSON file
{"button.suggestion.03":{"type":"message","text":"This is button.suggestion.03.","attachmentLayout":"SUGGESTIONS","attachments":[{"contentType":"application/vnd.microsoft.card.hero","content":{"buttons":[{"type":"postBack","title":"Hola"},{"type":"postBack","title":"Gracias"},{"type":"postBack","title":"Adiós"},{"type":"postBack","title":"Ayuda"},{"type":"postBack","title":"Esto va a greetings","value":{"intent":"intent.common.greetings"}},{"type":"postBack","title":"Connection issue"}]}}],"inputHint":"expectingInput"}}
Suggestion 04 JSON file
{"button.suggestion.04":{"type":"message","text":"This is button.suggestion.04.","attachmentLayout":"SUGGESTIONS","attachments":[{"contentType":"application/vnd.microsoft.card.hero","content":{"buttons":[]}}],"inputHint":"expectingInput"}}
Suggestion 05 JSON file
{"button.suggestion.05":{"type":"message","text":"This is button.suggestion.05.","attachmentLayout":"SUGGESTIONS","attachments":[{"contentType":"application/vnd.microsoft.card.hero","content":{"buttons":[{"type":"postBack","title":""},{"type":"postBack","title":""},{"type":"postBack","title":""}]}}],"inputHint":"expectingInput"}}
Actions
Actions 01 JSON file
{"text":"This should be the insight text.","attachments":[{"contentType":"application/vnd.microsoft.card.hero","content":{"buttons":[{"type":"imBack","title":"Yes"},{"type":"imBack","title":"No"}]}}]}
Actions 02 JSON file
{"text":"This should be the insight text.","attachments":[{"contentType":"application/vnd.microsoft.card.hero","content":{"buttons":[{"type":"imBack","title":"Yes"},{"type":"imBack","title":"No"},{"type":"imBack","title":"Cancel"}]}}]}
Actions 03 JSON file
{"button.actions.03":{"type":"message","text":"This should be the insight text.","attachmentLayout":"list","attachments":[{"contentType":"application/vnd.microsoft.card.hero","content":{"buttons":[{"type":"imBack","title":"Yes, I agree with 30 characters"},{"type":"imBack","title":"This action contains 50 characters, dont do it pls"},{"type":"imBack","title":"This action button contains way more than 100 characters. Never do this please. User experience is horrible."}]}}],"inputHint":"expectingInput"}}
Actions 04 JSON file
{"button.actions.04":{"type":"message","text":"This should be the insight text.","attachmentLayout":"list","attachments":[{"contentType":"application/vnd.microsoft.card.hero","content":{"buttons":[{"type":"imBack","title":"Yes"},{"type":"imBack","title":"No"},{"type":"imBack","title":"Maybe"},{"type":"imBack","title":"Didn't understand"},{"type":"imBack","title":"Don't know"},{"type":"imBack","title":"Cancel"}]}}],"inputHint":"expectingInput"}}
Actions 05 JSON file
{"button.actions.05":{"type":"message","text":"This should be the insight text.","attachmentLayout":"list","attachments":[{"contentType":"application/vnd.microsoft.card.hero","content":{"buttons":[]}}],"inputHint":"expectingInput"}}
Actions 06 JSON file
{"button.actions.06":{"type":"message","text":"This should be the insight text.","attachmentLayout":"list","attachments":[{"contentType":"application/vnd.microsoft.card.hero","content":{"buttons":[{"type":"imBack","title":""},{"type":"imBack","title":""},{"type":"imBack","title":""}]}}],"inputHint":"expectingInput"}}
External buttons
External button 01 JSON file
{"button.external.01":{"type":"message","text":"This should be the insight text.","attachmentLayout":"list","attachments":[{"contentType":"application/vnd.microsoft.card.hero","content":{"buttons":[{"type":"openUrl","title":"**Google**","value":"https://www.google.com"}]}}],"inputHint":"acceptingInput"}}
External button 02 JSON file
{"button.external.02":{"type":"message","text":"This should be the insight text.","attachmentLayout":"list","attachments":[{"contentType":"application/vnd.microsoft.card.hero","content":{"buttons":[{"type":"openUrl","title":"Url button with 30 characters","value":"https://www.google.com"},{"type":"openUrl","title":"This url button contains 50 characters, dont do it","value":"https://www.google.com"},{"type":"openUrl","title":"This url button contains way more than 100 characters. Never do this please. User experience is horrible","value":"https://www.google.com"}]}}],"inputHint":"acceptingInput"}}
External button 03 JSON file
{"button.external.03":{"type":"message","text":"This should be the insight text.","attachmentLayout":"list","attachments":[{"contentType":"application/vnd.microsoft.card.hero","content":{"buttons":[{"type":"openUrl","title":"Google 1","value":"https://www.google.com"},{"type":"openUrl","title":"Google 2","value":"https://www.google.com"},{"type":"openUrl","title":"Google 3","value":"https://www.google.com"},{"type":"openUrl","title":"Google 4","value":"https://www.google.com"},{"type":"openUrl","title":"Google 5","value":"https://www.google.com"},{"type":"openUrl","title":"Google 6","value":"https://www.google.com"}]}}],"inputHint":"acceptingInput"}}
External button 04 JSON file
{"button.external.04":{"type":"message","text":"This should be the insight text.","attachmentLayout":"list","attachments":[{"contentType":"application/vnd.microsoft.card.hero","content":{"buttons":[]}}],"inputHint":"acceptingInput"}}
External button 05 JSON file
{"button.external.05":{"type":"message","text":"This should be the insight text.","attachmentLayout":"list","attachments":[{"contentType":"application/vnd.microsoft.card.hero","content":{"buttons":[{"type":"openUrl","title":"","value":"www.google.com"}]}}],"inputHint":"acceptingInput"}}
External button 06 JSON file
{"button.external.06":{"type":"message","text":"This should be the insight text.","attachmentLayout":"list","attachments":[{"contentType":"application/vnd.microsoft.card.hero","content":{"buttons":[{"type":"openUrl","title":"Google","value":""}]}}],"inputHint":"acceptingInput"}}
External button 07 JSON file
{"button.external.07":{"type":"message","text":"This should be the insight text.","attachmentLayout":"list","attachments":[{"contentType":"application/vnd.microsoft.card.hero","content":{"buttons":[{"type":"openUrl","title":"**Url button with 30 characters.**","value":"https://www.google.com"},{"type":"openUrl","title":"**This url button contains 50 characters, dont do it**","value":"https://www.google.com"},{"type":"openUrl","title":"**This url button contains way more than 100 characters. Never do this please. User experience is horrible**","value":"https://www.google.com"}]}}]}}
Aura integrates in WhatsApp channels the capability of managing files. Learn how in the following guidelines
Introduction
Aura integrates in WhatsApp channels the capability of managing files, in a bidirectional way:
A WhatsApp use case can send a file to the user
A user can sedn a file to a WhatsApp use case
How to configure a use case to send a file to the user
Constructors can configure a use case to send a file to the user by providing its URL. There are two ways of doing that:
As a text message.
As an attached file.
Send a file as a text message
For this purpose, we will send the URL of the file as a text message. When aura-bridge receives this activity, it renders it as a text with preview and the user, depending on her configuration, will show the preview of the sent file.
In order to include a file in use case dialog as an attachment, send an activity with the following template custom type in the field contentType:
'application/vnd.telefonica.aura.file'
⚠️ This section has only descriptive purposes, as it refers to an internal process. Use cases constructors do not have to carry out any aditional task.
The message will arrive to aura-bridge after going through the use case with the following format:
Finally, the message will be received by WhatsApp services after conversion through aura-bridge. Depending on the file extension, the output to WhatsApp will be sent with one type or another.
The caption tag will only be sent for the types allowed by WhatsApp document, image or video.
How to configure a use case to receive a file from the user
This scenario corresponds to an Aura use case requesting one or several files from the user, so the user sends them back to Aura.
Any dialog that implements a personalized use case in Aura will be able to receive one or more files sent by a user through WhatsApp channels. For this purpose, during the use case development, two main tasks are required:
Firstly, set the needed pre-requirements for enabling the channel to handle files and set the supported type and size of files.
Then, configure your use case dialog to support files. In this step, we distinguish among different scenarios, which are summarized in the flowchart below and detailed in the following sections.
During the use case execution, the process carried out by Aura is as follows:
The use case asks for file(s) and the user sends it(them) or the user sends a file proactively (See the different scenarios below).
The dialog receives the files and processes them one by one.
Once received, the file will be validated to verify that it complies with the predefined requirements regarding file type and size.
If the validation is successful, the files will be stored in an Azure temporary repository, so the dialog can have them available.
If case validations are not satisfied, the dialog is informed and sends a message to the user informing about the situation.
The URL of the files are available during a configurable time set in the File Manager environment variable AURA_MICROSOFT_AZURE_STORAGE_SAS_URL_VALIDITY.
If any internal error occurs during the files processing, a retry policy is performed and if it fails again, the control will be returned to the dialog.
Pre-requirements
Two tasks must be carried out previous to the use case configuration:
Enable the channel to handle files
The first thing to do is to configure the channel on which we will use dialogs able to handle file management.
For this purpose, it is necessary to enable the option in the channel configuration file through the RequestOptions model, where the enabled property must be set to true.
AURA_MAX_FILE_SIZE_BYTES: Maximum file size in bytes by default, 104857600.
AURA_MIN_FILE_SIZE_BYTES: Minimum file size in bytes by default, 256.
If these values are modified in the aura-file-manager, it will affect to all enabled channels that do not have a specific configuration of files types and sizes.
All these values will be overriden if other supported ones are configured at channel level.
Moreover, during deployment, the DevOps Team should configure the Azure container where the files will be temporarily stored and to set the configurable time for its automatic deletion.
b) At channel level
If OBs want to configure the supported types and sizes for files per channel, it must be done in the aura-configuration-api, using the properties included in the RequestOptions model related to fileAttachments:
The OB constructors can establish their own checks in the use case dialog regarding the type and size of files or set a more restrictive conditions for a specific use case.
In this case, they will be responsible of their own specific validations.
ℹ️ TIPS: WhatsApp file management
Sending files through WhatsApp has certain limitations, set directly by Meta API. The main one is that WhatsApp applies a quality reduction and a change in the format of the file, in case the user sends an image:
WhatsApp works only with JPG files, so no matter what type of file the user tries to send to Aura, WhatsApp will convert it to JPG.
Besides, its quality will be reduced, to save bandwith and space.
But, both issues can be overcome, following some rules:
JPG type of files MUST be always configured in the enabledExtensions property when setting up a channel to receive files from users from WhatsApp. This will allow receiving the images from users, but with a reduced quality.
Aura Global Team recomendation is to inform the users to send the files as documents instead of images, to avoid both format conversion and quality reduction.
Configure a use case to ask the user for one file and receive it
The use case dialog must be configured to request a unique file from the user.
Depending on the behavior of the user, two scenarios can arise:
Scenario 1. The use case asks the user for one file and the user sends one file to Aura
For the management of one file sent by the user, the incoming message must be handled by aura-bot. Therefore, aura-bot must be in normal operation mode.
In this case, Prompt Attachment will be used as a communication tool with the user. Constructors must follow these steps in the use case dialog:
Where PromptUtils.getAttachmentValidator(...) is a function provided by Aura Platform to make it easier for use cases developers to validate the information sent to the Prompt Attachment launched in the previous step.
It allows to return the control to the result of the prompt or not, depending on:
Retries: possibility to control retries until the correct information is received.
Time: the time taken to process the file sent by the user.
State: state of processing file or not yet.
Files no expected: Receipt of new files while a previous file was already being processed.
Text: it is checked whether the user has written text instead of sending a file.
Process NO Available: checked if the file could not be processed due to technical problems (Outage of File Manager API service).
prompt.recognized.succeeded=false;maxRetries=maxRetries<0?0 : maxRetries;constfileStatus: FileStatus=awaitFileContextUtils.getFileStatus(prompt.context);if(fileStatus?.processing){// File process in progress
// There is a previous file being processed and the user has sent something other than an Attachment.
if(prompt.context.activity.text&&fileRetryMessages?.textButProcessingAttachment){prompt.options.retryPrompt=fileRetryMessages.textButProcessingAttachment;}elseif(prompt.context.activity.attachments?.[0]&&fileRetryMessages?.fileButProcessingAttachment){prompt.options.retryPrompt=fileRetryMessages.fileButProcessingAttachment;}consttimeFinishPrompt=fileStatus.initProcessingTimeStamp+(minutesWaitingFileProcessed*60*1000);if(Date.now()>timeFinishPrompt){prompt.recognized.succeeded=true;// Force finish prompt
}}else{// No file process in progress
constattachments=prompt.context.activity.attachments;if(fileStatus?.processingIsNotAvaliable&&fileRetryMessages?.noProcessAttachmentAvailable){prompt.options.retryPrompt=fileRetryMessages.noProcessAttachmentAvailable;}elseif(attachments?.[0]){// Attachments receive
// Check all processed
prompt.recognized.succeeded=PromptUtils.checkAttachmentsProcessed(attachments);}elseif(prompt.context.activity.text&&fileRetryMessages?.textAndNoAttachment){prompt.options.retryPrompt=fileRetryMessages.textAndNoAttachment;}}// Check retries
if((!prompt.recognized.succeeded)&&prompt.attemptCount>maxRetries){// Succeeded needs to be TRUE in order for BF to assign the value assign the recognized.value to result.value
prompt.recognized.succeeded=true;}returnprompt.recognized.succeeded;
Once the information has been validated, the function to collect the result will be executed:
// Define the conversation flow using a waterfall model.
super.addDialog(newWaterfallDialog(FactotumPromptAttachmentDialog.id,[this.beginPrompt.bind(this),this.receiveAttachmentProcessed.bind(this)]));
In the beginPrompt function when setting the Prompt, it is necessary to set the fileTreatment parameter as true.
On the other hand, if the text handling is already controlled by the validation function, disableRecognition can be specified to disable NLP recognition.
constpromptOptions: PromptOptions={prompt:{...MessageFactory.text('Send a file'),inputHint: InputHints.ExpectingInput},retryPrompt:'The files are being processed. We will let you know when they are ready. Thank you.',validations:{fileTreatment: true,disableRecognition: true}};
In this case, receiveAttachmentProcessed will be executed and appropriate checks can be made to determine whether the file sent by the user meets the requirements in terms of supported type and size.
If the channel conditions are met (in terms of supported type and size of the file), now the dialog can do its own checks if included in the code.
⚠️ WARNING
receiveAttachmentProcessed can also be executed when it has been forced to finish by number of retries, or by time if using PromptUtils.getAttachmentValidator(...).
In the case of an error in the File API Manager when trying to respond with the information, the only way to unblock the Prompt for the user is to interact with Aura again.
Scenario 2. The use case asks the user for one file and the user sends several files to Aura
If the use case requests one file from the user but she decides to send several files all at one, then:
The first file is processed.
Once the dialog receives the validated file and the prompt is closed, the following files sent by the user are not processed.
In this case, Aura will trigger a default dialog, the unexpected-file dialog dialog.
This dialog will receive the file(s) and will send an error message to the user, informing that the file is unexpected.
The text message can be configurable through POEditor.
Configure a use case to ask the user for several files one by one
If the use case needs more than one file from the user, OB constructors can build the dialog so it asks for the files one by one.
⚠️ This is the recommended behavior for the dialog when requesting several files from users
In this scenario, two behaviors from the users are expected, as described in the following sections.
Scenario 1. The use case asks for several files one by one and the user sends them this way
Scenario 2. The use case asks for several files one by one and the user sends more than one file all at once
Although the dialog is requesting the files one by one, the user can decide to send several files at the same time.
In this scenario:
The first file is processed.
Once the dialog receives the validated file and the prompt is closed, the following files sent by the user are not processed.
In this case, Aura will trigger a default dialog, the unexpected-file-dialog dialog.
This dialog will receive the file(s) and will send an error message to the user, informing that the file is unexpected.
The text message can be configurable through POEditor.
Configure a use case to ask for several files all at once
If constructors want the dialog to receive more than one file from the user all at one, the dialog must be configured in bypass mode, so it can manage all the files.
When redirecting all message traffic to this dialog (while the bypass is open), it has to check if the information received is an attachment or not.
// Attachment receive directly.
if(attachmentsReceied&&awaitthis.checkAttachmentsProcessed(stepContext,attachmentsReceied)){this.receiveAttachment(stepContext,attachmentsReceied);}else{// No attachment or prompt keyword, send the bypass instructions.
awaitstepContext.context.sendActivity('Type "prompt" to init a prompt Attachment'+' or you can send an attachment directly'+' type "exit" to finish.');}
It is also necessary to check whether the file has been validated or not (Similar to PromptUtils.getAttachmentValidator(...) in normal case):
The speed for attachments to arrive to aura-bot depends on how long the system takes to process them. Therefore, a number of considerations need to be taken into account:
If no service failures have occurred, as many messages will arrive as attachments the user has sent. The order will be determined by the time to process each of them.
It should be noted that the use of the bypass.data field (to store incoming information) does not have atomic mechanisms. A race condition could be produced. However, in order to minimise this situation, it is advisable to mark the use of persistent storage (Mongo) in loading and updating bypass operations.
This scenario corresponds to the user sending proactively a file or several ones to Aura, although there is no use case requesting them (no dialog running).
This dialog will receive the file(s) and will send an error message to the user, informing that the file is unexpected.
The text message can be configurable through POEditor.
4.6.4 - Use of templates
Use of templates in WhatsApp use cases
Guidelines for the configuration of a use case to send a template to the user in the response
Introduction
Aura integrates in WhatsApp channels the capability of managing templates.
A template is defined as a combination of different elements (multimedia, buttons, different designs for texts, etc.) that can be used for sending proactive and enricher messages to the user in WhatsApp channel.
Constructors can configure a use case to send a template. Currently, templates can only be sent unidirectionally: from WhatsApp to the user.
In case of handover use case, a human agent can send a template to the user. A human agent receives a response from the user as a result of sending the template (i.e., button pressed).
How to configure a use case to send a template to the user
Template registration
Previously, templates must be registered in the Facebook Administration Panel, and supervised and approved by Facebook.
To do that, follow the guidelines in the provided link and ask for support to the Kernel Team.
Gather information from template
Once the template has been created and registered, we will need to gather some basic information to start using it.
Namespace: identifier of the workspace where the template has been created in the FB administration panel. This param is optional.
Name: template name.
Parameters: template composition. Parameters are arrays whose elements can be in an object format or simply text. Templates may or may not have parameters. It is necessary to know the composition to determine whether to inject values into certain parts of the template.
The sections where parameters can be incorporated are:
Header: type parameters for the header can be found here
Body: type parameters for the body can be found here
An example of buttons as simple string and object is shown below:
Configure the use case to send a template
In order to include a template in use case dialog, send an activity with the following template custom type in the field contentType:
'application/vnd.telefonica.aura.template'
⚠️ This section has only descriptive purposes, as it refers to an internal process. Use cases constructors do not have to carry out any aditional task.
The message arrives to aura-bridge after going through the use case with the following format:
Guidelines for the configuration of a use case to send a catalog to the user in the response
Introduction
Aura integrates in the WhatsApp channel the capability of managing catalogs for businesses to share their products and services with customers. There are some types of messages that can be handled and sent by the dialogs.
How to configure a use case to send a catalog to the user
Catalog registration
Catalogs must be created in your WhatsApp business account after sending or receiving catalog messages in your bot.
Sending catalog messages to user
With the catalog already created, you could start to send catalog messages to the user. There are many catalog messages that could be sent to the user:
To send a message about one single product, the message with
WhatsApp format
should be added to the activity attachment with the attachment type application/vnd.telefonica.aura.whatsapp. This type
of attachment will be sent without changes to WhatsApp (except the to field).
To send a message with a list of products, the message with
WhatsApp format
should be added to the activity attachment with the attachment type application/vnd.telefonica.aura.whatsapp, as for the single product message.
Some WhatsApp catalog messages fields will be sent raw to the bot inside an attachment according to the type of catalog message received.
To set the dialog that will receive each of these attachments, some settings should be added to the channel configuration, inside the requestOptions field. Find all the information in the attachment-recognizer-middleware documentation.
Receiving catalog order messages
Catalog order image
After setting the configuration for the middleware, you will receive an activity to your dialog with an attachment with the content
of the order field in the WhatsApp message.
Here is an example of what you will find inside stepContext.context.activity.attachments:
Use of interactive messages in WhatsApp graphical interface
Aura is able to use certain interactive messages in WhatsApp channels: reply buttons and list messages in order to enrich the user’s experience.
Learn how to include them in the following guidelines
Introduction
Aura is able to use certain interactive messages in the WhatsApp graphical interface: Reply Buttons and List Messages.
Those components will be mapped to prompts and suggestions in the Aura answer model. That means that for WhatsApp-type channels, a prompt or a suggestion could be shown to the user using three components:
Reply buttons: messages including different options as buttons, thus offering a quicker way for users to make a selection from a menu when interacting with Aura.
List messages: messages that offer a simpler and more consistent way for users to make a selection when interacting with Aura.
Enumerated text list: text-based list with the enumerated options for the user to select one of them (normal behavior in previous releases)
With these new components, Aura will improve the users’ experience, as they will be able to select among different options shown in WhatsApp in an easy and practical way.
Components and operation modes
Aura provides three modes of operation to show the different options to the users based on the above-mentioned interactive messages:
Automatic configuration (default mode)
For the new format of reply buttons and list messages in WhatsApp, there is a default configuration that contains the basic conversion rules from the response model to buttons/lists.
The default mode is set at Platform level, with different layouts depending on two parameters:
The number of options (options offered to the user to choose among them).
The length of the text of each option.
This configuration is described in the following table:
Number of options
Less or equal to 20 characters
More than 20 characters
1-3 options
Reply buttons
Enumerated text list
4-10 options
List message
Enumerated text list
More than 10 options
Enumerated text list
Enumerated text list
The following figure includes a screenshot of each layout, showing how the prompts or suggestions will be presented to the user.
This default configuration set by the Platform can be modified at channel or dialog level to achieve any of the two operation modes set in the following sections and always bearing in mind the limitations for each format.
List message configuration
Aura sends the options inside a list message even if it is possible to present them using buttons.
⚠️ By default, the description field is empty, but if we want to add some more information, we can use it as in the example below.
[{"type":"imBack","title":"2a via de fatura","value":1,"channelData":{"description":"Caso de Uso: 2a via de fatura"// Example
}},{"type":"imBack","title":"Informe de pagamento","value":2,"channelData":{"description":"Caso de Uso: Informe de pagamento"// Example
}},{"type":"imBack","title":"Faturas anteriores","value":3,"channelData":{"description":"Caso de Uso: Faturas anteriores"// Example
}},{"type":"imBack","title":"Outros assuntos","value":4,"channelData":{"description":"Exibir outras opções"// Example
}}]
Enumerated text list configuration
Aura sends the options as an enumerated text list, even if it is possible to present them using buttons or list messages.
How to change the default configuration of lists and buttons
When can constructors modify the default configuration?
Constructors can change the default configuration of lists and buttons at two levels: by channel or by dialog.
⚠️ The modification of the default configuration is only allowed with values (number of options and number of characters) within the ranges established by this default model (see table in Automatic configuration (default mode)).
If constructors try to set an invalid configuration, the Platform will change this configuration to a suitable one, which is included in the range of values (number of options and number of characters) set in the default mode.
The following table shows examples of allowed and not allowed configurations that the OB could try to set:
✅ ALLOWED CONFIGURATIONS
Example 1: - 1-10 options and less than 20 characters: use list message configuration - More than 10 options and more than 20 characters: use enumerated text list
Example 2: - 1-3 options and less than 20 characters: use reply buttons - More than 3 options (any number of characters): use enumerated text list
⛔ INVALID CONFIGURATIONS
Example 1: - 4 options : use reply buttons
⚠️ The number of options must be between 1 and 3 to allow reply buttons 🔧 In this scenario, the Platform will change this configuration to an allowed one: list message
Example 2: - More than 20 characters: use list message
⚠️ The numer of options must be between 4 and 10 to allow list messafe 🔧 In this scenario, the Platform will change this configuration to an allowed one: enumerated text list
Change default configuration by channel
The default configuration for lists and buttons can be overwritten at channel level. Therefore, a specific channel can have a different configuration than the default one set by the platform, provided that this configuration is allowed.
This information must be added to the whatsapp.listOptions property of the channel configuration file (aura-configuration-api).
[// ...
{"channel_id":"e75e7b9d-7949-451a-9493-3d759745492c","name":"whatsapp-1004","whatsapp":{"client":{"id":"client-id","scopes":"client-scopes","secret":"client-secret"},"phoneNumber":"34666666666","listOptions":{// Whatsapp list options here!
}},}// ...
]
The listOptions property has the following format and fields:
If this field is indicated, it takes precedence over the general algorithm for detecting the list type. Possible values: - button: reply button - enumeratedList: enumerated text list - list: list message
rules
Object[]
Rules used to configure the list type
rules.type
Enum
List option type. Values: button, enumeratedList or list
rules.resources
Object[]
List with the information of resources to use for this list type
rules.resources.name
string
Field name. Currently, the possible values are: body, item or button
rules.resources.resourceKey
string
POEditor resource key
For example, a channel can force the use of list type, whenever possible, with the next configuration added in the listOptions property of the channel configuration file:
If aura-bridge receives a prompt or suggestion message from the bot for a channel with this configuration, it will use the list type as the first option and will try to build the message.
If the message cannot be built in list format due to any WhatsApp API restriction, aura-bridge will finally build the message using an enumerated text list.
Change default configuration by dialog
The default configuration for lists and buttons set by the Platform can be overwritten at dialog level. Therefore, a specific dialog can decide which configuration must be used provided that this configuration is allowed.
For example, it will not be possible to force the presentation of 4 options as reply buttons. If the dialog tries to establish it, then the Platform will change this layout to a WhatsApp list, according to the default algorithm.
This field has the same format as that defined for by channel configuration, as shown in the code below.
{"type":"message","text":"Ok, estarei aqui sempre que você precisar.",..."channelData":{"payload":{"bridge":{"whatsapp":{"listOptions":{// Whatsapp list options here!
}}}}}}
Priority among channel and dialog configuration
If channel has a configuration for the WhatsApp list format and the dialog establishes a different configuration than the channel, the second one prevails over the channel configuration.
Therefore, the order of precedence is as follows:
Configuration by dialog.
Configuration by channel.
Default configuration.
POEditor resources for lists and buttons texts
The texts shown to the user in the interactive messages can be configurable through POEditor resources:
Text in the header, for reply buttons, list messages and enumerated text list.
Text in the button for list drop-down in list messages.
Text for each option in enumerated text list.
These texts will be sent by the dialog in charge of building the response. If the dialog does not send them, they will be extracted from a specific POEditor resource (See table below). The POEditor resources are included in the following table:
- Format for each option: bridge.[WA/A1004].wa.numeric.list.bullet This is a template that uses the following variables: - An ID to identify the option (identified as %(id)s) - The text for this option (identified as %(title)s)
The footer is an optional field in interactive message objects. It supports emojis, markdown, and links. There is a maximum limit of 60 characters. If this limit is exceeded, the message will be rendered as an enumerated list without footer.
With this new component, Aura will improve the users’ experience, as it will be possible add footer in interactive messages.
An example of interactive list with footer is shown below:
How to use footer in your interactive list
The footer is optional and is included within the ChannelData. To use it, add a footer message to the channelData payload, as shown in the example below.
{"payload":{"bridge":{"whatsapp":{"listOptions":{"type":"list"}},"cards":{"footer":"Este es un mensaje de pie de página"}}},}
4.6.8 - Error management
Error management in WhatsApp channel
Guidelines for error management in WhatsApp channel
Errors in a WhatsApp use case
When an error happens in a WhatsApp use case, it is necessary to set the error in context status.
Guidelines for the configuration of the prompt to render an emoticon properly
Introduction
Aura is able to use emoticons, as part of the prompt options title.
This new feature, a most customized conversational flow can be generated, that allows an enhanced communication and engagement and a stronger emotional connection with the users.
How to configure prompt options to render emoticons
The way the prompt is created has changed: Previously, when specifying the title, it was reused for the id field of the options button. However, the title field did not support special characters such as emoticons.
To make emoticons rendering possible in the title field, adjustments have been made to allow different values in both fields, one for title and another for id.
For example, in the scenario below we have the same text, but one with emoticon and the other without it.
title: Loved the response 😍
id: Loved the response
To achieve this result, a new id field will be included at button level, within the channelData object of the button, which will be used in the prompt creation by Aura.
Important considerations
The id field, at channelData, must not contain emoticon! (See the example below).
If id is sent with emoticon, an error will be thrown and the list will be rendered as a common enumerated list.
If the id is not provided, the default logic continues, where the title is reused as the id. Therefore, if the title contains an emoticon and channelData.id is not provided, it will also result in an error and the list will be rendered as an enumerated list by default.
Example
When creating a new HeroCard prompt and modeling/creating the options that this prompt will have, you can include the new field called id in channelData object of the button, as seen in the example below:
constchoices: CardAction[]=[//...
{type:ActionTypes.ImBack,title:"Didn't like it 😠",value:"Didn't like it",channelData:{id:"Didn't like it"}},{type:ActionTypes.ImBack,title:"Didn't help me 😞",value:"Didn't help me",channelData:{id:"Didn't help me"}},//There is no emoticon, so there is no need for the channelData.id field.
{type:ActionTypes.ImBack,title:"Neutral",value:"Neutral"}//...
];
4.6.10 - Use of section title
Use of section title in interactive messages
Guidelines to configure a HeroCard to render a section title properly
Introduction
Aura is able to use a section title if the message has more than one section. This section title acts as a header for delimiting the beginning of the different sections in a WhatsApp action.
The section title is a string and can have a maximum of 24 characters.
The number of rows, joining all sections, cannot exceed 10. If this limit is surpassed, it will be rendered as an enumerated list.
From Cloud API, at least 2 sections are necessary to render the title.
How to use section title in your section
The section title is optional and is placed inside the HeroCard/Section, but it is required, if the card has more than one section.
In this case, we will use the HeroCard content field and include a new field called subtitle. This will be used by Aura to render the section title. When it exists, the section title is rendered; otherwise, nothing appears.
The image below shows more details on when this title will be placed.
Example
After creating the HeroCard, with its corresponding choices, it is possible to add the new field subtitle, and then the value will be rendered, as shown in the example below:
//...
letheroCard=CardFactory.heroCard(null,text,null,choices);(heroCard.contentasany).subtitle='This is the section title';//...
The result will be something like this:
4.6.11 - Use of WhatsApp referral
Use of WhatsApp referrals
Functionality to include WhatsApp referrals in use cases
Introduction
Aura is able to handle WhatsApp referrals when developing a use case in this channel.
This feature enables the retrieval of information from an advertisement when the user has clicked on a product ad in Instagram or Facebook using the WhatsApp channel. The derived benefit is the purchase of products or services in WhatsApp that are advertised in other platforms, such as Instagram or Facebook.
The WhatsApp referral works as follows:
A user clicks on an ad with the “Click to WhatsApp” call-to-action.
The user is redirected to WhatsApp and sends a message to the advertising business. (Be aware that users may elect to remove their referral data).
The advertising business gets an inbound message notification including the referral property, which provides additional context on the ad that triggered the message. Knowing all this information, the business can appropriately reply to the user message.
How to use this functionality?
aura-bridge is the component in charge of propagating the information received in a WhatsApp referral object to aura-bot using the channelData.payload property: aura-bridge request model, through the parameter referral.
5 - Development tools
Use cases development tools
Creating Aura experiences is easier thanks to the innovative tools and resources our engineers have designed for use case developers.
Discover the available ones and when and how you can use them
Introduction
In both cases, certain tools are release-dependent, so you should select the appropriate one for your Aura Platform release.
The key tools at your disposal are listed below:
▶️ Get started with Aura minibot, in order to work in local environment for testing purposes
▶️ The NLP virtual machine is ready for the configuration of the NLP development environment
▶️ Discover Abacus 1.0.0., a tool for training, testing and certify an NLP model.
▶️ With Aura mocks server you can provide a mock for any service using aura-bot
5.1 - Aura minibot
Aura Minibot user guide
Guidelines for the installation and configuration of Aura minibot
⚠️ In Aura’s new architecture, Aura minibot works jointly with Aura minigroot
Introduction to Aura minibot
Aura minibot is a tool intended for testing purposes in local environment.
It is highly recommended to use Aura minibot to get familiar with aura-bot when developing use cases.
Pre-requirements
Azure accounts (It can be a free one)
Visual Studio Code (required for the minibot generated by a Docker image)
Remote – Containers extension for Visual Studio Code (required for the minibot generated by a Docker image)
Aura docker registry token (Contact your manager or APE team who will supply it for you)
Register a bot in Azure
The current section explains the steps for the registration of a bot in Azure. Bear in mind that the Azure site and the steps to register a new resource change very often. If any questions arise, please contact APE Team, so they can aid with the registration.
In the Azure portal, create a resource of Azure Bot type.
Type in the search box “bot” and click on “Azure Bot”, the click on “Create”.
Fill in the form fields with the following values:
Bot handle: unique identifier for your bot, for instance: aura-bot-ape
Subscription: OB Subscription
Resource Group: OB Resource Group
Pricing tier: Free
Type of App: Multi Tenant
Creation type: Create new Microsoft App ID
Now click on “Review + create”
⚠️ Currently, with the addition of the aura-groot, it is needed to create 2 bots in Azure (root & skill).
The new Azure Bot resource will be validated, so the next step is to click on “Create” again, so this step will deploy our new resource. A new Microsoft App Id and password will be generated.
Click on “Go to Resource” to see the breakdown of options and configurations available for your bot.
Once the Azure Bot is created, it is required to get two parameters: Microsoft App ID and Microsoft App Password:
Microsoft App ID is located in Configuration. Copy it in a safe place.
Get Microsoft App Password by clicking on “Manage”.
Copy it in a safe place, as you will need it for the bot identification and cannot be visualized afterwards, when requesting a token.
In case you have lost it, click on “New client secret” and set the expiration date.
Install and configure Aura minibot
The minibot is provided as a Docker image from Aura’s private registry.
From this docker image, follow the next steps for its installation and configuration.
Complementary, the minibot can also be generated through a .tgz file, if the docker cannot be used.
Set all the required environment variables
Firstly, you need to set some environment variables located in:
aura-mini-bot/config.env
In this file, there are the environment variables shared between aura-groot and aura-bot as skill. Also, there are variables for
the scripts to set Direct Line endpoint, so in Microsoft variables you should set the ones of the Azure bot that will be
configured in aura-groot.
You also have two files with variables for aura-groot and aura-bot as skill. These files are:
As now we have 2 bots, you should set these variables in both files, config-groot.env and config-bot.env. Also, you
should set the same AURA_MICROSOFT_APP_ID that you set in config-bot.env in the mocked skills configuration file
(mock-configuration/mocks/mock-files/skills-configuration-mock.json), in the appId field, to indicate aura-groot the appId of the skill it has to communicate with.
Access to the database
Minibot requires access to a MongoDB database to be able to store information related to the user session. Those variables can be found here:
By default, AURA_MONGODB_USERNAME and AURA_MONGODB_PASSWORD variables are set as “admin” and “pass” in the .env file. These values must match the <user_name> and <password_db> set in the next step.
Run a local database
If you do not have any mongoDB instance, download a Docker image and run docker for storing sessions locally:
It is possible to get all available minibot and minigroot images using azcli (native or dockerized version) tool and following these steps:
Login in Azure:
az login
This message will appear:
To sign in, use a web browser to open the page https://microsoft.com/devicelogin and enter the code XXXX to authenticate.
Open the URI an insert the provided code.
To get the available minibot images from registry, the user must use this command.
az acr repository show-tags -n auraregistry --repository aura/aura-mini-bot
To get the available minigroot images from registry, the user must use this command.
az acr repository show-tags -n auraregistry --repository aura/aura-mini-groot
These commands will show an array of string with all available versions for each.
Get latest version
To get the latest minigroot and minibot versions, replace <version> by latest in the command of the section Pull minibot and minigroot images.
NOTE: using latest for the second or successive times does not update the image if there is a new latest image in the registry. In this scenario, to make sure the latest image is being retrieved and pulled, execute the following docker commands in that order:
To work with the all-in-one solution, five files must be created: docker-compose.yml, config.env, config-groot.env, config-bot.env and ngrok.yml.
The initial scaffolding is located in the repo: https://github.com/Telefonica/aura-mini-bot (Contact your manager or APE team if you do not have access to it)
In this case, you can use the command:
NOTE: Set all <param> from ngrok.yml, config.env, config-groot.env, config-bot.env and docker-compose.yml to your needs.
The docker-compose.yml file starts MongoDB, azurecli, ngrok, minigroot and minibot containers and exposes minigroot, minibot, MongoDB and ngrok ports (8080, 8081, 27017 and 4040 respectively).
The environments can be started with the command:
docker-compose up -d
Work with Aura minibot and install new dialogs
To work with new dialogs on minibot, follow the steps below:
Place a copy of docker-compose.yml, config-bot.env, config-groot.env, config.env and ngrok.yml in the working directory and create a packages directory to contain the dialogs source code.
Start the environment from shell with the command:
docker-composeup-d
If VSCode is used, you can connect/attach to the aura-minibot container, so you can work as local minibot version.
Minibot with the new dialog is located at /opt/aura-bot/aura-mini-bot. The current dialog sources (TypeScript files) are located at /tmp/dialogs, so you can work as non-container version.
Azure endpoint must be updated. This can be made by simply right clicking on the azcli container. Then, click on Show Container Log.
This will show in the integrated terminal a message with the URL that must be opened in a web browser and the code needed to authenticate in Azure.
When the URL is opened, an insert code request will appear on web navigator.
If no active session exists, Azure credentials must be inserted.
After credentials are set, a successful message will appear and bot endpoint will be updated.
Install Dialogs
At this stage, you can install a new dialog or an existing one, as well as update or remove dialogs.
Install a new dialog
To install new dialogs on minibot, another run task is included. To use it, click on Run button (#1 on next image), select Install dialogs from dropdown (#2 on next image) and click on on start debugging (#3 on next image).
This action will build and pack the dialogs from its source code and insert them into the minibot, but this action will not start minibot.
Install an existing dialog
Installing one or more than one existing dialog can be useful for developers, as they can use them as a reference.
To install an existing dialog on the minibot container, we firstly need to add it to the minibot source code, inside the packages/ folder.
In the following example, we have added three dialog libraries: bill-col, common and factotum-test.
To add the dialogs to the minibot container, follow these steps:
Click on “File” -> “Add Folder to Workspace”
In the “Add Folder to Workspace” input text bar, type in “/tmp/dialogs/”. A list of dialog libraries passed by volume to the container will be shown. Click “Ok” to add them to the minibot container.
At this point, we will be able to see the list of dialogs passed by volume in our VS Code File Explorer.
We can now proceed to install new dialogs, if required, as shown above.
Run Aura minibot
To get minibot running click on Run (#1 on next image) and then click on start debugging (#2 on next image). This action will not install new dialogs from its source (/tmp/dialogs).
This action will start minibot so it can be debugged as normally.
Update a single dialog
⚠️ Before you can update a single dialog, you must perform the task Install dialogs.
To update a dialog independently click on Update Dialog. The task will ask for the name of the dialog folder inside /tmp/dialogs.
Remove a Dialog
To delete a dialog, temporarily you can delete it from the file /opt/aura-bot/aura-mini-bot/sources/plugin-config.json
To permanently remove it you have to delete its folder inside /tmp/dialogs. Then run the Install Dialog or Update Dialog task.
Working with Mocks in Aura minibot
It is possible to use Mocks to simulate external HTTP services. This is done using a tool called Nock.
In order to use custom Mocks we must:
Configure the environment variables that we are going to modify, which are usually the endpoints to the services to impersonate.
Configure the data for Nock.
If necessary, create a custom response file in JSON format.
To work with custom Mocks it is necessary to create this file and directory structure:
Once the container is generated, this folder will be linked to:
mock-configuration/environment.env
It contains the necessary environment variables. These environment variables will replace the ones configured in the libraries (dialogs).
mock-configuration/mocks/nock-items.json
This file contains the configurations for the Nock tool.
The general format is as follows:
"name":"<NAME>","var":"<ENVIRONMENT VARIABLE WITH ENDPOINT_>,
"method": "<HTTPMETHOD>",
"regex": "<REGEXTOACTIVATE>", (Optional. Mandatory if does not exist path),
"path": <PATH TO ACTIVATE>, (Optional. Mandatory if does not exist regex)
"reply": {
"status": <HTTP STATUS>,
"response": <HTTP RESPONSE> (Optional. Mandatory if does not exist file),
"file":<FILENAME>(Optional.Mandatoryifdoesnotexistresponse),}
A general application example is shown below:
Example
[{"name":"Channels configuration","var":"AURA_CHANNELS_CONFIGURATION_API_ENDPOINT","method":"get","regex":"\/channels","reply":{"status":200,"file":"channels-configuration-mock.json"}},{"name":"Skills configuration","var":"AURA_CHANNELS_CONFIGURATION_API_ENDPOINT","method":"get","regex":"\/skills","reply":{"status":200,"file":"skills-configuration-mock.json"}},{"name":"Authorization","var":"AURA_AUTHORIZATION_ENDPOINT","method":"get","regex":"^/.*","reply":{"status":200,"file":"authentication-mock.json"}},{"name":"FP Terms and conditions API GET","var":"AURA_TERMS_AND_CONDITIONS_ENDPOINT","method":"get","regex":"\/v0","reply":{"status":404,"response":{}}},{"name":"FP Terms and conditions API POST","var":"AURA_TERMS_AND_CONDITIONS_ENDPOINT","method":"post","regex":"\/v0","reply":{"status":200,"response":{"status":"accepted"}}}]
mock-configuration/mocks/mock-files
If the configuration of one of the Nock entries requires a file for the response it must be contained in this directory.
Enable Custom Mocks
To enable custom Mocks, run the task “Enable Custom Mocks”.
Disable Custom Mocks
To deactivate the custom Mocks and leave everything with the configuration you have the default dialogs you have to run the task “Disable Custom Mocks”.
Aura minibot start-up messages
The start-up messages of the minibot are the following ones:
Once this step is done, developers will have their local Aura instance up and running.
Aura minigroot start-up messages
The start-up messages of the minigroot are the following ones:
Minigroot start-up messages
DEBUGEnvironmentconfigurationloaded{module:'configuration-manager',corr:'aura-system',version:'1.23.0',app:'aura-groot',host:'12c481794fce'}DEBUGStartingHttpMonkeyPatcher{module:'start-service',corr:'aura-system',version:'1.23.0',app:'aura-groot',host:'12c481794fce'}DEBUGAuthenticationApiKeystarting{module:'orchestrator',corr:'aura-system',version:'1.23.0',app:'aura-groot',host:'12c481794fce'}INFOAuthenticationApiKeystarted.{module:'orchestrator',corr:'aura-system',version:'1.23.0',app:'aura-groot',host:'12c481794fce'}DEBUGMiniBotServiceMockstarting{module:'orchestrator',corr:'aura-system',version:'1.23.0',app:'aura-groot',host:'12c481794fce'}INFOMiniBotServiceMockstarted.{module:'orchestrator',corr:'aura-system',version:'1.23.0',app:'aura-groot',host:'12c481794fce'}DEBUGConnectorstarting{module:'orchestrator',corr:'aura-system',version:'1.23.0',app:'aura-groot',host:'12c481794fce'}DEBUGSettingconnectionwithoptions{module:'connector',configuration:{maxPoolSize: 60,ssl: false},corr:'no-correlator',version:'1.23.0',app:'aura-groot',host:'12c481794fce'}INFOConnectorstarted.{module:'orchestrator',corr:'aura-system',version:'1.23.0',app:'aura-groot',host:'12c481794fce'}DEBUGLocaleManagerstarting{module:'orchestrator',corr:'aura-system',version:'1.23.0',app:'aura-groot',host:'12c481794fce'}INFOLocaleManagerinitialized{module:'locale-manager',corr:'aura-system',version:'1.23.0',app:'aura-groot',host:'12c481794fce'}INFOLocaleManagerstarted.{module:'orchestrator',corr:'aura-system',version:'1.23.0',app:'aura-groot',host:'12c481794fce'}DEBUGAuraCurrentChannelsConfigurationstarting{module:'orchestrator',corr:'aura-system',version:'1.23.0',app:'aura-groot',host:'12c481794fce'}INFOAuraCurrentChannelsConfigurationstarted.{module:'orchestrator',corr:'aura-system',version:'1.23.0',app:'aura-groot',host:'12c481794fce'}DEBUGAuraSkillConfigurationstarting{module:'orchestrator',corr:'aura-system',version:'1.23.0',app:'aura-groot',host:'12c481794fce'}INFO1skillhavebeenloaded{module:'aura-skill-configuration',skillsNames:['aura-bot'],corr:'aura-system',version:'1.23.0',app:'aura-groot',host:'12c481794fce'}INFOAuraSkillConfigurationstarted.{module:'orchestrator',corr:'aura-system',version:'1.23.0',app:'aura-groot',host:'12c481794fce'}DEBUGChannelDataValidatorstarting{module:'orchestrator',corr:'aura-system',version:'1.23.0',app:'aura-groot',host:'12c481794fce'}INFOSuccessfullyloadedvalidatorschema/opt/aura-groot/aura-mini-groot/node_modules/@telefonica/aura-models/resources/channel-data/3.1.0/request/channeldata-3.1.0-request.schema.json{module:'channel-data-validator',corr:'aura-system',version:'1.23.0',app:'aura-groot',host:'12c481794fce'}INFOSuccessfullyloadedvalidatorschema/opt/aura-groot/aura-mini-groot/node_modules/@telefonica/aura-models/resources/channel-data/3.1.0/response/channeldata-3.1.0-response.schema.json{module:'channel-data-validator',corr:'aura-system',version:'1.23.0',app:'aura-groot',host:'12c481794fce'}INFOChannelDataValidatorstarted.{module:'orchestrator',corr:'aura-system',version:'1.23.0',app:'aura-groot',host:'12c481794fce'}DEBUGKpiHandlerstarting{module:'orchestrator',corr:'aura-system',version:'1.23.0',app:'aura-groot',host:'12c481794fce'}DEBUGKPIFileWriterstarted{module:'kpi-entity-writer',corr:'',version:'1.23.0',app:'aura-groot',host:'12c481794fce'}INFOKpiHandlerstarted.{module:'orchestrator',corr:'aura-system',version:'1.23.0',app:'aura-groot',host:'12c481794fce'}DEBUGPrometheusManagerstarting{module:'orchestrator',corr:'aura-system',version:'1.23.0',app:'aura-groot',host:'12c481794fce'}INFOPrometheusManagerstarted.{module:'orchestrator',corr:'aura-system',version:'1.23.0',app:'aura-groot',host:'12c481794fce'}DEBUGAuraGrootCachestarting{module:'orchestrator',corr:'aura-system',version:'1.23.0',app:'aura-groot',host:'12c481794fce'}WARNAuraGrootCachecouldnotbestarted,noinstancereturnedatinit.{module:'orchestrator',error:'AuraGrootCache could not be started, no instance returned at init.',corr:'aura-system',version:'1.23.0',app:'aura-groot',host:'12c481794fce'}DEBUGServerstarting{module:'orchestrator',corr:'aura-system',version:'1.23.0',app:'aura-groot',host:'12c481794fce'}INFOSkillshavebeenupdated{module:'activity-handler',corr:'aura-system',version:'1.23.0',app:'aura-groot',host:'12c481794fce'}DEBUGSkillsChannelMap{module:'activity-handler',skillsChannelMap:{'novum-mytelco':'366de758-14aa-4527-a897-d04f165d80da',whatsapp:'366de758-14aa-4527-a897-d04f165d80da','aura-channel-factory-web':'366de758-14aa-4527-a897-d04f165d80da','aura-channel-factory-mobile':'366de758-14aa-4527-a897-d04f165d80da','novum-mytelco-qa':'366de758-14aa-4527-a897-d04f165d80da','movistar-plus':'366de758-14aa-4527-a897-d04f165d80da','set-top-box':'366de758-14aa-4527-a897-d04f165d80da','set-top-box-haac':'366de758-14aa-4527-a897-d04f165d80da','qa-ner':'366de758-14aa-4527-a897-d04f165d80da','qa-gazetteer':'366de758-14aa-4527-a897-d04f165d80da','qa-ner-gazetteer':'366de758-14aa-4527-a897-d04f165d80da','qa-domain-selector':'366de758-14aa-4527-a897-d04f165d80da','qa-disam':'366de758-14aa-4527-a897-d04f165d80da','qa-no-disam':'366de758-14aa-4527-a897-d04f165d80da',whatsapp2:'366de758-14aa-4527-a897-d04f165d80da','qa-disam-sugg':'366de758-14aa-4527-a897-d04f165d80da','qa-disam-sugg-black':'366de758-14aa-4527-a897-d04f165d80da','global-video-platform':'366de758-14aa-4527-a897-d04f165d80da','whatsapp-1004':'366de758-14aa-4527-a897-d04f165d80da',emulator:'366de758-14aa-4527-a897-d04f165d80da'},corr:'aura-system',version:'1.23.0',app:'aura-groot',host:'12c481794fce'}INFOModule: Server,loaded.{module:'aura-groot-server',corr:'aura-system',version:'1.23.0',app:'aura-groot',host:'12c481794fce'}INFOServerstarted.{module:'orchestrator',corr:'aura-system',version:'1.23.0',app:'aura-groot',host:'12c481794fce'}DEBUGHttpMonkeyPatcherstarting{module:'orchestrator',corr:'aura-system',version:'1.23.0',app:'aura-groot',host:'12c481794fce'}INFOHttpMonkeyPatcherstarted.{module:'orchestrator',corr:'aura-system',version:'1.23.0',app:'aura-groot',host:'12c481794fce'}INFOIAmGroot!!!{module:'start-service',corr:'aura-system',version:'1.23.0',app:'aura-groot',host:'12c481794fce'}INFOModule: Server,listeningto8080{module:'aura-groot-server',corr:'aura-system',version:'1.23.0',app:'aura-groot',host:'12c481794fce'}
POSTMAN can be used as a client to send messages to the bot and check the replies from the bot. To be able to do this task, please use a Microsoft POSTMAN collection for Direct Line.
Create a Direct Line token
Create a Direct Line token to be able to talk with your bot. This can be done in the Azure portal: Firstly, go to the bot service resource, and then to Direct Line channel configuration.
If you click on Direct Line, a new side window will open on the right hand side of the screen where you can see your bot keys. At this stage, click on the eye icon to view they key and copy it, so it can be used later from POSTMAN.
Publish your bot
The Aura instance is running locally in your machine.
Now, you should publish it, so it is available to the world. It can be deployed in Azure or similar clouds, but we recommend to use some applications that allow you to generate an external URL, such as ngrok or Localtunnel. You have to expose the 8080 port of your machine, which is the default port used by Aura.
This is the URL you have to set in the Configuration section of your bot in Azure portal.
NOTE: This process is already done automatically if you use the all-in-one solution with docker-compose.
Test from POSTMAN
Once the POSTMAN collections provided by Microsoft are downloaded, store them in the same folder and import the folder from POSTMAN (File -> Import -> Import Folder).
Set the DirectLine secret in the POSTMAN environment. Select the right environment file and then click on the Gears icon, both are located on top right.
Select the Direct Line 3.0 POSTMAN environment:
Enter the secret key value copied in previous steps inside the INITIAL VALUE and CURRENT VALUE of directLineSecret variable, so other requests can use it. This secret key is the responsible to tell Microsoft which bot has to reach once we send requests to DirectLine 3.0 endpoints.
Once this information is filled, execute the requests step by step, as shown below:
The conversationId field is extracted automatically from this first request and is included in the rest of the requests.
Send message sends an AuraCommand in order to avoid the NLP process, so the dialog is triggered without NLP.
You should edit the body request to be similar to the following one (remember to change the intent name to the one set in your library):
from.id is the user who is going to access the bot. This information can be obtained from the file /sources/files/mock-files/authentication-mock.json, choosing an userAuraId.
auraCommand.value.intent contains the intent (dialog) to be reached. This information can be obtained in the files located in dev/settings/dialog-config.xx-xx.json (where xx-xx is the locale referred to the country, i.e., es-gb) in the library repository or local development in case of a new one.
If everything worked fine, once the request is sent, it is shown in the ngrok console. Also, the dialog activation is shown on the bot console.
ngrok:
ngrok example
HTTPRequests-------------POST/api/messages202AcceptedBot(consolaVisualStudioCode):INFOHTTPAPIrequestGETauthorization-mock/ca9961f9-c6f0-3acd-5c72-ce2719f43ec9{domain:'authorization-mock',method:'GET',path:'/ca9961f9-c6f0-3acd-5c72-ce2719f43ec9',corr:'no-correlator',module:'HttpMonkeyPatcher',version:'6.0.0',app:'aura-bot',host:'cc45bbf4b438'}DEBUGHTTPAPIresponseGETauthorization-mock/ca9961f9-c6f0-3acd-5c72-ce2719f43ec9200{domain:'authorization-mock',method:'GET',status: 200,path:'/ca9961f9-c6f0-3acd-5c72-ce2719f43ec9',drt: 4,corr:'no-correlator',module:'HttpMonkeyPatcher',version:'6.0.0',app:'aura-bot',host:'cc45bbf4b438'}INFOHTTPAPIresponseGETauthorization-mock/ca9961f9-c6f0-3acd-5c72-ce2719f43ec9200{domain:'authorization-mock',method:'GET',status: 200,path:'/ca9961f9-c6f0-3acd-5c72-ce2719f43ec9',drt: 4,corr:'no-correlator',module:'HttpMonkeyPatcher',version:'6.0.0',app:'aura-bot',host:'cc45bbf4b438'}DEBUGStartingrecognizerAuraCommandRecognizer{corr:'11efcaff-67fb-46cd-be7f-6a54f68fd926',module:'recognizer-middleware',version:'6.0.0',app:'aura-bot',host:'cc45bbf4b438'}DEBUGIntentset{corr:'11efcaff-67fb-46cd-be7f-6a54f68fd926',intent:{intents:{'intent.common.greetings':[Object]},entities:[],text:'',answers: undefined,promptCheck: true,utm:{source:'channel_name',medium:'text'}},module:'aura-context-utils',version:'6.0.0',app:'aura-bot',host:'cc45bbf4b438'}INFOAuraCommandRecognizer:6e204898-9fee-4006-a17e-7e6851fb8fca{corr:'11efcaff-67fb-46cd-be7f-6a54f68fd926',intent:'{"intent.common.greetings":{"score":1}}',module:'recognizer-middleware',version:'6.0.0',app:'aura-bot',host:'cc45bbf4b438'}DEBUGEndrecognizerAuraCommandRecognizer.Result:{"intents":{"intent.common.greetings":{"score":1}},"entities":[],"text":"","promptCheck":true,"utm":{"source":"channel_name","medium":"text"}}{corr:'11efcaff-67fb-46cd-be7f-6a54f68fd926',module:'recognizer-middleware',version:'6.0.0',app:'aura-bot',host:'cc45bbf4b438'}DEBUGFinalizerecognizers.Result:{"intents":{"intent.common.greetings":{"score":1}},"entities":[],"text":"","promptCheck":true,"utm":{"source":"channel_name","medium":"text"}}{corr:'11efcaff-67fb-46cd-be7f-6a54f68fd926',module:'incoming-message-middleware',version:'6.0.0',app:'aura-bot',host:'cc45bbf4b438'}DEBUGBreakprompt{topIntent:{intent:'intent.common.greetings',score: 1,entities:[],type:'suggestion'},corr:'11efcaff-67fb-46cd-be7f-6a54f68fd926',module:'incoming-message-middleware',version:'6.0.0',app:'aura-bot',host:'cc45bbf4b438'}DEBUGClearstackevaluation: PromptOptions: NoPromptdetected.Score1,min-scorethreshold: 0.95{corr:'11efcaff-67fb-46cd-be7f-6a54f68fd926',module:'aura-context-utils',version:'6.0.0',app:'aura-bot',host:'cc45bbf4b438'}DEBUGRequestreceived{domain:'26eba81ecfb9.ngrok.io',method:'POST',path:'/api/messages',corr:'11efcaff-67fb-46cd-be7f-6a54f68fd926',module:'AuraBotServer',version:'6.0.0',app:'aura-bot',host:'cc45bbf4b438'}DEBUGRunningdialogwithMessageActivity.{corr:'11efcaff-67fb-46cd-be7f-6a54f68fd926',module:'aura-bot',version:'6.0.0',app:'aura-bot',host:'cc45bbf4b438'}INFORecognizethisintentpre-contextfilter{intent:'{"intent":"intent.common.greetings","score":1,"entities":[],"type":"suggestion"}',corr:'11efcaff-67fb-46cd-be7f-6a54f68fd926',module:'main',version:'6.0.0',app:'aura-bot',host:'cc45bbf4b438'}DEBUGroutingresolution{recognizer:'intent.common.greetings',result: undefined,corr:'11efcaff-67fb-46cd-be7f-6a54f68fd926',module:'RoutingMap',version:'6.0.0',app:'aura-bot',host:'cc45bbf4b438'}INFOThereisnodialogtohandlethismessage{corr:'11efcaff-67fb-46cd-be7f-6a54f68fd926',module:'main',version:'6.0.0',app:'aura-bot',host:'cc45bbf4b438'}INFOOutgoingactivity{text:'Vaya, parece que no soy capaz de entenderte. Inténtalo de nuevo',corr:'11efcaff-67fb-46cd-be7f-6a54f68fd926',module:'outgoing-message-middleware',version:'6.0.0',app:'aura-bot',host:'cc45bbf4b438'}DEBUGFinalizemiddlewarespipeline{corr:'11efcaff-67fb-46cd-be7f-6a54f68fd926',module:'outgoing-message-middleware',version:'6.0.0',app:'aura-bot',host:'cc45bbf4b438'}DEBUGDialogundefinedfinished,NOsuggestions.{corr:'11efcaff-67fb-46cd-be7f-6a54f68fd926',module:'main',version:'6.0.0',app:'aura-bot',host:'cc45bbf4b438'}INFOResponsereturned200POST/api/messages{method:'POST',status: 200,path:'/api/messages',drt: 35,corr:'11efcaff-67fb-46cd-be7f-6a54f68fd926',module:'AuraBotServer',version:'6.0.0',app:'aura-bot',host:'cc45bbf4b438'}INFOHTTPAPIrequestPOSTlogin.microsoftonline.com/botframework.com/oauth2/v2.0/token{domain:'login.microsoftonline.com',method:'POST',path:'/botframework.com/oauth2/v2.0/token',corr:'no-correlator',module:'HttpMonkeyPatcher',version:'6.0.0',app:'aura-bot',host:'cc45bbf4b438'}DEBUGHTTPAPIresponsePOSTlogin.microsoftonline.com/botframework.com/oauth2/v2.0/token200{domain:'login.microsoftonline.com',method:'POST',status: 200,path:'/botframework.com/oauth2/v2.0/token',drt: 1974,body:'{"token_type":"Bearer","expires_in":86398,"ext_expires_in":86398,"access_token":"<token>"}',corr:'no-correlator',module:'HttpMonkeyPatcher',version:'6.0.0',app:'aura-bot',host:'cc45bbf4b438'}INFOHTTPAPIresponsePOSTlogin.microsoftonline.com/botframework.com/oauth2/v2.0/token200{domain:'login.microsoftonline.com',method:'POST',status: 200,path:'/botframework.com/oauth2/v2.0/token',drt: 1974,corr:'no-correlator',module:'HttpMonkeyPatcher',version:'6.0.0',app:'aura-bot',host:'cc45bbf4b438'}INFOHTTPAPIrequestPOSTdirectline.botframework.com/v3/conversations/IiKY7bzb1Pd5VdtN4FZKmB-a/activities/IiKY7bzb1Pd5VdtN4FZKmB-a%7C0000000{domain:'directline.botframework.com',method:'POST',path:'/v3/conversations/IiKY7bzb1Pd5VdtN4FZKmB-a/activities/IiKY7bzb1Pd5VdtN4FZKmB-a%7C0000000',corr:'no-correlator',module:'HttpMonkeyPatcher',version:'6.0.0',app:'aura-bot',host:'cc45bbf4b438'}DEBUGHTTPAPIresponsePOSTdirectline.botframework.com/v3/conversations/IiKY7bzb1Pd5VdtN4FZKmB-a/activities/IiKY7bzb1Pd5VdtN4FZKmB-a%7C0000000200{domain:'directline.botframework.com',method:'POST',status: 200,path:'/v3/conversations/IiKY7bzb1Pd5VdtN4FZKmB-a/activities/IiKY7bzb1Pd5VdtN4FZKmB-a%7C0000000',drt: 185,body:'{\r\n "id": "IiKY7bzb1Pd5VdtN4FZKmB-a|0000001"\r\n}',corr:'no-correlator',module:'HttpMonkeyPatcher',version:'6.0.0',app:'aura-bot',host:'cc45bbf4b438'}INFOHTTPAPIresponsePOSTdirectline.botframework.com/v3/conversations/IiKY7bzb1Pd5VdtN4FZKmB-a/activities/IiKY7bzb1Pd5VdtN4FZKmB-a%7C0000000200{domain:'directline.botframework.com',method:'POST',status: 200,path:'/v3/conversations/IiKY7bzb1Pd5VdtN4FZKmB-a/activities/IiKY7bzb1Pd5VdtN4FZKmB-a%7C0000000',drt: 185,corr:'no-correlator',module:'HttpMonkeyPatcher',version:'6.0.0',app:'aura-bot',host:'cc45bbf4b438'}```
</details>
Inside POSTMAN, use “Receive activities” request to follow up all the messages sent to and from the bot.
Example
{"activities":[{"type":"message","id":"IiKY7bzb1Pd5VdtN4FZKmB-a|0000000","timestamp":"2021-01-28T16:02:49.6587305Z","serviceUrl":"https://directline.botframework.com/","channelId":"directline","from":{"id":"ca9961f9-c6f0-3acd-5c72-ce2719f43ec9"},"conversation":{"id":"IiKY7bzb1Pd5VdtN4FZKmB-a"},"textFormat":"plain","locale":"es-ES","channelData":{"auraCommand":{"type":"suggestion","value":{"intent":"intent.common.greetings"}}}},{"type":"message","id":"IiKY7bzb1Pd5VdtN4FZKmB-a|0000001","timestamp":"2021-01-28T16:02:52.6086472Z","channelId":"directline","from":{"id":"bot-antonio","name":"bot-antonio"},"conversation":{"id":"IiKY7bzb1Pd5VdtN4FZKmB-a"},"text":"Vaya, parece que no soy capaz de entenderte. Inténtalo de nuevo","inputHint":"acceptingInput","channelData":{"correlator":"11efcaff-67fb-46cd-be7f-6a54f68fd926"},"replyToId":"IiKY7bzb1Pd5VdtN4FZKmB-a|0000000"}],"watermark":"1"}
Develop a new use case
Once the use case is developed following the guidelines included in the document Use cases development over Aura Bot, it is required to follow the step below:
Run the command npm pack from the library root folder to generate a .tgz with the library packed.
Now, the library is ready to be imported and used by the minibot.
Minibot set-up to import and run the library
Copy the path where the .tgz file is located (right click and copy path in VSCode):
Go to root/ folder in your minibot project and run:
npminstall<pathcopied>`
Open the plugin-config.json file and set the name of the library inside the array as below (in the sample, the library’s name is test-app):
Add the dialogs in their libraries inside aura-mini-bot/sources/files/mock-files/channels-configuration-mock.json as well:
NOTE: We can do a copy of the content inside of the file dialog-config.json located in our original library development.
Go to dev folder and run npm run makeup-local and wait until it finishes (it will notify us through the console):
Now the library is ready to be used from the minibot. Run the minibot through VSCode debugger (using your launch.json file).
Debugging with Aura minibot
Right now, the best way to debug a dialog is from .js files located into node_modules once our packed library is installed. This is the way to avoid NPM Link dependency issues.
Breakpoints can be set in those dialog files. Once our breakpoint is reached, when we send the request from POSTMAN, the minibot will stop and it will show the debug options in VSCode:
Global use cases debugging example (personalized data)
In the following example it is shown how to debug an existing dialog with personalized data using the intent intent.billing.check. The steps to debug it from scratch are the following:
Set the channel configuration and enable the dialog in that channel.
Go to channels-configuration-mock.json located into the folder:
aura-mini-bot/sources/files/mock-files
Once there, check that the dialog is enabled inside the dialogLibraries property of the desired channel:
We use the intent.billing.check name to activate the dialog through POSTMAN in future steps. Let’s see now a screenshot of the full channel configuration for this example:
From the code above, the id property must be copied to a safe place, because it will be used in the next step.
Go to aura-mini-bot/sources/files/mock-files/authentication-mock.json file located into aura-mini-bot/sources/files/mock-files/ folder.
Paste the previous value copied (id) into the id property and check that the name and prefix property fit with the channel information.
The id property is the responsible to link the user to that channel (remember that a user has to be registered on a channel).
Now we have all we need. Pay attention to auraId property, as it will be used on POSTMAN to send messages to Aura.
Go to the root node_modules folder and open the bill-check-dialog.js file in order to set the desired breakpoints:
Go to debug module in VSCode and run the minibot in debug mode.
Go to POSTMAN and send the request to start conversation. In addition, send a request with an aura command to reach bill-check dialog:
We should be able to see our minibot stops in our breakpoints set in previous steps:
As we can see in the console, we have reached the intent.billing.check as a Final recognizer result. It can be noticed that the auraData object includes the information from the authentication-mock.json file mentioned before.
Run Aura minibot against a remote environment
In cases where it is necessary or desired to test use cases against a remote test environment, the following steps should be performed.
Get the environment variables
Using the kubeconfig file that your manager or DevOps Team should provide you with, run the following commands from a Unix terminal which will generate an .env file:
$ exportKUBECONFIG=<path-to-file>
$ (kubectl -n aura-<environment> get cm aura-bot -o json | jq -r ".data|to_entries|map(\"\(.key)=\(.value|tostring)\")|.[]"; kubectl -n aura-<environment> get secret aura-bot -o json | jq -r ".data|to_entries|map(\"\(.key)=\(.value|tostring|@base64d)\")|.[]") > aura-<environment>.env
NOTE: Set all 3 of <environment> params to your needs.
NOTE: In case the command does not find jq, you must install the library by executing the following:
$ apt-get update
$ apt-get install jq
Modify environment file
In order for the minibot to work correctly against a remote environment, the following variables must be added at the beginning of the .env file:
For convenience, we will create a new docker-compose file to be able to use the minibot locally and remotely without making modifications each time. This file will be added along with the previous docker-compose.yml file.
In order to get the configuration of locally installed use cases, and skills, create a mappings folder in the working directory and add these three files:
This configuration will use the docker volume created in the docker-compose to be able to serve through the WireMock container the files located in /sources/files/mock-files/.
Start the minibot containers
You must use the following command to raise the containers with the new compose file:
$ docker-compose -f ./docker-compose-remote.yml up -d
You should also use the following command to shut down the correct containers:
$ docker-compose -f ./docker-compose-remote.yml down
Docker scaffolding
Below, you can find the complete folder and file structure with links to download them, so you can start using minibot in docker right away:
Guidelines for the installation of Aura NLP Virtual Machine, required for the configuration of the NLP development environment
Installation and operation guidelines
Aura Platform Team has generated a Virtual Machine that allows the configuration of the Aura NLP development environment following a semi-automatic process.
Follow the steps explained below to install and operate it:
Import OVA formatted files that contain all the technical requirements for the installation.
Once the VirtualBox is installed, follow these steps:
3.1. Select “File” -> “Import Appliance”
3.2. Access Aura NLP Virtual Machine for your release in the Sharepoint L-CDO repository and select the corresponding aura-nlpdata.ova file for importing it.
3.3. Click on “Next >” button and, afterwards, select the “Import” button.
3.4. When the importation process has finished, in the main view of VirtualBox the new Virtual Machine is shown.
Click over the new virtual machine and then press “Start”.
Ask the APE Team for the user and password to access.
Generate a new SSH key to operate the Virtual Machine
In order to operate with the NLP Virtual Machine, it is required to generate a new SSH (Secure Shell Protocol) key.
For this purpose, follow the steps described in the section Generate a new SSH key and add it to the ssh-agent.
Be aware of the time update, as if the Virtual Machine is paused, the time is not updated and it can lead to errors with certificates.
Generate a new SSH key and add it to the ssh-agent
In order to operate with the NLP Virtual Machine, certain configuration is needed to allow users to access GitHub NLP repositories.
You can access and write data in repositories on GitHub using SSH (Secure Shell Protocol). When you connect via SSH, you authenticate using a private key file on your local virtual machine.
SSH configuration guidelines
Follow the steps explained below to configure the SSH keys:
Open VirtualBox and run the NLP Virtual Machine by clicking in the “Start” button.
After login into the VM (if you do not remember the password, ask APE team), open the terminal.
In the terminal, type in the command: ssh-keygen -t ed25519 -b 4096 -C your-email@telefonica.com, replacing your-email by your corporate e-mail. This command generates a new pair of SSH keys using the ed25519 algorithm. After introducing the command, press “enter” as shown in the following image.
Now that we have our SSH key pair generated, introduce the following command: ssh-add ~/.ssh/id_ed25519. This command adds the private key id_ed25519 to the SSH agent, allowing SSH connections to use that key without requiring the password each time we need to access the repositories.
The next step is to display the content of the id_ed25519.pub file, which contains the public SSH key. To do this, type in the following command: cat ~/.ssh/id_ed25519.pub. We need to copy the displayed key to add it to GitHub in the following steps. Copy everything except your email address, displayed at the end of the string.
Open GitHub in a web browser and log in.
In the top-right corner, click on your profile image, and select “Settings”.
In the new page, on the left-hand side bar, click on “SSH and GPG keys”, and then click on “New SSH key” button (in the top right corner).
Now, add a title for the SSH key, for example, “VM NLP”. The key type should be Authentication Key, and in the key field, add the key copied from the terminal in step 5. Finally, click on “Add SSH key” button.
In the list of SSH keys shown after clicking “Add SSH Key” in the previous step, identify the recently created SSH key and, on the right-hand side, click on the “authorize” button, as shown in the following image. GitHub will prompt you to verify with your password in order to authorize the Telefónica organization.
Now that we have our SSH keys set up, we can proceed with cloning the repositories we need to work with. Remember that to clone the repositories from the VM, we must click on “SSH” to clone via SSH and copy the URL.
5.3 - Abacus 1.0.0.
Abacus 1.0.0. user guide
Learn how to use Abacus, the tool for the training, testing and certification of the NLP model in Aura through an agile and efficient process
What’s Abacus?
Abacus is a web tool that eases the management of understanding models in Aura. Using Abacus, you can get a higher efficiency and autonomy, leading to a more agile certification of your NLP trainings.
Linguists or NLP experts can use Abacus to train, test and certify a full NLP understanding model in a specific channel and verify that Aura is able to understand properly.
With Abacus, you can certify your NLP model in four steps:
Upload my NLP training
Train & test the full understanding model
Live mode: Iterate and test
Check your accuracy and iterate your model
Publish your model
Publish your branch in Github transparently
Limitations of Abacus version 1.0.0.
Abacus journey map
The following image shows the main steps in your process for using Abacus. Access the guidelines for each step in the following documents:
You have already filled the variables required for training in the configuration file build_local_variables.sh.
Steps for Abacus set-up
Access the NLP Virtual Machine.
Enter your local working project, henceforth {Root_project}, whose name should be: aura-nlpdata-[country-code]
Copy the local variables configuration template:
"${Root_project}/tools/build_local_variables.sh.tpl"
and rename as: "${Root_project}/tools/build_local_variables.sh"
Copy the token in the variable GITHUB_TOKEN.
⚠️ Make sure you copy it, as it will only shown once.
Run the script file:
${Root_project}/tools/run_web_trainings.sh
When the script is finished, Abacus is opened automatically.
5.3.2 - Use Abacus
Guidelines for the use of Abacus 1.0.0.
After the Abacus set-up, learn how to use the tool with our guidelines.
Open Abacus
Open the NLP Virtual Machine.
Execute the following commands in the console:
cd${Root_project}/tools./run_web_trainings.sh
Abacus is now opened.
Discover Abacus main screen
Create a new Pull Request
Enter Abacus and select “New Pull Request” as your working mode.
In the main interface, select the channel where your understanding model is.
Train your understanding model.
When the training is finished, select “Results” in the drop-down menu and access to the results of the accuracy tests.
End-to-end tests (accuracy of the overall NLP model)
Evaluate the accuracy of your model:
Check in “last test” the overall accuracy related to the last test performed in the tool.
Click on each specific error in “last test report” to access to detailed information.
Use the filters to visualize errors per type, intent obtained or intent expected.
Test your NLP model locally (Abacus simulator).
Once your model is trained, you can use the Simulator to launch and test your pipeline locally and make a real-time evaluation of accuracy in the recognition of a specific statement.
Open the simulator.
Type a phrase.
Check how your model recognizes it.
When the accuracy is satisfactory, publish your model:
Press the “PUBLISH” button.
Create your Pull Request inserting the type, related JIRA issue, title and description and publish it.
If everything goes right, your PR is published. You can also see the details in Github.
Edit an existing Pull Request
Enter Abacus and select “Edit existing Pull Request” as your working mode.
Select your intended Pull Request. You can open it from Abacus or from GitHub to see its details.
All the operations carried out with Abacus are recorded in the logs file:
${Root_project}/server.log
If an error occurs, Abacus will show this message:
Clicking on “Download”, you can access to the log report and check the error for fixing it.
If, the problem persists, contact the Global Support Team and provide them with the report.
When it is solved, press “Reload”, to continue using Abacus.
Git conflicts
If the remote branch has changes that have not been updated in the local working branch, Github detects this situation as a conflict when publishing, and is not able to recognize which are the correct changes.
The following pop up will appear after clicking on “publish”.
Clicking on “Download”, you will get the file ${Root_project}/server.log, where you can check the errors that have occurred and try to solve them.
Conflicts in server.log must be resolved locally using the editor:
Open a terminal in code editor. Make sure the branch in terminal is the correct working branch.
Move changes from the remote branch to local: git pull origin <<working-branch>>
A message with a list of files with conflicts is shown.
Open each file and right-click to access the conflicts resolver.
Resolve the conflict. You can include texts from the local branch (left) or from the remote one (right) or discard both and copy what is needed.
Once conflicts are resolved, launch the following command to review the status of the local branch and check that all the conflicts are fixed in the response message: git status
When all the conflicts are resolved, commit changes: git commit –m "[[feat]] resolve conflicts: <<description of changes>>"
Push to update changes to the remote branch: git push origin <<working-branch>>
A message with all the details will appear.
If everything is solved, now restart the web server and continue with the existing Pull Request.
5.4 - Aura Mocks Server
Aura Mocks server
Description of Aura Mocks Server, a tool to provide a mock for any of the services that use Aura Bot or that are used by Aura Bot, and guidelines for working with it
Introduction
Aura Mocks Server is a server that provides a mock for any of the services that use aura-bot or that are used by aura-bot.
This component defines rest services that allow aura-bot system to run without the need for any other external system to provide these services.
Aura Mocks Server is composed by different plugins, which provide functionality to the tool and can work independently.
$ docker run -d -p 3000:3000 auraregistry.azurecr.io/aura-mocks-server
This starts a server listening on port 3000
Deploy
To deploy in performance environments, there is a convinient deployment yaml in aurak8s repository at tools/mocks/deployment.yml so you just need to run kubectl apply -f tools/mocks/deployment.yml.
Developer notes
The folder structure used for development is:
src
├── api // Statics API code
├── modules // Modules code (jsonserver)
├── scripts // Scripts
└── shared // Shared code between APIs and modules.
├── common
└── services
aura-mocks-server plugins are components that provide different functionalities to this component
Introduction
aura-mocks-server is composed of plugins, which provide functionality to the tool. Plugins work independently, the same way as a service in a microservices oriented architecture: isolated, self-contained and without affecting other existing functionality in the system.
Discover in the current documents detailed information regarding aura-mocks-server plugins:
Aura Platform Team is progressively documenting each plugin within the current documents. Check the already documented ones in the left sidebar index.
Types of plugins
There are different types of plugins:
Api. REST services that perform specific tasks not associated with the communication with a channel.
Client. These plugins define clients that can be used to communicate with a channel. These clients are normally used by processor plugins.
Processor. Plugins in charge of communicating with a channel, transforming the message received from a source channel to a destination channel.
Service. Utility plugins to be used by the rest of plugins.
Plugins management
As indicated in the previous section, aura-mocks-server uses the library@architect/architect for the management of plugins, so it is the architect library that is responsible for managing the dependencies injection in each module.
To create the architect application, aura-mocks-server uses the PluginManager module (located in the modules/plugin-manager folder). This module starts as the rest of modules at the aura-mocks-server start-up.
The PluginManager performs the following tasks:
It starts the architect application with the plugins defined in plugin-config.json file, located at the root of the aura-mocks-server component.
Currently, the plugins are in the src/plugins folder of aura-mocks-server, but in the future these plugins should be independent libraries and could be charged by library name (for example: @telefonica/aura-mocks-server-example-service).
Apart from the aura-mocks-server core environment variables, each plugin can define its own specific variables.
Plugin basic structure
Currently, aura-mocks-server uses @architect/architect library for plugins management.
A basic plugin must define at least:
A package.json file defining the library, like any other JavaScript library, with a plugin section defining which modules it consumes and supplies.
A source code file that defines the modules that it supplies (index.ts for example).
A couple of examples with the content of each file are included below:
/* file: index.ts */import{PluginType,registerPlugin}from'@telefonica/xxxx-server-common';import{v4asuuidv4}from'uuid';import{Services}from'./example-consume-services';export=registerPlugin([{type:PluginType.Service,// Plugin service type
name:'exampleService',// Name of the plugin service
instance:{// [provides] Instance that provides the module
getUniqueId() {returnuuidv4();}},services: Services// [consumes] Needed modules are added here
}]);
The modules specified in the plugin.consumes field define the services that are needed by this plugin. The modules specified in the plugin.provides field define the modules that this plugin offers.
Plugins modules
aura-mocks-server currently adds three modules that can be used by the different plugins. To use them, it is only necessary to add the package.json dependencies on plugin.consumes (like any other module/component).
configurationManager: Module with the aura-mocks-server configuration information.
auramocks-serverCache: Module to manage the aura-mocks-server cache.
prometheus: Service for metrics management.
A plugin can provide one or more plugin modules and each plugin module can be of a different type. Each type of module is intended to add a specific functionality to aura-mocks-server.
The existing types are defined in PluginType, which are described in the following sections.
Plugin that mocks asynchronous notification message
Description
The aura-mocks-async-callback-api plugin simulates aura-bridge asynchronous notification message for asynchronous API requests, both internal, such as file-manager or external, such as technical-problems-api in Kernel. It also adds several useful endpoints for the QA team and performance testing.
The aura-mocks-auraline-api plugin simulates aura-bridge for aura-botAuraline callbacks and adds several useful endpoints for the QA Team and performance testing.
The aura-mocks-data-store-api plugin simulates an API to manage documents in a generic way with several useful endpoints for the QA team and performance testing.
Defines an API to manage documents in a generic way.
Enpoint
Method
Group
description
/data-store/sorted/:collection
POST
Data Store
Save document
/data-store/sorted/:collection
GET
Data Store
Find documents
/data-store/sorted/:collection/:id
GET
Data Store
Get document in collection by id
GET: /data-store/sorted/:collection
Get message by timestamp. The query param timestamp is mandatory.
DELETE: /data-store/sorted/:collection
Delete message by timestamp. The query param timestamp is mandatory.
POST: /data-store/sorted/:collection
Add new collection document.
5.4.2.6 - dynamic-settings-service plugin
aura-mocks-dynamic-settings-service plugin
Description of the aura-mocks-dynamic-settings-service plugin
Description
The aura-mocks-dynamic-settings-service plugin is responsible for loading profile configurations from an Azure account or locally to be used afterwards.
An attempt is made to collect data from the specified Azure Storage account and container. If nothing is found, a default file is collected locally from path src/plugins/aura-mocks-dynamic-settings-service/dynamic-settings-default.json. The active cron performs this check periodically.
Currently, the mock for Genesys has the following endpoints implemented:
Enpoint
Method
Group
description
/genesys/2/chat/{serviceName}
POST
Chat
Request Chat
/genesys/2/chat/{serviceName}/{chatId}/send
POST
Chat
Send Message
/genesys/2/chat/{serviceName}/{chatId}/disconnect
POST
Chat
Disconnect
/genesys/2/chat/{serviceName}/{chatId}/pushUrl
POST
Chat
PushUrl
Start a new chat
Steps
Perform a POST request to /Genesys/2/Chat/{ServiceName}
When a new chat is created using the POST request to “/Genesys/2/Chat/{ServiceName}”, the system uses the settings indicated in the profile parameter or uses the default profile configuration if this parameter is not informed (see Profiles mock API
Send messages to chat using the endpoint /genesys/2/chat/{serviceName}/{chatId}/send
You can change at any time the value of Pushurl using the endpoint /genesys/2/chat/{serviceName}/{chatId}/pushUrl
Sessions Mock API
To help in testing tasks, the mocks exposes a series of services associated with the sessions it manages and the profiles that can be used to start a conversation.
Get session information
Sessions are identified by the chatId, so once a chat is created, you can check the session using /genesys/2/mock/sessions/{chatId}.
Endpoins
Enpoint
Method
Group
description
/genesys/2/mock/sessions
GET
Session
Get chat mock sessions
/genesys/2/mock/sessions/{chatId}
GET
Session
Get session by chatId
/genesys/2/mock/sessions/stats
GET
Session
Get session stats
/genesys/2/mock/sessions/keys
GET
Session
Get session keys
/genesys/2/mock/sessions
DELETE
Session
Remove session
Profiles Mock API
The profiles allow you to configure a different execution environment to the default environment, in order to receive answers in another address (Pushurl) and execute automatic actions when starting a new chat.
What are the profiles for?
When a new chat is created using the POST request /genesys/2/chat/{serviceName}, a profile is used to configure mainly two parameters:
pushUrl: It indicates the address where PUSH notifications will be sent.
autoMessages: Messages that will be executed automatically at the beginning of the conversation and using the waiting time indicated for each message.
See default profile settings
An example of configuration for the “default” profile is shown below:
// Post result to "/genesys/2/mock/profiles"
[{"profile":"default","settings":{"chat":{"pushUrl":"https://svc-ap-current.auracognitive.com/aura-services/v1/genesys/messages","autoMessages":[{"from":{"nickname":"system","type":"External"},"type":"ParticipantJoined","timeout":1},{"from":{"type":"External"},"type":"Message","timeout":1,"text":"You have approximately 15 minutes to be attended"},{"from":{"type":"External"},"type":"Message","timeout":1,"text":"Soon one of our agents will attend you personally"},{"from":{"nickname":"agent1","type":"Agent"},"type":"ParticipantJoined","timeout":1},{"from":{"type":"Agent"},"type":"Message","timeout":1,"text":"Hello, I am an Agent, how can I help you?"}]}}}]
In the default configuration, once a new chat is created, the following messages will be executed:
A second after starting the chat, the “system” (external) user will join conversation.
After that, “system” will send a message “You have approximately 15 minutes to be attended” (1 second after the previous message).
“system” will send a message “Soon one of our agents will attend you personally” (1 second after).
“agent1” (Agent) user will join conversation (1 second after).
“agent1” will send a message “Hello, I am an Agent, how can I help you?” (1 second after).
Endpoints
Enpoint
Method
Group
description
/genesys/2/mock/profiles
GET
Profile
Get profiles
/genesys/2/mock/profiles/{profile}
GET
Profile
Get profile by name
/genesys/2/mock/profiles/default
POST
Profile
Set profile by name
/genesys/2/mock/profiles/reset
GET
Profile
Reset profiles
/genesys/2/mock/chat/{serviceName}/{chatId}/send
POST
MockChat
Send message directly to the session, with optional timeout
Chat Mock API
You can send any type of event in chat using the service /genesys/2/mock/chat/{serviceName}/{chatId}/send. The format is similar to “autoMessages” for a profile.
The postman linked to this documentation contains an example of all types of events that can be sent to chat.
Module that mocks the behavior of any of the REST APIs called by aura-bot
Description
aura-mocks-json-server-api is a tool using express that allows you to generate REST services with predefined responses from a Javascript file that can be easily modified.
You must create a file to store the information of your new response mocks in data/db/module (for our example, greetings.js):
data
├── db
│ ├── module
│ │ ├── greetings.js
Add to greetings.js the response to the request GET /greetings/hello:
module.exports={"configuration":{"name":"greetings","basePath":"/greetings"},"routes":{"/hello":{"GET":{"examples":{"default":{"status":200,"body":{"response":"Hello from mock"}}}}}}};
Now, you can make a call to:
<URL_MOCK_SERVER>/greetings/hello
That should answer with a:
{"response":"Hello from mock"}
Creating a more complex answer
For example, to create a POST service /aura-services/v1/users/:id, where the user is dynamic:
The main idea is to obtain and generate all the requests in an automated way from the data sent and received by the aura-bot platform itself. In this way, there is no need to generate by hand each of the services required by the bot.
To obtain these requests, it is possible to use a sniffer and filter by the domains used by the aura-bot platform itself or use the aura-bot platform to record in a file all the requests and responses made (chosen option).
Modifications in Aura Bot Platform (temporary)
To use aura-bot platform as a request/response generator, you can temporarily modify the code as follows:
To import the data obtained, check the documentation for json-server-import script
aura-mocks-json-server-api plugin scripts
Import requests/response to aura-mocks-server database
script: json-server-import.js
To import the information obtained previously, the script src/scripts/json-server-import.ts is used.
This script allows you to load the request / response information into the mock server database.
npm run jsonserver:import --file=/tmp/hello-greeting.txt
The previous sentence will load the requests, overwriting existing ones.
You can also debug the script code:
npm run jsonserver:import:debug --file=/tmp/hello-greeting.txt
How it works
The script will load in the JSON server database information of each request associated with the example named default. (All loaded requests are loaded as “samples” by default).
Examples are each of the responses that a request can return. You can create examples with a different identifier to default using the getExampleKey function (in configuration object) for that request:
In the previous configuration, the json-server-import script will get the example identifier using the id parameter obtained from the request URL itself. Thus, the request /aura-services/v1/users/e7c26f93-bf15-419b-8893-2728afad3b6c will create the example:
This script will show the routes stored in the JSON server database and the examples that each route contains.
npm run jsonserver:routes
aura-mocks-json-server-api plugin database
/v3/domain_classifier/default_query
Currently, the mocks service for apigw url /auracognitive/v3/domain_classifier/default_query is ready to respond to the following POST queries:
Intent
Channel
Phrase (spanish)
intent.common.goodbyes
mp
hasta pronto
intent.common.greetings
mp
hola
intent.common.help
mp
ayuda
intent.common.swearwords
mp
joder
intent.common.thankyous
mp
gracias
intent.tv.content_get_info
mp
peliculas de fox
intent.tv.display
mp
quiero ver cuatro
intent.tv.none
mp
aabb
intent.tv.question_time_loc
mp
hora del partido del barcelona
intent.tv.search
mp
busca masterchef
intent.tv.search
mp
busca telediario
intent.tv.search_similar
mp
similar a telediario
/aura-services/v1/users/:id
User (auraId)
Channel Name
channelId
fb7926db-0283-41ef-a02f-541946090c92
mp
60f0ffda-e58a-4a96-aad9-d42be70b7b42
5.4.2.9 - openai-api plugin
aura-mocks-openai-api plugin
Description of the aura-mocks-openai-api plugin that mocks some of the services defined in the Azure OpenAI Service, used mainly by the Aura Gateway API service.
Description
The aura-mocks-openai-api plugin contains the services used by aura-gateway-api to work without real OpenAI services.
The endpoint /openai/deployments/:deployment_id/chat/completions is used to create a new chat completion. It is a POST request that receives the following query parameters:
Parameter
Type
Description
api-version
string
version of the API to be used
The response can be modified using the content field of the request body.
Using a specific response
The content field of the request body can be used to return a specific response:
The content field of the request body can be used to return responses based on a profile. The retries profile allows to return different responses for each retry. Example:
Description and guidelines for working with the aura-mocks-profiles-response-service plugin
Introduction
The aura-mocks-profiles-response-service plugin provides the rest of the plugins a specific utility to employ profiles and perform different behaviors, depending on the information received in requests and the configuration by type.
/**
* Get data of profile.
*
* @param {string} value Message identifier
* @returns {ProfileData} Profile data
*/publicgetData(value: string):ProfileData{
/**
* Determine whether the service contains a correct profile.
*
* @param {string} value Value to test
* @param {ProfileSettings[]} profiles Profile list
* @returns {boolean} Is profile?
*/publicisProfile(value: string,profiles: ProfileSettings[]):boolean{
getProfile
/**
* Get profile from value.
*
* @param {string} value Value to test
* @param {ProfileSettings[]} profiles Profile list
* @returns {ProfileSettings|undefined} Profile settings
*/publicgetProfile(value: string,profiles: ProfileSettings[]):ProfileSettings|undefined{
/**
* Execute `tokenExpired` profile.
* Emulate the `token expired` response from 4P.
*
* @param {any} message Message sent by the bridge.
* @returns {ResponseResult} Response result.
*/privateexecuteProfileTokenExpired(message: any):ResponseResult{
getNamespaceAndProfile
/**
* Get namespace and profile from value.
* Example: '12345|namespace:aura-ap-next|retries:wa-1015&4p-200' => { namespace: 'aura', profile: '12345|retries:wa-1015&4p-200' }
*
* @param {string} value Value to test
* @returns {{ namespace: string, profile: string }} Namespace and profile
*/publicgetNamespaceAndProfile(value: string):{namespace:string,profile: string}{
The aura-mocks-send-feedback-api plugin simulates the server that is responsible for receiving the different requests from the aurapush-sendfeedback-service plugin of *aura-bridge component. These requests may involve the sending of statues, errors o messages.
Flag to indicate if SOAP service is active. By default: false.
false
AURA_MOCKS_SOAP_SERVER_URI
string
URI for SOAP service used to define wsdl. By default: http://localhost:3000.
false
5.4.2.15 - storage-file-manager plugin
aura-mocks-storage-file-manager plugin
Description of the aura-mocks-storage-file-manager plugin
Description
The aura-mocks-storage-file-manager plugin is responsible for providing access to the aura-storage-file-manager utility to upload and download files from an Azure Storage account.
Container where mocks resources are stored. By default: aura-mocks-server
no
5.4.2.16 - store-activities-api plugin
aura-mocks-store-activities-api plugin
Plugin that mocks sending activities* of aura-bot*
Description
The aura-mocks-store-activities-api plugin simulates sending activities messages with several useful endpoints for the QA team and performance testing.
{"type":"Receive_Message","activity":{"type":"message","id":"DF8d619NDYp3ywW1ew9QFK-fr|0000003","timestamp":"2022-05-23T14:59:52.0129204Z","channelId":"directline","from":{"id":"BOT-aura-ap-next","name":"BOT-aura-ap-next"},"conversation":{"id":"DF8d619NDYp3ywW1ew9QFK-fr"},"attachmentLayout":"list","text":"Fiquei com dúvida. Veja se uma dessas respostas pode ajudar:","speak":"Fiquei com dúvida. Veja se uma dessas respostas pode ajudar:","inputHint":"expectingInput","attachments":[{"contentType":"application/vnd.microsoft.card.hero","content":{"buttons":[{"type":"imBack","title":"Canonic phrase for intent:intent.bundle.get_name_by_type","value":"Canonic phrase for intent:intent.bundle.get_name_by_type"},{"type":"imBack","title":"Canonic phrase for intent:intent.common.greetings","value":"Canonic phrase for intent:intent.common.greetings"},{"type":"imBack","title":"¿Cómo puedo acceder a Mi Movistar?","value":"¿Cómo puedo acceder a Mi Movistar?"}]}}],"channelData":{"hasMoreMessages":false,"correlator":"6ed5ed79-cd88-415e-9135-654417fef9b6"},"replyToId":"DF8d619NDYp3ywW1ew9QFK-fr|0000002"}}
5.4.2.17 - whatsapp-api plugin
aura-mocks-whatsapp-api plugin
Plugin that mocks WhatsApp.
Description
The aura-mocks-whatsapp-api plugin simulates aura-bridge for aura-bot WhatsApp callbacks and adds several useful endpoints for the QA team and performance testing.
Get messages from WhatsApp. The query param to is mandatory.
POST: /whatsapp/messages
Add new message for WhatsApp.
{"to":"34666666660","text":"Testing POST /whatsapp/messages"}
DELETE: /whatsapp/messages
Delete messages from WhatsApp. The query param to is mandatory.
PUT: /whatsapp/messages/:id
Add new read message for WhatsApp.
{"to":"34666666660","text":"Testing PUT /whatsapp/messages/:id"}
GET: /whatsapp/read-messages
Get read messages from WhatsApp. The query param to is mandatory.
POST: /whatsapp/read-messages
Add new read message for WhatsApp.
{"to":"34666666660","text":"Testing POST /whatsapp/read-messages"}
DELETE: /whatsapp/read-messages
Delete read messages from WhatsApp. The query param to is mandatory.
POST: /whatsapp/no-notification/messages
Add new message for WhatsApp.
{"to":"34666666660","text":"Testing POST /whatsapp/no-notification/messages"}
PUT: /whatsapp/no-notification/messages/:id
Add new read message for WhatsApp.
{"to":"34666666660","text":"Testing PUT /whatsapp/no-notification/messages/:id"}
POST: /whatsapp/4p/:error/messages
Add new message and return status code error.
{"to":"34666666660","text":"Testing POST /whatsapp/4p/:error/messages"}
PUT: /whatsapp/4p/:error/messages/:id
Add new read message for WhatsApp.
{"to":"34666666660","text":"Testing PUT /whatsapp/4p/:error/messages/:id"}
POST: /whatsapp/:error/messages
Add new message and return status code error and error message.
{"to":"34666666660","text":"Testing POST /whatsapp/:error/messages"}
PUT: /whatsapp/:error/messages/:id
Add new read message for WhatsApp.
{"to":"34666666660","text":"Testing PUT /whatsapp/:error/messages/:id"}
6 - Aura API clients
Aura API clients
Available API clients in Aura and process for their creation or update
Introduction
aura-bot has connections with several APIs through the use of different modules, which constitutes a practical way to communicate with them.
In this framework, API clients, or just clients, are defined as modules to be used inside the code that contain a set of tools with the purpose of carrying out requests in the simplest way.
API clients are generated automatically from the swagger file delivered by the API constructor, usually Kernel. Aura uses a custom code generator based on the OpenAPI initiative in order to generate TypeScript clients which is compatible with JavaScript.
There are two types of clients, External Clients that are associated with services external to Aura, and Internal Clients, associated with Aura servers.
Description of internal API clients implemented and used by aura-bot
Introduction
Internal API clients in Aura are associated with Aura servers. They are automatically generated and published with changes in the API definition of its server during the CI execution, the developer does nothing to update it.
The self-generated clients are clients automatically generated and published with changes in the API definition of its server during the CI execution, the developer does nothing to update it.
Almost all servers developed by the aura-bot team belong to this set, but not all. For instance, aura-bridge client, as its complete swagger is built out of the different partial swaggers of aura-bridge core and all its plugins, is generated and stored in aura-clients repository instead of in aura-bridge repository, as would happen with the self-generated clients.
Aura cognitive client
This client provides a set of classes to interact with the Telefónica Cognitive Service. It implements version 3.4.0.
These classes are:
DomainClassifierApi: interaction with Telefónica’s Domain Classifier Cognitive Service. This service is no longer used by aura-bot, because the updated version is the one available in aura-nlp-client.
InsightsResolutionApi: interaction with Telefónica’s Insights Resolution Classifier Cognitive Service passing the base path where the service is hosted and the user OAuth access token to use when interacting with the remote service.
SuggestionsApi: interaction with Telefónica’s Suggestions Cognitive Service passing the base path where the service is hosted and the user OAuth access token to use when interacting with the remote service.
NotificationsFilterApi: interaction with the Telefónica’s NotificationFilter Cognitive Service.
This client provides a set of classes to interact with the Movistar+ cognitive Service.
These classes are:
MovistarPlusCognitiveClient: Interaction with Movistar+ Resolution Cognitive Service passing the base path where the service is hosted and the user OAuth access token to use when interacting with the remote service.
MovistarPlusCognitiveStatusClient: Interaction with Movistar+ Resolution Status Cognitive Service passing the base path where the service is hosted and the user OAuth access token to use when interacting with the remote service.
This client implements the internal NLP API that provides access to the aura-botnlp-recognizer-middleware. It implements the client for the 3.0.0. version of the API.
It provides access to DomainClassifierApi: interaction with Telefónica’s Domain Classifier Cognitive Service.
This client implements the internal authentication API that provides access to the Aura user’s service. It implements the client for the 2.2.0. version of the API and provides access to UsersApi.
This client implements the internal API that provides access to the aura-file-manager component. It implements the client for the 2.2.0. version of the API and provides access to the File Manager API, microservice responsible of handling attached files storage and validations at channel level.
This client implements the API that provides access to the aura-configuration-api component. It implements the client for the 2.3.0. version of the API.
The aura-bridge client contains a set of endpoints that support aura-bridge, that is, Aura component in charge of adapting the communication protocol between aura-groot and certain external channels, such as Whatsapp, that cannot implement the Direct Line protocol.
It provides a central class called InvoicingClient that makes it the very simple to interact with Telefónica Kernel Invoicing Service, passing the base path where the service is hosted and the user OAuth access token to use when interacting with the remote service.
It provides a couple of classes called BalanceClient and TopUpClient that makes it very simple to interact with Telefónica Kernel Mobile Balance Service, passing the base path where the service is hosted and the user OAuth access token to use when interacting with the remote service.
It provides a central class called MobileQuotaClient that makes it the very simple to interact with Telefónica Kernel Mobile Quota Service, passing the base path where the service is hosted and the user OAuth access token to use when interacting with the remote service.
It provides a central class called SmartWifiClient which makes it very simple to interact with Telefónica Kernel Smart Wifi Service passing the base path where the service is hosted and the user OAuth access token to use when interacting with the remote service.
It provides a central class called SubscribedProductsClient which makes it very simple to interact with Telefónica Kernel Subscribed Products Service passing the base path where the service is hosted and the user OAuth access token to use when interacting with the remote service.
The common call center solution in Telefonica OBs is a platform called Genesys.
The current client is an implementation of the Genesys API version 8.5.2, that is compatible with the call center platform of all the OBs. It is required in order to provide the internal handover to agent solution in Aura.
As Genesys API is not defined with OpenAPI, we have gathered all the methods and objects needed to handle Genesys requests and provide the API definition by our own.
Guidelines for the generation or the update of an API client in Aura
Introduction
There are two main ways to create or update a new API client, both based on a swagger OpenAPI schema:
Create a new client based on a swagger
Update an already available client by re-creating it based on the next version of the published swagger
API clients are generated automatically from the swagger file delivered by the API constructor, usually Telefónica Kernel. Aura uses a custom code generator based on the OpenAPI initiative in order to generate TypeScript clients, which is compatible with JavaScript. Two different types of clients live together in the current Aura release:
Clients generated directly from the swagger with the original code generator described on the swagger documentation.
Clients generated directly from the swagger based on the custom code generator. ℹ️ Recommended way.
A copy of the swagger generator tools is available in the repository in the folder called tools, to be used directly from the scripts of the client. In the current version, we are using aura-code-generator/packages/aura-client-generator/tools/openapi/openapi-generator-cli-6.2.1.jar as the custom code generator.
Procedures for generating or updating clients
There are three different processes, depending on the type of client and purpose:
Moreover, if implementing a minor change version, check how the original client was created and follow the same procedure. Otherwise, there can be uncontrolled breaking changes.
Previous to the creation of a client, it is required to install the library: @telefonica/aura-develop-utilities
Create a new external client
We have integrated Hygen as a way to boost the process of creating new API clients.
To create a new API client template, please follow the next steps:
In your project install the client generator:
$ @telefonica/aura-client-generator
Create a new branch with a descriptive name:
$ git branch -b feat/new-api-client
Execute the following commands to create or update API:
$ aura-client-generator, $ aucg or $ aura-cg: Generate new API with base files, model files and API files.
$ aucg-update: Generate only API files.
$ aucg-model: Generate only model files.
Send answers for aucg.
Hygen: Answer the questions requested by the Hygen for the generation of the new client. Hygen will ask you for the name of the new API, the location of the swagger, the location where you want to generate the client (by default, it is generated in the root directory with the name of client), the version, the enumeration, the projectType and the tag to be set.
Flags options: Add flags options with the answers.
$ -V, --version: output the version number
$ --clientName: Which is the name of the new API (ex.: Admin, User Authentication, etc.)?
$ --swaggerFile: Path of the swagger
$ --clientDirectory: In which directory do you want to generate the client (default: “client”)
$ --versionNumber: Client version
$ --tagName: Tag used in the publishConfig configuration (default: “”)
$ --enumeration: Enumeration format (choices: “Unchange”, “Unify”, “Particularize”, default: “Unchange”)
$ --projectType: Destination project type (choices: “client”, “server”, default: “client”)
$ -h, --help: display help for command
Enumeration question
It is a list of options from which you can choose the specific way the models are generated.
Unchange: No modification is applied to names, enums or interfaces themselves. (If the swagger has several schemas with the same name, they will step on each other).
Unify: This option unifies in a single enum or interface the schemas that may have the same name. (Recommended option).
Particularize: This option separates all enums that have the same name by assigning the name of the enum + the name of the schema it belongs to.
projectType question
It is a list from which you can choose the type of client: external client (client) or internal client (server). This question is asked since the aura-code-generator is used to generate these two types of clients and certain elements change in the generation of each type.
client: make reference to the external client.
server: make reference to the internal client.
Note that when Hygen asks for the location for the new client, the format of this folder name must be a dash-separated name similar to name-of-your-api or ./package/name-of-your-api only in external clients.
In the background, the aura-client-generator command carries out the following steps:
Create a new package for the new API client at the indicated address directory.
Create the .gitignore, .npmignore, .npmrc, package.json, README.md and tsconfig.json files in the new API client package directory.
Create a new src/ folder in the new API client package directory.
Create the index.ts, models.ts files and a folder called api inside this API folder.
The provided Swagger API specification file is copied to the swagger directory of the new API client package directory.
At this stage, developers are ready to start working on the new API client from the newly created API client template:
Write a description of the new client and a minimal usage example in the README file.
Commit your changes and push them to Github.
Make a Pull Request to merge your changes in master/main branch.
After approved, merge the PR into master/main branch.
Then, the new version of the client is published in the private npm registry and available to be used.
Once the creation of the new client is finished, follow the guidelines to contribute your changes according to Contributing code to the repository section.
Create a new internal client
In order to create an internal client, execute the following command: $ npm run create-client
This will execute the process that will generate a new client, internal clients do not execute hygen as in external clients since all the information they need is passed to them through the flags that are explained below.
The complete command executed is the following: $ npx aucg --clientName \"server name\" --swaggerFile \"swagger path\" --projectType \"server\"
Where:
npx aucg: command that executes the aucg
--swaggerFile: Location of the server swagger.
--projectType: Type of project, among the ones defined in enumeration projectType. In this case, it is server because it is an internal client. (Remember that this same generator is also used for external clients selecting the projectType client).
Steps to upload changes:
Write a description of the new client and a minimal usage example in the README file.
Commit your changes and push them to Github.
Make a Pull Request to merge your changes in master/main branch.
After approved, merge the PR into master/main branch.
Then, the new version of the client is published in the private npm registry and available to be used.
Once the creation of the new client is finished, follow the guidelines to contribute your changes according to Contributing code to the repository section.
Update a client
ℹ️ This procedure is valid both for external and internal clients
Due to the superagent HTTP library migration of all clients, a new procedure to update those clients has been implemented.
In addition, this new implementation depends on templates, which can be found here. If there are changes in the template that need to be reflected in a client, before continuing with this procedure, you should create a PR with those changes in templates and merge them into master/main branch.
The procedure to update a client with an updated template is as follows:
Create a new branch for the new code: git checkout -b feat-or-fix-or-chore-depending-on-the-update/the-name-of-your-branch
If needed, add a tag or, if it has already been added, increase the numeric version in the package.json version: "version": "2.1.0-superagent.x",
Execute the following command to update the client APIs: npm run swagger-generate-client
Execute the following command to update the client models: npm run swagger-generate-model
Commit your changes and push them to Github.
Make a Pull Request to merge your changes in master.
After approved, merge the PR into master.
Then, the new version of the client is published in the private npm registry and available to be used.
Authentication methods
All clients are generated using a common template for OpenAPI generator, so they have similar structure: all of them have a generic constructor to set a basePath endpoint: constructor(basePath?: string);
If no basePath is defined, which is not recommended, the default basePath defined on swagger file is used.
The current client generator supports several authentication methods based on swagger security definitions. The available authentication methods are described in the following sections.
Basic authentication
This authentication method is based on user and password.
Credentials can be set by different forms:
Using constructor. Credentials can be set on constructor using this method:
This authentication method is based on a bearer token standard. It injects an Authorization header on HTTP request.
It can be set using the setter: accessToken: clientInstance.accessToken = 'token'
The token can contain a bearer prefix or not. If no bearer prefix is included, the setter method adds it automatically.
Oauth authentication
This authentication method is based on oauth authentication standard. It is similar to bearer authentication method, so an authorization header is injected on HTTP request.
It can be set using the setter: accessToken: clientInstance.accessToken = 'token'
The token can contain a Bearer prefix or not. If no Bearer prefix is included, the setter method adds it automatically.
Apikey authentication
This authentication method is based on APIKey authentication standard. It injects a generic header with key and value.
It can be set by using setApiKey method with the key and value parameters: clientInstance.setApiKey(key: string, value:string);
None
If no security schema is defined in the API definition file or the security methods do not follow any OpenAPI standards, a generic accessToken setter is provided. This setter works as bearer and it injects an authorization header on HTTP request.
It can be set using the setter: accessToken: clientInstance.accessToken = 'token'
The token can contain a bearer prefix or not. If no bearer prefix is included, the setter method adds it automatically.
Contributing code to the repository
To contribute your code to the repository, follow the next steps:
Once the code is satisfactory, stash changes into your branch.
Push your branch to the remote repository (this step runs the unit tests of all the packages and does not let the process continue until of all them have passed):
From Github, send a new Pull Request from the branch with your code to master.
Ask for revision from any of the main contributors of the project.
Once the code has been reviewed and accepted, merge your code into master.
7 - Development troubleshooting
Development troubleshooting
In this section you will find solutions to common problems that we may encounter when developing in Aura
Introduction
The current section includes guidelines for the resolution of the most common problems that can occur when developing over aura-bot and in the Webclient channel.
Apart from the guides included here, specific problem-solving procedures for a component are included in this component documentation.
Resolution of common problems, fixes and enhancements in Aura Bot
Developing a dialogs library aka plugin
Issues with aura-bot-common and @hapy/joi
How to detect it
As all the plugins run inside the aura-bot-platform, they must share the very same version of the libraries that are used across all the modules within the bot.
This is quite important because some of the common libraries provide a kind of singleton access to shared information, needed both during the core steps executions and during the dialogs execution. If the versions are not the same, then the instances will not be the same and the dialogs will not find the information where it is expected.
It is important to understand how the dependencies are resolved in nodejs: npm dependency resolution.
How to solve it
To avoid it, the proposal is to lay on the bot dependencies and just configured in the plugin a minimal version:
For example, if the library allows all versions starting from 1.8.3 (without a major change) and the bot provides the 1.13.7 (which is fixed in the package-lock.json of aura-bot), then both components will use the same one.
Although it is not an internal library, almost the very same issue happens with @hapy/joi. Do not change the version provided by aura-bot, or there would be unexpected issues with the schema merging and validation.
Example of package.json plugin
Each global library has specific dependencies. Developers should access to the library and check its corresponding package.json file.
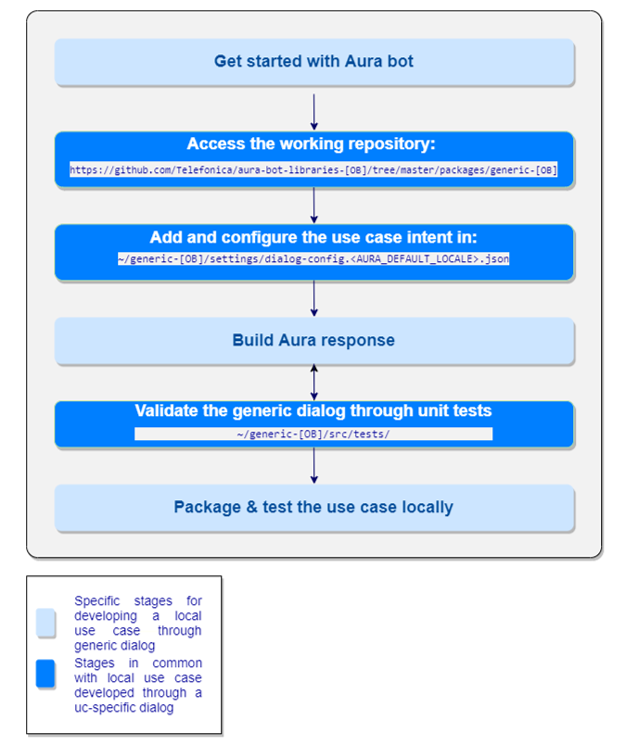

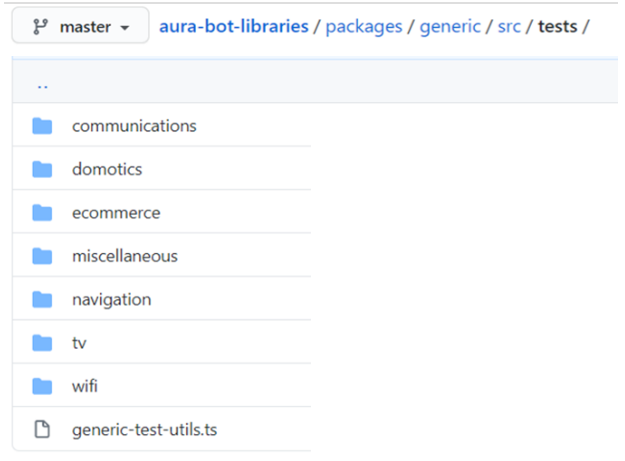
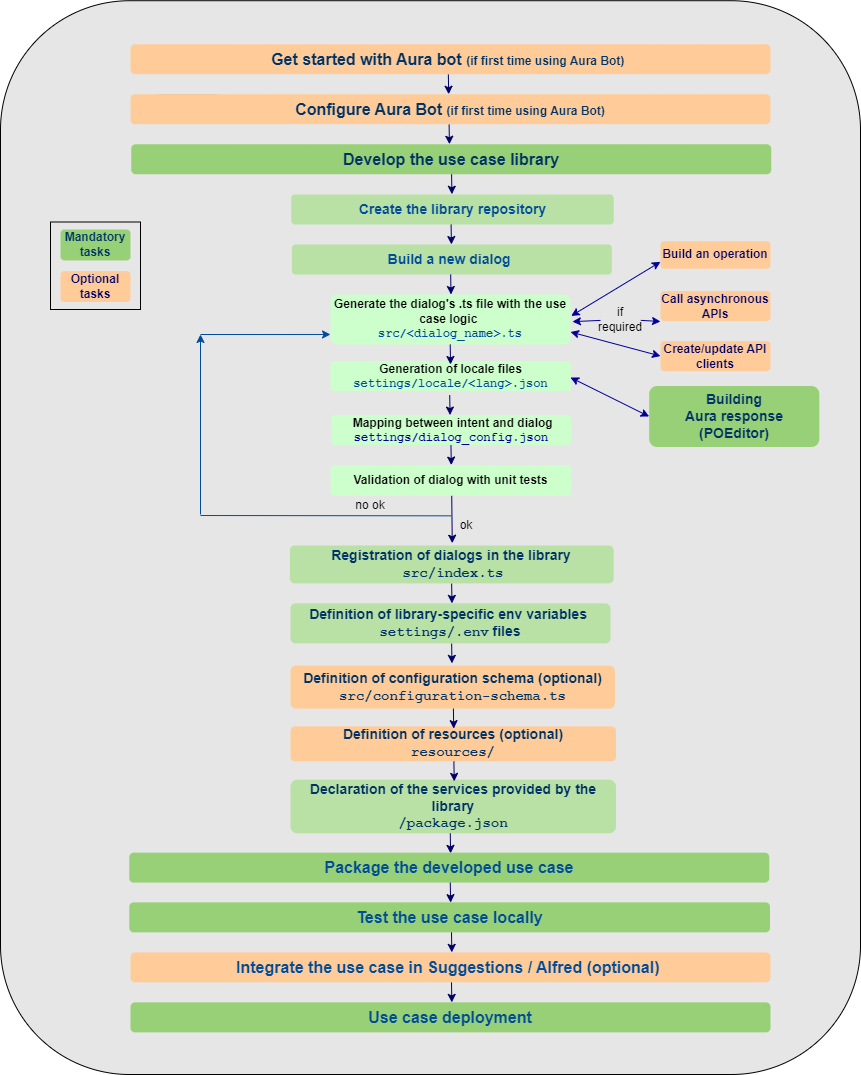
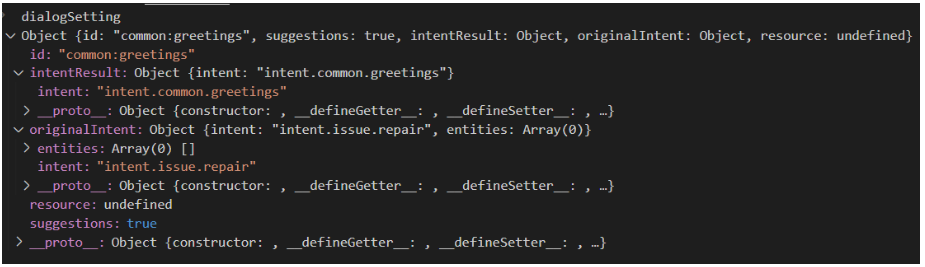
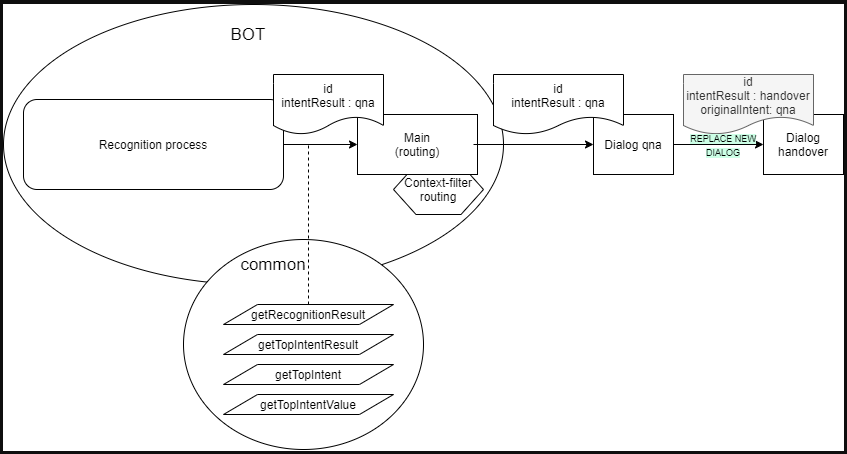
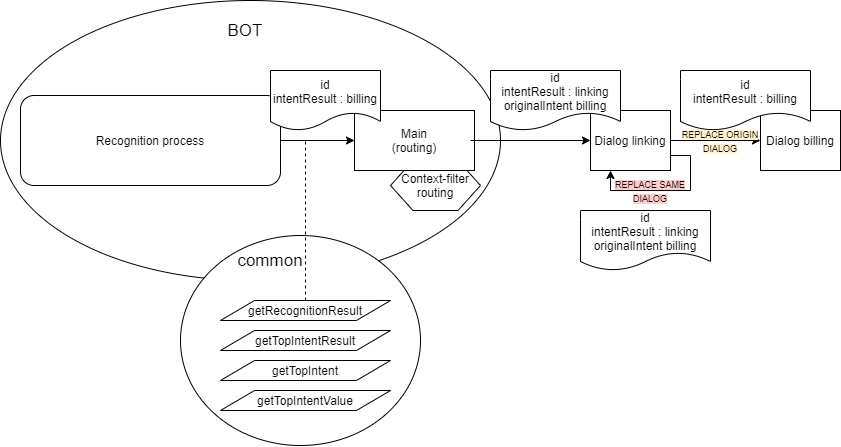
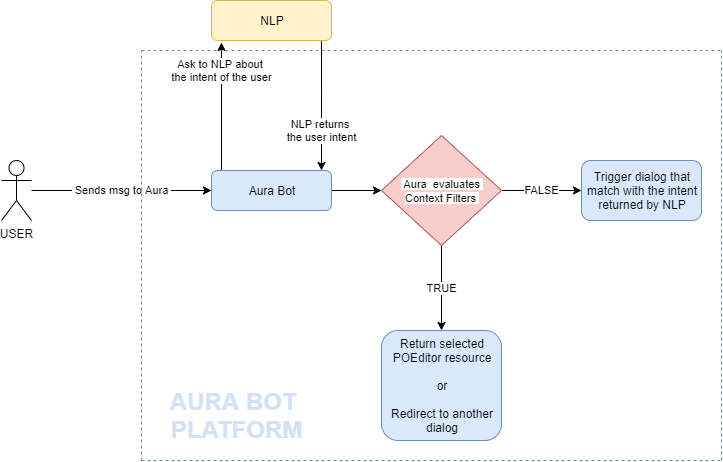
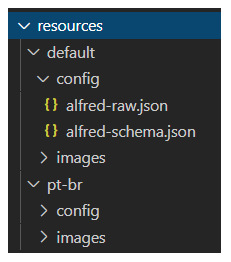
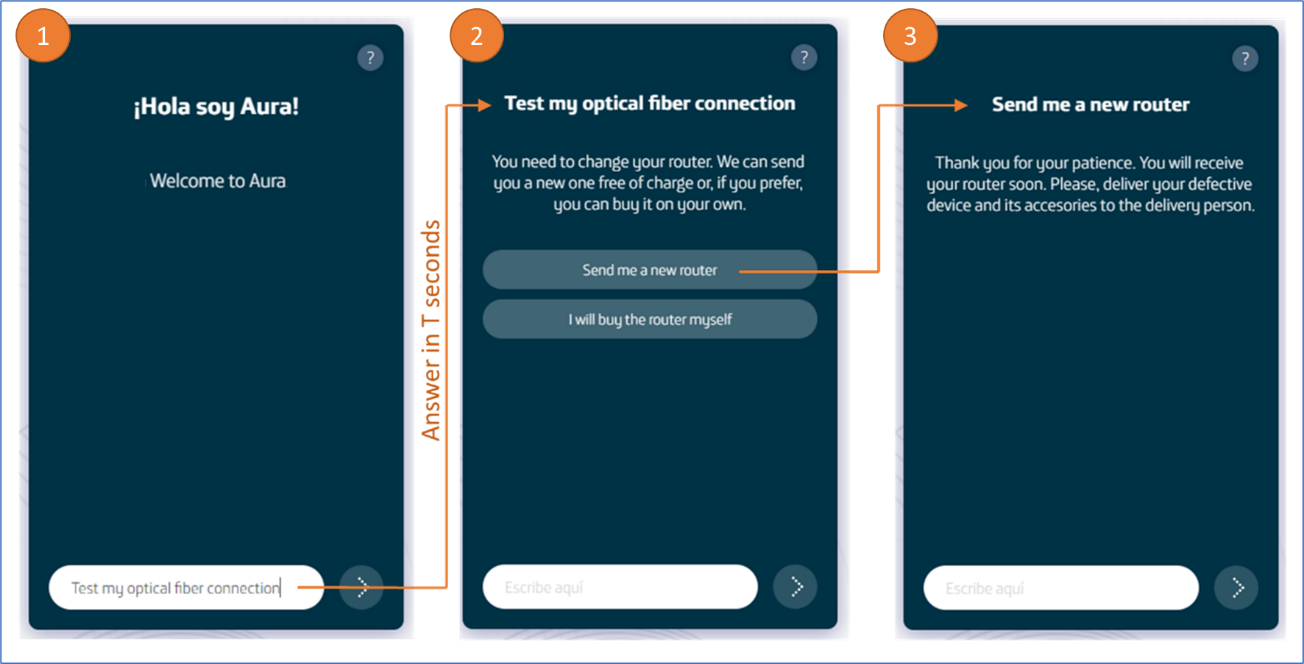
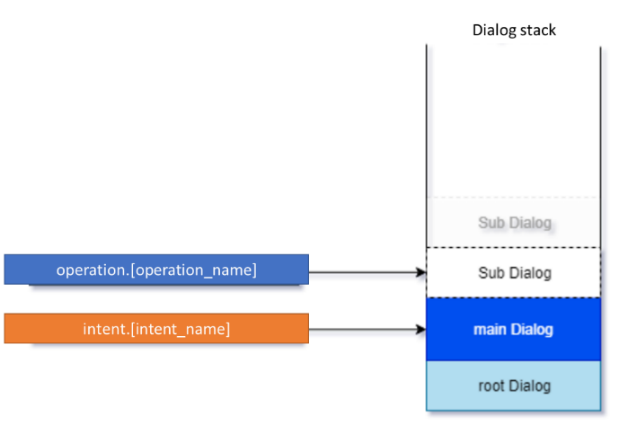
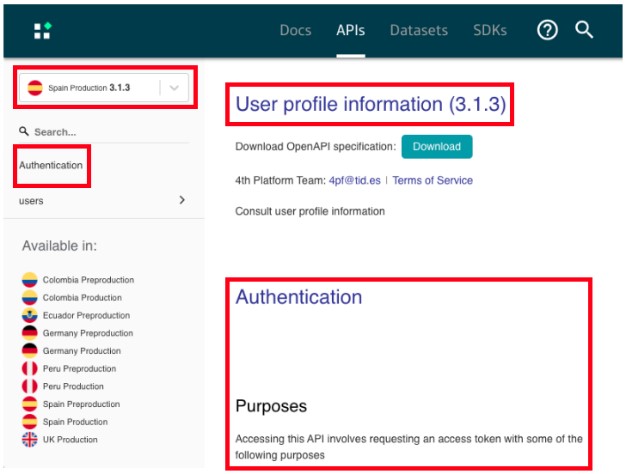
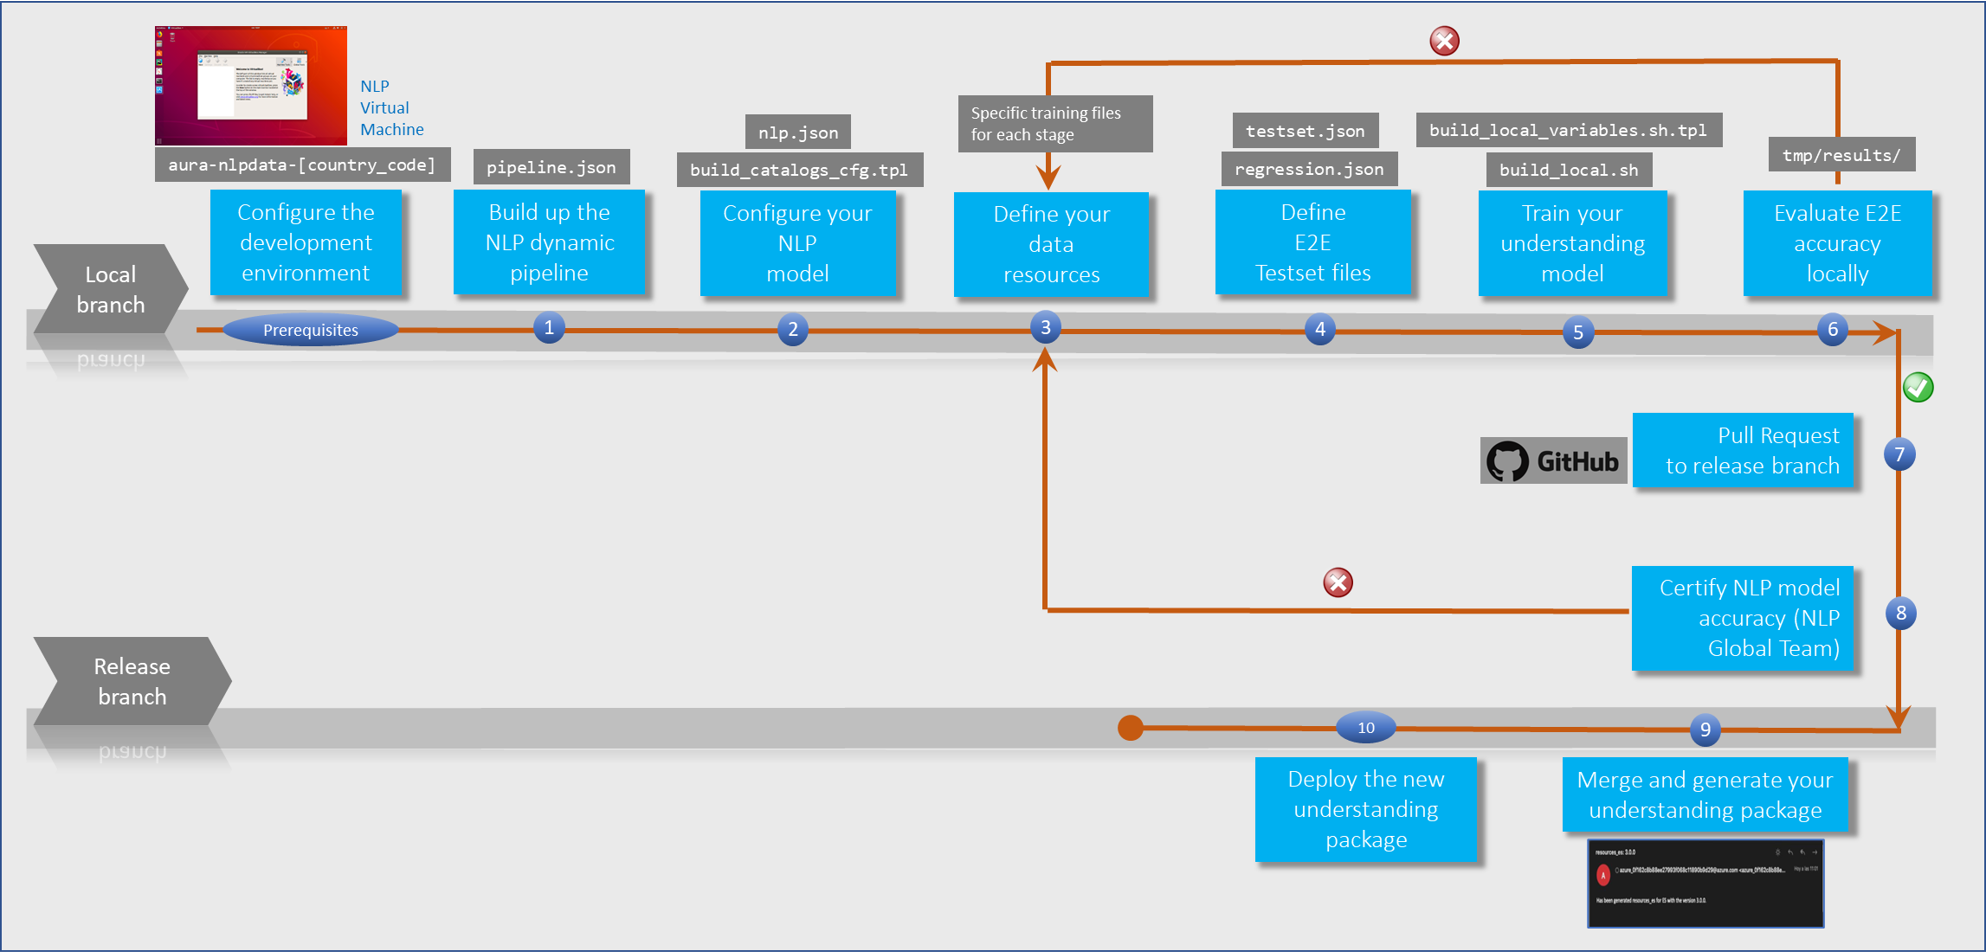
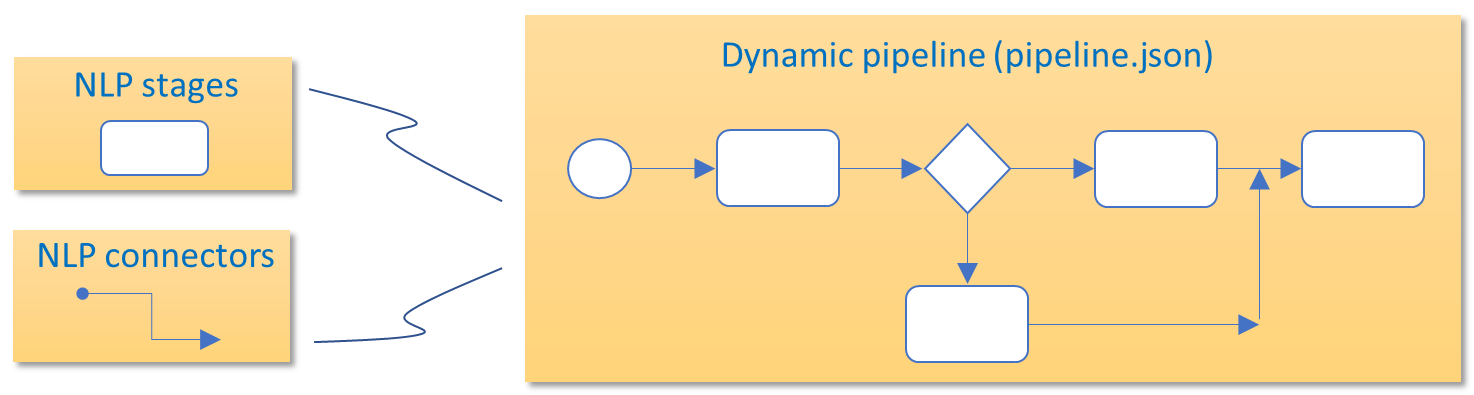
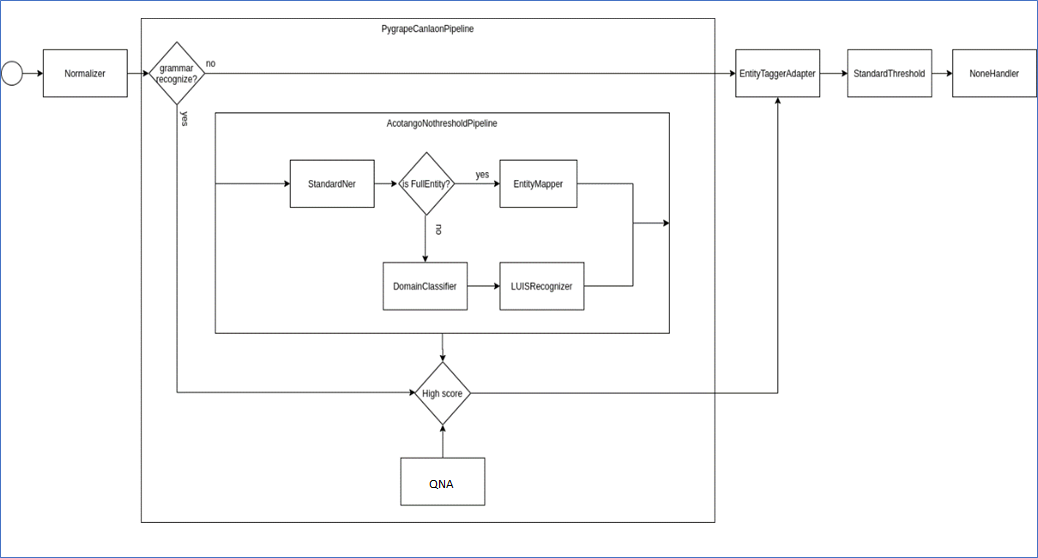
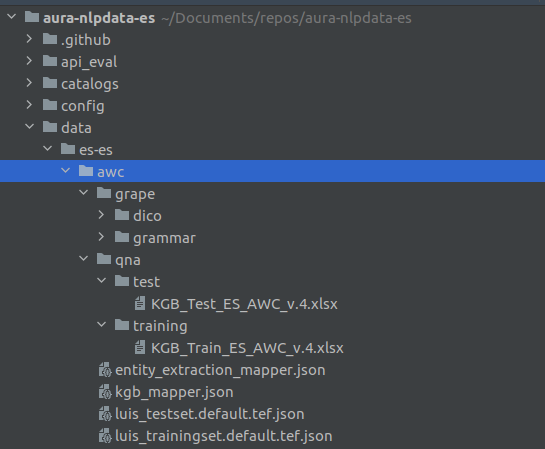
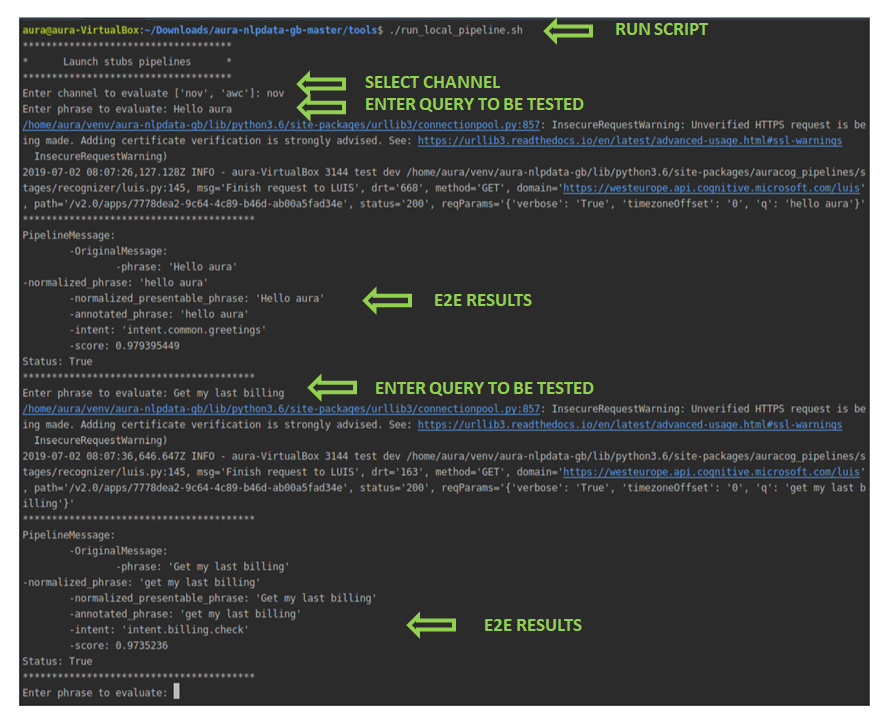
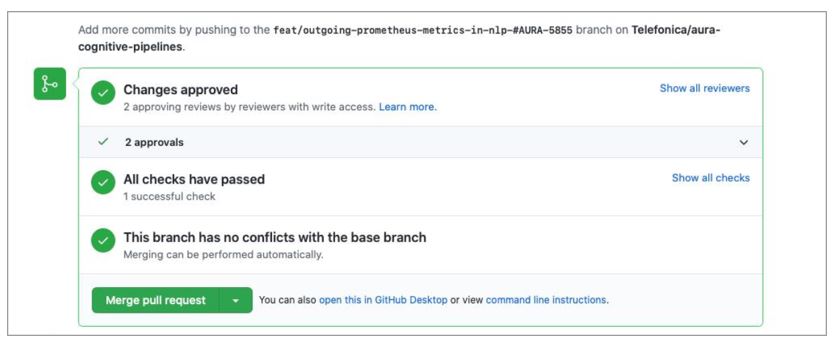
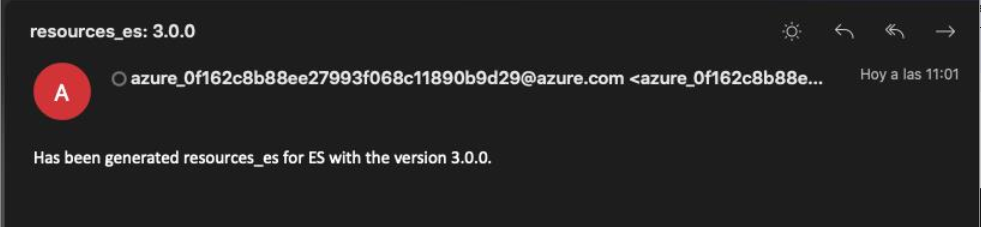
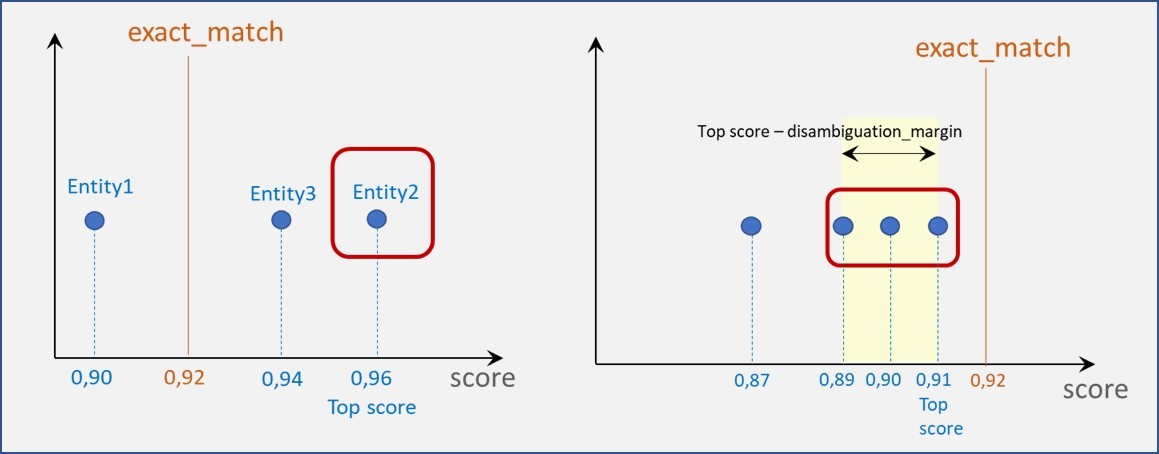
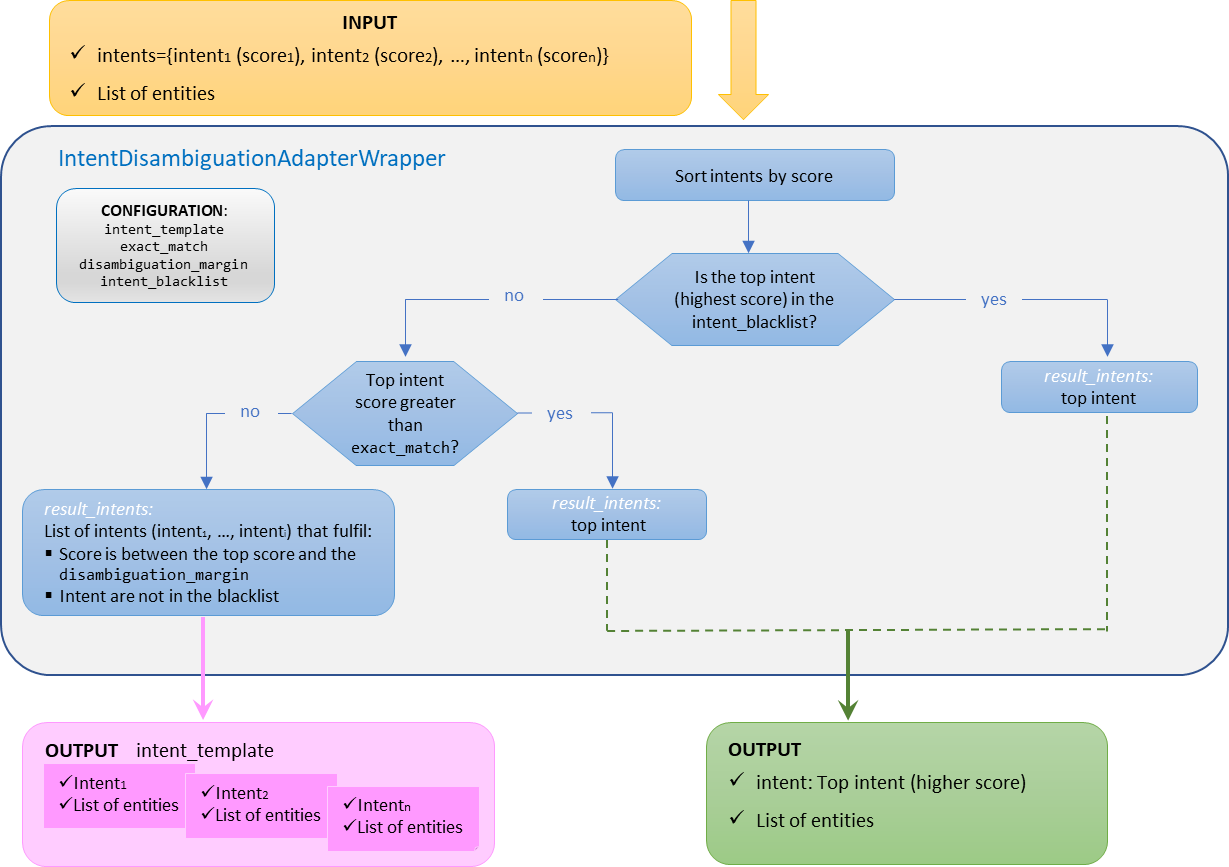
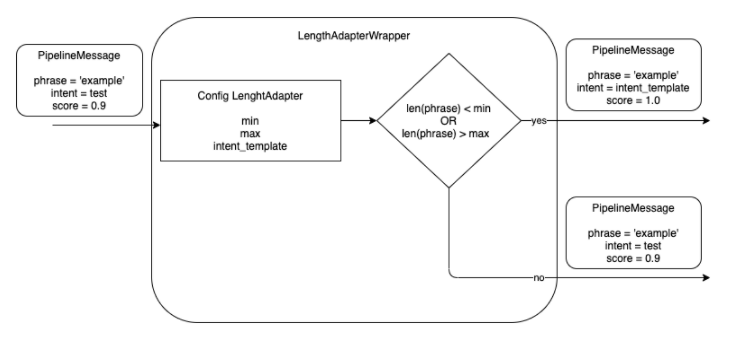
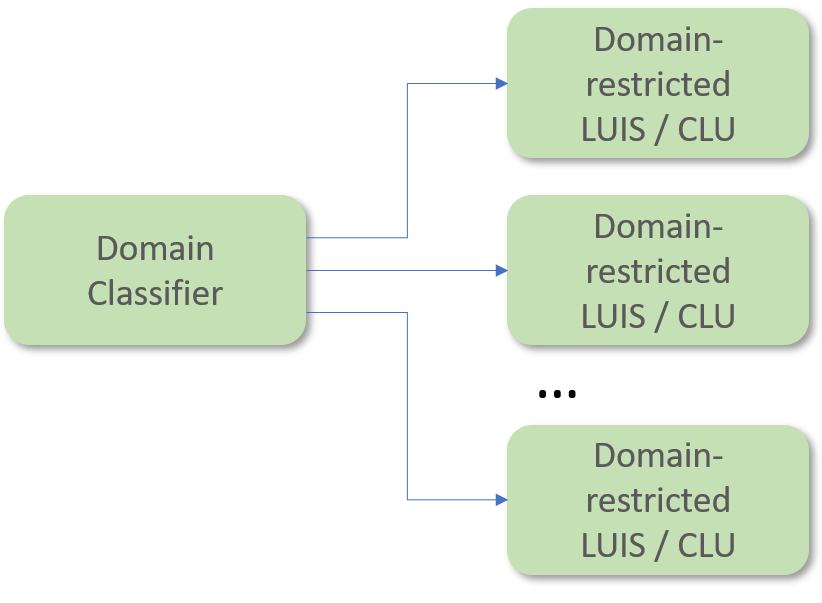


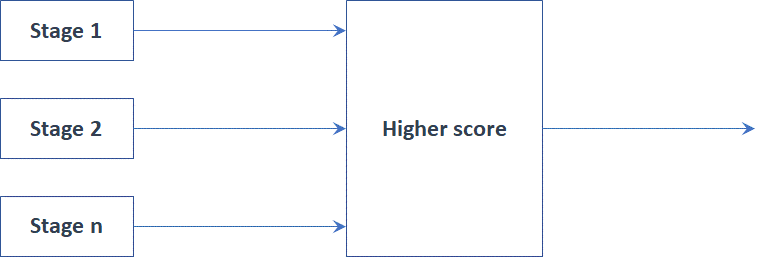


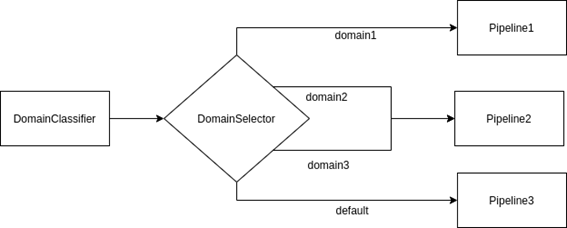
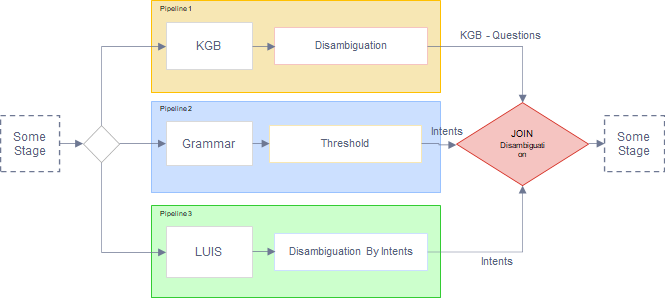
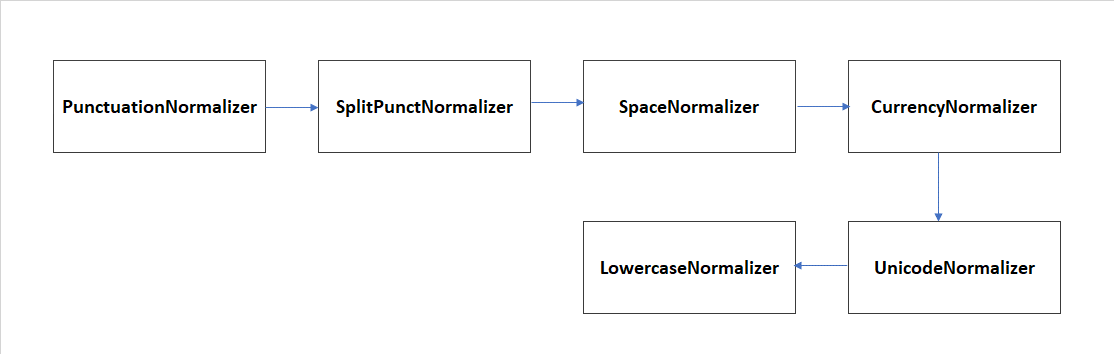
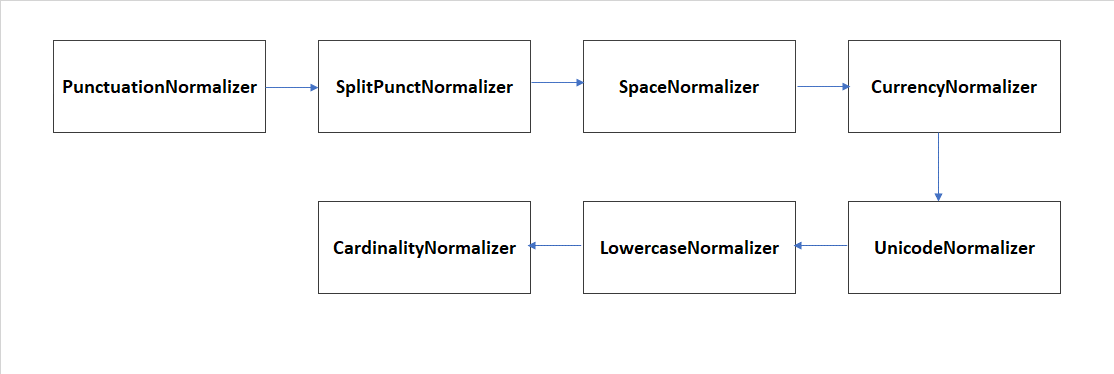
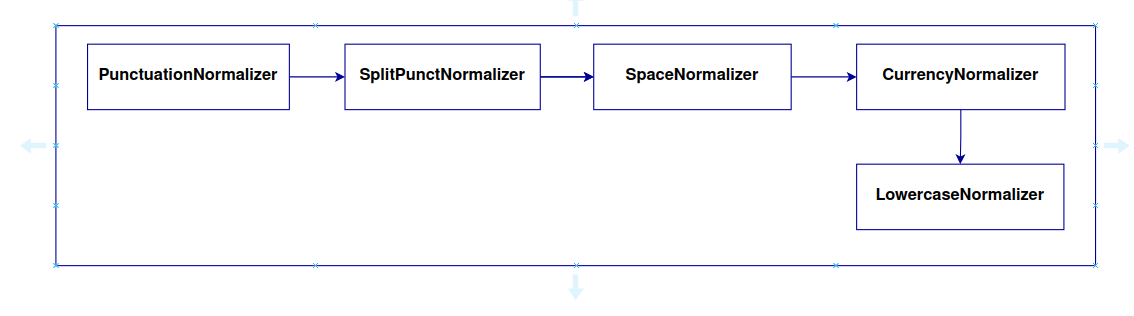
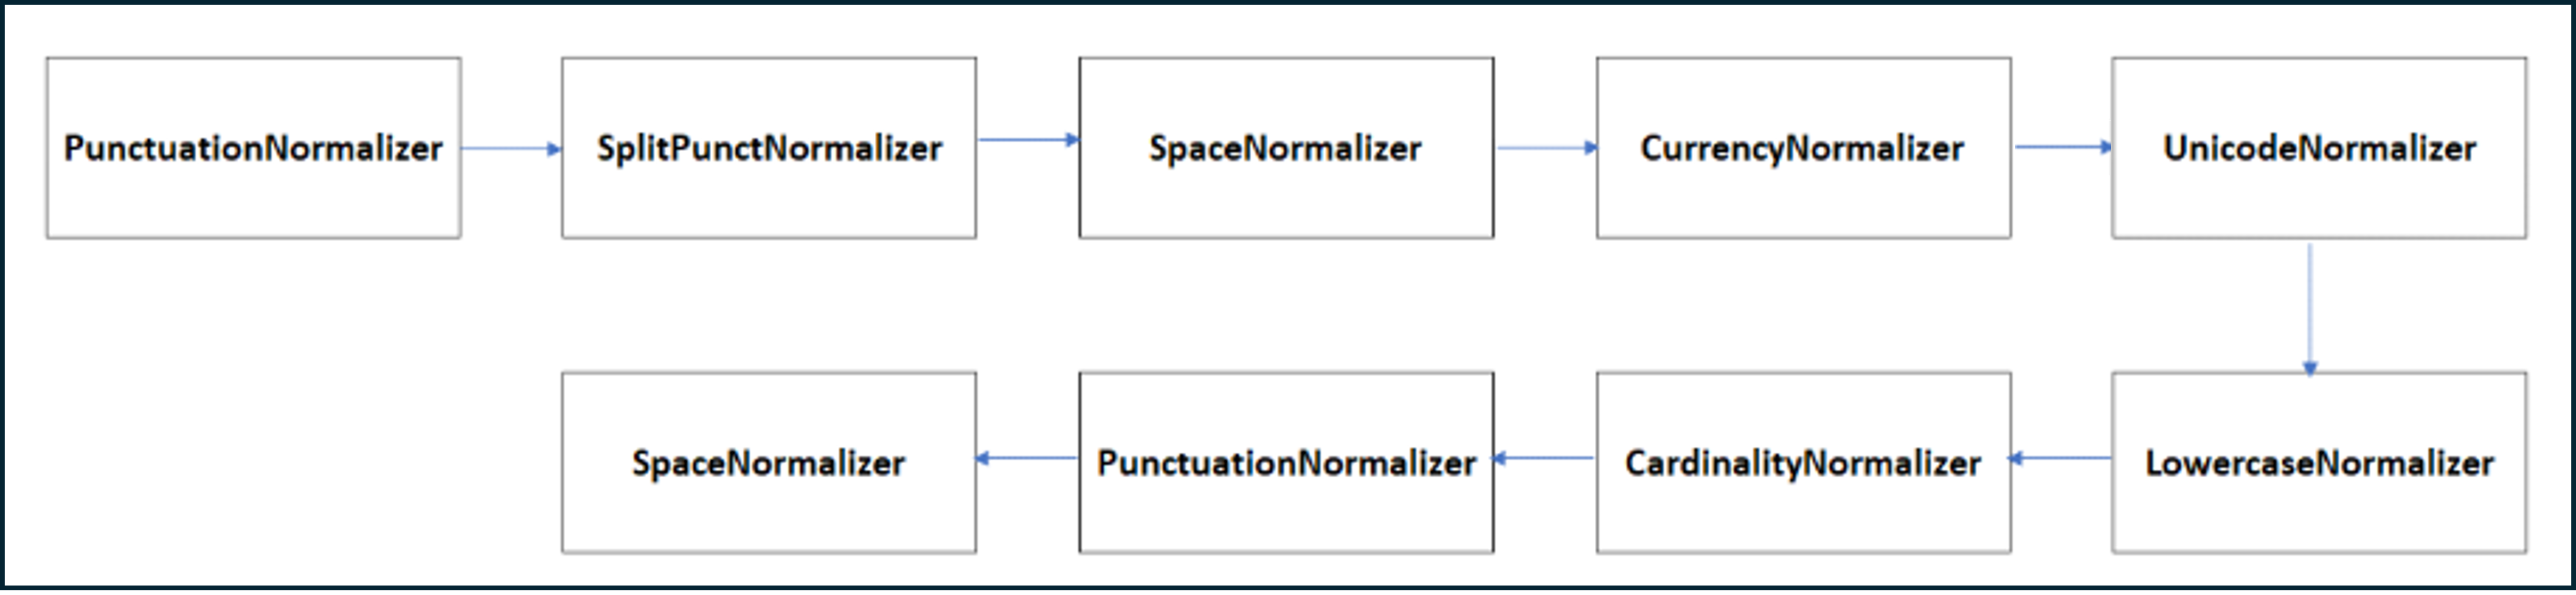
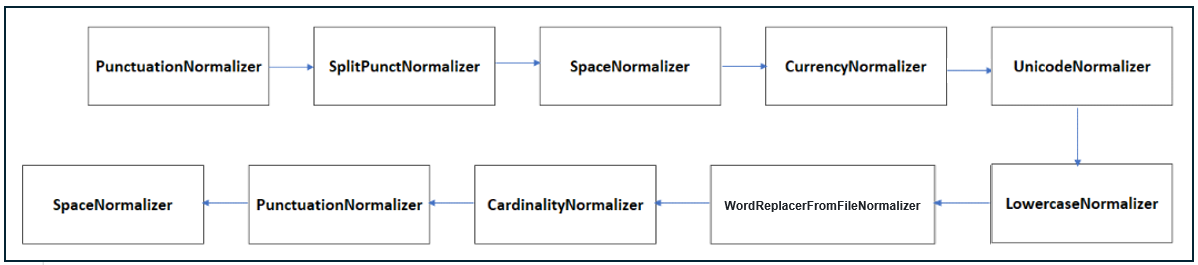
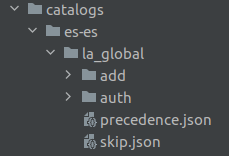
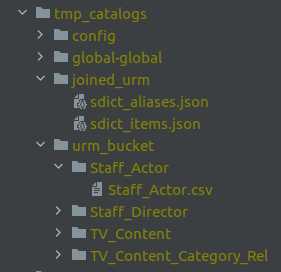
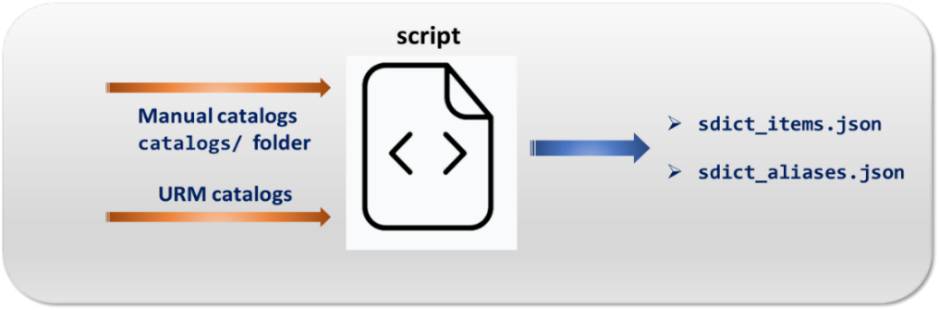
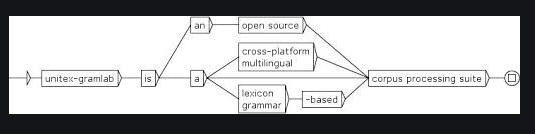

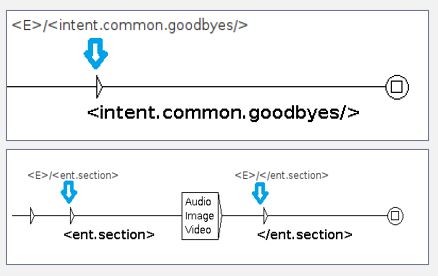
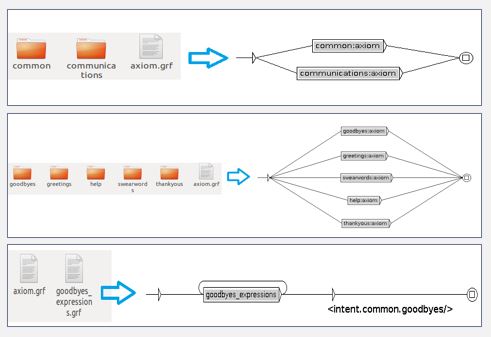

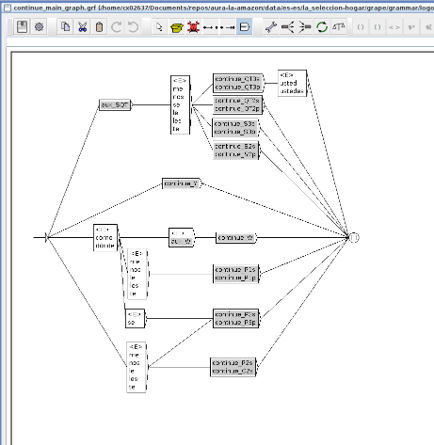
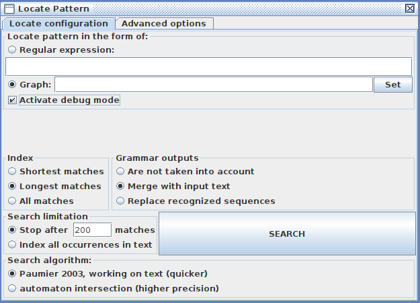

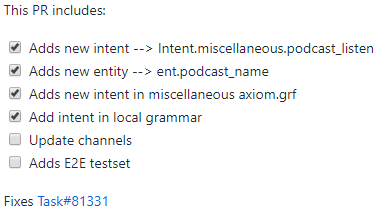


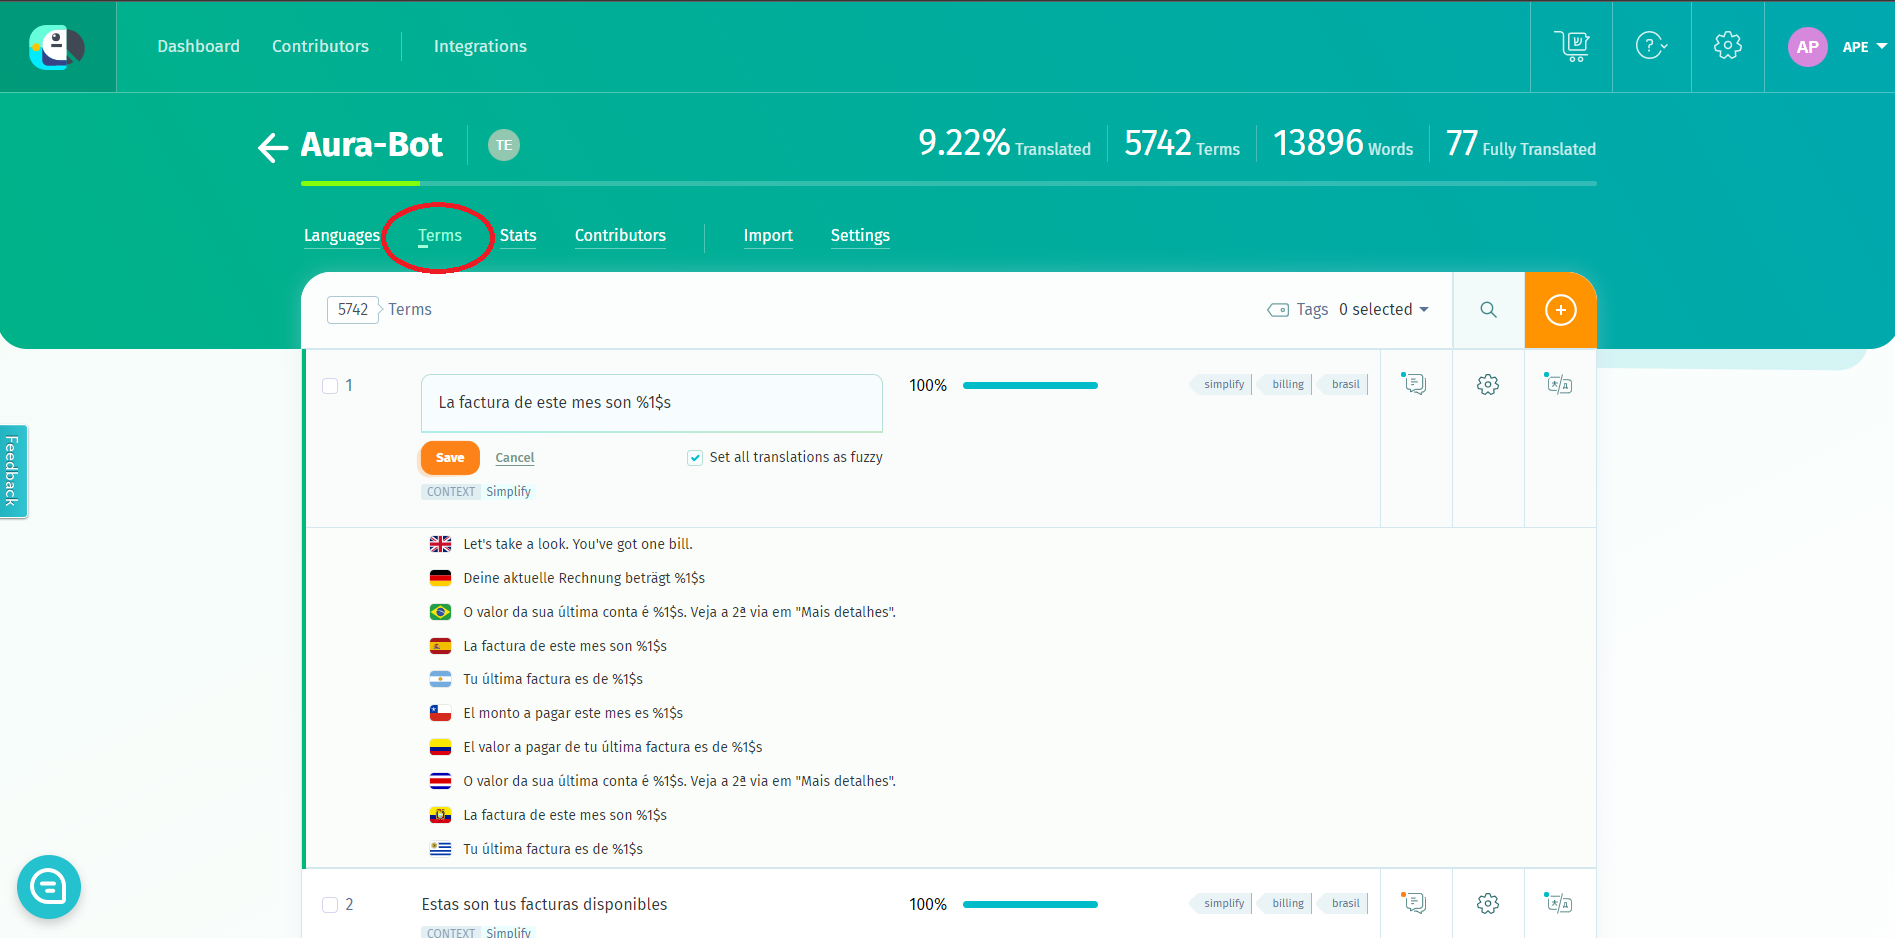
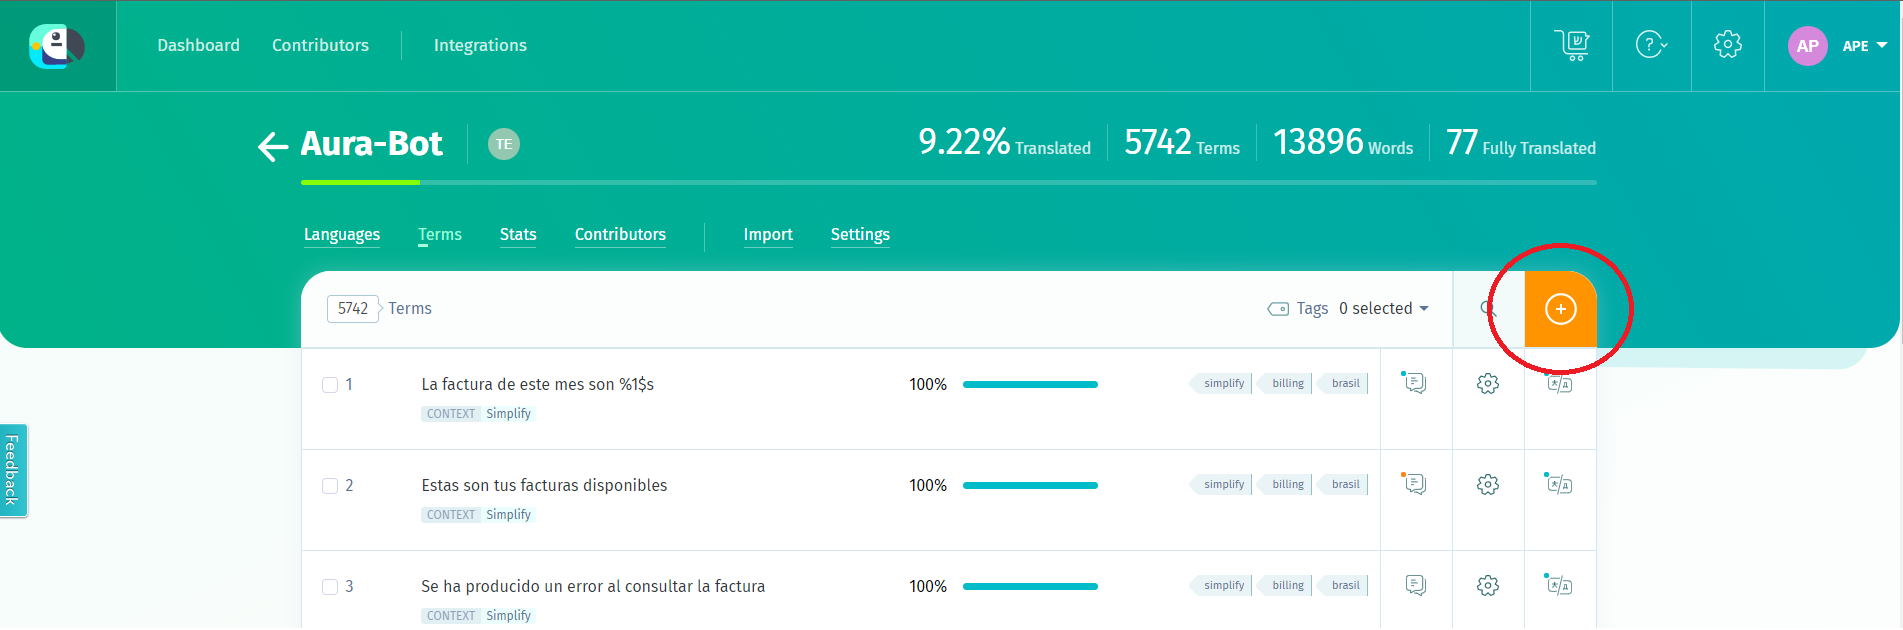
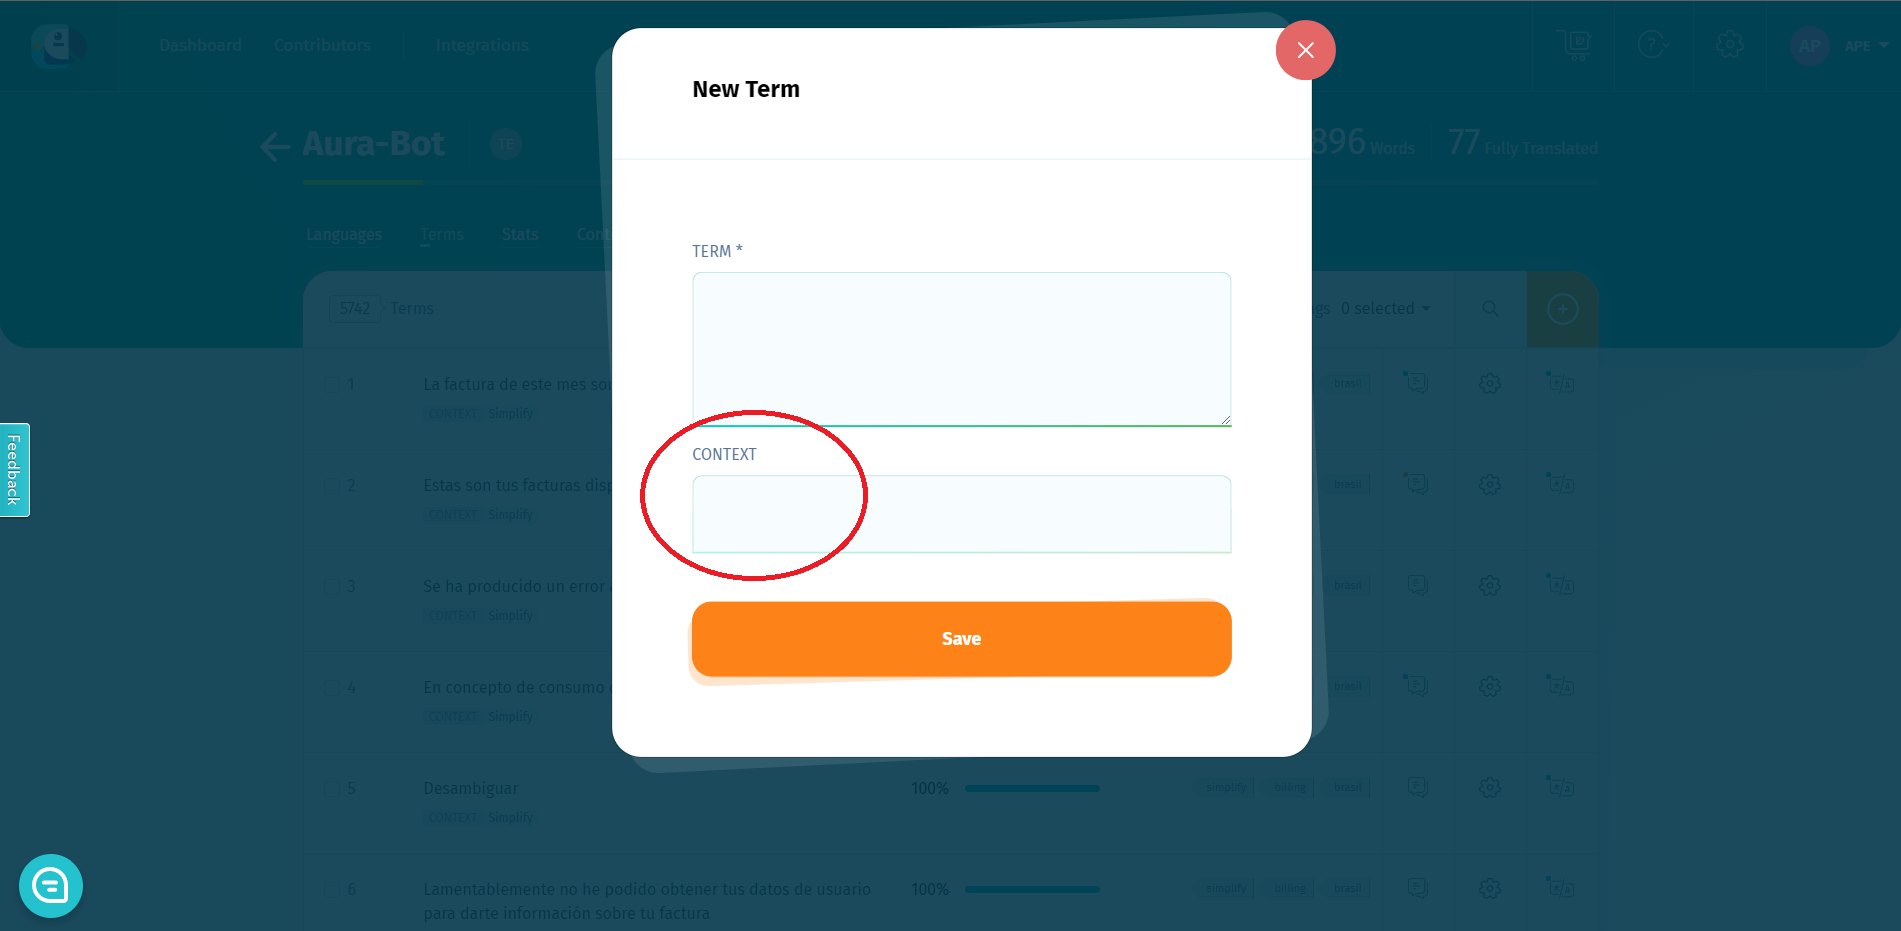

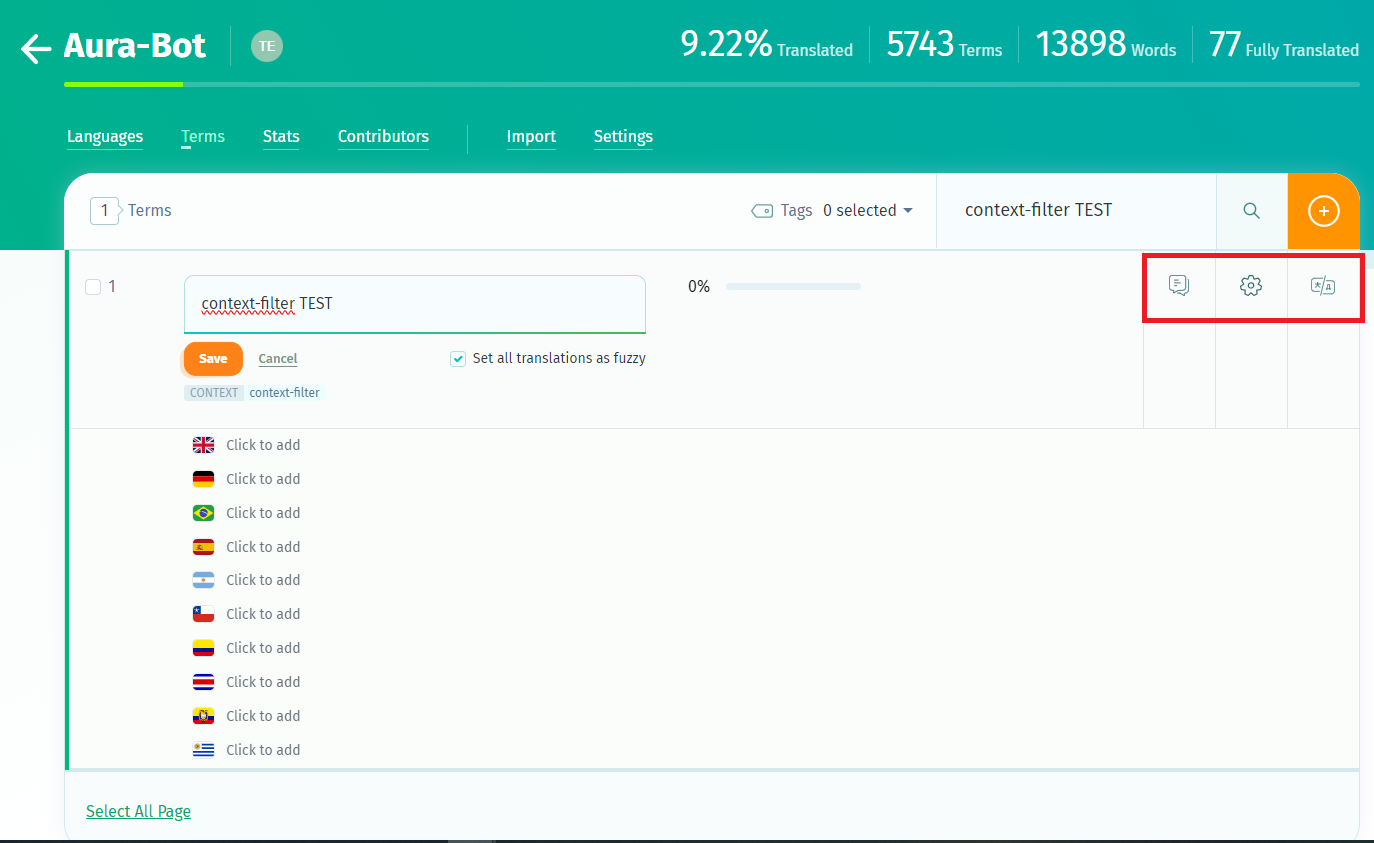
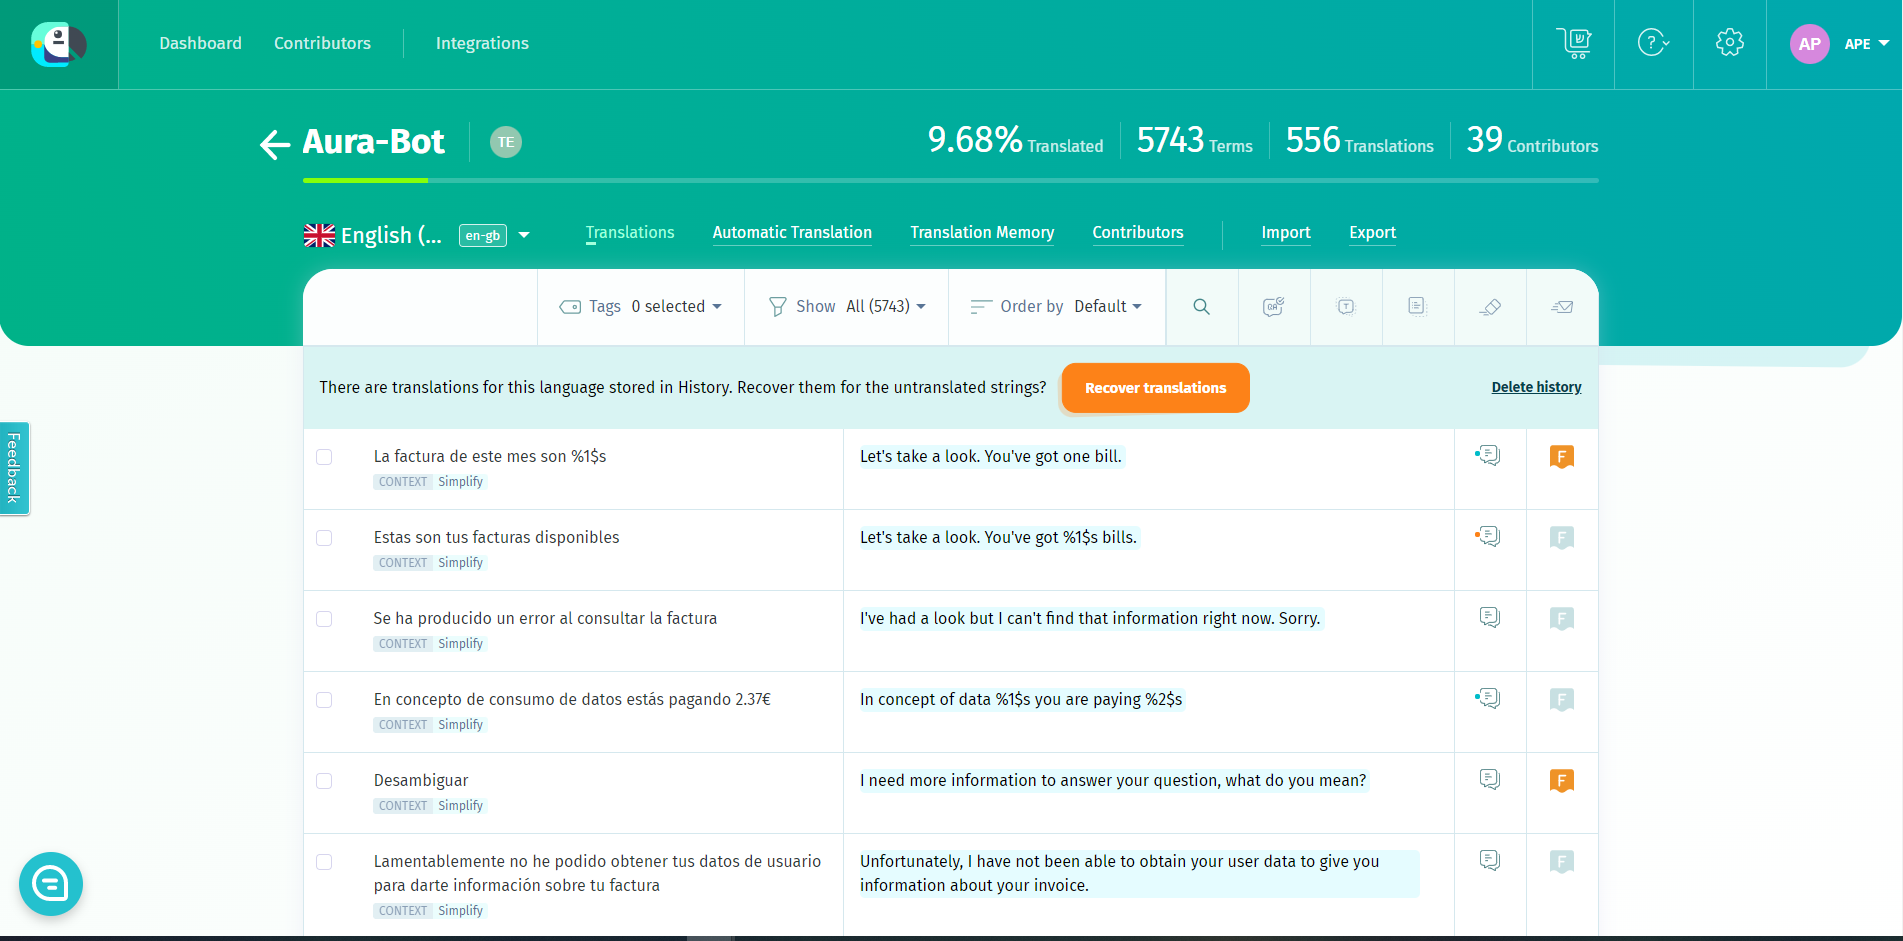
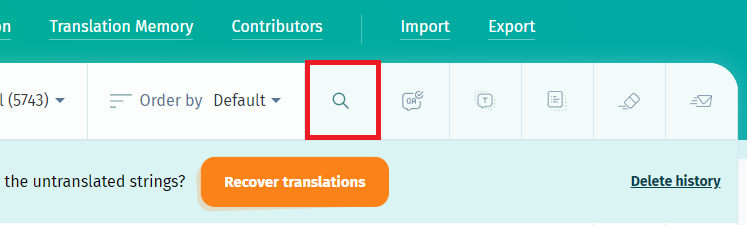

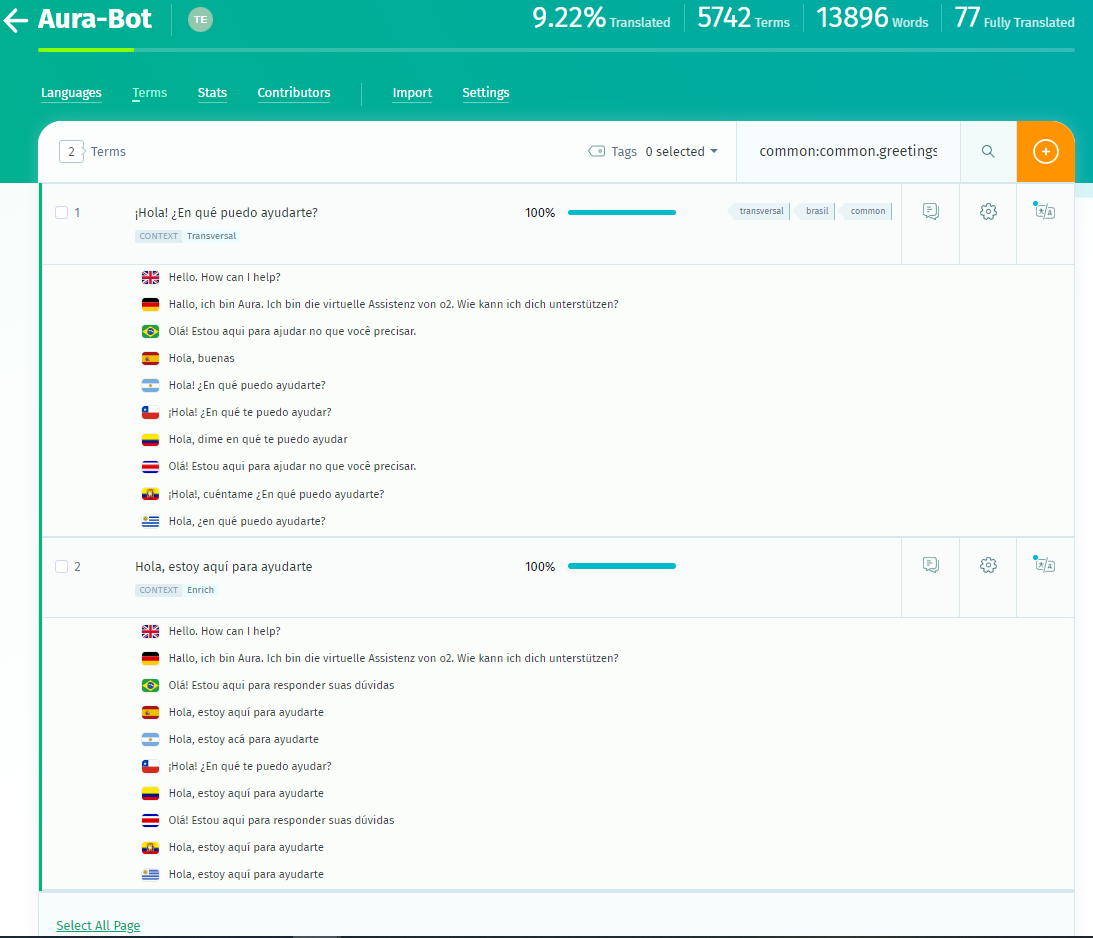
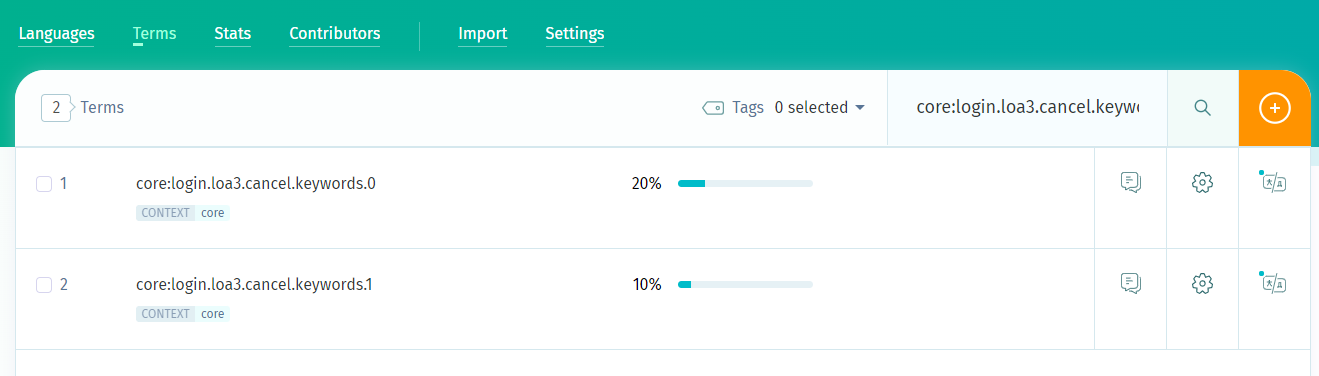
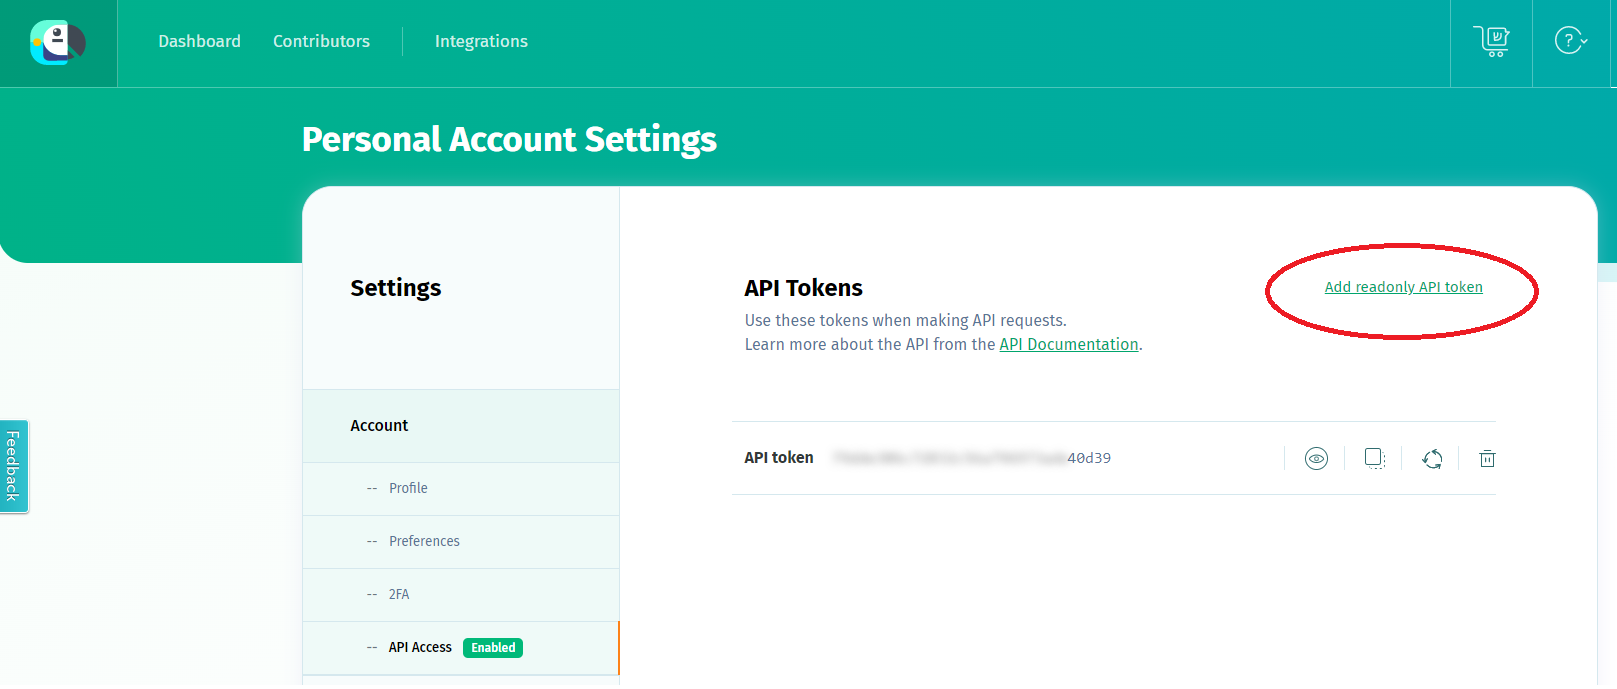
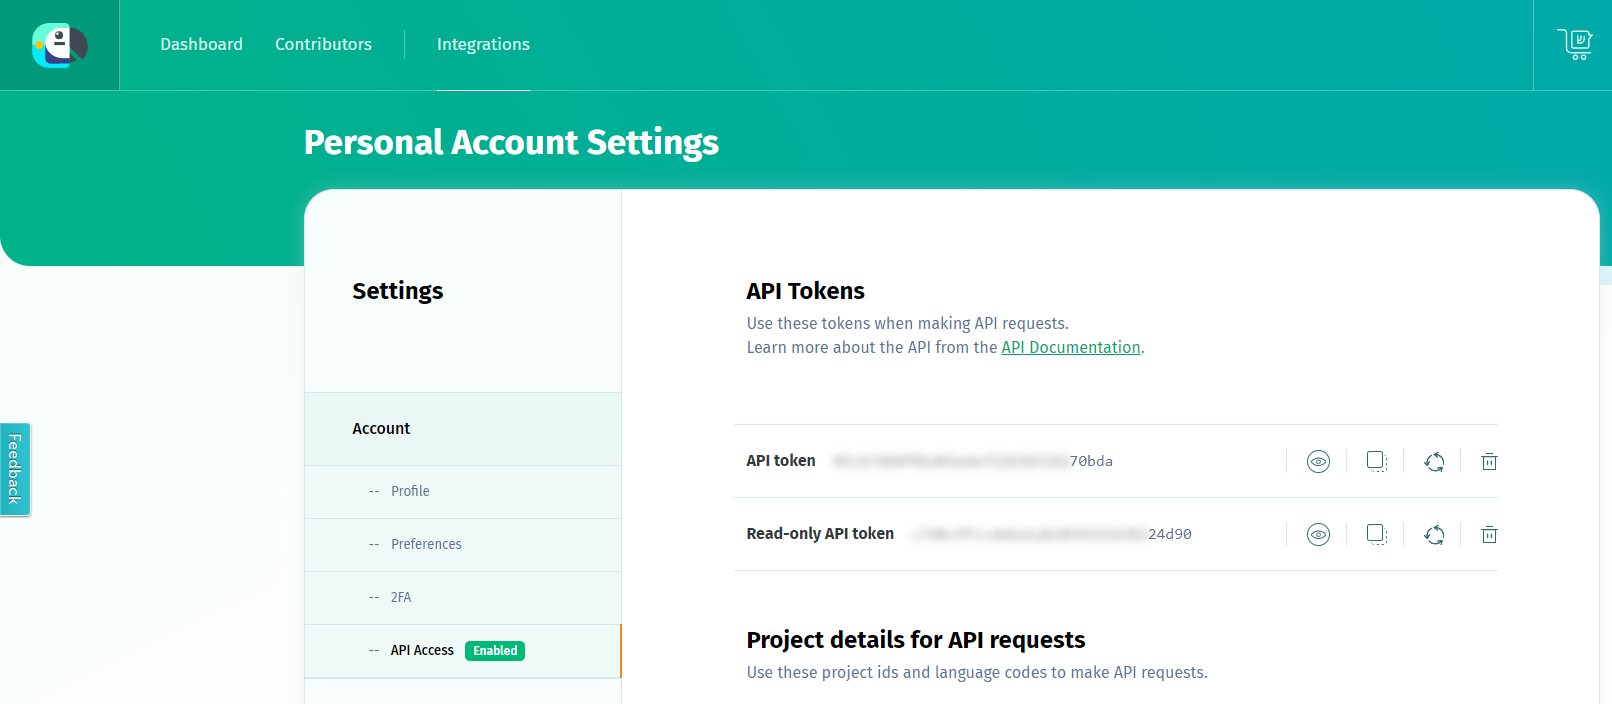 - Once you have the token, you can follow two different processes:
- Define it in the environment variable
- Once you have the token, you can follow two different processes:
- Define it in the environment variable