This is the multi-page printable view of this section.
Click here to print.
Return to the regular view of this page.
Build use case logic
Build the use case logic: use cases development over Aura Bot
Guidelines for every step included in the development of a use case over Aura Bot, from building the dialog that models the conversational flow with the user and fetches the required data to its deployment in order to make the experience available for Aura users
Process at a glance
. Make certain key checks before deployment
. Finally, deploy the developed use case
Introduction
The documents included in this section show the detailed processes for the development of use cases over aura-bot, with guidelines for all the feasible scenarios that can appear at this stage.
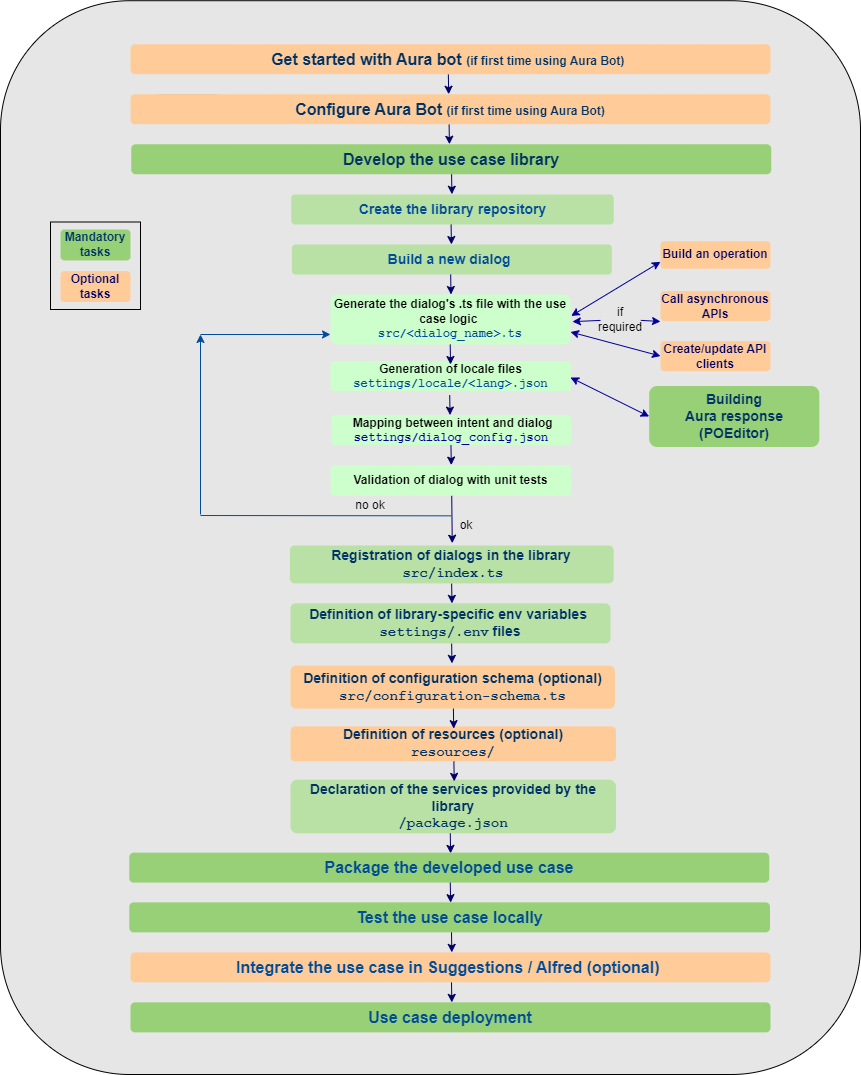
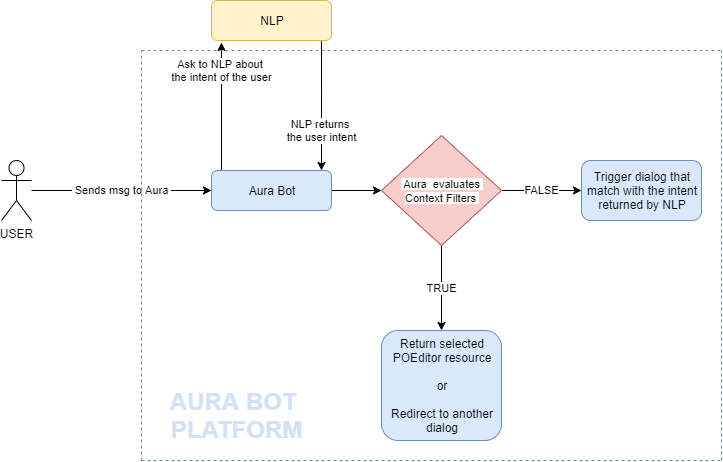
The following figure schematically shows the general workflow for the development of a use case over aura-bot.
1 - Build an Aura Bot dialog
Build an Aura Bot dialog
This section includes different processes for building an Aura bot dialog when developing a local use case, both general guidelines and specific ones for concrete scenarios
Introduction
Dialogs are software components that model conversations with the final users by interchanging messages with them. Currently, aura-bot supports the Microsoft Bot Framework SDK v4 for JavaScript as the internal bot engine.
When developing a local use case, that can be both an experience built from scratch or inspired in a global use case, the OB developers must build a new local dialog that includes the logic of the use case or modify an existing one.
The dialog will interact with the customer using a conversational interface, this is, interchanging messages back and forth and, if required, the dialog will summon Kernel or third-party APIs in order to fetch data to fulfil the user’s request.
Before getting started, we recommend you to read some useful Microsoft documentation:
📄 Send and receive text message
📄 Dialogs library
Scenarios for building a dialog
Bot developers can find different scenarios when building a dialog over aura-bot:
1.1 - Build a dialog
General guidelines for building an Aura Bot dialog
Orderly steps for building a dialog over Aura Bot in a common scenario
Create the dialog’s file
- The dialog is a
.ts file that must be placed within the src/ folder of its library.
- Have you already created the library? Then, go ahead.
- If not, go to Build a new library section and create it.
- Developers must create one
.ts file for each dialog of the use case.
- All dialogs must include these two mandatory components:
| Parameter |
Type |
Comments |
| id |
string |
Dialog’s identifier |
| configuration |
configuration |
Global and specific dialog’s configuration is validated over aura-bot and passed to the dialog through the constructor, when instantiated. |
- The maximum size for an activity response may not exceed the maximum limit established by the Direct Line (MS) protocol under any circumstances. In case this happens, the answer is ignored and a generic text is returned to the user explaining that there are too many results.
📌 Best practices
- When generating a new dialog, a general recommendation for developers is to copy another working dialog and use it as a template.
- If the dialog’s code is too long or complex, it can be split into several files, in order to increase readability.
- It is also a good practice to create utility files with code shared between dialogs in the same library.
The following sections include certain features that are useful for the generation of a dialog within Aura’s framework.
Management of dialogs are waterfall dialogs
The interaction with the user can be based on a single stage back-and-forth dialog (this is, the user asks Aura and Aura provides the appropriate answer back to the user) or, on the contrary, a multiple stage dialog.
Currently, although the dialog is based on a single stage, all dialogs are built as waterfall dialogs.
For this purpose, you should use the Microsoft tool botbuilder-dialogs package, that contains functions to assist with the formatting of a message activity containing a list of choices.
- Within its specific library, the dialog must implement the Microsoft Bot Framework 4
ComponentDialog class. Libraries have to import the dependency on “botbuilder-dialogs: “~4.13.3`. To avoid conflict in the versions of this library, aura-bot specifies the concrete version.
/**
 * Aura Bot dialog implementation for any class.
 */
export default class NameClassAuraBotDialog extends ComponentDialog {
    ...
}
- As shown in the code below, the constructor must support the configuration, which includes both global and local variables (always validated variables) that the dialog can use.
Additionally, the constructor can include
auraDataAccessor as a second parameter. See details in Data saving in the same conversation.
    public static id: string = 'name-class-dialog';
    private configuration: Configuration;

    constructor(configuration: Configuration) {
        super(NameClassAuraBotDialog.id);
        this.configuration = configuration;
        // ID of child dialog that should be started anytime component is started.
        super.initialDialogId = NameClassAuraBotDialog.id;
        // Define the conversation flow using a waterfall model.
        super.addDialog(new WaterfallDialog(NameClassAuraBotDialog.id, [
            this.method1.bind(this),
            this.method2.bind(this)
            // ...
            this.methodN.bind(this)
        ]));
       }
- If the dialog requires the use of prompts, please read Prompts treatment section for its declaration within the dialog file.
Retrieving data from clients
If the dialog’s conversational flow requires to fetch user’s data, the dialog code must include the specific instructions to call an API (Kernel API or external API).
Therefore, at library’s level, it is required to import the client of the corresponding API.
In case of Kernel APIs, please read the section Create or update an API client.
Basic utilities for building a dialog
The current section extracts specific procedures based on Microsoft Bot Framework 4 functionalities that are of particular importance for the generation of a dialog within aura-bot.
Localized text
const correlator = ContextUtils.getCorrelator(stepContext.context);
const auraUser: AuraUserBaseModel<any> = ContextUtils.getAuraUser(stepContext.context);
const text = this.localizer.getText('common:common.greetings.main', auraUser, correlator)
Code for localizing this id:
common:common.greetings.main
Dialogs can include a localizer as an attribute that points to the single instance of the class that was initialized during aura-bot start-up.
this.localizer = LocaleManager.instance;
Alternatively, you can use the getLiteral method from @telefonica/aura-bot-utilities/lib/aura-bot-library-util library without having to obtain user or correlator as follows:
const text = getLiteral(context)('common:common.greetings.main')
Send a simple text
The example below shows how to send a simple localized text.
await stepContext.context.sendActivity(text);
return await stepContext.endDialog();
ℹ️ In BotBuilder v4, nothing is sent (text cannot be sent) in the endDialog, only that the current dialog is finished and the result of the dialog’s finalization.
Complex messages
There is big flexibility composing user’s messages. They can be built with MessageFactory using the Bot Framework, built by your own, combined, etc.
In this section, certain flags are included that can help the channel understand the conversation flow.
InputHint allows building messages in different modes, indicating to the destination channel when it is waiting for new messages or not.
For more information, read InputHints enum Microsoft documentation.
AcceptingInput: bot is passively ready for input, but it is not waiting a response from the user. (Example: last message in the dialog)ExpectingInput: bot is waiting a response from the user. (Example: when a prompt is sent)IgnoringInput: bot is not ready to receive input. (Example: when several messages are sent together excepting the last one)
Add inputHint in the activity when it is necessary to change the default behavior:
messageOneOfFour.inputHint = InputHints.IgnoringInput
Be careful with the default value given in the activities, as it is not always the desired behavior.
When constructing a complex message to the user in which, for example, partial activities are joined with attachment cards for finally sending a prompt or some parts are built with Factory and others are not, it is necessary to make sure that the final message contains the desired InputHint. In this example, the result prompt has an invalid InputHint:
// Example with INVALID InputHint:
// the message variable will have acceptingInput as default.
const message: Partial<Activity> = MessageFactory.text('My text');
const cardActions: CardAction[] = options.map(q => ({
	type: ActionTypes.ImBack,
    value: q,
    title: q
}));
// the attachment variable will have acceptingInput as default
const attachment: Partial<Activity> = MessageFactory.attachment(
   CardFactory.heroCard(null, null, cardActions)
);
const promptOptions: PromptOptions = {
 	prompt: { ...message, ...attachment },
	choices: ChoiceFactory.toChoices(cardActions)
};
// Prompt will have acceptingInput. IT IS NOT VALID!
The example with a valid InputHint is shown below:
// Example with valid InputHint:
const message: Partial<Activity> = MessageFactory.text('My text');
message.inputHint = InputHints.ExpectingInput;
const cardActions: CardAction[] = options.map(q => ({
	type: ActionTypes.ImBack,
    value: q,
    title: q
}));
const attachment: Partial<Activity> = MessageFactory.attachment(
   CardFactory.heroCard(null, null, cardActions)
);
attachment.inputHint = InputHints.ExpectingInput;
const promptOptions: PromptOptions = {
 	prompt: { ...message, ...attachment },
	choices: ChoiceFactory.toChoices(cardActions)
};
// The prompt will have expectingInput as expected in a Prompt
HasMoreMessages flag
There is another legacy flag in channelData: hasMoreMessages (created in Aura) that indicates whether aura-bot will send more messages to the channel.
Currently, all channels should use batch-outgoing-message-middleware which stacks all the messages related to an incoming activity together with the Suggestions and automatically sets hasMoreMessages field to proper value (only when messages are processed in batch mode.
Note that even though the hasMoreMessages flag is sent in some cases (if in batch mode and channel is configured to do so), it is preferable to use the standard message property inputHint, that is always available and will be maintained in the future.
It is the recommended way to configure channels and aura-bot, so messages are properly marked up both with hasMoreMessages and the proper Microsoft Bot Framework field, inputHint.
Prompts treatment
ℹ️ Before facing this section, see how the special prompts recognition works in the prompt-check-recognizer-middleware.
The following list of prompt recognizers are available in Aura:
- Attachment prompt: it asks for one or more attachments, such as a document or image.
- Choice prompt: it asks for a choice among a set of options.
- Date-time prompt: it asks for a date-time.
- Number prompt: it asks for a number.
- Text prompt: it asks for a general text input.
- Custom prompt: prompt that can be personalized with different options.
Break prompt and NLP Recognition
When a dialog returns a prompt and thus is waiting for an action, then the user can choose one of the prompt answers or can decide to carry out another option.
In this second case, the prompt must be broken (if conditions are fulfilled) and the aura-bot main-dialog redirects to the new dialog.
By default, prompts have NLP recognition. When the user interacts with the prompt, the prompt-recognizer is executed and tries to recognize the user’s intention. But, also by default, if the None intent is recognized, it will not break the prompt.
To make the process of prompt breaking flexible, Aura provides a default behavior and offers flags that allow the default behavior to be changed. These flags should be added during the instantiation of the prompt:
disableRecognition: enabling this flag, NLP recognition is disabled, preventing to break the prompt. (It only affects to prompts without choices).
Use: prompts without choices.enableNone: enabling this flag, if NLP recognizer has recognized the None intent, this intent is allowed to break the prompt (by default, None intent can never break a prompt).
Use: all types of prompts with NLP recognition.useValueAsCommand: using this flag, the prompt choices are interpreted as text commands, and, when properly configured, the conversation flow is redirected to the intent defined by the command.
Use: only with choice prompts.
These flags should be added in the validations attribute inside promptOptions.
For example, if a prompt wants to disable NLP recognition, it should be marked as follows:
const promptOptions: PromptOptions = {
	prompt: description,
	validations: { disableRecognition: true }
};
return await stepContext.prompt('ID_PROMPT', promptOptions);
Disable ordinals and numbers recognition in prompt choices
To avoid the recognition of ordinals and numbers in prompts, two steps should be followed:
- First, add the proper flags in
promptOptions:
const promptOptions: PromptOptions = {
  ...
  validations: {
        findChoicesOptions: {
            recognizeNumbers: false,
            recognizeOrdinals: false
        }
    }
};
- After that, a new validation method should be added to the prompt:
getRetriesValidatorAndOverwriteRecognizerResult
const connectPrompt = new ChoicePrompt('promptName', PromptUtils.getRetriesValidatorAndOverwriteRecognizerResult(0));
Retries handling in prompt choices
This section includes the procedure for managing prompt attempts. In the botbuilder-js code, the function continueDialog must include the following code in the Prompt class:
const recognized: PromptRecognizerResult<T> = await this.onRecognize(dc.context, state.state, state.options);
// Validate the return value
let isValid = false;
if (this.validator) {
    if (state.state['attemptCount'] === undefined) {
        state.state['attemptCount'] = 0;
    }
    isValid = await this.validator({
        context: dc.context,
        recognized: recognized,
        state: state.state,
        options: state.options,
        attemptCount: ++state.state['attemptCount']
    });
} else if (recognized.succeeded) {
    isValid = true;
}

// Return recognized value or re-prompt
if (isValid) {
    return await dc.endDialog(recognized.value);
} else {
    if (!dc.context.responded) {
        await this.onPrompt(dc.context, state.state, state.options, true);
    }

    return Dialog.EndOfTurn;
}
By default, the result of the internal recognition made by the prompt is the one that triggers the retry or the return of the result. In other words, if the recognition result fails, the prompt is shown N times.
To control the number of retries, it is required a validator function that allows to manage the attemptCount counter. For this purpose, aura-bot-common library provides a validator function: getRetriesValidator, to control the number of retries. For its use, it is necessary to send this function as a second parameters in the prompt:
// Create a prompt without retries:
const myPrompt = new ChoicePrompt(ID_PROMPT,PromptUtils.getRetriesValidator(0));
Note that this validation function (that the dialog developer can build on his own), gives total flexibility to modify parameters each time the user responds.
Choice prompts
The prompt type “choice” asks the user to choose from a list of options. In this situation, the prompt-recognizer tries to recognize the choice selected with the options provided. If there is no match, it executes the NLP recognition.
The process for executing a choice prompt is detailed below:
- Declare the name of prompts to be used within the current dialog.
private promptsNames = {
    ACCESS_PERMISSION: 'access-permission',
    TERMS_AND_CONDITIONS: 'terms-and-conditions'
  };
- Notify the parent dialog that a prompt (with a declared id) is to be used and set its style.
const connectPrompt = new ChoicePrompt(this.promptsNames.ACCESS_PERMISSION);
connectPrompt.style = ListStyle.heroCard;
super.addDialog(connectPrompt);
- In a step of the waterfall dialog, define the prompt.
- Create Choices:
// Choice options.
const choicesText: Choice[] = [
   {value: text1},
   {value: text2} ];
// Prompt with text.
const message: Partial<Activity> = MessageFactory.text('message');
const promptOptions: PromptOptions = {
   prompt: message,
   choices: ChoiceFactory.toChoices(choicesText)
};
- Execute the prompt:
return await stepContext.prompt(this.promptsNames.ACCESS_PERMISSION, promptOptions);
An example to handle the result of the user’s action is shown below:
if (stepContext.result && stepContext.result.index === 0 ) {
 	// Save data
 	return await stepContext.next();
 } else {
 	// Cancel option
 	return await stepContext.endDialog();
 }
Use prompt values as commands
If the target is to provide as prompt options a series of commands to redirect to other dialogs, we can use the useValueAsCommand flag.
// create a list of intent commands to be used with the prompt
const actions = [
// REMARK: In this case, the trigger condition points to the same dialog, but it could point to ANY INTENT known to the bot,
// making it a versatile feature.
{ intent: 'intent.fake.something', entities: [{ entity: CommandChoices.FIRST_OPT, type: 'suggestion' }] },
{ intent: 'intent.fake.something2', entities: [{ entity: CommandChoices.SECOND_OPT, type: 'suggestion' }] }
];
const cardActions = CardFactory.actions(actions.map(a => {
    return {
      type: ActionTypes.ImBack,
      title: a.entities[0].entity,
      value: JSON.stringify(a)
     };
}));
const promptOptions: PromptOptions = {
	choices: ChoiceFactory.toChoices(cardActions),
        prompt: 'This is an example of Choice prompt with command values',
	validations: { useValueAsCommand: true }
};
return await stepContext.prompt('ID_PROMPT', promptOptions);
Creating the prompt in this way, when the user selects one of the options, it automatically redirects to a new intent in the process of recognizing the user’s action, forcing the prompt dialog to be cleared when there is a match.
⚠️ If the option chosen is the None intent, the stack cleaning behavior remains the same as always with the non-default cases to break the prompt (See section Break prompt and NLP recognition) such as the flag of enableNone etc.
Use of prompts in bypass mode
In a dialog working in bypass mode, you can use prompts that can be created as usual in the dialog:
    public DEFAULT_RETRIES: number = 2;
    public promptsNames = {
        COMMAND_CHOICE_PROMPT: 'command-choice-prompt'
    };

    constructor(configuration: Configuration) {
        ....
        // adds the prompt dialog to the Dialogs Set
        this.customPrompt = new ChoicePrompt(this.promptsNames.COMMAND_CHOICE_PROMPT,
            PromptUtils.getRetriesValidator(this.DEFAULT_RETRIES));
        ...
    }
The prompt will be instantiated, when the bypass mode initializes.
    this.customPrompt = new ChoicePrompt(this.promptsNames.COMMAND_CHOICE_PROMPT, PromptUtils.getRetriesValidator(retries));
    // To change retries we need replace original dialog for prompt
    (this.dialogs as any).dialogs['command-choice-prompt'] = this.customPrompt;
    return await Bypass.initialize(
        context,
        parseFloat(timeoutMin),
        { value: '' },
        'test',
        BypassState.Bypass,
        closeWords
    );
The prompt can be sent to the user and its value retrieved in the dialog.
private async sendPrompt(stepContext: WaterfallStepContext): Promise<DialogTurnResult> {
        const choicesText: Choice[] = [
            { value: 'id-0001', action: { title: 'Option 1 (id-0001)', type: '', value: '' }, synonyms: [] },
            { value: 'id-0002', action: { title: 'Option 2 (id-0002)', type: '', value: '' }, synonyms: [] },
            { value: 'id-0003', action: { title: 'Option 3 (id-0003)', type: '', value: '' }, synonyms: [] },
            { value: 'id-0004', action: { title: 'Option 4 (id-0004)', type: '', value: '' }, synonyms: [] },
            { value: 'id-0005', action: { title: 'Option 5 (id-0005)', type: '', value: '' }, synonyms: [] }
        ];

        const promptOptions: PromptOptions = {
            prompt: 'Hello, select one option: write the number, cardinal, ordinal or text',
            choices: ChoiceFactory.toChoices(choicesText)
        };
        return await stepContext.prompt(this.promptsNames.COMMAND_CHOICE_PROMPT, promptOptions);
    }

    private async fallbackStep(stepContext: WaterfallStepContext): Promise<DialogTurnResult> {
        await stepContext.context.sendActivity(`Option selected: ${stepContext.result.value}`);
        return await stepContext.endDialog();
    }
Data saving between Waterfall steps
getDataActiveDialog and setDataActiveDialog from DialogUtil in the aura-bot-common library are used to keep data between steps of a waterfall.
⚠️ If it is required to send data to another dialog, this method cannot be used.
The following example saves data in DATA_KEY as key:
DialogUtils.setDataActiveDialog(stepContext, 'DATA_KEY', data);
In the dialog code, it should use the DialogUtils utility to recover those parameters with the key DATA_KEY:
const data: any = DialogUtils.getDataActiveDialog(stepContext, 'DATA_KEY');
(context.activeDialog.state[keyData] can be used as well directly.)
Read dialog settings
When in aura-bot flow the main-dialog has routed a dialog to be started, it is launched with dialogSetting parameters:
return await stepContext.beginDialog(idDialog, dialogSetting);
To receive configuration parameters when a dialog is started, the DialogUtils utility should be used to recover those parameters with the key options:
dialogSetting = DialogUtils.getDataActiveDialog(stepContext, 'options');
In the following example, the channel data is being routed:
{
   "name":"issues",
   "dialogs":[
      {
         "id":"issue-create",
         "suggestions":true,
         "triggerConditions":[
            {
               "intent":"intent.issue.repair",
               "contextFilters":[
                  {
                     "name":"Example redirect to greetings from issues",
                     "type":"type",
                     "conditions":"'1' eq '1'",
                     "true":{
                        "name":"Test",
                        "breakDialogExecution":true,
                        "breakFilterEval":true,
                        "redirectToIntent":"intent.common.greetings",
                        "suggestions":true
                     }
                  }
               ]
            }
         ]
      }
   ]
}
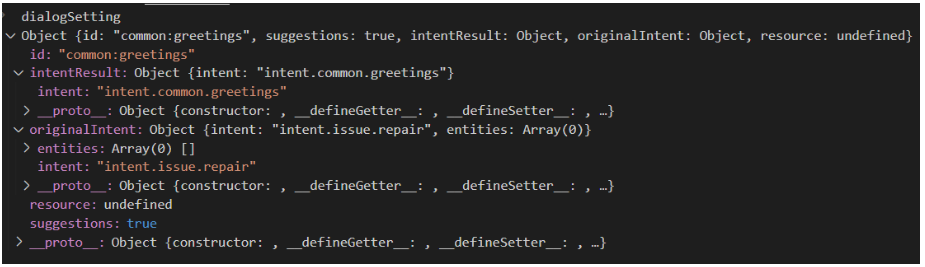
Conditions of contextFilter are always be fulfilled so intentResult will be “greetings” while originalIntent will be “issue” (if there is no contextFilter, intentResult would be “issue”). Therefore, this is the structure of dialogSetting:
Replacing a dialog
A dialog can replace another dialog by breaking its current flow. For this purpose, the command replaceDialog is used and it is necessary to know the identifier of the library and the dialog destination.
A basic example is shown below:
return await stepContext.replaceDialog(`${ID_LIBRARY}:${ID_DIALOG_DESTINATION}`);
If the destination dialog does not expect any dialogSettings, the above example would be valid.
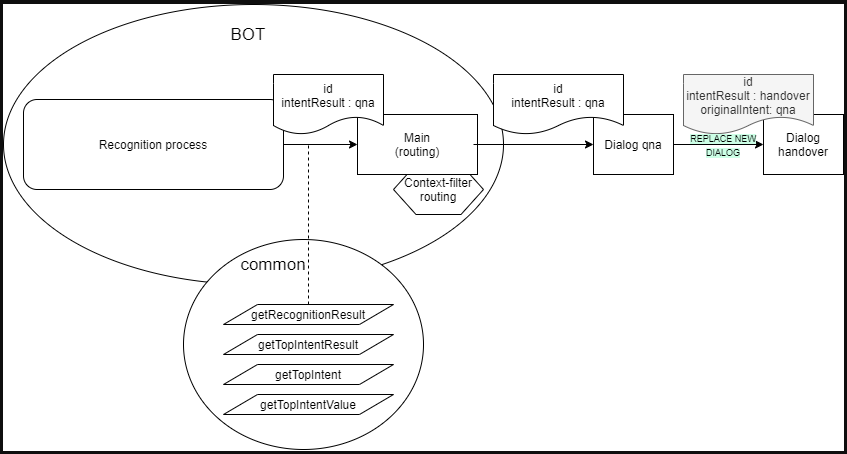
If it is necessary for the destination dialog to receive data from the original dialog, the developer must include the appropriate instructions for sending and receiving the required parameters. However, in order to maintain consistency with the established protocol for sending dialogSettings from the main dialog, it is recommended to maintain id, originalIntent and intentResult structure.
Two case examples are shown below:
- Case A: Simple dialog replacement:
const currentDialogSettigns = DialogUtils.getDataActiveDialog(stepContext, 'options');
const destinationDialogSettings =
      {
          id: ID_DIALOG_DESTINATION,
          originalIntent: currentDialogSettings.intentResult,
          intentResult: {intent: INTENT_DESTINATION},
          ...
          others :?
          ...
      }
return await stepContext.replaceDialog(`${ID_LIBRARY}:${ID_DIALOG_DESTINATION}`,destinationDialogSettigns );
destinationDialogSettings can be optional and is not sent to Handover (in fact, real Handover dialog is not using these settings).
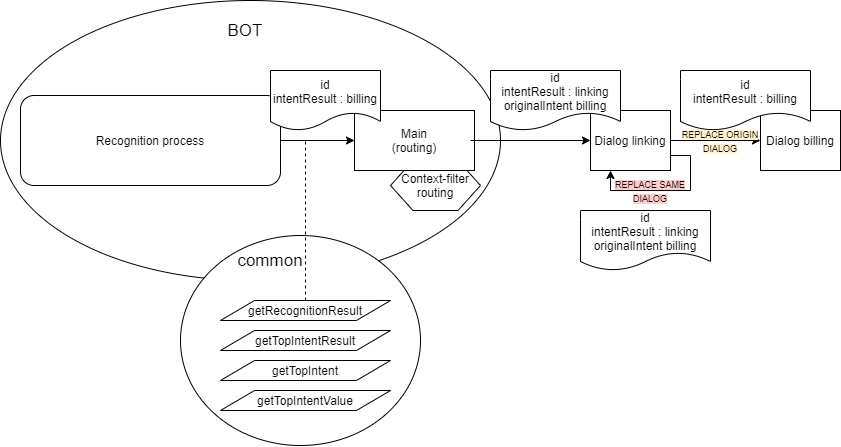
- Case B: Replace a dialog where there is a
contextFilter
In this case, if the dialog needs to replace itself, it is necessary to send the same dialogSettings that was sent by the main dialog:
const currentDialogSettings = DialogUtils.getDataActiveDialog(stepContext, 'options');
return await stepContext.replaceDialog(`${ID_LIBRARY}:${ID_DIALOG_DESTINATION}`,currentDialogSettings );
Data saving in the same conversation
auraDataAccessor can be the second parameter of the constructor. The command auraDataAccessor?: auraDataAccessor allows accessing to the conversation data, certain user data, etc.
auraDataAccessor has the following schema:
export interface AuraDataAccessor {
    conversationDataAccessor: StatePropertyAccessor;
    dialogStateAccessor: StatePropertyAccessor<DialogState>;
    userAuthDataAccessor: StatePropertyAccessor;
    userDataDataAccessor: StatePropertyAccessor;
Logs management
For a proper analysis of the code, it is very important to use logs correctly.
The field corr refers to the correlator, which has to be set in all cases in order to follow up the requests.
The correlator can be retrieved through a functionality of the commons library: ContextUtils.getCorrelator(context). It is necessary to send the current context (in a Waterfall step, it should be stepContext.context).
this.logger.info({
     msg: 'Message',
     corr: ContextUtils.getCorrelator(context)
});
There are cases in which the correlator does not exist because aura-bot is in start process, configuration, make-up, etc. In these cases, the assigned field is no-correlator. In debug and info mode, it can include new fields in order to organize and improve the data.
An example is shown below:
this.logger.debug({
     msg: 'Cognitive Services API response',
     corr: ContextUtils.getCorrelator(context),
     NEW_FIELD: value
});
The following example is useful to write error logs:
logger.error({
      corr: ContextUtils.getCorrelator(context),
      error: error.message,
      msg: 'Server cannot be closed',
      stck: error
});
1.2 - Build a library
Guidelines for building an Aura Bot library
Orderly steps for building a library in Aura Bot when developing a use case
Introduction
The customization of aura-bot is done through libraries: libraries in aura-bot are node.js packages, with a particular structure of folders and files that contain one or several dialogs, plus i18n strings, environment variables, configuration files and graphical resources. Libraries are deployed in the bot as plugins.
Within these libraries’ structure, developers are able to build extensions over aura-bot global components (dialogs) to be deployed in concrete scenarios where customized capabilities and functionalities are required, such as the development of a new use case.
The following sections include the detailed steps for building or modifying a library over aura-bot.
Build an Aura Bot library
When developing a local use case in Aura, you should:
✅ For local use cases generated from scratch: develop a new use case library
✅ For local use cases based on the customization of a global use case: modify existing use case library
We can have one or several libraries in one repository:
-
If the repository only contains one library, the root/ folder can be used. In this case, the folders of the library can be created directly from the root/ folder.
For example, for the src/ folder: [repository_name]/src
-
If the repository contains more than one library, a folder hierarchy is required. The working directory is:
For example, for the src/ folder: [repository_name]/[library name]/src
# Optional, only with multiple libraries in same repository (replace newlibrary with library name)
$ mkdir -p packages/newlibrary
$ cd packages/newlibrary
# Creates the src folder and move the dialog files inside
$ mkdir src
⚠️ The names of Aura global libraries are reserved. Therefore, both for the creation of a new local library or a customization of a global one, constructors must use a different name in order to avoid overlapping. We recommend to use the following structure for local libraries’ names: [local_library_name]-[OB]
⚠️ The library name must be exactly the same in all its associated files.
At this stage, you should build the structure of your library repository, with all the required folders and files.
📌Practical tip
Use a global library as template, copy it and edit the corresponding folders and files for your use case.
You can use: https://github.com/Telefonica/aura-bot-libraries/tree/master/packages/bill. This library will be used as an example throughout the document.
The recommended order is detailed below:
-
Copy in the root of the library the generic required files as identical copies:
.gitignore, .npmignore, tsconfig.json and tslint.json.
-
Create a package.json containing a plugin block with the name of the service this plugin will provide.
ℹ️ Detailed guidelines: Section package.json
-
A README.md file will be also desirable, explaining the library.
-
Create one file within src/ folder for each dialog (parts common to several dialogs could share utility clases, as usual).
ℹ️ Detailed guidelines: Use case dialogs
Now, copy here your dialog or code the it as explained in General guidelines for building an Aura Bot dialog.
-
Create an index.ts file, that will register all the dialogs when loading the plugin.
ℹ️ Detailed guidelines: index.ts
-
After publishing or npm linking the package (or npm packing), this plugin could be loaded from aura-bot by declaring the package name in the plugin configuration array. Additionally, any of the dialogs could be excluded from the load. A simple plugin configuration file could be:
[
    "@telefonica/aura-bot-bill-library",
    "@telefonica/aura-bot-common-library",
    {
        "packagePath": "@telefonica/aura-bot-other-library",
        "exclude": [
            "./first-dialog"
        ]
    }
]
Note that the object format (with packagePath) is optional. When no options are passed to the plugin, we could just use a string with the name of the package. When there are more options (like exclude array), the object format must be used. So, these two configuration files are equivalent:
[
    "@telefonica/aura-bot-bill-library",
    "@telefonica/aura-bot-common-library"
]
and
[
    {
        "packagePath": "@telefonica/aura-bot-bill-library"
    },
    {
        "packagePath": "@telefonica/aura-bot-common-library"
    }
]
Aura bot libraries repository
A library in aura-bot must contain a fixed structure of folders and files, both mandatory or optional.
These elements can differ for different environments, deploys or channels.
| Folder / Files |
Content |
| src/ |
- <dialog-name>.ts files: Files containing the dialogs logic
- index.ts file: Registration of dialogs in the library. Declaration of locale, config and .env files of the library.
- configuration-schema.ts: schema for library-specific configuration variables
- Unit tests for each dialog: <dialog-name>.spec.ts |
| settings/ |
- locale folder: Definition of text resources for Aura response
- dialog-config.json: Mapping of intents with dialogs within the library; definition of context filters
- .env files: Definition of environment variables associated with the library |
| resources/ |
Optional folder including files for composing Aura response |
| package.json |
File that contains a plugin block with the name of the service this plugin provides |
| package-lock.json |
File including the versioning control
Do not modify it |
| Other files |
.gitignore, .npmignore, tsconfig.json and tslint.json
Copy them in the root library as identical copies and do not modify them |
| Readme.md |
Optional file with information regarding the library |
src/ folder
| src/ content |
Mandatory/Optional |
File(s) containing the use case dialog(s): <dialog-name>.ts |
Mandatory |
index.ts file |
Mandatory |
configuration-schema.ts |
Optional |
📌Practical tip
Check the src/ folder in our global library: https://github.com/Telefonica/aura-bot-libraries/tree/master/packages/bill/src
Use case dialogs
Dialogs are .ts files containing the dialog logic.
Bot developers must generate the associated dialog(s) for their use case following the guidelines defined in General guidelines for building an Aura Bot dialog.
Afterwards, remember that all the developed dialogs must be tested.
index.ts file
index.ts file registers all the dialogs in the library.
Once the use case dialog is developed, edit this file with the corresponding values for each field explained below:
let dialogNames: names of all the dialogs included in the library.register:
<libraryName>: library name.dialogs: it points to the dialogs declared in let dialogNames.locale: the locale files must be exposed in the locale property when registering the plugin in order to be merged (during the make-up process).env: the .env files must be exposed in the env property when registering the plugin in order to be merged (during the make-up process).config: the config files must be exposed in the config property when registering the plugin in order to be merged (during the make-up process).configSchema: declaration of specific variables for the use case included in the configuration-schema.ts file.resources: it indicates the path (__dirname) where the resources folder, containing the resources used in the use case, is included:
resources: path.resolve(__dirname, '..', 'resources')
A complete example can be found below for the library generic:
  import * as path from 'path';
import * as libraryUtil from '@telefonica/aura-bot-utilities/lib/aura-bot-library-util';
import configurationSchema from './configuration-schema';


export = function setup(options: any, imports: any, register: (err: Error, result: any) => void) {
    let dialogNames = [
        './generic-dialog'
    ];
    // If there is an array of dialogs to disable, remove from dialog array
    libraryUtil.excludeDialogs(dialogNames, options);
    // Register that this plugin has been fully loaded
    const settingsPath = path.resolve(__dirname, '..', 'settings');
    register(null, { resources: path.resolve(__dirname, '..', 'resources')
        generic: {
            dialogs: dialogNames.map(dialogName => require(dialogName)),
            locale: libraryUtil.readLocaleFolder(path.resolve(settingsPath, 'locale')),
            env: libraryUtil.readEnv(settingsPath),
            config: libraryUtil.readDialogConfig(settingsPath),
            configSchema: configurationSchema,
            resources: path.resolve(__dirname, '..', 'resources')
        }
    });
};
configuration-schema.ts
Optional file for the validation of schemas from the library-specific configuration variables required for the use case.
When the bot loads all the plugins, it verifies that the schemas provided by the library fulfil the conditions established in the current file.
The orderly process for editing this file is defined below:
-
Declare the library-specific configuration variables in the .env configuration file starting with the library name: [library_name]_[variable_name]. This file includes the values of these variables.
-
For these variables, include in the configuration-schema.ts restrictions, default values, checking, etc. in order to validate them.
During the during the make-up process, the content of the different configuration-schema.ts files for each library will be automatically uploaded into a .env.libraries file.
You can create a schema (using @hapi/joi) and specify the name of the library-specific variable as shown in the following example:
import joi from 'joi';

const configurationSchema = {
    LIBRARYNAME_DEFAULT_GREETINGS: joi.string().default('hello'),
    LIBRARYNAME_COMMON_COUNT_GREETINGS: joi.number().default(1800)
};

export default configurationSchema;
settings/ folder
| settings/ content |
Mandatory/Optional |
localefolder |
Optional |
dialog-config.json file |
Mandatory |
.envconfiguration files |
Optional |
📌Practical tip
Check the settings/ folder in our global library: https://github.com/Telefonica/aura-bot-libraries/tree/master/packages/bill/settings
locale/ folder
Each library may contain (optionally) a settings/locale folder, with one or more locale files with the format:
settings/locale/dialog-config.<culture_code>.json
The content of this file corresponds to the text resources, both from aura-bot core or text of Aura response for a specific use case. This content can be generated using POEditor, which handles the different messages that the bot shows to the customer and to adapt them to a specific language.
Find detailed information for the generation of texts included in Aura response in Build Aura response: POEditor texts.
⚠️ These files must be generated during the building up of a dialog, as they must be included in the unit tests for the dialogs.
An example of this file is shown below:
[
  "common:common.goodbyes.main": [
        "See you soon.",
        "See you soon."
    ],
    "common:common.greetings.main": [
        "Hello. How can I help?"
    ],
    "common:common.thankyous.main": [
        "Happy to help",
        "Happy to help."
    ]
}
dialog-config.json
dialog-config.json is a mandatory file that maps each intent with a dialog from the library. Therefore, the dialog is launched if the intent is recognized.
Moreover, the file defines the suitability of the use case and allows the definition of context filters.
Each library must contain a dialog-config.json file that can be general or defined per language and OB.
This general configuration could be merged (with higher priority) with a specific file per language and OB:
dialog-config.<AURA_DEFAULT_LOCALE>.json
where AURA_DEFAULT_LOCALE contains the culture code to be used by default in the current deployment: en-gb, es-es, etc.
The dialog-config.json file follows the DialogLibrary model, excepting for the field onlyIn which is described below.
onlyIn property
The OnlyIn field is an optional field that indicates to which channels the dialog will be added.
If it is not present, it means that the dialog will be added to all the channels of the environment.
Configure it, if required, including an array of channels names.
contextFilters
A contextFilter allows to configure the behavior of a dialog depending on the fulfilment of specific conditions. You can define contextFilters in the dialog-config.json file for a specific intent.
Currently, the conditions that can be established correspond to the user’s subscription type (for example, prepaid or postpaid) and the type of contract (monomsisdn or multimsisdn). Depending on the fulfilment of the established condition (true or false), the behavior of the dialog is different.
For including contextFilters, edit the fields included in the ContextFilter model.
An example is shown below with authorization at library level, only a dialog, without contextFilters, that is returned without suggestions and that applies to all channels.
  {
 "name": "handover",
  "authorization": {
    "purposes": "customer-self-service",
    "scopes": "subscribed-products-user-read"
  },
  "dialogs": [
    {
      "id": "handover",
      "suggestions": false,
      "triggerConditions": [
        {
          "intent": "intent.common.handover"
        }
      ]
    }
  ]
}
The following example includes authorization at library level, only a dialog, without contextFilters, that is returned without suggestions and that applies only to Novum and Movistar Home.
 {
 "name": "handover",
  "authorization": {
    "purposes": "customer-self-service",
    "scopes": "subscribed-products-user-read"
  },
  "dialogs": [
    {
      "id": "handover",
      "suggestions": false,
      "triggerConditions": [
        {
          "intent": "intent.common.handover"
        }
      ],
     "onlyIn": ["novum-mytelco"]
    }
  ]
}
The third example includes contextFilters:
  "dialogs": [
             {
               "intent": "intent.billing.check",
               "contextFilters": [
                  {
                      "name": "subscrition_type_prepaid_invoice",
                      "type": "subscrition_type_filter",
                      "conditions": "/authData/subscriptionType eq 'prepaid'",
                      "true": {
                          "name": "subscription_type_prepaid_invoice_true",
                          "breakDialogExecution": true,
                          "breakFilterEval": false,
                          "resource": "bill:bill.check.prepaid",
                          "suggestions": true
                    }
NOTE: All intents of the same dialog must be defined together for each channel. Like:
  {
    "name": "mocks",
    "dialogs": [
        {
            "id": "mocksv3-dialog",
            "channelDataVersion": "v3",
            "triggerConditions": [
                {
                    "intent": "intent.tv.display"
                }
            ],
            "onlyIn": [
                "set-top-box"
            ]
        },
        {
            "id": "mocksv3-dialog",
            "channelDataVersion": "v3",
            "triggerConditions": [
                {
                    "intent": "intent.tv.search"
                },
                {
                    "intent": "intent.tv.display"
                }
            ],
            "onlyIn": [
                "movistar-plus"
            ]
        }
    ]
}
.env configuration files
When developing a use case, you must include in this file the values for the library-specific configuration variables required for the use case.
These variables must be formatted as follows: [library_name]_[variable_name].
There can be multiple .env files corresponding to different libraries, environments, etc. All of them are automatically uploaded into a .env.libraries file during the make-up process.
A simple example of .env variables is shown below:
MYLIBRARY_VERSION=1.2.3
MYLIBRARY_ENDPOINT=https://my-library.test/v1
resources/ folder
The resource folder is optional and, if existing, is placed on the directory:
[repository_name]/resources/ or [repository_name]/[library name]/resources/
It includes different folders with images or any other binary files (such as JSON files) required by the use case.
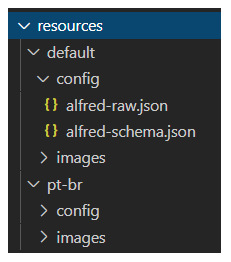
Resources in this directory can be organized in different sub-folders: a default folder and locale folders for different culture codes.
📌Practical tip
Check the resources/ folder in our global library: https://github.com/Telefonica/aura-bot-libraries/tree/master/packages/bill/resources
Declare in this folder the graphic resources of your use case, if existing.
Inside each folder /images, if required, resources may be organized in sub-folders depending on the image resolution.
If existing, the files in the resources/ folder are uploaded to Azure container pointed by the AURA_STATIC_RESOURCE_ENDPOINT and the AURA_STATIC_RESOURCE_SAS_TOKEN environment variables, during the during the make-up process.
package.json file
The package.json is a mandatory file and is placed on the directory:
[repository_name]/package.json or [repository_name]/[library name]/package.json
This file contains a plugin block, with the name of the service this plugin provides.
📌Practical tip
Check the package.json file in our global library: https://github.com/Telefonica/aura-bot-libraries/blob/master/packages/bill/package.json
For including your use case, follow the structure shown below changing “newlibrary” with the name of your library:
"plugin": {
    "provides": [
        "newlibrary"
    ]
},
The package.json can contain different dependencies. Useful ones for libraries are:
@telefonica/aura-bot-utilities/lib/aura-bot-common: common library shared among aura-bot Platform and the corresponding library for global use cases.@telefonica/aura-bot-utilities/lib/aura-bot-library-util: library with specific utilities for libraries, such as resource loading, currencies, etc.@telefonica/aura-logging: recommended for Aura logs tracking.botbuilder-dialogs: dialogs classes.
1.3 - Build a dialog that uses async APIs
Guidelines for building a dialog that uses async APIs
Orderly steps for building an Aura Bot dialog that require to call asynchronous APIs
Introduction to asynchronous APIs
Asynchronous APIs are defined as APIs that do not provide the information back immediately, but with a certain standby time as they must perform a specific task derived from the user’s request. When the execution of this task is finished, these APIs invoke a callback and pass to the dialog the result of the task accomplishment.
The call to an asynchronous API must be included in the use case dialog and the payload from the API will be sent to aura-bridge, which is in charge of delivering it to the dialog that invoked this API.
This functionality can be useful, for example, in use cases that need to call to self-diagnostics APIs.
ℹ️ Current requisites:
- This functionality only applies to Kernel APIs.
- The correct operation implies that the dialog is in bypass mode.
An example of the usefulness of asynchronous APIs is shown below:
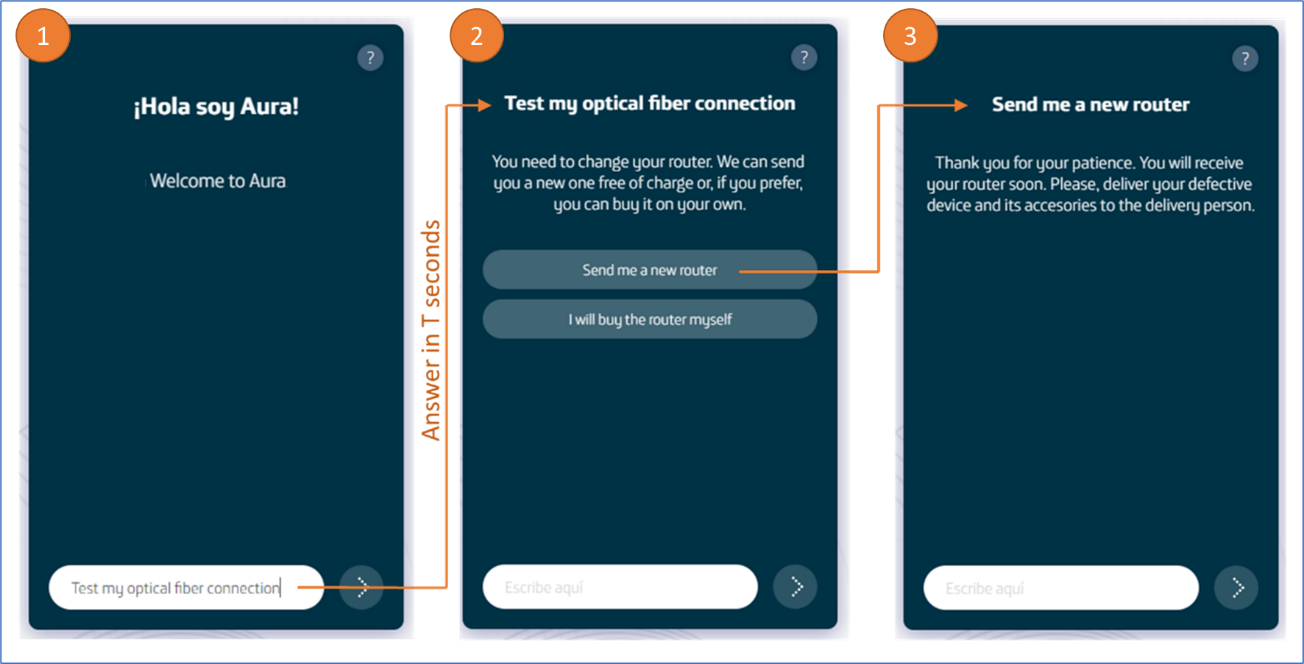
- The user asks Aura: “Test my optical fiber connection”
aura-bot recognizes this request and triggers a specific dialog. The dialog, that must be configured in bypass mode, calls an asynchronous API.
The API takes T seconds in answering as Aura has to perform certain verification tests.
- After that time, the API sends a callback to the dialog with a text that include the result of the verification tests and offers different solutions for the user to choose.
- The user selects one of the options and the intended answer is provided to her.
How to call asynchronous APIs in a dialog
Follow these guidelines in order to make your dialog call an asynchronous API.
1. Check purposes and scopes
Firstly, you should add in the channel configuration (aura-configuration-api) all the necessary purposes and scopes in order to invoke the APIs.
⚠️ It must be done for all the intended channels* that will use the dialog.
2. Call asynchronous APIs in the dialog
For including asynchronous APIs in the dialog, it must work in bypass mode. This bypass mode must be started when the first call to the asynchronous API is made.
    const callbackId = stepContext.context.activity.id;
    const bypass: Bypass<BypassModelData> = await Bypass.initialize(
            stepContext.context,
            this.timeout,
            { callbackId },
            'asyncCallback',
            BypassState.Init,
            getLiteral(stepContext?.context)('factotum:bypass.close.words'));
        const message = this.message4pCreate;
        message.diagnosis_callback_url = getAsyncCallbackUrl(
                stepContext.context, this.configuration, callbackId);
        const response = await this.sendMessageTo4p(stepContext, this.url4p, message, corr);
        // Update bypassmode (if connection is ok)
        bypass.state = BypassState.Bypass;
        bypass.data.tecnicalProblemId = response?.body?.id;
        await bypass.updateBypass(stepContext?.context, false);
This API has a parameter to send the callback where the response is received, in this case aura-bridge. To build this URL, there is a getAsyncCallbackUrl(@telefonica/aura-bot-common) method, belonging to the bridge-utils utility. This will return the callback URL based on the context, the configuration and an identifier that will be sent in the answer.
message.diagnosis_callback_url = getAsyncCallbackUrl (
                 stepContext.context, this.configuration, callbackId);
In each execution of the dialog, this must be finished (as bypass mode requires closing the dialog in each execution), so that it is reactivated by aura-bot when it finds the bypass mode.
Communication flow
The following diagram shows the request flow of a message to a dialog invoking an asynchronous API:
sequenceDiagram
    actor User
    participant Whatsapp
    participant 4P
    participant Bridge
    participant Bot
    participant Dialog
    User ->> Whatsapp: message
    Whatsapp ->> 4P: message
    4P ->> Bridge: message + apiKey + channelId
    Bridge ->> 4P: response 200
    Bridge ->> Bot: message + channelId
    Bot ->> Dialog: message
    Dialog ->> 4P: request async + callback bridge
    4P ->> Dialog: response 200
    Note right of 4P: when 4p finishes the request sends the response to the indicated callback (bridge)
    4P ->> Bridge: response request async
    Bridge ->> 4P: response 200
    Bridge ->> Bot: response request async
    Note right of Bridge: the response is sent as payload
    Bot ->> Bridge: response 200
    Bot ->> Dialog: response request async
Example of a dialog calling an asynchronous API
This is a dialog’s example that makes calls to an asynchronous API.
- Firstly, the dialog checks in which bypass state is:
    const corr = ContextUtils.getCorrelator (stepContext.context);
    try {
        const bypass = await Bypass.loadBypass (stepContext.context);
        switch (bypass.state) {
            case BypassState.Off:
            case BypassState.Init: {
                await this.onInit (stepContext, corr);
                break;
            }
            case BypassState.Bypass: {
                await this.onByPass (stepContext, corr);
                break;
            }
            case BypassState.Closed: {
                await this.onClosed (stepContext, corr);
                break;
            }
        }
    } catch (err) {
        await stepContext.context.sendActivity ('Error async event 4p');
        this.logger.error ({error: 'Error async event 4p', stck: err, corr});
    }
    return await stepContext.endDialog ();
- If bypass mode is not started, the asynchronous API call will be sent and the bypass mode will be initialized.
    private async onInit (stepContext: WaterfallStepContext, corr: string) {
        try {
            const callbackId = stepContext.context.activity.id;
            const bypass: Bypass <BypassModelData> = await Bypass.initialize (
                stepContext.context,
                this.timeout,
                {callbackId},
                'asyncCallback',
                BypassState.Init,
                getLiteral (stepContext? .context) ('factotum: bypass.close.words'));
            const message = this.message4pCreate;
            message.diagnosis_callback_url = getAsyncCallbackUrl (
                stepContext.context, this.configuration, callbackId);
            const response = await this.sendMessageTo4p (stepContext, this.url4p, message, corr);
            // Update bypassmode (if connection is ok)
            bypass.state = BypassState.Bypass;
            bypass.data.tecnicalProblemId = response? .body? .id;
            await bypass.updateBypass (stepContext? .context, false);
            this.logger.info ({msg: `Bypass initializated`, corr});
        } catch (err) {
            await Bypass.closeBypass (stepContext.context);
            await stepContext.context.sendActivity ('Error call async api 4p');
            this.logger.error ({msg: 'Error call async api 4p', error: err.message, stck: err, corr});
        }
    }
- If aura-bot is in bypass mode, the dialog could receive users’ messages. In the example, messages are ignored, but at this point the dialog can receive the response of the asynchronous API. If the sent identifier matches, the content will be sent to the user, thus ending the bypass mode.
In the
bypass.data element, information can be stored in order to be used between different bypass cycles.
   private async onByPass (stepContext: WaterfallStepContext, corr: string) {
        const payload = ChannelDataUtils.getPayloadAsyncCallback(stepContext.context);
        const bypass: Bypass <BypassModelData> = await Bypass.loadBypass (stepContext.context);
        if (payload && bypass.data.callbackId === payload.callbackId) {
            const payloadText = JSON.stringify (payload);
            this.logger.debug ({msg: `Send activity message $ {payloadText}`, corr});
            await stepContext.context.sendActivity (payloadText);
            await this.cancelTecnicalProblem (stepContext, corr);
        } else {
            this.logger.debug ({msg: `Ignore $ {stepContext? .context? .activity? .text}`, corr});
        }
    }
- If the bypass has ended, the bypass time has expired or the user has used one of the closing terms, the dialog must close the bypass mode and perform the appropriate operations.
In the following example, a message is sent to the user.
    private async onClosed (stepContext: WaterfallStepContext, corr: string) {
        await Bypass.closeBypass (stepContext.context);
        await stepContext.context.sendActivity ('Bypass closed');
    }
1.4 - Aura Bot bypass mode
Orderly steps for the configuration of Aura Bot in bypass mode
Introduction
The main functionality of bypass mode, is that once we are in this mode within a conversation, any input message to aura-bot will be directly sent to the external service. Likewise, any message from the external service will be shown to the user without going through the bot recognition system.
In section bypass-mode-middleware you can find detailed information regarding the middleware that manages the bypass mode and the bypass mode model.
The configuration of aura-bot in bypass mode implies three steps that are shown below.
Initialize bypass mode
To use bypass mode, the dialog must initialize the bypass object.
Params Bypass.initialize method:
| Property |
Description |
| BypassState |
Current bypass state |
| context |
Current context of dialog |
| duration |
Bypass life time in minutes |
| initialData |
Initial data of bypass |
| payloadName |
Name of the property in the channelData.payload used to send data to bypass.ex: 'handover'.
For asynchronous APIs, it must be asyncCallback. |
| closeString |
Comma-separated string or array of string with the words that directly close the bypass |
    const bypass: Bypass<BypassModelData> = await Bypass.initialize(
            stepContext.context,
            this.timeout,
            {},
            'handover',
            BypassState.Init,
            getLiteral(stepContext?.context)('factotum:bypass.close.words'));
Once the bypass mode is initialized, all user’s messages will be redirected to the dialog.
In bypass mode, when the dialog finishes all the actions of the use case logic, the dialog must be closed.
return await stepContext.endDialog();
Execute bypass mode
Bypass information can be loaded into the dialog by calling the Bypass.loadBypass method.
const bypass = await Bypass.loadBypass(stepContext.context);
From its initialization, the dialog should monitor the status of the bypass that can be one of the following:
BypassState.OffBypassState.InitBypassState.BypassBypassState.Closed
    const bypass = await Bypass.loadBypass(stepContext.context);
    switch (bypass.state) {
        case BypassState.Off:
        case BypassState.Init: {
            .....
            break;
        }
        case BypassState.Bypass: {
            ....
            break;
        }
        case BypassState.Closed: {
            ....
            break;
        }
    }
Bypass data field is used to exchange information between bypass interations, it is an any object.
To update the information in the bypass object, the bypass object is modified to invoke updateBypass.
    const bypass = await Bypass.loadBypass(stepContext.context);
    bypass.data.value = bypass.data.value + stepContext.context.activity.text + ' ';
    await bypass.updateBypass(stepContext.context, false);
Close bypass mode
At any time the dialog can close the bypass mode by using the Bypass.closeBypass method.
await Bypass.closeBypass(stepContext.context);
The bypass may also be closed because of its expiration or because the user has said any of the closing words.
In these cases, when the control returns to the dialog, the state of the bypass will change to BypassState.Closed and the closeReason field will indicate the reason for the closing.
Example of dialog with Aura Bot in bypass mode
    export default class AuraBotTestBypass extends ComponentDialog {
    /**
     * Dialog id for the base Aura Bot app dialog.
     */
    public static readonly id: string = 'test-bypass';
    public TTL_BYPASS_MIN: number = 0.25; // 15 seconds
    /**
     * logger
     */
    public readonly logger = new AuraLogger.AuraBusEmitter('AuraTestBypass');
    public readonly autoRegister: boolean = true;
    protected configuration: Configuration;
    /**
     * Constructor for Bypass Handover.
     *
     * @param {Configuration} configuration The configuration joi schema.
     */
    constructor(configuration: Configuration) {
        super(AuraBotTestBypass.id);
        super.initialDialogId = AuraBotTestBypass.id;
        this.configuration = configuration;
        super.addDialog(new WaterfallDialog(AuraBotTestBypass.id, [
            this.handoverStart.bind(this),
            this.handoverContinue.bind(this)
        ]));
    }
    /**
     * Check Bypass Status
     * INIT: Start Bypass Mode and create Bypass model into userData.
     * BYPASS: Execute handoverContinue step dialog.
     * CLOSE: Remove Bypass Model from userData and close Dialog.
     *
     * @param {WaterfallStepContext} stepContext The current step context.
     */
    private async handoverStart(stepContext: WaterfallStepContext): Promise<DialogTurnResult> {
        const corr = ContextUtils.getCorrelator(stepContext.context);
        try {
            let bypass = await Bypass.loadBypass(stepContext.context);
            switch (bypass.state) {
                case BypassState.Off:
                case BypassState.Init:
                    bypass = await Bypass.initialize(stepContext.context, this.TTL_BYPASS_MIN, { value: '' }, 'test', BypassState.Bypass, ['exit','disconnect','disable']);
                    this.logger.info({ msg: `Bypass for: ${bypass.intent.intent} initialized`, corr });
                    await stepContext.context.sendActivity('Welcome to the CONCATENATOR, type "exit" to finish.');
                    return await stepContext.endDialog();
                case BypassState.Bypass:
                    this.logger.info({ msg: `Bypass for: ${bypass.intent.intent} continue`, corr });
                    return await stepContext.next(bypass);
                case BypassState.Closed:
                    await Bypass.closeBypass(stepContext.context);
                    this.logger.info({ msg: `Bypass for: ${bypass.intent.intent} closed`, corr });
                    if (bypass.closeReason === BypassCloseReason.BypassExpired) {
                        await stepContext.context.sendActivity('The CONCATENATOR has expired!');
                    }
                    await stepContext.context.sendActivity('The final result was: [ ' + bypass.data.value + ']');
                    return await stepContext.endDialog();
            }
        } catch (reason) {
            this.logger.error({
                corr,
                msg: 'Error handover bypass',
                error: reason.message,
                stck: reason.stack
            });
            await stepContext.context.sendActivity(reason.message);
            return await stepContext.endDialog();
        }
    }
    /**
     * Executes the logic for Bypass
     *
     * @param {WaterfallStepContext} stepContext The current step context.
     */
    private async handoverContinue(stepContext: WaterfallStepContext ): Promise<DialogTurnResult> {
        const bypass = stepContext.result;
        bypass.data.value = bypass.data.value + stepContext.context.activity.text + ' ';
        await bypass.updateBypass(stepContext.context, false);
        await stepContext.context.sendActivity(bypass.data.value);
        return await stepContext.endDialog();
    }
}
How to use prompts in bypass mode
Prompts can be used within a dialog working in bypass mode.
    public DEFAULT_RETRIES: number = 2;
    public promptsNames = {
        COMMAND_CHOICE_PROMPT: 'command-choice-prompt'
    };
    constructor(configuration: Configuration) {
        ....
        // adds the prompt dialog to the Dialogs Set
        this.customPrompt = new ChoicePrompt(this.promptsNames.COMMAND_CHOICE_PROMPT,
            PromptUtils.getRetriesValidator(this.DEFAULT_RETRIES));
        ...
    }
- The prompt will be instantiated, when the bypass mode is initialized.
    this.customPrompt = new ChoicePrompt(this.promptsNames.COMMAND_CHOICE_PROMPT, PromptUtils.getRetriesValidator(retries));
    // To change retries we need replace original dialog for prompt
    (this.dialogs as any).dialogs['command-choice-prompt'] = this.customPrompt;
    return await Bypass.initialize(
        context,
        parseFloat(timeoutMin),
        { value: '' },
        'test',
        BypassState.Bypass,
        closeWords
    );
- The prompt can be sent to the user and and the returned value can be collected in the dialog.
    private async sendPrompt(stepContext: WaterfallStepContext): Promise<DialogTurnResult> {
        const choicesText: Choice[] = [
            { value: 'id-0001', action: { title: 'Option 1 (id-0001)', type: '', value: '' }, synonyms: [] },
            { value: 'id-0002', action: { title: 'Option 2 (id-0002)', type: '', value: '' }, synonyms: [] },
            { value: 'id-0003', action: { title: 'Option 3 (id-0003)', type: '', value: '' }, synonyms: [] },
            { value: 'id-0004', action: { title: 'Option 4 (id-0004)', type: '', value: '' }, synonyms: [] },
            { value: 'id-0005', action: { title: 'Option 5 (id-0005)', type: '', value: '' }, synonyms: [] }
        ];
        const promptOptions: PromptOptions = {
            prompt: 'Hello, select one option: write the number, cardinal, ordinal or text',
            choices: ChoiceFactory.toChoices(choicesText)
        };
        return await stepContext.prompt(this.promptsNames.COMMAND_CHOICE_PROMPT, promptOptions);
    }
    private async fallbackStep(stepContext: WaterfallStepContext): Promise<DialogTurnResult> {
        await stepContext.context.sendActivity(`Option selected: ${stepContext.result.value}`);
        return await stepContext.endDialog();
    }
1.5 - Build an operation
Build an operation in a developed dialog
Guidelines for building an operation within an already developed dialog.
Introduction
Besides first-level intents in Aura, that are associated to the execution of a dialog and have the following format: intent.[intent_name], there is another type of intents called Operations that do not have to be associated to a dialog.
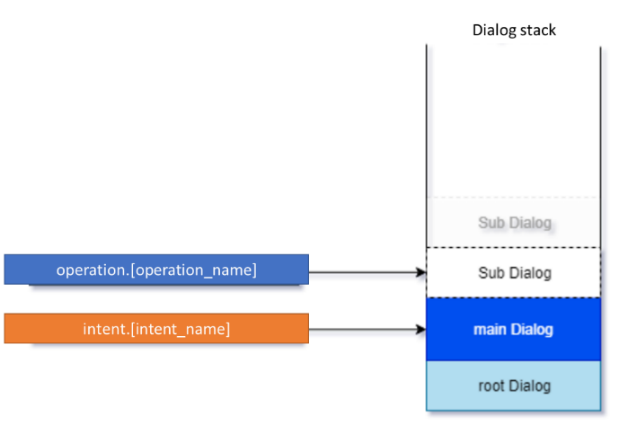
An operation is an intention that makes sense within a context, that is, within a specific dialog conversational flow and when the dialog is waiting for an interaction with the user.
Operations are not recognized by Aura NLP but through a direct auraCommand or through a dialogContext.
Operations have the following format: operation.[operation_name].
How to build an operation
It is recommended to build a specific .ts file for each operation and place it in the following folder together with the use case dialogs’ files:
[repository_name]/src/ or [repository_name]/[library name]/src/
An example is shown below:
If we want to select the seat for a flight and we say to Aura: “I want the seat 24A”. Then, the recognizer will choose an intention, but this intention only makes sense if it is within a sub-process, which in this case would be “buying tickets”.
In the following example, we have already opened a session in Air Europe and we have sent the intention to buy tickets:
{
  "intent": "intent.air-europe.buy-ticket",
  "entities": []
}
Secondly, in the “buy tickets” section of the App interface, when the user chooses a seat, the App will send the following operation to select the seat:
{
  "intent": "operation.air-europe.select-seat",
  "entities": [
    {
      "type": "ent.seat-number",
      "entity": "A24",
      "canon": "a24"
    }
  ]
}
1.6 - Dialog in channelData v3
Guidelines for creating/migrating a dialog to channelData v3
Orderly steps for building or migrating a dialog to be compatible with channelData normalized model (version 3)
Introduction
If you want your use case to be compatible with the new channelData normalized model (v3), both for a new developed use case or for migrating an existing one, you should:
- Develop the use case as explained in Building an Aura Bot dialog.
- After that, carry out certain extra tasks that are orderly included in the following sections.
Examples in this section will be referenced to greetings dialog, which has been already prepared for channelData v3 version.
Create v3 folder
According to the general guidelines, all dialogs must be created inside the library’s src/ folder.
However, channelData v3 dialogs must be included in a v3 folder, within src/:
${your_library_root_folder}/src/v3
In this folder, you must place the dialog’s .ts files with the dialog’s implementation and the .spec.ts files for testing.
These files should specify the channelData version in the filename, for example: /my-dialog/newdialog-v3-dialog.ts.
Dialog’s id
The dialog’s id should include channelData version for its differentiation.
For example, in greetings dialog this is done appending v3 to the dialog’s id.
     * The id of the dialog.
     */
    public static id: string = 'greetings-v3';
Dialog configuration
Regarding the dialog’s configuration, which is found in the dialog-config.json file, inside settings/ folder, the channelData v3 dialog configuration must include a new property called channelDataVersion.
This property should be filled with the dialog’s version, in our use case v3.
If no version is specified, it is understood that the dialog works in v1 mode (for classic use cases).
{
            "id": "greetings-v3",
            "channelDataVersion": "v3",
            "triggerConditions": [
                {
                    "intent": "intent.common.greetings"
                }
            ]
        }
It is also recommended to set suggestions to false in the dialog’s configuration.
{
            "id": "greetings-v3",
            "channelDataVersion": "v3",
            "suggestions": false,
            "triggerConditions": [
                {
                    "intent": "intent.common.greetings"
                }
            ]
        }
As shown in the example, the format for intents in channelData version 3 only changes internally. Therefore, when defining an intent, it is not necessary to specify its version, as the dialog loading system will do it internally.
Dialog implementation
Building a dialog in channelData v3 is quite similar to legacy channelData dialogs, whose process is fully explained in Building an Aura Bot dialog.The main difference is in the dialog’s output, which should be compatible with the channelData version’s schema.
For this case, the utility ChannelDataResponseMapper.formatChannelDataV3() creates a valid channelData v3 response and can be used with properties obtained from the Bot Framework’s context:
const correlator: string = ContextUtils.getCorrelator(stepContext.context);
const auraUser = ContextUtils.getAuraUser(stepContext.context);
const intentResult = DialogUtils.getDataActiveDialog(stepContext, 'options').intentResult;
const activity: Partial<Activity> = {
            text: this.localizer.getText('common:common.greetings.main', auraUser, correlator),
            channelData: ChannelDataResponseMapper.formatChannelDataV3(intentResult, intentConfigSettings, correlator)
        };
There is another important utility in this code snippet, ContextUtils.getIntentConfig(). It is used if there are configurations that refer to the same intent but have different implementations regarding channelData versions. This utility will obtain the dialog’s configuration based on this version.
Find the full waterfall step in the greetings dialog .
Dialog implementation extending existing dialogs
To avoid code repetition, you can reuse the code of existing v1 dialogs and extend it to be reused in v3 dialogs. To do this, follow these simple steps:
- Modify your original v1 dialog to receive the
dialogId as a param:
export default class ExampleDialog extends ComponentDialog {
    public static id: string = 'example-dialog';
    private configuration: Configuration;
    private logger: AuraLog;

    // Dialog id is received as a param or set to the original v1 value as default
    constructor(configuration: Configuration, id: string = ExampleDialog.id) {
        super(id);
        this.initialDialogId = id;

        this.logger = new AuraLog(id);
        this.configuration = configuration;

        super.addDialog(new WaterfallDialog(id, [
            this.examplePrompt.bind(this),
            this.exampleResult.bind(this),
        ]));
        const confirmCurrentPrompt = new ChoicePrompt(this.promptsNames.CONFIRM_CURRENT, PromptUtils.getRetriesValidator(0));
        confirmCurrentPrompt.style = ListStyle.heroCard;
        super.addDialog(confirmCurrentPrompt);
    }
    .
    .
    .
- Create your v3 dialog extending your v1 dialog:
import {
    Configuration} from '@telefonica/aura-bot-utilities/lib/aura-bot-common';
import ExampleDialog from '../../whatsapp/otp-confirm-user-phone-number-dialog';
import OtpPhoneNumberV3Dialog from './otp-phone-number-v3-dialog';

/**
 * Aura bot dialog implementation for otp phone number TODO
 */
export default class ExampleV3Dialog extends ExampleDialog {
    /**
     * The id of the dialog.
     */
    public static id: string = 'otp-confirm-user-phone-number-v3-dialog';

    /**
     * Constructor dialog
     *
     * @param  {Configuration} configuration configuration dialog
     */
    constructor(configuration: Configuration) {
        super(configuration, ExampleV3Dialog.id);
    }
}
- If your dialog does not modify the response
channelData, the process is finished.
But if your original v1 dialog modifies some channelData values, you need to use auxiliary methods to create this channelData and overwrite them in the v3 dialog:
export default class ExampleDialog extends ComponentDialog {
    .
    .
    .
    private async registerUser(stepContext: WaterfallStepContext): Promise<DialogTurnResult> {
            const activity: Partial<Activity> = {
                type: 'message',
                text: getText('login.otp.success')
            };
            activity.channelData = await this.getRedirectChannelData(auraUser, this.configuration, this.logger, corr, dialogData?.originalIntent);

            await stepContext.context.sendActivity(activity);
    }

    protected async getRedirectChannelData(auraUser: AuraUserBaseModel<any>, configuration: Configuration, logger: AuraLog, corr: string, originalIntent?: Intent):
    Promise<AuraModels.ResponseChannelDataV3.ResponseChannelData | any> {
        return {
            customData: await LinkingUtils.checkTacAndRedirect(auraUser, this.configuration, this.logger, corr, originalIntent)
        };
    }
    .
    .
    .
export default class ExampleV3Dialog extends ExampleDialog {
    .
    .
    .
    protected async getRedirectChannelData(auraUser: AuraUserBaseModel<any>, configuration: Configuration, logger: AuraLog,
        corr: string, originalIntent?: Intent): Promise<AuraModels.ResponseChannelDataV3.ResponseChannelData> {
        const actions: AuraModels.ResponseChannelDataV3.Action[] = [];
        const redirectAction = await LinkingUtils.checkTacAndRedirectV3(auraUser, configuration, logger, corr, originalIntent);
        if (redirectAction) {
            actions.push(redirectAction);
        }
        return {
            actions
        };
    }
}
1.7 - Migrate use cases to Bot Framework 4.19
Migrate use cases to Bot Framework 4.19
Guidelines for the migration of use cases to Bot Framework 4.19, which is the version used by Aura’s upcoming architecture based on Microsoft skills protocol
Introduction
Due to Bot Framework Skills implementation in Aura, aura-bot components have been updated to use Microsoft Bot Framework version 4.19.0.
Therefore, local use cases must be migrated in order to be compatible with this version.
The guidelines for the migration of use cases are summarized in the current document.
:warning:
The upgrade to Microsoft Bot Framework 4.19.0. comes together with the upgrade of node and other aura-bot dependencies in order to make Aura work properly.
For this purpose, OBs must follow the guidelines Node and dependencies upgrade.
Changes for use cases migration
In this section, a list of mandatory and recommended changes are explained, but consider applying them both, as it will prevent future incompatibilities.
Mandatory changes
Bot Framework version
The following dependencies must be included in the package.json file and set to 4.19.0 version:
{
    "botbuilder": "~4.19.0",
    "botbuilder-dialogs": "~4.19.0",
    "botbuilder-core": "~4.19.0",
}
Joi version
Joi must be updated to version 17 in the use case package.json file:
Keep in mind that any package followed by @hapi/joi and its types should be removed from package.json:
{
    "@types/hapi__joi": "^16.0.12",
    "@hapi/joi": "16.1.5",
}
Aura components version
All components from @telefonica private npm’s repository must be updated to release version 8.
Here is an example of how they should be defined in a package.json file:
{
    "@telefonica/aura-bot-common": "^8.0.0",
    "@telefonica/aura-movistar-libraries-utilities": "^8.0.0",
    "@telefonica/aura-bot-library-util": "^8.0.0",
}
Recommended changes
In this section, changes which have been applied in the base code of aura-bot components are included.
⚠️ We highly encourage applying them, in addition to the mandatory changes.
aura-clients
There has been a big overhaul in client generation, using superagent 8, and in its auto-generation. In the document create/update an API client, the guidelines to use and generate them are included.
Our recommendation is to generate clients using these tools and use the already generated ones into your new developments.
eslint
We are migrating from tslint to eslint, due to its deprecation.
For this purpose, we recommend using our unified set of rules, which are defined in @telefonica/eslint-config-aura which can be found in npmjs.
Here is an example of how to apply this configuration to a project:
Jest
We are migrating from Mocha to Jest, which is our testing library.
We encourage developers to use it in new implementations.
Making HTTP/HTTPS requests
As a reminder, request and request-promise libraries have reached End Of Life and were deprecated 3 years ago.
The use of an alternative such as superagent 8 is highly recommended, as keeping using request and request-promise can expose vulnerabilities.
AuraLogging
The library @telefonica/aura-logging was modified internally, to increase performance and enhance usability. Minor modifications are required, in order to use the new interfaces, which simplify the instantiation process. Note that even though the new interface was added, and is the recommended way to use logging, the legacy system also works by now (it is deprecated, and legacy code will be removed in next versions).
We have to replace the old code, shown in the following snippet:
const logger = new AuraLogger.AuraBusEmitter('my-module');
With the new version:
const logger = new AuraLog('my-module');
On the other hand, it is recommended, but not necessary, adapting unit tests (in case the log calls are mocked), to mock the new interface.
Replace the code snippet shown below:
auraBusEmitterStub = stub(AuraLogger.AuraBusEmitter.prototype, 'emit');
With this one:
auraBusEmitterStub = stub(AuraLog.bus, 'emit');
1.8 - Migrate a use case to Evanescence 9.0.0 release
Migrate a use case to Evanescence 9.0.0 release
Evanescence 9.0.0 includes key modifications in aura-bot in order to keep Aura Platform up to date and improve its operation. For this reason, use cases dialogs created in previous releases must be migrated to be compatible with this version.
This document includes the guidelines for the migration of local use cases.
Introduction
Evanescence 9.0.0 release includes certain modifications and upgrades in botBuilder, nodejs version, Aura channels configuration, repos and libraries, etc. Due to these changes, use cases must be adapted in order to be aligned with the Aura Platform changes through the execution of mandatory and recommended modifications.
The modifications in aura-bot are summarized below, together with the required changes to execute in local use cases, which are fully detailed in succeeding sections:
- Update of Node.js to version 20.0.0, to keep Aura platform up to date.
- Update of Bot Framework version to version 4.22.1, to keep Aura platform up to date.
- Update Aura channel data model (information about channels stored in the platform) to eliminate the extra effort of maintaining the platform internal components using different channel data models.
- Reduction of the number of internal libraries to improve and streamline the platform release generation process:
- Update to eslint2024, Typescript, dependencies
Mandatory modifications
1. Change package.json file
Update the package.json file content as shown below:
{
    "name": "@my-registry/my-library",
    "version": "1.0.0",
    "main": "lib/index.js",
    "engines": {
        "node": ">=18.0.0"
    },
    "license": "UNLICENSED",
    "plugin": {
        "provides": [
            "my-service"
        ]
    },
    "dependencies": {
        "@telefonica/aura-bot-utilities": "^1.0.0",
        "@telefonica/aura-clients": "^1.0.0",
        "@telefonica/aura-utilities": "^1.0.0",
        "botbuilder": "~4.22.1",
        "botbuilder-dialogs": "~4.22.1",
        "joi": "^17.6.0",
        "moment": "^2.29.3"
    },
    "devDependencies": {
        "@types/jest": "^29.2.5",
        "@types/node": "^14.17.5",
        "@types/uuid": "^8.3.0",
        "jest": "^29.3.1",
        "jest-junit": "^15.0.0",
        "shx": "^0.3.3",
        "ts-jest": "^29.0.3",
        "ts-node": "^10.9.1",
        "typescript": "~5.0.0"
    },
    "scripts": {
        "build": "npm run clean && npm run compile",
        "clean": "cross-env shx rm -fR ./lib",
        "compile": "tsc"
    },
     "repository": {
        "type": "git",
        "url": "git@github.com:Telefonica/my-repository.git",
        "directory": "packages/my-library"
    }
}
2. Change use case dialog code
2.1 Due to Node.js update
- No necessary changes have been identified and the current code should run correctly on Node.js version 20.0.0.
- Some unit tests that make use of error messages generated by Node.js may need to be adapted.
2.2 Due to Bot Framework update
- No necessary code changes have been identified and the current code should run correctly with BotFramework 4.22.1.
- In any case, as shown in Section 1, Botbuilder dependencies must be updated in the
package.json of all libraries:
"dependencies": {

   "botbuilder": "~4.22.1",
   "botbuilder-dialogs": "~4.22.1"

}
2.3 Due to the use of the current channel model
Update use cases dialogs to replace the references to the old data model with the new one:
-
All the imports of import {AuraChannel} from '@telefonica/aura-bot-common' should be changed to import { ChannelConfiguration } from '@telefonica/aura-clients/lib/aura-configuration-api-client'.
-
Also, all channel models imported from channel-models.ts in @telefonica/aura-bot-common should be imported from @telefonica/aura-clients/lib/aura-configuration-api-client.
-
user.channel will change its model from AuraChannel to ChannelConfiguration.
- With this change, certain accesses to properties should be changed:
| Deprecated channel model field |
Current channel model field |
| channel.scopes |
channel.security?.authScopes |
| channel.purposes |
channel.security?.authPurposes |
| channel.outputMessageFormat |
channel.responseOptions?.outputMessageFormat |
| channel.fpaAuthIntegratedConfiguration.logoutCallback.channel_communication_query_params |
channel.security.federatedAuthentication.logoutCallback.queryParams |
| channel.fpaAuthIntegratedConfiguration.logoutCallback.channel_communication_endpoint |
channel.security.federatedAuthentication.logoutCallback.endpoint |
| channel.fpaAuthIntegratedConfiguration.logoutCallback |
channel.security.federatedAuthentication.logoutCallback |
| channel.fpaAuthIntegratedConfiguration.channelUserSeparator |
channel.security.federatedAuthentication.auraIdSeparator |
| channel.fpaAuthIntegratedConfiguration.channelCallback.channel_communication_query_params |
channel.security.federatedAuthentication.loginCallback.queryParams |
| channel.fpaAuthIntegratedConfiguration.channelCallback.channel_communication_endpoint |
channel.security.federatedAuthentication.loginCallback.endpoint |
| channel.fpaAuthIntegratedConfiguration.channelCallback |
channel.security.federatedAuthentication.loginCallback |
| channel.fpaAuthIntegratedConfiguration.accountLinkingUrl |
channel.security.federatedAuthentication.loginUrl |
| channel.fpaAuthIntegrated |
channel.security?.federatedAuthentication |
| channel.dialogs |
channel.dialogLibraries |
| channel.authentication?.anonymous |
channel.security?.anonymous |
| channel.alwaysSpeak |
channel.responseOptions?.sendSpeak |
| channel.allowUserProfile |
channel.security?.allowUserProfile |
2.4 Due to Aura libraries grouping
As Aura libraries have been grouped, it is required to update the imports in the use cases dialogs code:
| Old imports |
New imports |
Imports from @telefonica/aura-bot-common |
import * from @telefonica/aura-bot-utilities/lib/aura-bot-common |
Imports from @telefonica/aura-bot-library-util |
import * from @telefonica/aura-bot-utilities/lib/aura-bot-library-util |
| If using any of the Aura’s published API clients |
import * from @telefonica/aura-clients/lib/the-client-used
Check the current list of API clients in the document Aura API clients |
| If using any of the Aura’s published utilities |
import * from @telefonica/aura-utilities/lib/the-utility-used
Check the current list of utilities in the document: Aura utilities |
Recommended modifications
In addition to the mandatory changes outlined in the previous sections, we highly recommend implementing the following additional adjustments:
Update to eslint 2024
eslint version is updated to 8.57.0. It is recommended to upgrade this component.
Update Typescript
- Changes in
tsconfig:
- Remove unnecessary libraries defined in
lib field (DOM, etc.)
- The
target field should be set to es2022 to make use of the latest capabilities of Nodejs 20.0.0
- The
lib field should be set to es2023 (Typescript >= 5.2.2 is required)
{
    "compilerOptions": {
        "lib": [
            "ES2023"    // Typescript >= 5.2.2 is required
        ],
        "target": "2022",
        // ...
    }
    // ...
}
References:
Dependencies updates
Deprecations
-
Aura old channel model is deprecated.
Access here the current channel model.
-
The use of request and request-promise is deprecated.
The recommended dependency to use is superagent, but also got and axios are validated.
Further information: Making HTTP/HTTPS requests.
-
The use of zlib as a external library is deprecated.
The recommendation is to use the one included in node.js directly.
AuraLogger
Some releases ago, the version of AuraLogger was updated and, although the old version has been maintained until Dire Straits release, it will be removed in Evanescence release.
Please, follow the instructions for the new logger:
2 - Test a dialog
Test an Aura Bot dialog
Guidelines for the design and execution of unit tests for the validation of an Aura Bot dialog
Introduction
When developing a use case, and once the use case dialog is built, it is required to test the dialog in order to verify its proper performance in terms of the conversational flow between the user and aura-bot
.
This step is mandatory for the OB developers in order to merge their Pull Requests.
This task comprises three main steps:
- Generate the unit tests and place them on the use case library.
- Execute the unit tests through the Test Adapter that simulates sending messages from the user to the bot.
- Validate the dialog with the unit tests within an iterative process: if results are not satisfactory, the required modifications must be done in the dialog
.ts file.
Generate the unit tests files
-
Within the use case library, it is recommended that the unit tests files are placed in the folder src/ folder.
-
They should be named with the same name as the correponding dialog, which must be also included in this folder:
Dialog: <dialog-name>.ts ➡ Test file: <dialog-name>.spec.ts
-
Moreover, if auxiliary files are required for the tests, they can be optionally placed in a folder named /test.
📌 For a proper understanding of the unit tests for dialogs, it is recommended that developers check the source code of the Aura dialog greetings from the library common and its associated unit tests, as an example.
The code of these unit tests can be also used as a template for designing your own tests.
Execute the Aura Bot dialogs unit tests
For the execution of the unit tests, read the guidelines How to debug with mocha and Typescript.
3 - Package a use case
Package a developed use case
Guidelines for a use case packaging, previous to its deployment
Instructions for packaging a use case
Once a use case is developed, and previous to its deployment, the use case must be packaged.
The use case’s library should be packed as a .tgz file executing the following command from the library root folder:
$ npm pack
The outcome of the command is a .tgz file with the deployable code of the library.
Although the library was not published in npm registry, it is recommendable to update the package.json version field with every change, to be able to track the specific version being deployed in all the environments.
This package is the one that will be installed and tested in the minibot or delivered to the Local Operation Team to be deployed.
4 - Test a use case locally
Test a developed use case locally
Once the use case is developed, and prior to its deployment, it is required to test it in local environment. Learn how to do it in this document
Test a developed use case
There are two different options to test your brand-new use case:
- Using Aura Minibot locally, the recommended method.
- Through full bot local deployment.
Test a use case using Aura minibot
It is highly recommended to use Aura minibot for testing the use case in your local environment.
For this purpose, read the Aura minibot guidelines to know firstly how to install and run Aura minibot.
If you have already installed Aura minibot, go directly to section Develop a new use case to know how to import the use case library, after its packaging as a .tgz file.
Test a use case through full Aura Bot
Firstly, to work with full aura-bot, read the guidelines for the installation and configuration of full Aura Bot.
Now, test your use case following these instructions:
- Deploy the library to be tested. There are two options:
-
- Add the library
.tgz file to the file plugin-config.json (placed in the aura-bot-platform Github repository).
Note that manual addition of libraries to plugin-config.json file requires manual installation too:
npm install <library>
-
- Use the automatic script:
npm run import-libraries
This process will install any .tgz in aura-bot-platform/local_modules folder.
The previous command will add the library in package.json and plugin-config.json files and will install them into the project.
If a further configuration of the library is required (for example, disabling some dialogs), this must be done manually by editing plugin-config.json available at the root of the aura-bot-platform folder.
In the simplest case, plugin-config.json is an array of strings, each of them containing the name of the npm package of a library. It is the way used by aura-bot to configure the plugins that are going to be deployed in the runtime of each instance and is the format defined by the library used internally by aura-bot architect.
However, every element from this array can also be an object containing more information.
Note that the following two examples are totally equivalent:
[
    "@telefonica/aura-bot-bill-library",
    "@telefonica/aura-bot-common-library"
]
and
[
    {
        "packagePath": "@telefonica/aura-bot-bill-library"
    },
    {
        "packagePath": "@telefonica/aura-bot-common-library"
    }
]
When a package name is included in the plugin-config.json file, it is loaded when running the bot, and all the dialogs specified in the use case library file index.ts are loaded.
If for any reason, it is required to exclude one or more dialogs from the library, in order to not be loaded, they can be specified with the exclude property of the library, for example:
 [
    "@telefonica/aura-bot-bill-library",
    "@telefonica/aura-bot-common-library",
    {
        "packagePath": "@telefonica/aura-bot-other-library",
        "exclude": [
            "./first-dialog"
        ]
    }
]
In the previous example, all the dialogs from aura-bot-bill-library and aura-bot-common-library are loaded, as well as all the dialogs from aura-bot-other-library.
However, the dialog ./first-dialog is excluded (relative path, as specified within the index.ts file).
Max response times due to graceful shutdown policy (Recommendation)
Due to the infrastructure configuration, we recommend that the response time for the developed use cases should be less than the time configured in the AURA_SHUTDOWN_GRACEFUL_TTL aura-bot environment variable. If the message takes longer than the configured time, it could be lost due to aura-bot’s graceful shutdown policy, resulting in the user not receiving a response.
5 - Deploy a use case
Deploy a developed use case
Guidelines for the deployment of a new use case in Aura, in order to make it available for Aura users and the recommended checks to be done before deployment
Check points before use case deployment
Once the use case is developed and tested, and before its deployment, it is required to make certain verifications to assure its proper performance in the intended channel.
Check that the intended channel is enabled
aura-configuration-api must include an entry for each one of the desired channels the Aura users are going to use to interact with the aura-bot instance.
For example, if the Novum application is the intended channel, an entry such as the following one should be included in aura-configuration-api:
[
  {
    "name": "novum-mytelco",
    "prefix": "nov",
    "channel_id": "45494a5b-835a-4fff-a813-b3d2be529dbe"
    …
  }
…
]
At this stage, developers should validate with the local DevOps team that the channel name, prefix and identifier are the right ones. This channel identifier should be unique for the specific channel in Aura.
In case other channels are supported, additional entries such as the one provided in the example should be included.
Check that the required scopes and purposes are included
aura-configuration-api must include the Kernel scopes and the purposes granted for the user which are needed to cover all the enabled use cases (dialogs).
These scopes and purposes should include:
- The ones needed to get the user’s access token
- The ones needed to inject user’s information into the messages reaching the aura-bot instance
- The ones needed for the functionality implemented by each enabled use case.
The information regarding which scopes and purposes are needed can be located in the Kernel documentation website](https://developers.baikalplatform.com/) and, more concretely, in the specific sections for each Kernel installation made in every available environment for each specific country.
For example, in case of the Kernel User Profile API, for the production environment in Spain, the scopes and purposes information can be located at the Authentication section in User Profile (3.5.1). Notice the sections highlighted in bold on the previous URL to infer the specific URL to use for each concrete country and environment.
It is important to note that if the scope information is omitted, the requested access token is issued for all the scopes declared when the client application was created in the Kernel infrastructure.
An example of the scopes and purposes to be included into the concrete channel configuration to be able to invoke the previous APIs is the following one:
"name": "novum-mytelco",
    "prefix": "nov",
    "channel_id": "45494a5b-835a-4fff-a813-b3d2be529dbe",
    "fpa_auth_scopes": "device-catalog:devices-read device-stock:stock-read",
    "fpa_auth_purposes": "customer-self-service detect-abnormal-usage device-recommendations-v3 sim-upgrade-suggestion aura-read-insight-events identify-customer bolt-on-suggestion",
......
}
Two examples, for the Kernel User Profile API and the Subscribed Products API, are shown below, where scopes and purposes are found:
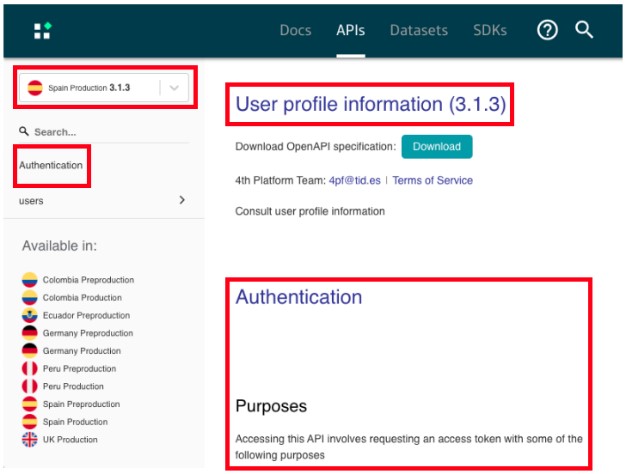
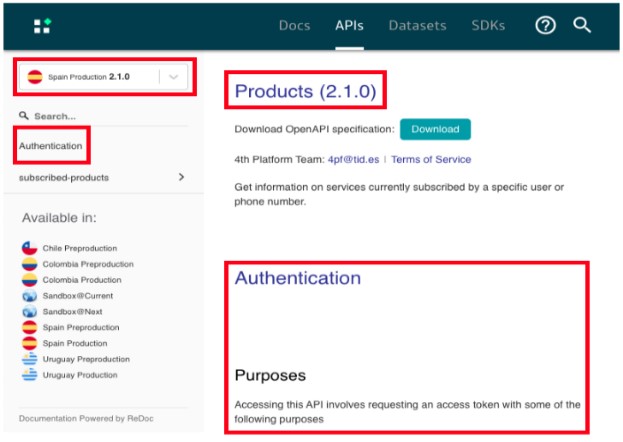
The following snippet shows how to indicate the scopes and purposes needed by an Aura user to execute all the dialogs within a library (if authorization setting is set at library level) or one of the dialogs (if set at dialog level), which are included in the dialog configuration (dialog-config.json.
These scopes and purposes are validated before making the correspondent API request to Kernel, to handle permissions errors beforehand and avoiding making a request that will fail in the end.
{ "id": "details-services",
      "suggestions": true,
      "authorization": {
        "purposes": "customer-self-service",
        "scopes": "subscribed-products-user-read"
      },
}
Deploy a developed use case
Once your developed use case is successfully tested in your local environment, provide the library’s .tgz file to your Local DevOps Team, which is responsible for the use case deployment.
This process will include the publication of the use case library and aura-bot make-up and running.