1 - Aura response errors
Aura response error messages
Sometimes, Aura could return some errors due to authentication or other APIs errors. This document describes the most common errors and how
clients should handle them.
Unauthenticated error
In some channels that require authentication, Aura could return an unauthenticated error if the auraId is invalid. In this cases, the client should
authenticate the user again and create a new auraId.
ChannelData v3 example:
        {
            "type": "message",
            "id": "4VJyNMnfcQLHuvOAbXMLAK-fr|0000005",
            "timestamp": "2024-06-27T14:01:24.9377437Z",
            "channelId": "directline",
            "from": {
                "id": "aura-bot-x",
                "name": "aura-bot-x"
            },
            "conversation": {
                "id": "4VJyNMnfcQLHuvOAbXMLAK-fr"
            },
            "text": "Desculpe, não consegui verificar suas informações. Por favor, reinicie o aplicativo e tente novamente.",
            "inputHint": "acceptingInput",
            "channelData": {
                "correlator": "5b25cd4a-aa57-420d-9fb3-8db437df01cf",
                "version": "3",
                "status": {
                    "code": "ERROR.USER.UNAUTHENTICATED",
                    "message": "Invalid aura user",
                    "params": {
                        "auraId": "asdf"
                    }
                }
            },
            "replyToId": "4VJyNMnfcQLHuvOAbXMLAK-fr|0000004"
        }
ChannelData v1 example:
        {
            "type": "message",
            "id": "4VJyNMnfcQLHuvOAbXMLAK-fr|0000003",
            "timestamp": "2024-06-27T14:01:07.7998256Z",
            "channelId": "directline",
            "from": {
                "id": "aura-bot-x",
                "name": "aura-bot-x"
            },
            "conversation": {
                "id": "4VJyNMnfcQLHuvOAbXMLAK-fr"
            },
            "text": "Desculpe, não consegui verificar suas informações. Por favor, reinicie o aplicativo e tente novamente.",
            "speak": "Desculpe, não consegui verificar suas informações. Por favor, reinicie o aplicativo e tente novamente.",
            "inputHint": "acceptingInput",
            "channelData": {
                "hasMoreMessages": false,
                "correlator": "593a44ac-3974-472b-a7e4-610b3c760679",
                "Error": {
                    "code": "UNAUTHENTICATED",
                    "data": "invalidAuraId",
                    "message": "Invalid auraId"
                }
            },
            "replyToId": "4VJyNMnfcQLHuvOAbXMLAK-fr|0000002"
        }
Too many requests error
In some cases, certain APIs could return an error 429 due to quota limits or other reasons. In these scenarios, the client should wait the returned
value of the parameter retryAfter and try again after this time.
ChannelData v3 example:
        {
            "type": "message",
            "id": "H2JRTbQW25d6Jyccs7PfEb-fr|0000007",
            "timestamp": "2024-06-27T14:08:26.8101993Z",
            "channelId": "directline",
            "from": {
                "id": "aura-bot-x",
                "name": "aura-bot-x"
            },
            "conversation": {
                "id": "H2JRTbQW25d6Jyccs7PfEb-fr"
            },
            "text": "Lo sentimos, ha ocurrido un error inesperado.",
            "inputHint": "acceptingInput",
            "channelData": {
                "correlator": "9df5cb1b-966c-4db4-9df8-e269c682a58b",
                "version": "3",
                "status": {
                    "code": "ERROR.API.TOO_MANY_REQUESTS",
                    "message": "Too many requests",
                    "params": {
                        "retryAfter": "10"
                    }
                }
            },
            "replyToId": "H2JRTbQW25d6Jyccs7PfEb-fr|0000006"
        }
ChannelData v1 example:
        {
            "type": "message",
            "id": "H2JRTbQW25d6Jyccs7PfEb-fr|0000009",
            "timestamp": "2024-06-27T14:08:45.5260908Z",
            "channelId": "directline",
            "from": {
                "id": "aura-bot-x",
                "name": "aura-bot-x"
            },
            "conversation": {
                "id": "H2JRTbQW25d6Jyccs7PfEb-fr"
            },
            "text": "Lo sentimos, ha ocurrido un error inesperado.",
            "speak": "Lo sentimos, ha ocurrido un error inesperado.",
            "inputHint": "acceptingInput",
            "channelData": {
                "hasMoreMessages": false,
                "correlator": "cd06e100-7783-46e8-8051-ee99e8b72f43",
                "Error": {
                    "code": "TOO_MANY_REQUESTS",
                    "data": {
                        "retryAfter": "10"
                    },
                    "message": "Too many requests"
                }
            },
            "replyToId": "H2JRTbQW25d6Jyccs7PfEb-fr|0000008"
        }
2 - Build Aura response texts
Guidelines for building Aura response texts
When developing a use case, discover how to generate the texts included in each element of the response that Aura provides to its users. Texts are generated with POEditor and imported into Aura Bot.
Process at a glance
. Search the specific text by library or resource name
. Edit the text with the message to be shown to the user
. Install aura-locale-importer tool
. Upload locales to Aura Bot through this tool
Introduction
When a new use case is developed, it is necessary to design Aura response for each step of the use case conversational flow. The answer, depending on the channel, can include text, cards, graphic resources, deeplinks, suggestions and actions.
The current section focuses on the text included in each element of the use case response.
Basic concepts
Get familiar with these basic concepts when designing your Aura response:
- POEditor
For the generation of the text included in each response element, Aura relies on POEditor.
POEditor offers a centralized localization tool to handle the different messages that the bot shows to the customer and to adapt them to a specific language.
-
POEditor project
Global project (for global use cases) or local project (for local use cases) to work in.
-
Term
Prototypical phrase of the resource to be able to locate it easily.
It is composed of a reference (resource), a context and n texts (translations).
-
Reference (resource)
It is the resource ID. Mandatory field for the subsequent importation of the term into the locales.
A resource is an aura-bot element for the generation of the required text in every component of Aura response.
aura-bot resources are organized in libraries of dialogs. Each resource is associated to a copy.
References must not contain spaces, they should be written all together or use kebab-case in the resource name.
-
Translations
Texts containing the translations of each language where the resource is to be used.
They correspond to the texts that Aura shows to the user in a specific field of Aura response in the selected channel containing the answer to the user’s request.

Depending on the use case type, different projects and tasks must be carried out:
Content managers should edit texts in POEditor both for global and local use cases. Meanwhile, the generation of new resources is only required in local use cases.

Once texts or resources are modified, they are automatically imported to aura-bot during the make-up process into the settings/locale folder of the use case library.
Enter POEditor
In order to use POEditor, a license is required. Therefore, the first step is the registration of a POEditor account, if not existing, in the POEditor website.
Once registered, access your local POEditor project.
Generation of resources in POEditor
A resource is an aura-bot element needed for the generation of the required text in every component of Aura response and its subsequent importation into Aura locales.
In this particular case, for local use cases, OBs are able to generate their own resources.
Resources naming conventions
The general format for Aura resources (references in POEditor) is composed of the mandatory name of the library followed by different prefixes:
➡️[library]:[ENVIRONMENT].[CHANNEL].[SUBSCRIPTION_TYPE].[resourcename]⬅️
. Bold: mandatory fields
. Italics: optional fields
-
[library]: mandatory field. Name of aura-bot library where the resource is contained.
The library name must be the same as the name of the library that is being exported and must be configured in the locale-update script of the package.json file where the library is declared.
-
[ENVIRONMENT]:name of the environment. This is an optional field for the aura-bot resource that can be used in case it is required to show the user a different text in different environments.
If this field is not existing, the same resource is used for every environment.
The field must include the prefix of the environment (in uppercase): PRE or PRO. DEV show the same texts than PRO.
-
[CHANNEL]:name of the channel. This is an optional field for the aura-bot resource that can be used in case it is required to show the user a different text in different channels.
This field must include the prefix of the channel (in uppercase): NOV, MH, MP,STB, STBH.
If this field is not existing, the same resource is used for every channel.
-
[subscriptionType]: optional field. Different texts can be defined for each user’s subscriptionType, particularly: POSTPAID, PREPAID, CONTROL.
They must be included in uppercase.
If this field is not existing, the same resource is used for every subscription type.
-
[resourcename]: Name of the intended resource. It can include as many parts as needed to describe the resource. It can be expressed in a single word with lowercase (resourcename) or using kebab-case (resource-name).
For example: services:services.usage.summary.
The following table shows some examples of bot resources and their associated copies in Aura:
| Aura domain |
Resource name (reference) |
Description |
Example of copy |
| Bundle |
services:services.find.oneservices |
Text associated to this resource is shown for every environment, channel and subscription type. |
You´ve got %1$s contracted |
| Bundle |
services:PRE.POSTPAID.services.usage.summary |
Text associated to this resource is shown to users with subscription type postpaid in PRE environment |
Let’s take a look. You’ve got %1$0.2f %2$s of data left, from your %4$0.2f %5$s allowance on %3$s, until %6$s. |
| Billing |
bill:bill.check.genericCardText |
Text associated to this resource is shown for every environment, channel and subscription type. |
Let’s take a look. You’ve got one bill. It´s 2f%1$s.%2$0 |
| Billing |
bill:billing.topup.voucherincomplete |
Text associated to this resource is shown for users in every environment and for every subscription type. |
Top-up is not done |
For each resource, there are certain pre-defined constraints (for example, the maximum number of characters) and determined variables which are common to every defined resource. The following table shows an example of these concepts.
| Resource |
Variables |
Copy (response text) |
| services:services.usage.summary |
%1$0.2f = Real Number, available data
%2$s = Text, measuring unit for data
%3$s = Text, name of bonus or plan
%4$0.2f = Number, total data of bonus or plan
%5$s = Text, date |
Let’s take a look.
You’ve got 5.5 GB of data left, from your 20 GB allowance on Custom plan, until 07-05-2019. |
Precedence of prefixes
Resources are managed using a resolution matrix based on “from general to specific”. This means we will always have a generic resource in order to provide an answer to the user and, once we got it, Aura looks for a specific one if exists.
The order in the format reference is important to make the resolution matrix works properly. In this framework, the precedence of the prefixes is (from higher to lower):
- SubscriptionType
- Channel
- Environment
The order in which the different combinations of prefixes must be checked for strings depends on the specificity (the number of matched prefixes) and the previously defined precedence order.
For example, given:
- library = “services”
- subscriptionType = “POSTPAID”
- channel = “TEST”
- Environment = “PRE”
- key = “title”
The order of checking for matching terms must be the following (choosing the first existing translation):
- services:PRE.TEST.POSTPAID.title
- services:TEST.POSTPAID.title
- services:PRE.POSTPAID.title
- services:PRE.TEST.title
- services:POSTPAID.title
- services:TEST.title
- services:PRE.title
- services:title
See also how it is implemented in the locale manager.
Generation of a new resource in POEditor
⚠️ Remember that, for adding a new resource in the POEditor project, you need admin grants.
Follow the next steps:
- Access the main page of POEditor and enter the username and password to access to the Local projects and choose the project to work on.
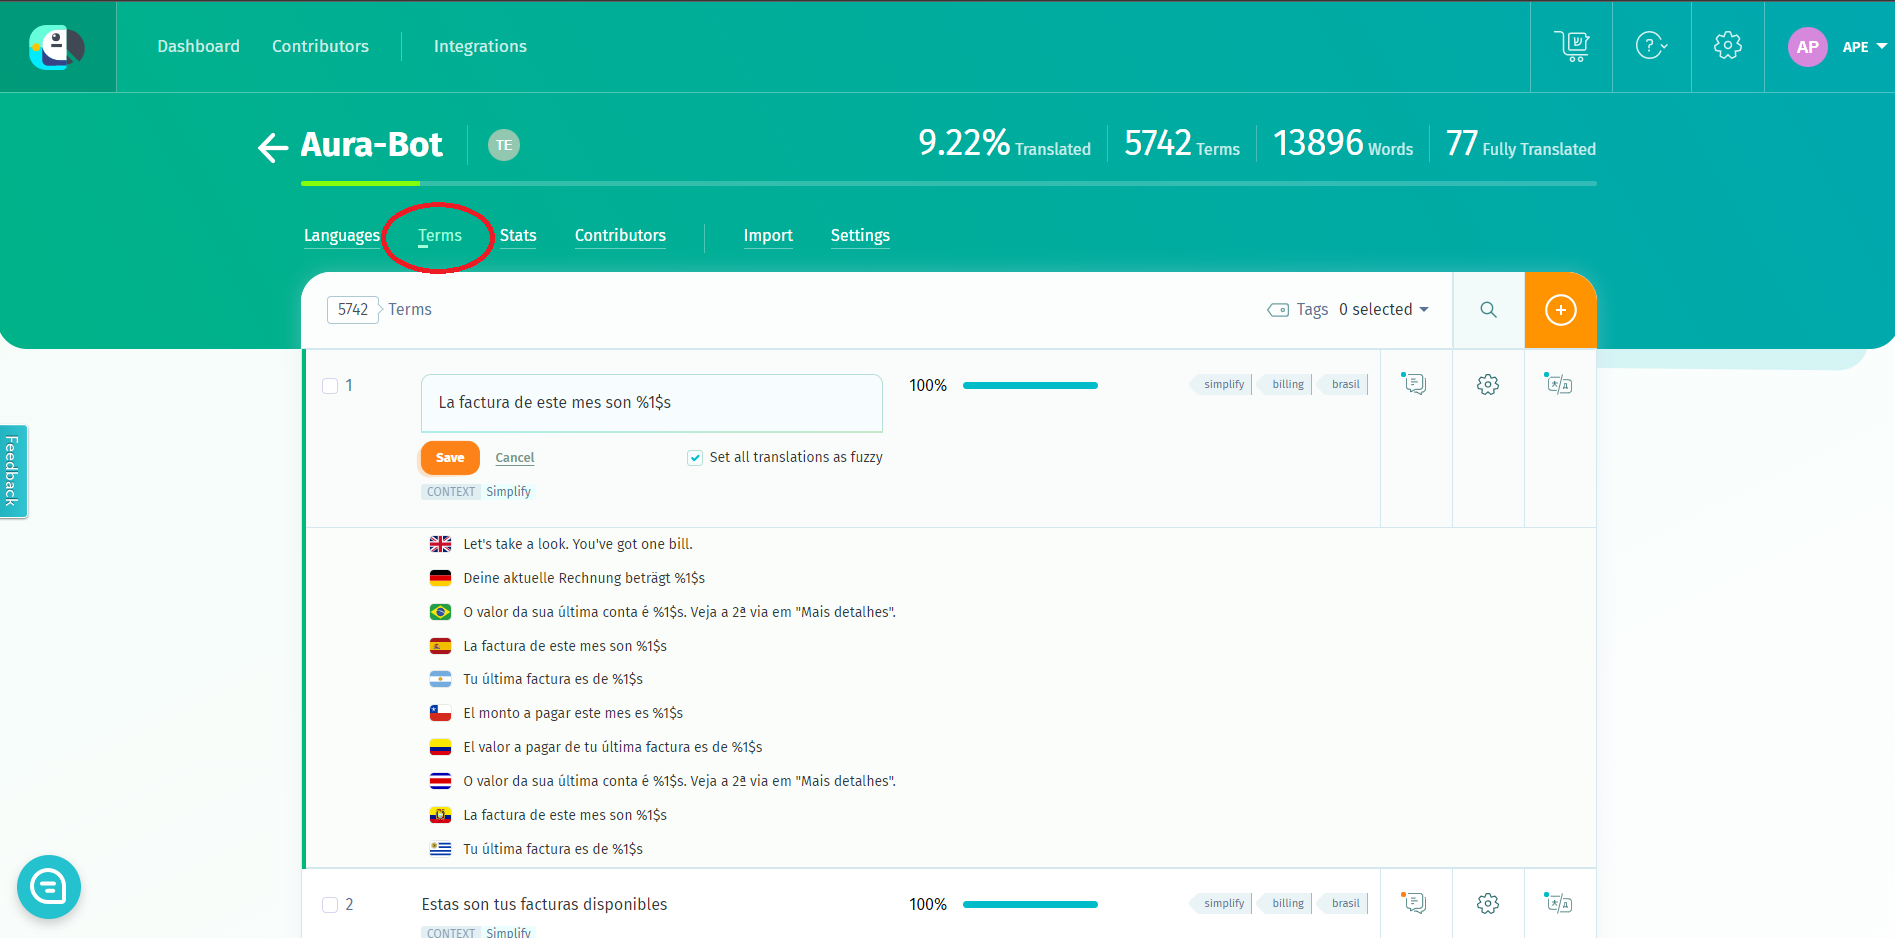
- Select your POEditor local project and access the “Terms” option. You can see all the existing resources or search by library or name.
Note that you should access “Terms” at project level (aura-bot in the example below), not for a specific language.
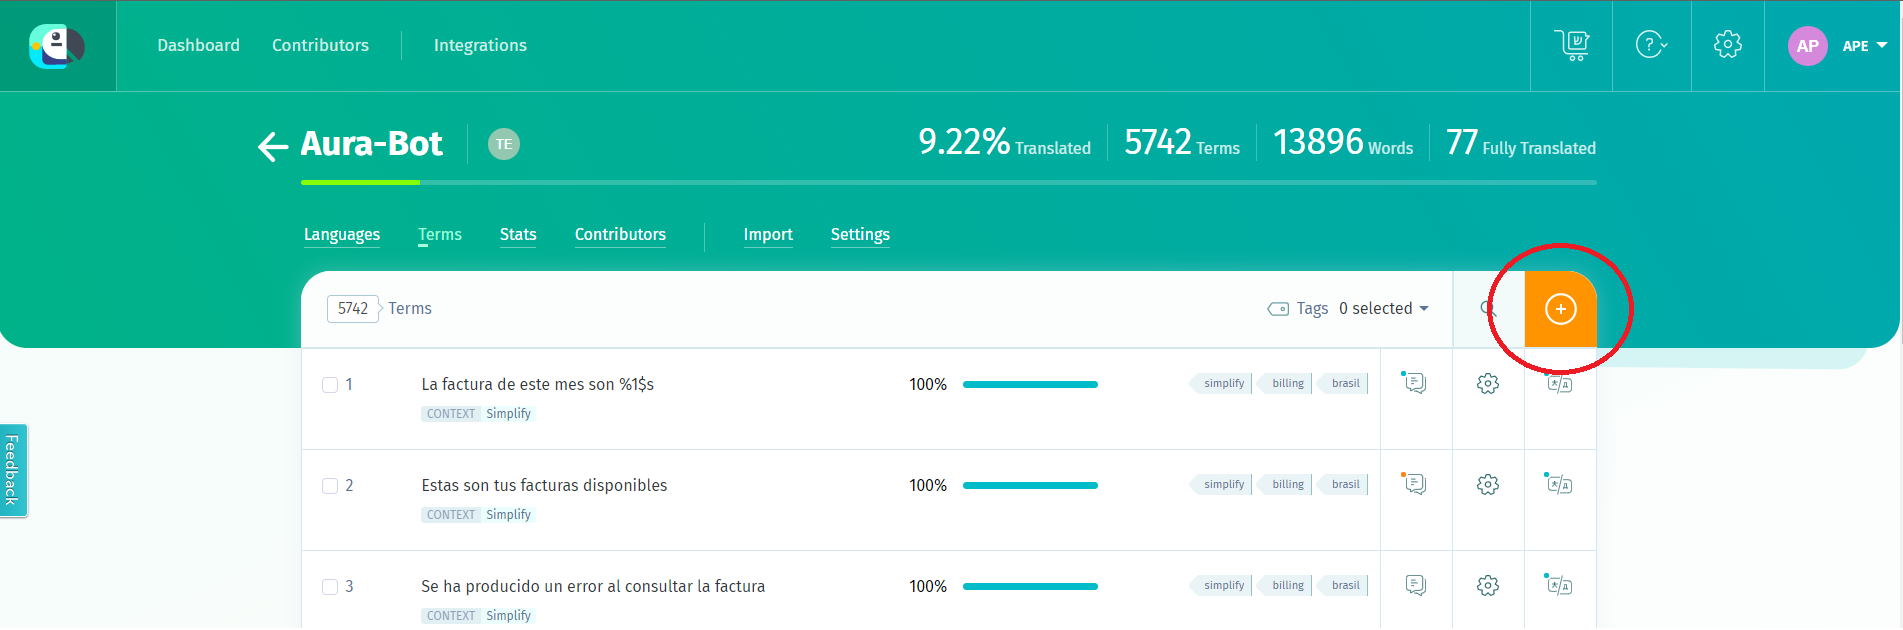
- Click on the “Add Term” button. In this field, the new resource must be added.
- Add the resource name, following the resources naming conventions.
- Optionally, you can add a context in the “context” field for the categorization of the resource. It is useful for further searching purposes to include the name of the library here.
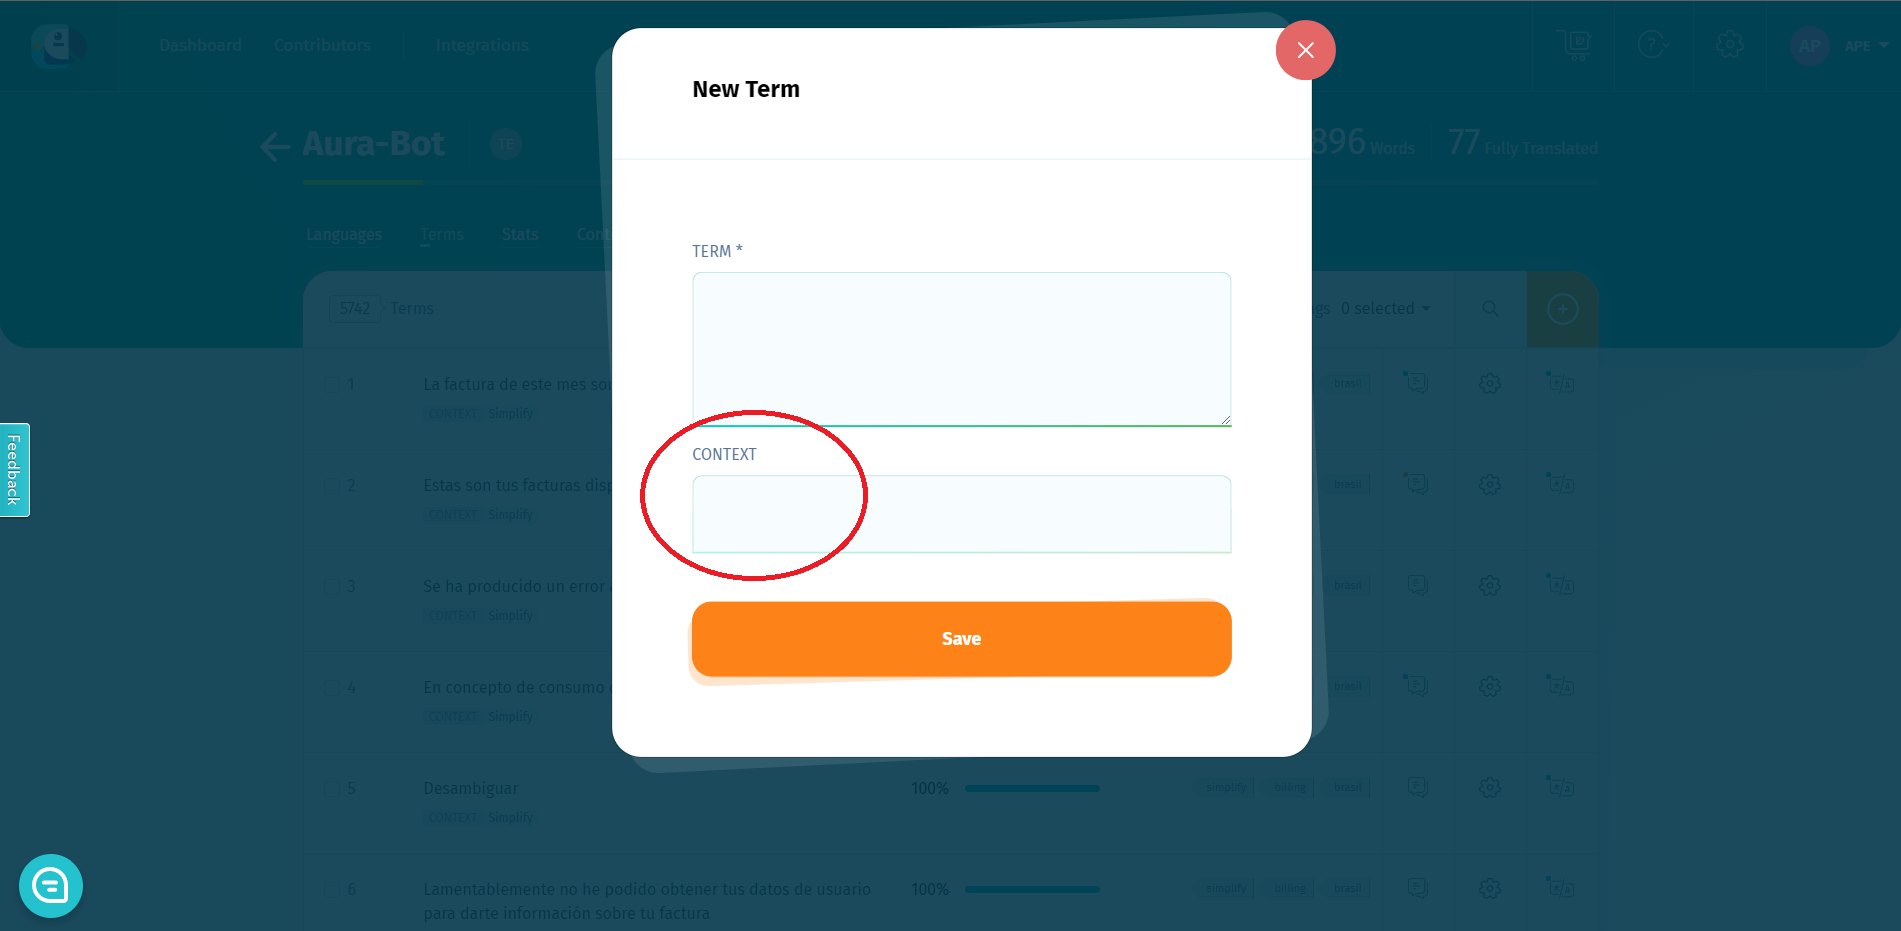
- Save the resource, so it is created and added to the project.
- Now, use the buttons in the right to fill in other fields:
-
“Reference”: it can be added by clicking on the gear icon placed on the right hand side of the term. It should be the same as the name of the resource. It is important to fill in the “Reference”, as Aura uses it to import the resource into aura-bot.

-
“Translations”: text for each different language.
-
“Comments”
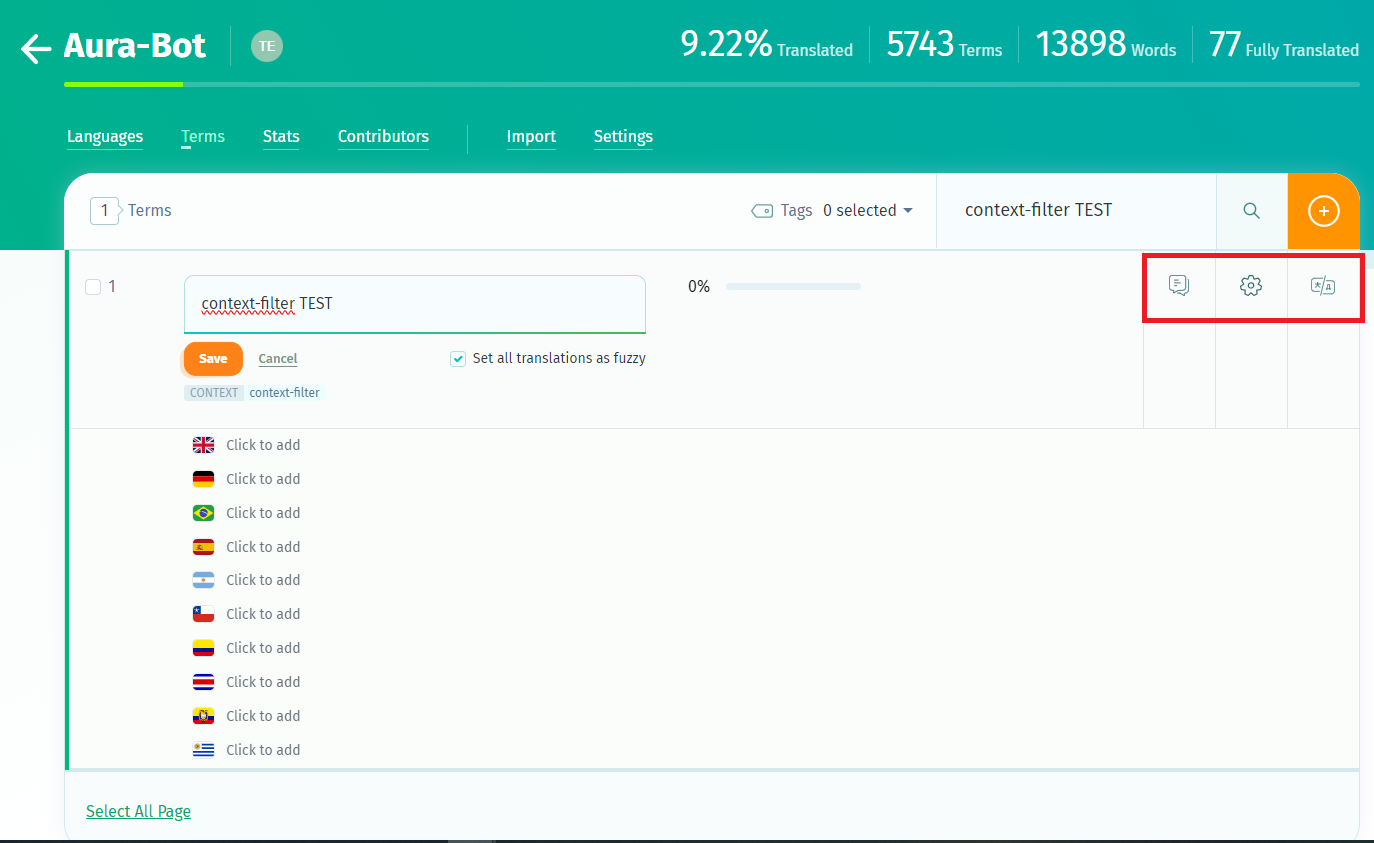
-
In order to check and modify references, please click the “R button” to the right of each term.
-
In order to check or edit all translations, please click the “T box”.
Resources for context filters and errors
There are special resources corresponding to errors or context filters that can be shared between libraries.
The recommended way to add these resources is to duplicate them in every library that uses them.
For example, if we want a new error message to be sent when an API fails in two libraries (my-lib-1 & my-lib-2), we will add 2 resources:
- my-lib-1:errors.api-error
- my-lib-2:errors.api-error
In the case of context-filters, the format of the references will be, for example:
- my-lib-1:context-filters.annonymous.not.allowed
- my-lib-2:context-filters.annonymous.not.allowed
There is another way to add these resources:
- Sharing the same resource BY adding it to a general [library] like:
- “ob-errors” (ob-errors:api-error) or
- “ob-context-filters” (context-filters:annonymous.not.allowed)
- Importing it in every use case library that uses it.
However, this last method has certain problems, because you need to add the new [library] to the
aura-locale-importer command with the flag –b like this:
aura-locale-importer -u -j Aura-Bot -b my-lib-1,ob-errors -d ./settings/locale -m library -f
Edition of texts in POEditor
At this stage, you have to edit the text (copy) of the existing resources associated with the use case under development or to translate the text to one specific language.
For this purpose, follow the instructions below:
-
Enter your local POEditor project and then click in the desired language. All the resources and its associated texts are shown.
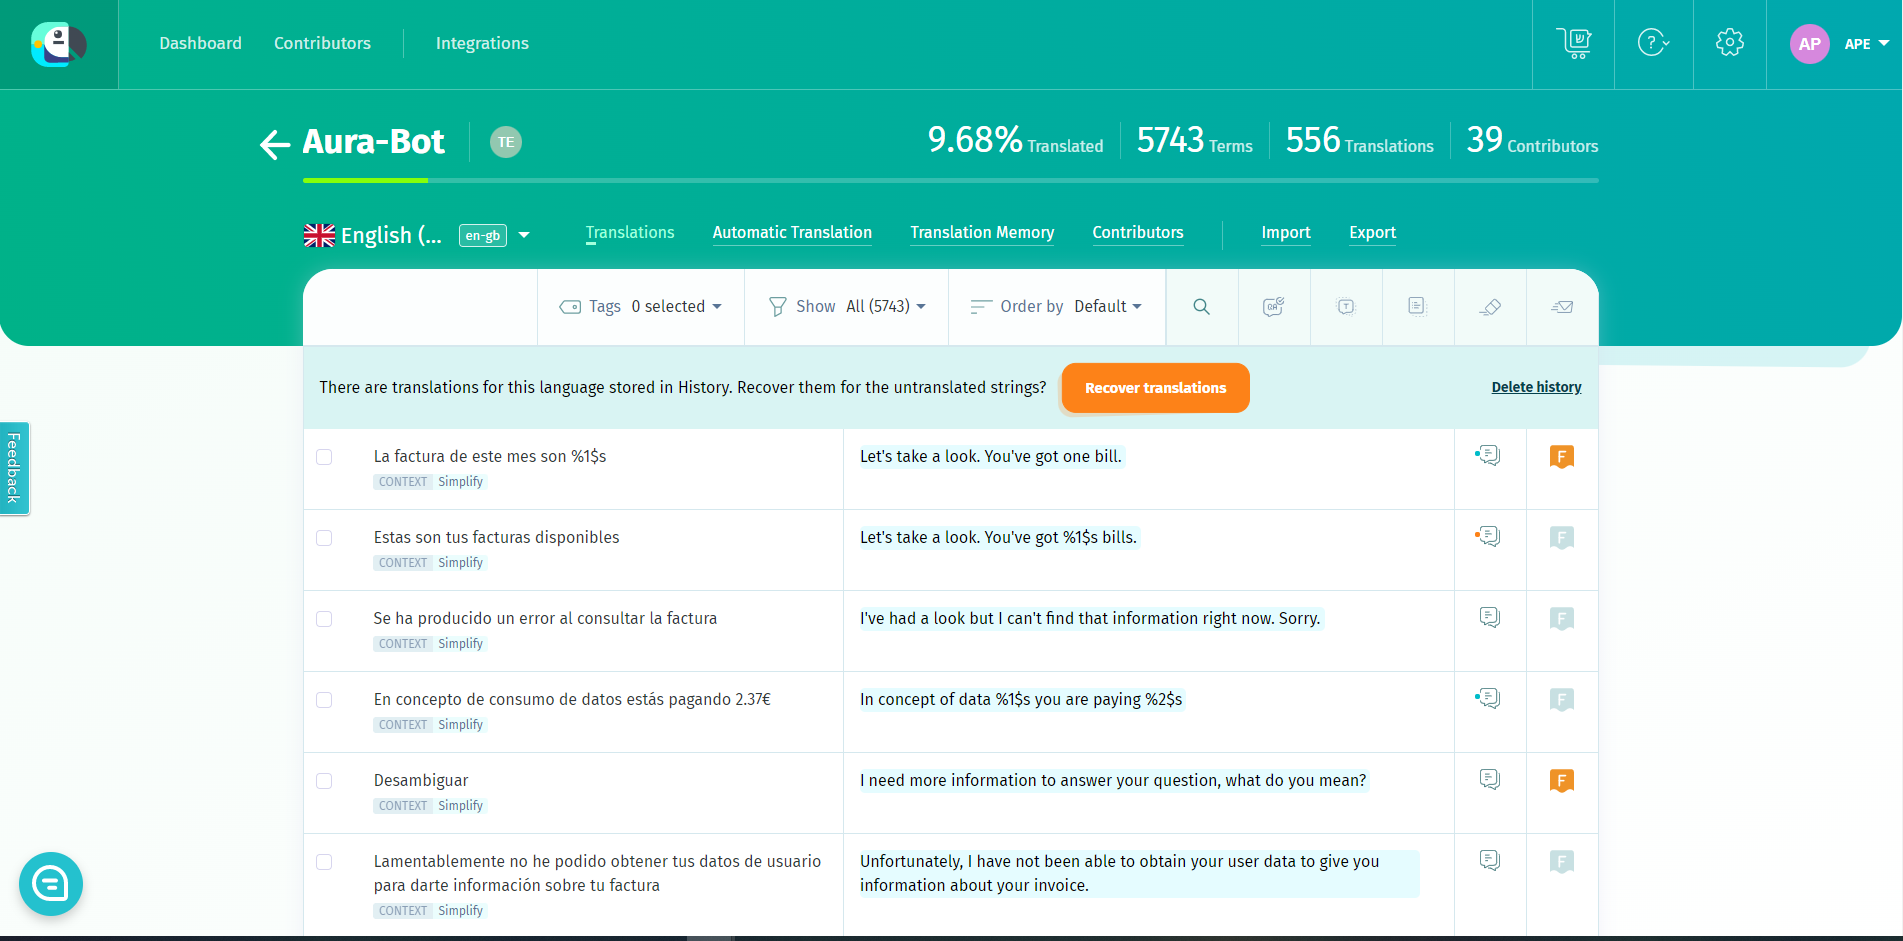
-
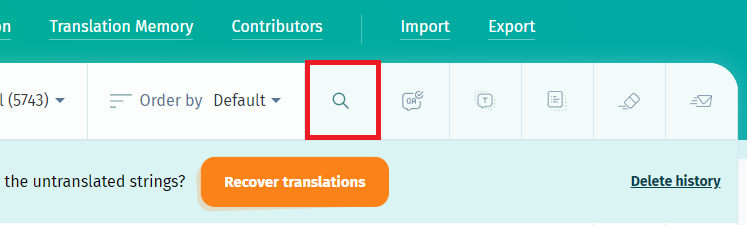
To find the text to be edited, there is a search box in the top-right corner of the POEditor interface.
It is possible to search by key or part of a key of the resource (spanish translation of the term), or full or partial reference (key used in aura-bot for that term).
-
In case it is required to edit, for example, all strings concerning to account linking, search “account.linking”, which is the leading part of those strings.
Each text can be edited just by clicking on the translation and modifying the text afterwards.
-
To find a term in a specific library, use the pattern “library_name”:

The edited texts are uploaded to aura-bot when deploying the corresponding Aura release.
Random alternative texts
aura-bot is able to show several alternative options of the same resource randomly. This behavior is provided as a platform feature and it only depends on the way the locales are defined in POEditor.
The main idea is to add as many terms as alternative texts needed, keeping the same reference, as can be seen in the following picture.
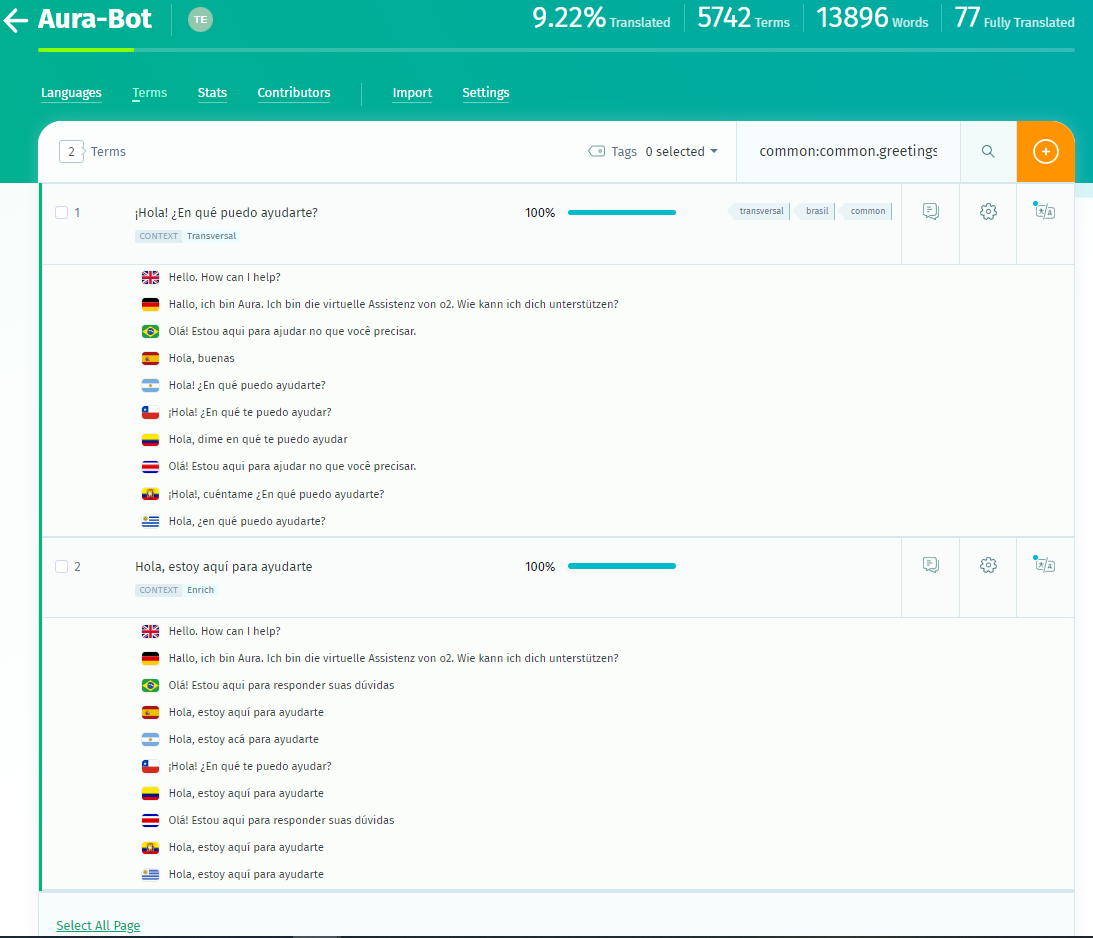
When the locales are read from POEditor API to be handled by aura-bot, an array of alternatives for the given reference are stored in the locale files of the use case:
"common:common.greetings.main":[
    "Hello"
    "Hello, I am here for helping your"
],
Then, when building the response, aura-bot will return one of the options randomly.
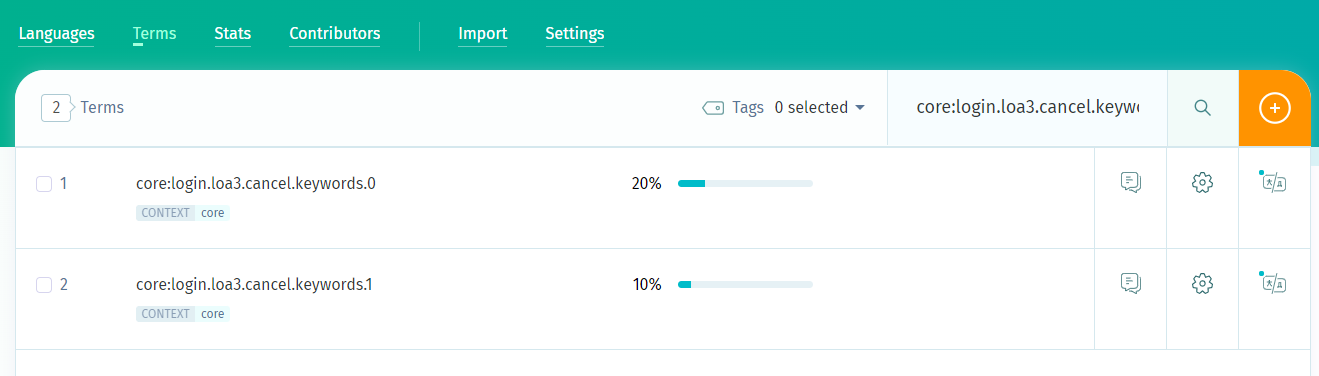
Sorted texts
aura-bot is able to export sorted options of the same resource. If you want to guarantee the order in which the resources will be exported you have to define the resources in POEditor with numerical names(terms) starting at 0 and the same reference.
For example
    core:login.loa2.cancel.keywords.0
    core:login.loa2.cancel.keywords.1
It will be exported as:
"core:login.loa2.cancel.keywords":[
    "close" (core:login.loa2.cancel.keywords.0)
    "cancel" (core:login.loa2.cancel.keywords.1)
],
This way ensure that the terms will be exported in order to the corresponding file.
Import locale files
We recommend using [aura-locale-importer() tool, a utility developed by Aura Global Team that allows locale files importation from POEditor.
- Install aura-locale-importer tool:
- Log in NPM to download the private NPM package dependencies. You can log in with user/password or using the token:
-
User/password -> npm login
-
Token -> Add the token to your environment variables on your machine. Follow the guidelines for mac/linux.
ℹ️ developers should request the token for the installation of the aura-locale-importer tool from the APE Team.
- Go to your use case library repository and enter the
package.json file. This file contains the scripts of the project.
- Go to the field
locale-update and add the following command:
aura-locale-importer -u -l <language-country> -j <POEditor project> -b <my-library> -d <local-directory> -m library -f –t <token>
Where:
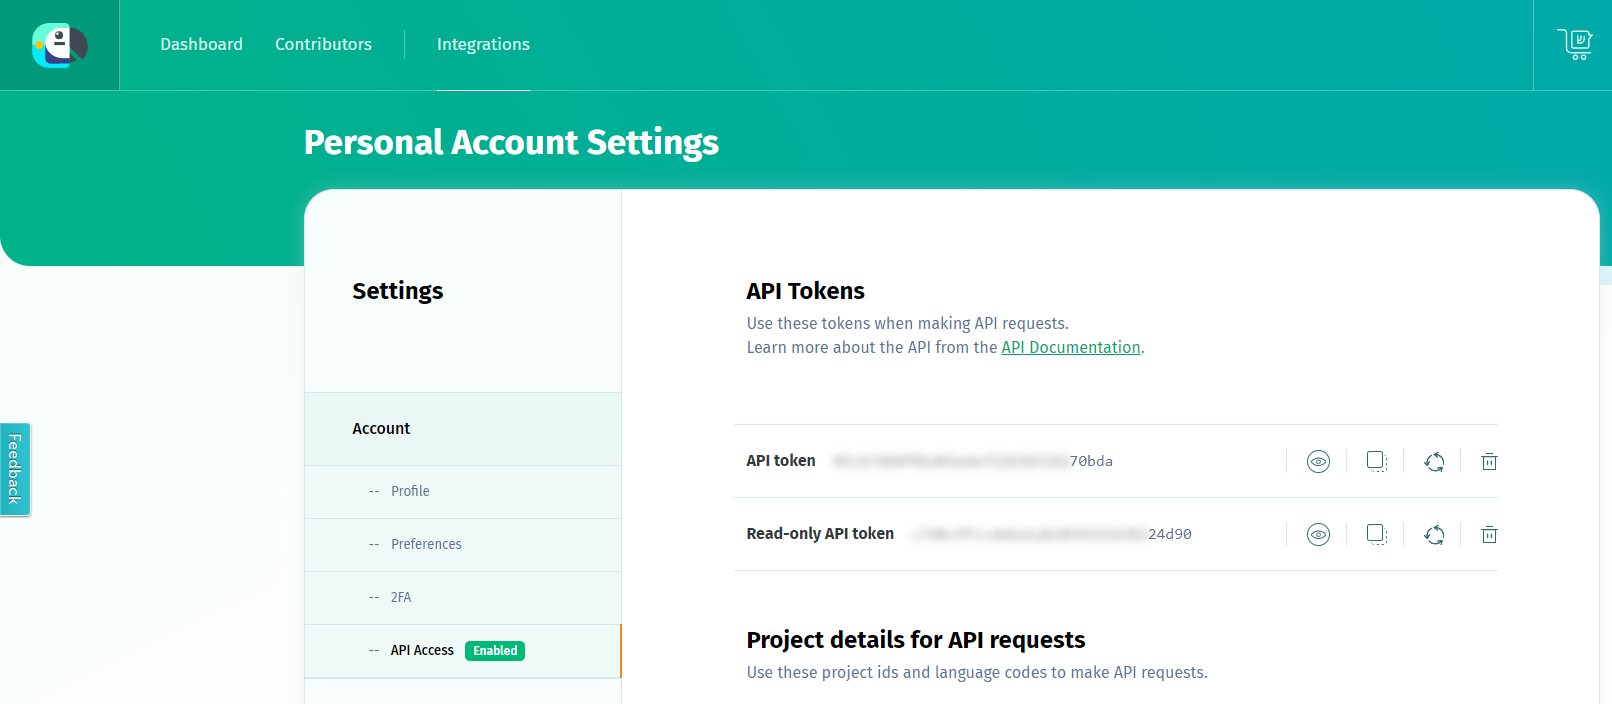
-l <language-country>: country translation e.g., en-gb. If this field is empty, the system imports every translation file.-j <POEditor project>: POEditor project to be used:
. For global use cases: Aura-Bot project (global project)
. For local use cases: name of the OB’s local project-b <my-library>: all the libraries to be uploaded by aura-bot. For example: context-filter, core, errors, suggestions, etc.-d <local-directory>: local directory where result files are uploaded.-f: this parameter forces the files overwriting.-m library: it indicates the way of working. For the current release, it must be library.-t <token>: read-only API token to access to POEditor.
- For local use cases, the local responsible of the POEditor website must, at this stage, provide you with the API token:
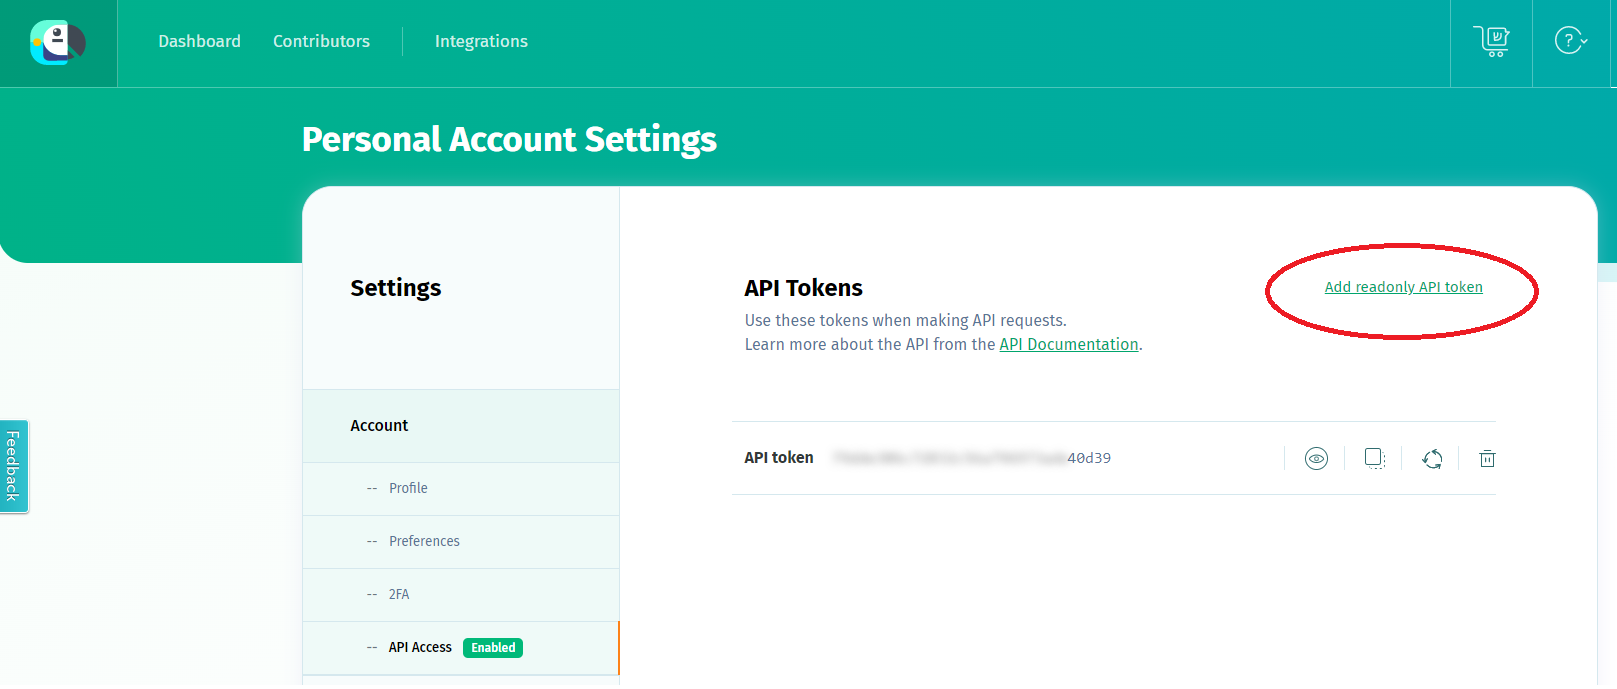
 - Once you have the token, you can follow two different processes:
- Define it in the environment variable
- Once you have the token, you can follow two different processes:
- Define it in the environment variable $POEDITOR_TOKEN in the host running the process. In this case, this command should not be included here.
- Add it in the current command within -t <token>
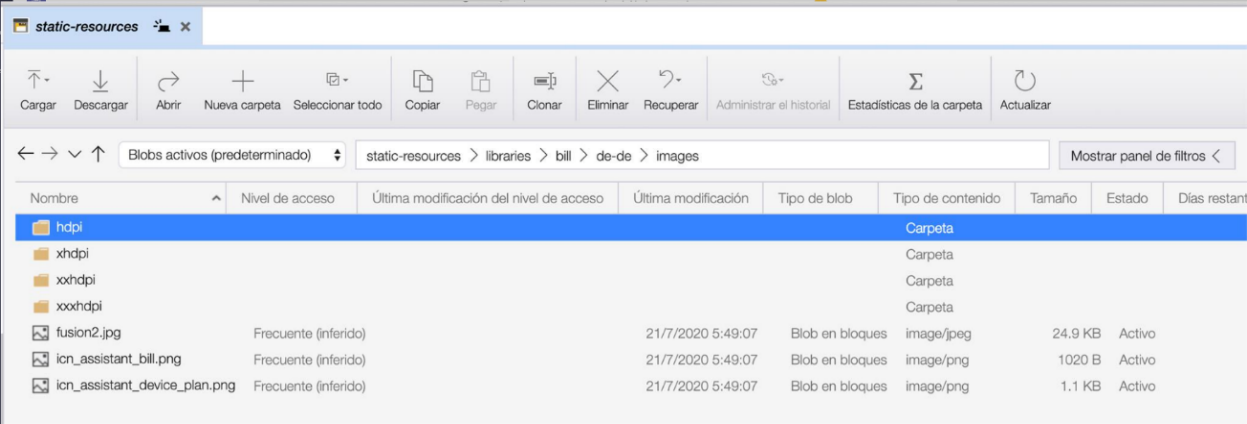
An example for a local use case in Germany is shown below:
-
This command generates the locale files for the “bill” library that fulfil the conditions established in the parameters above:
$ aura-locale-importer -u -l de-de -j Aura-Bot-De -b bill -d ./locale -m library -f –t f9023005c8792e57d3593511b69c300e
-
This command lists the content of the locale folder in the aura-bot project:
$ ls .locale
-
The output can be one of these:
de-de.json en-gb.json es-es.json pt-br.json
Once the texts and resources are imported following the process above, when a new version of the library is generated, they are automatically integrated during the make-up process.
Management of locales for intents’ canonical phrases
The management of canonical phrases for CLU intents has been implemented in POEditor, as intents must have a canonical phrase to be able to disambiguate with them.
To do this, follow the guidelines in Manage locales for canonical phrases of intents.
Hot swapping process for the update of POEditor texts
It is possible for aura-bot to load new text locale files through a hot swapping process without service outage in order to have the updated texts available in the period between one release and the consecutive one.
For this purpose, the aura-configuration-updater allows making these modifications by providing the updated locales to your local DevOps Team.
In case developers have the need of making modifications to locales belonging to aura-bridge or aura-configuration-api because of the requirements of their use cases, they can follow the process specified in the document locales-managing.
3 - Build Aura response cards
Guidelines for the design of cards in Aura response
Discover how to design different types of Microsoft cards and include them in the response that Aura provides to its users
Introduction
A card is a visual element that brings context to the answer in Aura response. It can contain images, graphic resources, texts and buttons and, through these elements, acts as a useful tool to summarize the information and present it in a structured and friendly-user way.
The design of the card in Aura response can be done through different tools, depending on the specific channel and its rendering capabilities.
Two types of cards can be rendered by the most common Aura channels:
- Microsoft Adaptive Cards: tool that provides developers an open card exchange format for the design of a customizable card content in a consistent way.
- Hero Cards: they typically contain a single large image, one or more buttons and text, providing a flexible layout.
- Moreover, there are other different data exchange formats in Aura such as custom JSON model, JSON response model or ZIP response model.
The procedure for declaring Adaptive Cards and Hero cards in a use case’s dialog is fully explained in the following sections.
There is a set of new utilities that you can use when working with these two types of Cards, included in the Microsoft Documentation: CardFactory class.
Microsoft Adaptive Cards
Microsoft Adaptive Cards is a tool that provides developers an open card exchange format for the design of a customizable card content in a consistent way.
For the generation of an Adaptive Card and its inclusion into aura-bot when developing a use case, developers should follow the steps shown below:
-
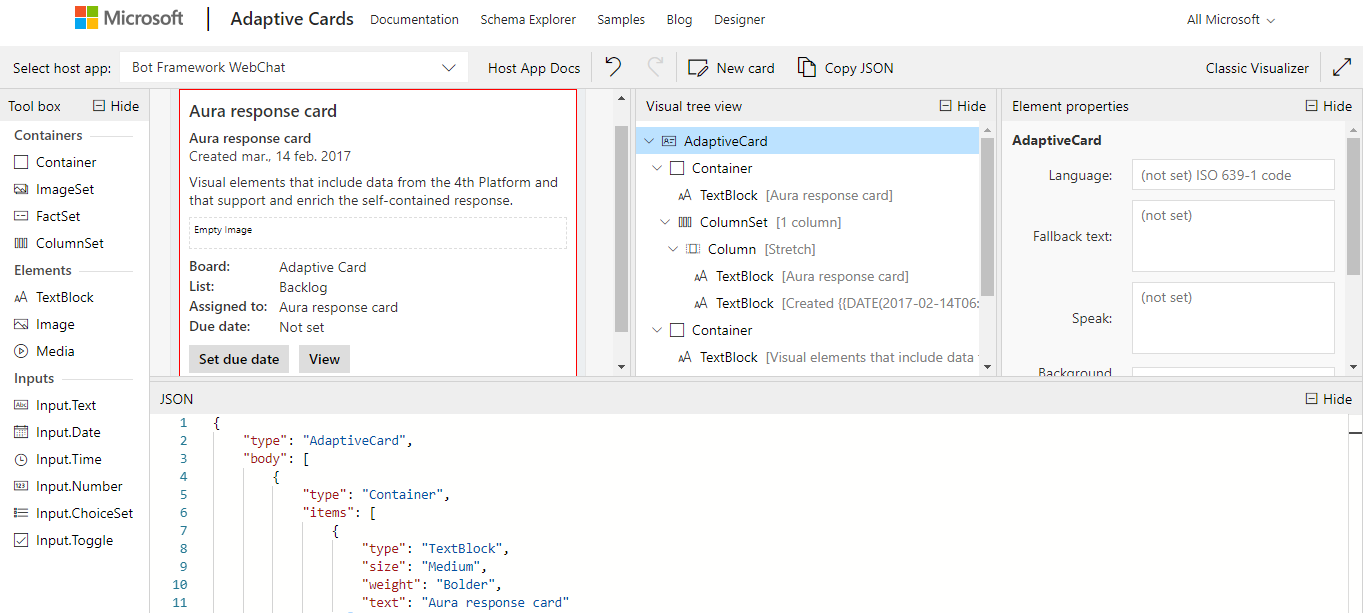
Design the Adaptive Card through the Adaptive Cards designer, that includes a simple drag and drop interface as shown in the following figure.
ℹ️ Developers in charge of building Aura response are kindly requested to read the Adaptive Cards documentation in order to understand how to design a card.
-
Once the card is designed, automatically, the design parameters and texts are loaded in a JSON file.
- Copy the generated JSON file in the Adaptive Card designer and paste it in the source code of the use case dialog.
It is recommended to copy it in
[dialog-name]-util.ts for a proper readability of the dialog files.
An example is shown below, where:
contentType: this field must be filled in with the following value:
'application/vnd.microsoft.card.adaptive'content: the JSON object generated in Microsoft Adaptive Cards card payload editor must be included in this field.
export function getIssueCreationConfirmationAdaptiveCard(stepContext: WaterfallStepContext, localizer: LocaleManager,
    description: string, configuration: Configuration) {
    const correlator = ContextUtils.getCorrelator(stepContext.context);
    const auraUser: AuraUserBaseModel<any> = ContextUtils.getAuraUser(stepContext.context);
    const issueCreationConfirmationAdaptiveCard = {
        contentType: 'application/vnd.microsoft.card.adaptive',
        content: {
            type: 'AdaptiveCard',
            version: '1.0',
            body: [{
                type: 'ColumnSet',
                columns: [{
                    type: 'Column',
                    width: 'auto',
                    items: [{
                        type: 'Image',

                        url: DialogUtils.getResourcePath('issues', 'images/icn_assistant_issue.png', configuration)
                    }]
                }, {
                    type: 'Column',
                    items: [
                        {
                            type: 'TextBlock',
                            text: localizer.getText('issues:issues.common.issue', auraUser, correlator),
                            size: 'medium',
                            weight: 'bolder',
                            horizontalAlignment: 'left'
                        }
                    ]
                }
                ]
            }, {
                type: 'ColumnSet',
                separator: true,
                spacing: 'medium',
                columns: [{
                    type: 'Column',
                    items: [{
                        type: 'TextBlock',
                        text: description,
                        size: 'small',
                        wrap: true,
                        maxLines: 5,
                        horizontalAlignment: 'left'
                    }]
                }]
            }] as any[]
        }
    };
    return issueCreationConfirmationAdaptiveCard;
}
- If specific graphic resources are included in the card:
-
4.1. Follow the procedure defined for the generation of graphic resources in Aura response for static resources or dynamic ones.
-
4.2. Declare the resource in the URL field of the card JSON file.
url: DialogUtils.getResourcePath('library_name', 'image_name', configuration)
In the previous example:
`url: DialogUtils.getResourcePath('issues', 'images/icn_assistant_issue.png', configuration)`
-
4.3. In order to get a complete URL, including device screen resolution, invoke getImageUrl from the library aura-bot-library-utils if the image has got several resolutions (instead of getResourcePath).
Microsoft Hero Cards
Hero Cards typically contain a single large image, one or more buttons and text, providing a flexible layout.
For the generation of a Hero Card and its inclusion into aura-bot when developing a use case, follow the steps below:
-
Design the Hero Card. For this purpose, developers are kindly requested to read the Hero Cards documentation for acquiring the required knowledge regarding this type of cards.
-
Declare the Hero card in the use case dialog.
For efficiency purposes, it is recommended to include them in the [dialog-name]-util.ts.
An example of the source code for including the Hero Card in the dialog is shown below. The last line indicates how the Hero Card is sent to the bot.
const cardActions: any[] = [
     {type: ActionTypes.OpenUrl, title: 'Button 1 title', value: 'www.google.es'},
     {type: 'openUrl', title: 'Button 2 title', value:  'www.google.es'}];
const card: Attachment = CardFactory.heroCard('', undefined, cardActions);
const reply: Partial<Activity> = {
   type: ActivityTypes.Message,
   attachments: [card]
};
await stepContext.context.sendActivity(reply);
-
If specific graphic resources are included in the card:
-
3.1. Follow the procedure defined for the generation of graphic resources in Aura response for static resources.
-
3.2. Declare the resource in the card as an attachment.
CardFactory.heroCard('', undefined, cardActions);
Where:
- ‘’: Hero Card text
undefined: Images in the Hero CardcardActions: Actions
If, for example, the image icon.png is to be included in the Hero Card, then the field “undefined” must be replaced by heroCardImages:
const card: Attachment = CardFactory.heroCard('', heroCardImages, cardActions);
const heroCardImages: string[] | CardImage[] = [DialogUtils.getResourcePath('issues', 'images/icon.png', configuration)]
-
3.3. In order to get a complete URL, including device screen resolution, invoke getImageUrl from the library aura-bot-library-utils if the image has got several resolutions (instead of getResourcePath).
4 - Build Aura response graphic resources
Guidelines for the design of graphic resources in Aura response
Learn how to design of different types of graphic resources and include them in the response that Aura provides to its users
Introduction
You can design your own graphic resources inside the visual components of Aura response (mainly, in the card), always depending on the rendering capability of the channel.
They are categorized into two main groups:
- Static graphic resources: icons, images, diagrams, etc.
- Dynamic graphic resources: graphics that include users’ data and change depending on them (for instance, new plot for data usage use case per country).
These graphics can fetch data from Kernel or from external services (for instance, images from smartphone models that can be shown to the user).
The following sections define the procedure for including both a static and dynamic graphic resource in Aura response.
Include static resources by library
-
The static resource must be previously defined in the resources/ folder of the use case library.
-
In the use case dialog (.ts file), each resource must be declared as shown in the following snippet:
import * as libraryUtil from '@telefonica/aura-bot-utilities/lib/aura-bot-library-util';
(...)
const wholeUrl = libraryUtil.getResourcePath(config, 'my_library', 'icon.png');
Where:
config: configuration object that should contain the environment variables AURA_STATIC_RESOURCE_ENDPOINT and AURA_STATIC_RESOURCE_SAS_TOKEN.'my_library': library name'icon.png': name of the image
In order to get a complete URL, including device screen resolution, invoke getImageUrl from the library aura-bot-library-utils.
-
In the index.ts file of your use case library, the resources path must be exposed in the resources property when registering the plugin, as shown in the following example:
register(null, {
    my_library: {
       …
        resources: path.resolve(__dirname, '..', 'resources'),
        (...)
    }
Where:
'resources': name of the folder where the resources are defined, within the library.
-
Just after it, the resource must be uploaded to Microsoft Azure Storage Explorer, in the images/ folder of the corresponding library. Doing so, Azure generates an URL for the defined resource.
Hot swapping of static resources
Once a static resource is created through the above defined steps, the OB can follow a hot swapping process for the modification of the resource:
- The name of the icon must not be modified: it has to be the same as the name in the code.
- Updata de resource file directly in Microsoft Azure Storage Explorer, in the
/resources/images/ folder of the corresponding library. Doing so, Azure generates an URL for the defined resource.
- However, it must be taken into account that, during the make-up process, the bot overwrites it, so the updating process should be repeated by the OB. For example, this process can be executed when publishing a local use case.
- It is not necessary to restart the bot, as the method which is invoked internally already fetches the icon from Azure Storage.
Include a dynamic graphic resource
The inclusion of dynamic graphic resources in Aura involves two main stages:
-
Data recovery from a Kernel API or from an external API
For Kernel APIs, follow the process in the document Create / update an API client.
-
Generation of dynamic graphic resources:
Developers must implement their own dynamic graphic resources generator. After generating the resource, the process of uploading the resource into Azure must be done manually.
-
If the dynamic resource is integrated into the card of Aura response, follow the instructions in Build Aura response: cards.