1 - Get started with Aura Bot
Get started with Aura Bot
Guidelines including how to create a bot service, different approaches to install Aura Bot and procedure for its configuration
Related documents
📃 Aura Bot Platform descriptive documentation
Introduction
ℹ️ First time using Aura Bot? Go ahead with this section.
aura-bot architecture is a modular one and has been designed in order to fulfil an essential requisite of configurability and extensibility for Aura deployment if a customized Aura behavior is needed.
This section is mainly intended to developers interested in the installation and configuration of aura-bot.
Create a bot service
⚠️ This task must be carried out only once by an aura-bot developer
-
Follow the guidelines in Microsoft documentation: Create a bot with Azure Bot Service.
-
Save the value of the following variables from the created bot:
"AURA_MICROSOFT_APP_ID":"YOUR ID",
"AURA_MICROSOFT_APP_PASSWORD":"YOURPASS",
Install Aura Bot
Developers can install aura-bot following two different approaches:
-
Aura minibot
Aura minibot is a tool intended for testing purposes in local environment. It is highly recommended to use Aura minibot to get familiar with aura-bot when developing simple use cases.
Learn how to install and work with Aura minibot.
-
Full Aura Bot
If you want to install locally a fully functional working instance of aura-bot, go to the full Aura Bot section.
How to start a basic Aura Bot configuration
We recommend to use Kubernetes for the management of the environment variables required for the bot configuration.
Developers can use the process explained below:
Access with kubeconfig
The jq JSON processor can be used to decode all the private variables (developers should install it and get sure it is added to the OS PATH).
-
Set the KUBECONFIG file (provided by DevOps) through the following command:
export KUBECONFIG=<name of the file provided>
-
To check all the available environments, use:
kubectl get ns
-
Download all the environment variables and join them in a unique file:
( kubectl -n <env name> cm aura-bot -o json | jq.exe -r ".data|to_entries|map(\"\(.key)=\(.value|tostring)\")|.[]" ; kubectl -n <env name> get secret aura-bot -o json | jq.exe -r ".data|to_entries|map(\"\(.key)=\(.value|tostring|@base64d)\")|.[]" ) > <env name>
Where: <env name> is the name space selected on step 2 (kubectl get ns)
ℹ️ Base 64 decodification requires a jq version from 1.6 onwards
-
Copy this file into the project folder (wherever you are storing .env files).
-
Enable forwarding from your local address (localhost) to the kubernetes aura-configuration-api deployment.
kubectl --namespace <env name> port-forward deployments/aura-configuration-api 8999:8999
-
Point AURA_CHANNELS_CONFIGURATION_API_ENDPOINT to previously forwarded service: http://localhost:8999/aura-services/v2/configuration.
-
Highly Recommended: if using Visual Studio Code, you could add these objects to your launch.json file to be able to run the make-up process in debug mode and change certain variables without directly modifying aura-configuration-api channels information and/or (according to AURA_MAKEUP_FILES_DESTINATION variable) the bot-response.json file.
[
  {
    "type": "node",
    "request": "launch",
    "name": "name of the script",
    "program": "${workspaceFolder}/lib/index.js",
    "console": "integratedTerminal",
    "outFiles": [
      "${workspaceFolder}/lib/**/*.js"
    ],
    "env": {
      "CONFIG_FILE": "your .env file path",
      "AURA_MICROSOFT_APP_ID": "YOUR ID",
      "AURA_MICROSOFT_APP_PASSWORD": "YOURPASS",
      "AURA_LOGGING_FORMAT": "dev",
      "AURA_LOGGING_LEVEL": "DEBUG"
    }
  },
  {
    "type": "node",
    "request": "launch",
    "name": "makeup",
    "program": "${workspaceFolder}/lib/make/makeup-cli.js",
    "outFiles": [
      "${workspaceFolder}/lib/**/*.js"
    ],
    "env": {
      "CONFIG_FILE": "your .env file path",
      "AURA_LOGGING_FORMAT": "dev",
      "AURA_LOGGING_LEVEL": "DEBUG",
      "AURA_MAKEUP_MODE": "local"
    },
    "console": "integratedTerminal"
  }
]
In case the adjustment of the value for certain variables is required, modify directly the file launch.json, as explained before.
Example of environment configuration
As an example, the main configuration file (.env.PRO) can be defined as follows:
AURA_DEFAULT_LOCALE=es-ar
AURA_SERVER_PORT=8080
All environment variables with their description can be found at the following link Aura Bot Platform environment variables
In case aura-bot is started using the following command:
CONFIG_FILE=./env/.env.PRO AURA_DEFAULT_LOCALE=es-es npm start
Then, the aura-bot instance would use the following configuration variables and values:
AURA_DEFAULT_LOCALE would take the value es-es since it is set as an environment variable and has the highest priority.AURA_SERVER_PORT would take the value 8080 since it is set in the main configuration file, and not as an environment variable.AURA_LOGGING_LEVEL would take the value INFO since it is set in the configuration schema definition and nowhere else (default value).
2 - Install full Aura Bot
Install full Aura Bot
Guidelines for the installation and configuration of full Aura Bot
Introduction to full Aura Bot
This document details the steps to locally deploy a fully functional working aura-bot instance. By fully functional working instance, we mean a bot interacting with the Aura Cognitive services as well as with the Kernel APIs deployed as part of the desired environment the local aura-bot instance should interact with.
Install Aura Bot
ℹ️ This is a general process suitable for every developer and environment.
The general process for the installation of an aura-bot instance is explained below.
-
Access to the main aura-bot repository:
https://github.com/Telefonica/aura-bot-platform
-
Clone the repository for the intended release branch, i.e., for Killers release:
git clone https://github.com/Telefonica/aura-bot-platform.git --branch release/killers
-
Get into the local repository root directory:
$ cd aura-bot-platform
-
Log in NPM to be able to download the private NPM package dependencies (request the token from the Aura Platform Team (APE) to properly log in).
You can login with user/password or using the token:
- User/password ->
npm login
- Token -> Add the token to the environment variables on your machine. Follow the guidelines for mac/linux.
-
Now configure your bot as explained in the section configure Aura Bot.
-
If required, install the existing local use cases (packaged as .tgz files)
There are two options:
-
a. Add the library .tgz file to the file plugin-config.json (placed in the aura-bot-platform Github repository).
Note that manual addition of libraries to plugin-config.json file requires manual installation too:
npm install <library>
-
b. Use the automatic script:
npm run import-libraries
This process will install any .tgz in aura-bot-platform/local_modules folder.
The previous command will add the library in package.json and plugin-config.json files and will install them into the project.
If a further configuration of the library is required (for example, disabling some dialogs), this must be done manually by editing plugin-config.json available at the root of the aura-bot-platform folder.
Practical example for working with full Aura Bot
The current section includes a practical example of the process for a specific environment (for example, applied to MacOS, Visual Studio, access to the kubernetes cluster, etc.). Therefore, the steps explained below may slightly differ from the general guidelines, but provide a useful practical approach for developers.
Dependencies
The following tools and artifacts are needed:
-
NodeJS version 14
You can download it here and install it via package manager.
-
ngrok
The executable binary can be downloaded for several systems in ngrok. Alternatively, ngrok can be installed via the NPM package, once NodeJS is installed, with the following command:
-
Personal Kubernetes configuration file
Your local DevOps or Development Team will provide you with it. In this case, this file looks like this (the certificate and key data have been modified for security reasons):
    apiVersion: v1

    clusters:

        cluster:

            certificate-authority-data: LS0tLS1CRUdJTiBDRVJUSUZJQ0FURS0tLS0tCk1JSUV5RENDQXJDZ0F3S

            server: https://aura-auradev-1-14-6.westeurope.cloudapp.azure.com

            name: aura-auradev-1-14-6

    contexts:

        context:

            cluster: aura-auradev-1-14-6

            user: german.torodelvalle-1573743046

            name: aura-auradev-1-14-6

        current-context: aura-auradev-1-14-6

            kind: Config

            preferences: {}

    users:

        name: user-1573743046

        user:

            client-certificate-data: LS0tLS1CRUdJTiBDRVJUSUZJQ0FURS0tLS0tCk1JSUVHRENDQWdDZ0F3SUJB

            client-key-data: LS0tLS1CRUdJTiBSU0EgUFJJVkFURSBLRVktLS0tLQpNSUlFb3dJQkFBS0NBUUVBdTR4
-
A bot service deployed in the Microsoft Azure portal (https://portal.azure.com) enabling the Direct Line channel to be able to interact with the bot from any client using Direct Line.
-
Visual Studio Code (https://code.visualstudio.com) to be able to debug the running instance of the Aura Bot locally.
Procedure for working with full Aura Bot
To install a working fully operational local instance of aura-bot, follow the steps below:
-
Local deployment of the aura-bot instance for your Aura Platform release. Check the example below for Jimi Hendrix release (each line corresponds to a command to be executed):
    git clone https://github.com/Telefonica/aura-bot-platform.git --branch release/jimihendrix

    cd aura-bot-platform

    npm install
-
Kubernetes configuration: Consider including the next environment variable export in your local terminal starting up configuration file to avoid running the following command each time. Obviously, a correct path to the personal Kubernetes configuration file mentioned as a dependency in the previous dependencies section should be used in the following command.
export KUBECONFIG=~/kubernetes-config.yaml
-
Get the list of available Kubernetes namespaces:
-
Get the configuration for the Kubernetes namespace of interest (contact your local DevOps team to figure it out).
In our case, since we are deploying a local release of the aura-bot instance, the aura-ap-next should be used as the namespace (the configuration will be stored in a file named aura-bot.ap-next.env):
(kubectl -n aura-ap-next get cm aura-bot -o json | jq -r ".data|to_entries|map(\"\(.key)=\(.value|tostring)\")|.[]" ; kubectl -n aura-ap-next get secret aura-bot -o json | jq -r ".data|to_entries|map(\"\(.key)=\(.value|tostring|@base64d)\")|.[]" ) > aura-bot.ap-next.env
-
Work with Visual Studio Code:
-
Open the previous aura-bot-platform directory (see step 1) in Visual Studio Code.
-
Open the internal Visual Studio Code terminal (CONTROL + ` in Windows).
-
Place the aura-bot.ap-next.env file (see step 4) in the .vscode/.env/ subfolder inside the aura-bot folder. Create the needed directories if not already created.
-
Include the following launch configuration in the .vscode/launch.json file inside the aura-bot-platform repository (create the needed directories if not already created) to be able to start the aura-bot instance from inside Visual Studio Code.
Please, set the AURA_MICROSOFT_APP_ID as well as the AURA_MICROSOFT_APP_PASSWORD configuration variables to the appropriate values obtained when creating the bot service in the Microsoft Azure portal (see the dependency number 4 included in the previous dependencies section):
{

    // Use IntelliSense to learn about possible attributes.

    // Hover to view descriptions of existing attributes.

    // For more information, visit: https://go.microsoft.com/fwlink/?linkid=830387

    "version": "0.2.0",

    "configurations": [

        {

            "type": "node",

            "request": "launch",

            "name": "aura-bot.ap-next.env",

            "program": "${workspaceFolder}/lib/index.js",

            "console": "integratedTerminal",

            "outFiles": [

                "${workspaceFolder}/lib/**/*.js"

            ],

            "env": {

                "CONFIG_FILE": ".vscode/.env/aura-bot.ap-next.env",

                "AURA_MICROSOFT_APP_ID": "8d72c407-XXXX-4b50-a076-76XXXX5437e4",

                "AURA_MICROSOFT_APP_PASSWORD": "password",

                "AURA_LOGGING_FORMAT": "dev",

                "AURA_LOGGING_LEVEL": "DEBUG"

            }

        }

    ]

}
-
In the aura-bot.ap-next.env file:
Set the values of the configuration variables named AURA_DEFAULT_LOCALE and AURA_DEFAULT_TIME_ZONE to the desired values according to the appropriate language and time zone. For example, for Spain these values are:
AURA_DEFAULT_LOCALE=es-es

AURA_DEFAULT_TIME_ZONE=Europe/Madrid
-
Provide access to the Aura Mongo databases:
- Substitute the Mongo connection URI configuration variable (named
AURA_MONGODB_URI) located in the .vscode/.env/aura-bot.ap-next.env configuration file to the next value:
AURA_MONGODB_URI=mongodb://localhost:27017
- Port forwards the local URI to the real one running the following command in an internal Visual Studio Code terminal using the following command:
kubectl port-forward mongodb-0 -n aura-system 27017:27017
This makes your bot use the Mongo database in your development environment, if you are not using Atlas.
-
Provide access to the Aura Cognitive Services:
- Substitute the Aura Cognitive URI configuration variable (named
AURA_COGNITIVE_ENDPOINT) located in the .vscode/.env/aura-bot.ap-next.env configuration file to the next value:
AURA_COGNITIVE_ENDPOINT=http://localhost:7000/auracognitive/v3
- Port forwards the local URI to the real one running the following command in an internal Visual Studio Code terminal using the following command:
kubectl -n aura-ap-next port-forward deployment/api-gw 7000:80
-
Provide external access to the locally deployed release of the aura-bot instance:
-
Start ngrok in an internal Visual Studio Code terminal using the following command:
-
Set the new HTTPS URL provided by ngrok in the configuration of the bot service available in the Microsoft Azure portal (see the dependency number 4 included in the dependencies section). The messaging connection endpoint should have a value similar to: https://55a1d84f.ngrok.io/api/messages
-
The locally deployed release of the aura-bot instance is ready to be started. Click on the “Play” icon in Visual Studio Code to run the launch configuration named aura-bot.ap-next.env.
-
Interact with the locally deployed Aura release of the aura-bot instance:
-
11.1. Get a DirectLine token running the following command (instead of the included one, use the secret for the Direct Line channel of the bot service available in the Microsoft Azure portal (see the dependency number 4 included in the dependencies section):
curl --location --request POST 'https://directline.botframework.com/v3/directline/tokens/generate' \

--header 'Authorization: Bearer 55FhfjL8soI.bm-NhUy68mwCfPar4zIjTYHGd5cEGmKWt5zXqmA9rxI' \

-d ''
A response such as the following one is received:
    {

    "conversationId": "AUR2oOohW9Z64MtvuQyoFO-a",

    "token": "ew0KICAiYWxnIjogIlJTMjU2IiwNCiAgImtpZCI6ICJBT08tZXhGd2puR3lDTEJhOTgwVkxOME1tUTgiLA0KICAieDV0IjogIkFPTy1leEZ3am5HeUNMQmE5ODBWTE4wTW1ROCIsDQogICJ0eXAiOiAiSldUIg0KfQ.ew0KICAiYm90IjogImF1cmEtYm90LWd01234ZGVsdmFsbGUiLA0KICAic2l0ZSI6ICI1NUZ1dmdMOHNvSSIsDQogICJjb252IjogIkFVUjJvT29oVzlaNjRNdHZ1UXlvRk8tYSIsDQogICJuYmYiOiAxNTg4NzYyMjQwLA0KICAiZXhwIjogMTU4ODc2NTg0MCwNCiAgImlzcyI6ICJodHRwczovL2RpcmVjdGxpbmUuYm90ZnJhbWV3XXXXLmNvbS8iLA0KICAiYXVkIjogImh0dHBzOi8vZGlyZWN0bGluZS5ib3RmcmFtZXdvcmsuY29tLyINCn0.pps98q5aYO2T4S7XwdIBudCzZB1T31HlwJ51tbEMcGGJrcHRI-hXnZskjHlcXIzBJiABeYiZSncqyWsNRWSmoVQ3iIYTrBiJM6y1EYn2qDJO4JYjZI5IZeFnp3GieB3eMP-HsW1DixK2p_C2DwxZy5pDc3nveclejI7SeUpl6m4frzNDPfqv7UoEW6aMthnT64JWhzncfF3y3_X-6J5v5RhTPW0OJEXpEuZ94AkhwHLfjLKzyewMwk0NzyAwmnCSZ0p6XyJjx9lA1FByHMRP0OLwcrfE8l_N_eXwUZuSY10gqRl5Tmm-D9p869mooA_0DuJYZUhgH_0D_4yg8PFjtg",

    "expires_in": 3600

    }
-
11.2. Start the conversation using the token obtained in the previous step (11.1).
curl --location --request POST 'https://directline.botframework.com/v3/directline/conversations' \

--header 'Authorization: Bearer ew0KICAiYWxnIjogIlJTMjU2IiwNCiAgImtpZCI6ICJBT08tZXhGd2puR3lDTEJhOTgwVkxOME1tUTgiLA0KICAieDV0IjogIkFPTy1leEZ3am5HeUNMQmE5ODBWTE4wTW1ROCIsDQogICJ0eXAiOiAiSldUIg0KfQ.ew0KICAiYm90IjogImF1cmEtYm90LWd01234ZGVsdmFsbGUiLA0KICAic2l0ZSI6ICI1NUZ1dmdMOHNvSSIsDQogICJjb252IjogIkFVUjJvT29oVzlaNjRNdHZ1UXlvRk8tYSIsDQogICJuYmYiOiAxNTg4NzYyMjQwLA0KICAiZXhwIjogMTU4ODc2NTg0MCwNCiAgImlzcyI6ICJodHRwczovL2RpcmVjdGxpbmUuYm90ZnJhbWV3XXXXLmNvbS8iLA0KICAiYXVkIjogImh0dHBzOi8vZGlyZWN0bGluZS5ib3RmcmFtZXdvcmsuY29tLyINCn0.pps98q5aYO2T4S7XwdIBudCzZB1T31HlwJ51tbEMcGGJrcHRI-hXnZskjHlcXIzBJiABeYiZSncqyWsNRWSmoVQ3iIYTrBiJM6y1EYn2qDJO4JYjZI5IZeFnp3GieB3eMP-HsW1DixK2p_C2DwxZy5pDc3nveclejI7SeUpl6m4frzNDPfqv7UoEW6aMthnT64JWhzncfF3y3_X-6J5v5RhTPW0OJEXpEuZ94AkhwHLfjLKzyewMwk0NzyAwmnCSZ0p6XyJjx9lA1FByHMRP0OLwcrfE8l_N_eXwUZuSY10gqRl5Tmm-D9p869mooA_0DuJYZUhgH_0D_4yg8PFjtg' \

--data-raw ''
A response such as the following one is received:
{

  "conversationId": "AUR2oOohW9Z64MtvuQyoFO-a",

  "token": "ew0KICAiYWxnIjogIlJTMjU2IiwNCiAgImtpZCI6ICJBT08tZXhGd2puR3lDTEJhOTgwVkxOME1tUTgiLA0KICAieDV0IjogIkFPTy1leEZ3am5HeUNMQmE5ODBWTE4wTW1ROCIsDQogICJ0eXAiOiAiSldUIg0KfQ.ew0KICAiYm90IjogImF1cmEtYm90LWd0b3JvZGVsdmFsbGUiLA0KICAic2l0ZSI6ICI1NUZ1dmdMOHNvSSIsDQogICJjb252IjogIkFVUjJvT29oVzlaNjRNdHZ1UXlvRk8tYSIsDQogICJu1234OiAxNTg4NzYyMjY5LA0KICAiZXhwIjogMTU4ODc2NTg2OSwNCiAgImlzcyI6ICJodHRwczovL2RpcmVjdGxpbmUuYm90ZnJhbWV3b3JrLmNvbS8iLA0KICAiYXVkIjogImh0dHBzOi8vZGlyZWN0bGluZS5ib3RmcmFtZXdvcmsuY29tLyINCn0.Ft_r71JQ-Qq39nXqzO2u3SEHYMjGY8vMb4_OJL89Uw9NXXXXcvYmM62iu6YG8DcFCy2PFj2hmOev35f06zNXsgbHAthPxTPTIboPO8DyXYFQe8yYbhBKXBt2AIoI4SOO16e_OKaEETh-R2sXe6rfSp3PTgKddzFyLkXCl77e2Tz3TI7Zwe-NIyfmXKhJwd-XzTl7lxJAunSDSDS1i2rwzz8yAjBwJl5wFFhGXnOxPph1bHi_Ag-gU-XIMk_vhTTMLvkCORhBGWZJCNSGXxs5XBUYOZf2oZJA_UWtHqNolNO3K5mF6-cHg188YbAax78-gq0lB2XQCKCamZTmD9TRCg",

  "expires_in": 3600,

  "streamUrl": "wss://directline.botframework.com/v3/directline/conversations/AUR2oOohW9Z64MtvuQyoFO-a/stream?watermark=-&t=ew0KICAiYWxnIjogIlJTMjU2IiwNCiAgImtpZCI61234T08tZXhGd2puR3lDTEJhOTgwVkxOME1tUTgiLA0KICAieDV0IjogIkFPTy1leEZ3am5HeUNMQmE5ODBWTE4wTW1ROCIsDQogICJ0eXAiOiAiSldUIg0KfQ.ew0KICAiYm90IjogImF1cmEtYm90LWd0b3JvZGVsdmFsbGUiLA0KICAic2l0ZSI6ICI1NUZ1dmdMOHNvSSIsDQogICJjb252IjogIkFVUjJvT29oVzlaNjRNdHZ1UXlvRk8tYSIsDQogICJuYmYiOiAxNTg4NzYyMjY5LA0KICAiZXhwIjogMTU4ODc2MjMyOSwNCiAgImlzcyI6ICJodHRwczovL2RpcmVjdGxpbmUuYm90ZnJhbWV3b3JrLmNvbS8iLA0KICAiYXVkIjogImh0dHBzOi8vZGlyZWN0bGluZS5ib3RmcmFtZXdvcmsuY29tLyINCn0.igWA6xJmWwYoTeOV_A5cY_1_spptYgG2xqhJFGBc6PR0l62W-XXXXohqwZqfs7-z-VfyRrWKmD6x2xCw17DRGua6P7qE5Sk9XeV5DcD4XE_f80jGsr86CxFxL_F23iAYWOnpRtYNXJ3yCn69GXHBHvp0sAefLno7JqaoeHZlstyEm72o1v_WqFVd1RHW9zzbbEzQrIhmixUoQbEacuIIMAc6Wtesi3bb8iPOVtFIN_nEovceIieeQggMn0YesYDjiQ600zUX6p4FnU8MPtWpwV6XCSspC3iTuuUSjnpMMbekXYqJHItdgPTE4dPFkqQI_mhPEU0Ravn4vWNQLMd0rg",

  "referenceGrammarId": "95090c7e-6475-5a58-ba7a-35e45f903d38"

}
-
11.3. Send a message to the bot using the conversation obtained in the previous step and any of the tokens obtained in step 11.1 or 11.2 (you should use a valid user Aura id set in the from.id property, request it from your local QA or DevOps team):
    curl --location --request POST 'https://directline.botframework.com/v3/directline/conversations/AUR2oOohW9Z64MtvuQyoFO-a/activities' \

    --header 'Content-Type: application/json' \--header 'Authorization: Bearer ew0KICAiYWxnIjogIlJTMjU2IiwNCiAgImtpZCI6ICJBT08tZXhGd2puR3lDTEJhOTgwVkxOME1tUTgiLA0KICAieDV0IjogIkFPTy1leEZ3am5HeUNMQmE5ODBWTE4wTW1ROCIsDQogICJ0eXAiOiAiSldUIg0KfQ.ew0KICAiYm90IjogImF1cmEtYm90LWd01234ZGVsdmFsbGUiLA0KICAic2l0ZSI6ICI1NUZ1dmdMOHNvSSIsDQogICJjb252IjogIkFVUjJvT29oVzlaNjRNdHZ1UXlvRk8tYSIsDQogICJuYmYiOiAxNTg4NzYyMjQwLA0KICAiZXhwIjogMTU4ODc2NTg0MCwNCiAgImlzcyI6ICJodHRwczovL2RpcmVjdGxpbmUuYm90ZnJhbWV3XXXXLmNvbS8iLA0KICAiYXVkIjogImh0dHBzOi8vZGlyZWN0bGluZS5ib3RmcmFtZXdvcmsuY29tLyINCn0.pps98q5aYO2T4S7XwdIBudCzZB1T31HlwJ51tbEMcGGJrcHRI-hXnZskjHlcXIzBJiABeYiZSncqyWsNRWSmoVQ3iIYTrBiJM6y1EYn2qDJO4JYjZI5IZeFnp3GieB3eMP-HsW1DixK2p_C2DwxZy5pDc3nveclejI7SeUpl6m4frzNDPfqv7UoEW6aMthnT64JWhzncfF3y3_X-6J5v5RhTPW0OJEXpEuZ94AkhwHLfjLKzyewMwk0NzyAwmnCSZ0p6XyJjx9lA1FByHMRP0OLwcrfE8l_N_eXwUZuSY10gqRl5Tmm-D9p869mooA_0DuJYZUhgH_0D_4yg8PFjtg
    ' \

    --data-raw ' {

        "type": "message",

        "from": {

            "id": "d1626d20-4e16-46ac-ba3c-c140fa3742a1"

        },

        "text": "Hola"

    }'
A response such as the following one is received:
        {
            "id": "AUR2oOohW9Z64MtvuQyoFO-a|0000001"
        }
-
To get the message sent by the aura-bot instance, run the following command to get the activities sent in the conversation (use the same conversation started in step 11.2 and any of the tokens obtained in step 11.1.
    curl --location --request GET 'https://directline.botframework.com/v3/directline/conversations/AUR2oOohW9Z64MtvuQyoFO-a/activities' \

    --header 'Authorization: Bearer ew0KICAiYWxnIjogIlJTMjU2IiwNCiAgImtpZCI6ICJBT08tZXhGd2puR3lDTEJhOTgwVkxOME1tUTgiLA0KICAieDV0IjogIkFPTy1leEZ3am5HeUNMQmE5ODBWTE4wTW1ROCIsDQogICJ0eXAiOiAiSldUIg0KfQ.ew0KICAiYm90IjogImF1cmEtYm90LWd01234ZGVsdmFsbGUiLA0KICAic2l0ZSI6ICI1NUZ1dmdMOHNvSSIsDQogICJjb252IjogIkFVUjJvT29oVzlaNjRNdHZ1UXlvRk8tYSIsDQogICJuYmYiOiAxNTg4NzYyMjQwLA0KICAiZXhwIjogMTU4ODc2NTg0MCwNCiAgImlzcyI6ICJodHRwczovL2RpcmVjdGxpbmUuYm90ZnJhbWV3XXXXLmNvbS8iLA0KICAiYXVkIjogImh0dHBzOi8vZGlyZWN0bGluZS5ib3RmcmFtZXdvcmsuY29tLyINCn0.pps98q5aYO2T4S7XwdIBudCzZB1T31HlwJ51tbEMcGGJrcHRI-hXnZskjHlcXIzBJiABeYiZSncqyWsNRWSmoVQ3iIYTrBiJM6y1EYn2qDJO4JYjZI5IZeFnp3GieB3eMP-HsW1DixK2p_C2DwxZy5pDc3nveclejI7SeUpl6m4frzNDPfqv7UoEW6aMthnT64JWhzncfF3y3_X-6J5v5RhTPW0OJEXpEuZ94AkhwHLfjLKzyewMwk0NzyAwmnCSZ0p6XyJjx9lA1FByHMRP0OLwcrfE8l_N_eXwUZuSY10gqRl5Tmm-D9p869mooA_0DuJYZUhgH_0D_4yg8PFjtg
    '
A response such as the following one is received:
{

  "activities": [

    {

      "type": "message",

      "id": "AUR2oOohW9Z64MtvuQyoFO-a|0000000",

      "timestamp": "2020-05-06T11:14:43.8618783Z",

      "serviceUrl": "https://directline.botframework.com/",

      "channelId": "directline",

      "from": {

        "id": "d1626d20-4e16-46ac-ba3c-c140fa3742a1"

      },

      "conversation": {

        "id": "DvpneVrCrDG9DVIL7pQr5N-a"

      },

      "text": "Hola"

    },

    {

      "type": "message",

      "id": "AUR2oOohW9Z64MtvuQyoFO-a|0000001",

      "timestamp": "2020-05-06T11:14:49.2303326Z",

      "localTimestamp": "2020-05-06T11:14:45.764+00:00",

      "channelId": "directline",

      "from": {

        "id": "aura-bot-gtorodelvalle",

        "name": "aura-bot-gtorodelvalle"

      },

      "conversation": {

        "id": "AUR2oOohW9Z64MtvuQyoFO-a"

      },

      "text": "Hola, buenas",

      "inputHint": "acceptingInput",

      "channelData": {

        "correlator": "6a3ccc2a-c80e-441f-83ff-945691fd3407"

      },

      "replyToId": "DvpneVrCrDG9DVIL7pQr5N-a|0000000"

    }

  ],

  "watermark": "1"

}
ℹ️ Instead of using HTTP requests, another possibility is to use the Web Sockets URL obtained in step 11.2 (see the streamUrl property obtained in the response) using a Web Sockets client such as the Smart Web Sockets extension for Google Chrome.
Notice the Aura Cognitive services recognized the “Hola” text message sent to the bot as a greeting and it responded with a greeting message (“Hola, buenas”).
You could set a breakpoint in any part of the code (for example, in the greetings dialog) to debug it.
3 - Keda configuration
Keda configuration
Guidelines for the configuration of Keda, used for the autoscaling of pods
Introduction
Keda is a Kubernetes-based event-driven autoscaler. It allows configuring different types of scaling per pod, that can be determined depending on the needs of each application running on the pod.
Keda is installed in Aura by default and the autoscaling of the pods will be managed by Keda scaled objects.
Further information regarding all the scaling methods available in Keda scalers documentation.
To access all the Kubernetes elements handled by Keda, scaledObjects, run the following command in your cluster:
$ kubectl get scaledObject
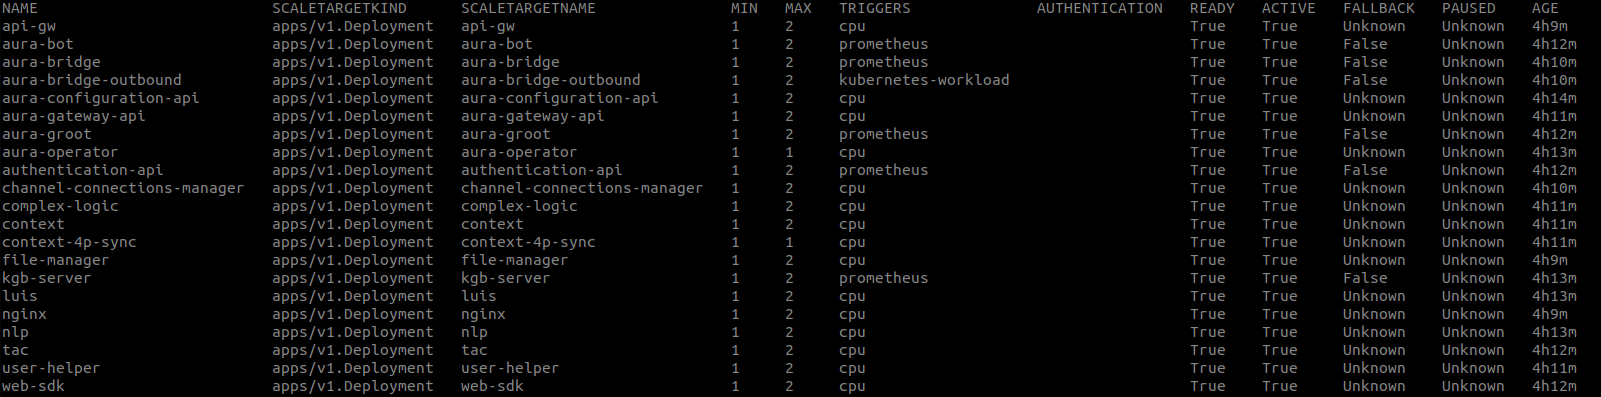
When Keda is available, instead of modifying the HPA configuration of each deployment, the scalation of each app is handled by Keda. In this scenario, and in order to modify it, update the deployment scaledObject settings: edit it and modify maxReplicaCount or minReplicaCount, as needed.
$ kubectl edit scaledObject <deployment-name>
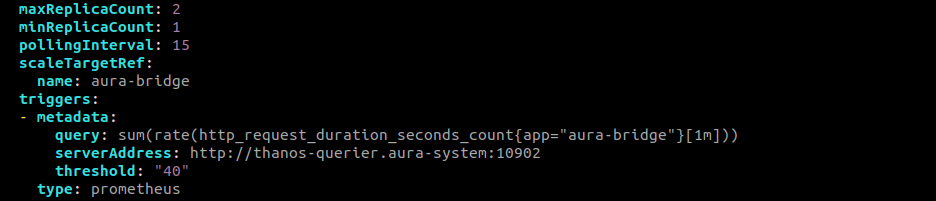
Here is an example of a component (aura-bridge) which scalation is based on Prometheus metrics (in this case, the number of incoming requests) and how to modify it:
$ kubectl edit scaledObject aura-bridge
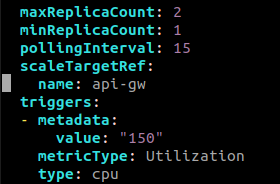
Here, an example of a component (aura-gateway-api) which scalation is based on CPU metrics and how to modify it:
$ kubectl edit scaledObject api-gw
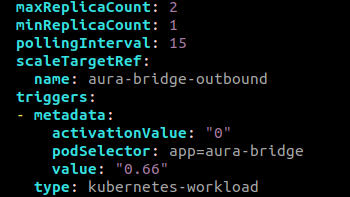
Here, an example of a component (aura-bridge-outbound) which scalation is based on the scalation of another component (Kubernetes-workload) and how to modify it:
$ kubectl edit scaledObject aura-bridge-outbound
4.1 - Handover activation
Handover activation
Guidelines for the activation and deactivation of direct handover-genesys feature in Aura
Prerequirements
-
This step must be only executed if the environment counts on a channel which integration with the customer center system in done via an aura-bot dialog and only if the customer center system is Genesys.
-
It must be executed only once, when setting up the dialog. Afterwards, the configuration must just be reviewed.
Moreover, the following pre-requirements must be met:
-
A kubeconfig of the Aura environment to be configured is available.
-
Request to Genesys team the data to access the service:
- The URL of Genesys service endpoint. For instance, in
PRE environment in Spain is: https://www.movistar.es/atcliente/Chat_PRE/ReActivo
- This endpoint must use basic HTTP authorization, so please, request also the credentials to access it.
-
There is an URL where the genesys callback of aura-bridge will be listening to once activated.
Usually, something like:
https://{{aura-services-domain}}.auracognitive.com/aura-services/v1/genesys/messages?apikey={{api_key}}
Where:
{{aura-services-domain}} should svc-[country]-[environment], for instance svc-es-pre{{api_key}} is a specific APIKey created for genesys to access this endpoint.
-
Send the aura-bridge Genesys callback to Genesys team, so it can be configured as callback to send the push notifications. They have to update the callback related to GCTI_GMS_PushProvider: Aura to this URL.
-
There is a Kernel environment to which Aura environment is connected. Recommended:
kubectl installed in your local host.curl installed in your local host.jq installed in your local host.
Enabling Genesys controller in Aura bridge
-
Ensure that all Genesys necessary plugins are set in aura-bridge plugin configuration file:
[
  "./lib/plugins/async-callback-directline-processor",
  "./lib/plugins/directline-service"
]
-
Once the configuration is applied, validate that the Genesys controller is working properly:
# substitute <aura-services-domain> with the domain of your environment, usually something like svc-es-pro
# substitute <api-key> with an apikey generated
# generate a valid UUID as correlator
# substitute {{correlator}} with the generated UUID
export CORRELATOR={{correlator}}

$ curl -i -X POST -H 'Content-Type: application/json' -H 'x-correlator: $CORRELATOR' 'https://<aura-services-domain>.auracognitive.com/aura-services/v1/whatsapp/messages?apikey=<api-key>'
-
It should return a response with a 401 statusCode.
-
If the endpoint is not configured, it should return a 404.
Enabling Genesys use case in Aura Bot
-
Set the following environment variables in the aura-bot section of your Aura installer configuration, as explained in the document Aura installer aurak8s.
aura_bot:
  config:
    HANDOVER_CLIENT_BASE_PATH_URL: '<genesys-api-endpoint>' # URL to access genesys system
    HANDOVER_CLIENT_BASIC_AUTH_NAME: '<aura-user-name>' # user for the basic authorization of genesys endpoint
    HANDOVER_CLIENT_BASIC_AUTH_PASSWORD: '<aura-user-secret>' # password for the basic authorization of genesys endpoint
    HANDOVER_CHAT_SERVICE_NAME: 'XXXX' # base chat name configured in genesys, by default, request-whatsapp-aura`
    HANDOVER_CHECK_STATUS_CHAT_SERVICE_NAME: 'XXX' #chat service to validate communication, by default request-whatsapp-testaura
    HANDOVER_USERDATA_GCTI_GMS_NODEGROUP: 'XXX' # in genesys PRE environments GMS_Cluster, in pro TELF_GMS_Cluster
    HANDOVER_ALWAYS_USE_REMOTE_CACHE: false # cache to get the bypass data. By default, false.
-
Review the plugins-config.json file to set the proper libraries configuration. This file can be found in this path of Aura installer, where you have to choose the country for your installation: br, de, es, uk:
deploy/files/containers/bot/plugin-config-[country].json
-
If the handover library is configured but the genesys use case is disabled, the file would contain the following lines:
{
    "packagePath": "@telefonica/aura-bot-handover-library",
    "exclude": [
        "./handover-genesys/handover-bypass-dialog",
        "./handover-genesys/handover-status-dialog"
    ]
},
-
To enable the use case, just remove all those lines and add the following one:
"@telefonica/aura-bot-handover-library",
-
If handover library was not previously configured in your environment, just add the last line. This enables all the dialogs within the handover library.
-
Now, follow the instructions in the current document in order to apply the updated configuration.
Apply the updated configuration
Once the configuration changes are applied:
-
If the environment has local use cases:
- First, run again the
deploy_local command, once the configuration changes and plugins file modifications are done.
- Then, run
deploy_core including -t aura-bridge parameter to deploy config changes to aura-bridge
-
If the environment is not using local use cases, just run deploy_core including -t aura-bridge aura-bot parameter to deploy config changes to aura-bridge and aura-bot components.
4.2 - Aura File Manager activation
Aura File Manager activation
Guidelines for the activation and deactivation of the Aura File Manager module
Related documents
📃Aura File Manager description
Prerequirements
-
This step must be only executed if the environment counts on a channel of whatsapp type (WhatsApp channel).
-
It must be executed once, when setting up each channel. Afterwards, the configuration must just be reviewed.
Steps for File Manager enabling
In order to enable Aura File Manager component to deploy it in environment, follow these steps:
-
Add to the environment config file the following command:
file_manager_enabled: true
-
Only for ES environments, it is also required to set the lines below, as the Whatsapp channel is already configured to accept this configuration in the environment config file:
clients:
  wa:
    file_attachments:
      enabled: true
-
If the clients structure already exists in the config file, merge this configuration with the current one:
-
WhatsApp channels need to have enabled attachments:
{
    name: 'nameOfChannel',
    requestOptions: {
        fileAttachments: {
            enabled: true
        }
    }
}
Find here detailed information regarding the requestOptions model within Aura channel model, that includes the configuration of the allowed files.
-
In order to process the files, aura-bot must set the Aura File Manager API URL in the environment variable AURA_FILE_ENDPOINT.
-
On the other hand, the variables of the File Manager must be configured.
-
It is also needed to configure a container in Azure Storage with Automatic removal files.
4.3 - Enable corporate anonymous users check
Enable corporate anonymous users check
Guidelines for the activation and deactivation of corporate anonymous users check, both general steps and specific ones for the use case under development
Prerequirements
-
Request to Kernel and OB Operations Teams to provide a purpose for aura-bot client in Kernel that provides access to UserProfile API via client credentials flow. It should be something like aura-bot-search-customer-purpose.
-
Request to Kernel to update the aura-bot client in Kernel to include the new purpose in client credentials flow. For instance:
        {
            "name": "client_credentials",
            "scopes": [
                "whatsapp:app-admin",
                "whatsapp:app-messaging",
                "whatsapp:manage-templates"
            ],
            "purposes": [
                "auraid-admin",
                "aura-bot-search-customer-purpose"
            ]
        }
Activation
- Set the following environment variable in aura-bot configmap or in the configuration file of the environment.
AURA_FP_CLIENT_CRED_PURPOSES: aura-bot-search-customer-purpose
- Activate the validation in the corresponding channels. These channels must support anonymous users and the identifier coming from the channel must be a phonenumber, WhatsApp based channels, for instance. Add the following settings to your channel configuration:
    "security": {
        "anonymous": "identifiable",
        "anonymousSettings": {
            "checkPromptedNumber": false,
            "enableUserProfile": true
        }
    }
Further information regarding these settings is found in anonymousSettings and aura-configuration-api component.
5 - Aura configuration updater
Aura configuration updater
Aura configuration updater is a set of operations to modify channel information in aura-configuration-api and locale files with the changes indicated
Introduction
Aura configuration updater allows making changes in certain aura-bot configuration directly in Aura environments in an easier way.
This tool allows changes in:
- channel configuration (aura-configuration_api server):
contextFilters of the intents of the dialogs.- aura-bot libraries and dialogs authorization fields: scopes and purposes.
- Channels scopes and purposes to be requested when generating a Kernel access_token.
- POEditor resources, to include new ones or update those already existing.
Aura configuration updater can work in two modes:
-
Included during the local-deploy procedure: all configuration changes defined will be applied after the aura-bot make-up job before rebooting the instances.
-
Local dry-run: where the script generates the files according to the changes requested in legacy format, so they can be reviewed before uploading them to the Azure Storage and being applied to aura-bot.
Development
Aura configuration updater configuration
AURA_VERSION: Mandatory. `String`. Aura version.
AURA_AUTHORIZATION_HEADER: Optional. `String`. Mandatory only if _aura-configuration-api_ is used.
AURA_MAKEUP_FILES_ORIGIN: Mandatory. `String` Default 'blob'. Possible values: ['config-server', 'blob']. Source from where the channel information will be obtained.
AURA_MAKEUP_FILES_DESTINATION: Mandatory. `String` Default 'blob'. Possible values: ['config-server', 'blob', 'all']. Destination where modifications to channel information will be saved.
AURA_MICROSOFT_AZURE_STORAGE_ACCESS_KEY. Mandatory. `String`. Storage access key.
AURA_MICROSOFT_AZURE_STORAGE_ACCOUNT. Mandatory. `String`. Storage account name.
AURA_LOGGING_LEVEL. Optional. `String` Default 'DEBUG'. Loggin level.
AURA_LOGGING_FORMAT. Optional. `String` Default 'DEV'. Loggin format.
CONFIG_FILE. Optional. `String`, File with environment variables
AURA_CHANNELS_CONFIGURATION_API_ENDPOINT. Optional. `String`. _aura-configuration-api_ url.
AURA_CHANNELS_CONFIGURATION_BLOB. Optional. `String` Default 'bot-response.json'. Name of blob of to configuration.
AURA_UPDATE_CONF_CHANNELS_CONFIGURATION_CHANGES_BLOB. Optional. `String` Default 'changes-bot-response.json'. Name of blob with changes to apply in bot configuration file.
AURA_UPDATE_CONF_CHANNELS_CONFIGURATION_CHANGES_PATH. Optional. `String` Default 'changes'. Path for file with changes to apply in bot configuration file.
AURA_CONFIGURATION_CONTAINER. Optional. `String` Default 'aura-configuration'. Name of configuration container.
AURA_UPDATE_CONF_LOCALE_CHANGES_PREFIX. Optional. `String` Default 'changes-locale-'. Prefix of files with changes to apply in locale files.
AURA_UPDATE_CONF_LOCALE_CHANGES_PATH. Optional. `String` Default 'changes'. Path for files wiht changes to apply in locale files.
AURA_UPDATE_CONF_LOCALE_PATH. Optional. `String` Default 'locale'. Path of locale files.
AURA_UPDATE_CONF_MODE_DRY_RUN. Optional. `boolean` Default 'false'. Flag to indicate whether or not updater is executed in dry-run mode.
AURA_UPDATE_CONF_MODE_DRY_RUN_PATH. Optional. `String` Default 'dry-run'. Output path for dry-run mode.
AURA_STATIC_CONTAINER. Optional. `String` Default 'static-resources'. Name of static container, container with locale files.
Prepare your CONFIG_FILE
- Example to read and write using aura-configuration-api:
AURA_AUTHORIZATION_HEADER=${AUTHORIZATION_HEADER}
AURA_CHANNELS_CONFIGURATION_API_ENDPOINT=${CONFIGURATION_API_ENDPOINT}
AURA_MICROSOFT_AZURE_STORAGE_ACCESS_KEY=${STORAGE_ACCESS_KEY=}
AURA_MICROSOFT_AZURE_STORAGE_ACCOUNT=${STORAGE_ACCOUNT}
AURA_MAKEUP_FILES_ORIGIN='config-server'
AURA_MAKEUP_FILES_DESTINATION='config-server'
AURA_VERSION='7.2.0'
The AURA_CHANNELS_CONFIGURATION_API_ENDPOINT variable is needed to make changes in aura-configuration-api server.
Running on dry-run mode
To execute on dry_run mode, it is necessary to set the AURA_UPDATE_CONF_MODE_DRY_RUN variable to true.
By default, the files generated during the process will be saved on the dry-run folder. It is possible to change this location using the AURA_UPDATE_CONF_MODE_DRY_RUN_PATH variable.
The aura-configuration-updater script already allows you to run in dry-run mode:
npm run aura-configuration-updater
The result will be available in the dry-run folder (or the one defined in the AURA_UPDATE_CONF_MODE_DRY_RUN_PATH variable) in blob container.
Execution example
- Add a file in
aura-configuration/7.4.0/changes/changes-bot-response.json:
{
    "version": "1.0",
    "channels": [
        {
            "channelId": "45494a5b-835a-4fff-a813-b3d2be529dbe",
            "fpaAuthPurposes": {
                "add": "my-purpose"
            }
        }
    ]
}
npm run aura-configuration-updater

# Output:
# INFO  Saving changes in: 7.4.0/dry-run/bot-response-2022-09-19T10:24:21.129Z.json {
#        module: 'aura-update-bot-response',
#        corr: 'd693e0a2-1382-45d5-a774-3380479f04db',
#        host: 'zbook'
#      }
- Validate generated file in the aura-configuration/7.4.0/dry-run folder:
[
    {
        ...
        "channel_id": "45494a5b-835a-4fff-a813-b3d2be529dbe",
        "nlp": {
        "enabled": true,
            "enabled": true
        }
        },
        "requestOptions": {
        "requestOptionsVersion": {
            "1": {
            "channel": "directline"
            }
        }
        },
        "name": "novum-mytelco",
        "fpa_auth_purposes": "customer-self-service identify-customer aura-technical-problems-purpose my-purpose",
        "fpa_auth_scopes": "",
        "prefix": "nov",
        ...
    }
]
Running as docker container
Pull image from repository
For this step, previous login is required.
docker login -u <username> -p <password> auraregistry.azurecr.io
docker pull auraregistry.azurecr.io/aura/aura-configuration-updater:$VERSION
An example is shown below:
docker pull auraregistry.azurecr.io/aura/aura-configuration-updater:7.2.0-devironmaiden.71
Run docker container
In order to run the docker container, two procedures are available:
With .env file
Change $VERSION accordingly, exporting it or changing the string in the commands.
docker run -e CONFIG_FILE=/opt/aura-configuration-updater/.env \
     -v $(pwd)/.env:/opt/aura-configuration-updater/.env  \
    auraregistry.azurecr.io/aura/aura-configuration-updater:$VERSION
With .env variables in command
docker run
     -e AURA_AUTHORIZATION_HEADER = \
     -e AURA_CHANNELS_CONFIGURATION_API_ENDPOINT = \
     -e AURA_MICROSOFT_AZURE_STORAGE_ACCESS_KEY=  \
     -e AURA_MICROSOFT_AZURE_STORAGE_ACCOUNT=  \
     -e AURA_VERSION= \
     auraregistry.azurecr.io/aura/aura-configuration-updater:$VERSION
It will be a JSON file with a version and an array of ‘channels’. Each element of this array is specified with the following properties:
-
Properties marked in bold are mandatory.
-
Properties marked in italics are optional.
-
channelId: Aura channel to which the changes apply.
-
fpaAuthPurposes: object with the information of the Kernel purposes to modify. It includes two fields, at least one of them is required:
add: space-separated text string for Kernel purposes that needs to be added to this channel.delete: space-separated text string for Kernel purposes that needs to be deleted in this channel.
-
fpaAuthScopes: object with the information of the Kernel scopes to modify. It includes two fields, at least one of them is required:
add: space-separated text string with the Kernel scopes that need to be added to this channel.delete: space-separated text string with the Kernel scopes that need to be deleted on this channel.
-
dialogLibraries: array with the changes on the dialog libraries (or plugins). ONLY the contextFilters that apply to each dialog on each channel are allowed to be modified. The format of each object in this array will be:
- name: name of the library that has the dialog on which you want to apply the change.
- authorization: object with the modifications in the Kernel purposes and scopes to perform for this library:
- purposes: object with the information of the Kernel purposes to modify. It includes two fields, at least one of them is required:
add: space-separated text string for Kernel purposes that needs to be added to this channel.delete: space-separated text string for Kernel purposes that needs to be deleted in this channel.
- scope: object with the information of the Kernel scopes to modify. It includes two fields, at least one of them is required:
add: space-separated text string with the Kernel scopes that need to be added to this channel.delete: space-separated text string with the Kernel scopes that need to be deleted on this channel.
- dialogs: array of dialogs whose configuration is going to change within the library. Each object in this array will contain:
- id: identifier of the dialog whose configuration you want to modify.
- authorization: object with the modifications in the Kernel purposes and scopes to perform for this library:
- purposes: object with the information of the Kernel purposes to modify. It includes two fields, at least one of them is required:
add: space-separated text string for Kernel purposes that needs to be added to this channel.delete: space-separated text string for Kernel purposes that needs to be deleted in this channel.
- scope: object with the information of the Kernel scopes to modify. It includes two fields, at least one of them is required:
add: space-separated text string with the Kernel scopes that need to be added to this channel.delete: space-separated text string with the Kernel scopes that need to be deleted on this channel.
- triggerConditions: array of dialog start conditions. Each object in this array will contain:
- intent: intent that will launch the dialog.
- settings: object with the dialog settings.
- contextFilters: array with the user context validation and channel to launch the use case. This array will carry the FULL LIST of
contextFilters from the dialog for the channel. The contextFilters array of each dialog will be populated with the information that comes in this file.
- suggestions: boolean that determines if the main dialog will execute the suggestions dialog.
Running the Aura configuration updater script multiple times with the same changes-bot-response.json file will not cause data to be duplicated. The information in dialogLibraries field will be overridden and the list of purposes and scopes will be unique (no duplication).
Example of changes-bot-response.json file
{
    "version": "1.0",
    "channels": [
        {
            "channelId": "45494a5b-835a-4fff-a813-b3d2be529dbe",
            "fpaAuthPurposes": {
                "add": "mi-purpose",
                "delete": "aura-technical-problems-purpose"
            },
            "fpaAuthScopes":  {
                "add": "mi-scope"
            },
            "dialogLibraries": [
                {
                    "name": "bill",
                    "authorization": {
                        "scopes": {
                            "add": "mi-lib-scope"
                        }
                    },
                    "dialogs": [
                        {
                            "id": "balance-check",
                            "authorization": {
                                "purposes": {
                                    "add": "aura-technical-problems-purpose",
                                    "delete": "customer-self-service"
                                },
                                "scopes": {
                                    "delete": "mobile-balance-read"
                                }
                            },
                            "triggerConditions": [
                                {
                                    "intent": "intent.balance.check",
                                    "contextFilters": [
                                        {
                                            "name": "Anonymous redirect to linking",
                                            "type": "type",
                                            "conditions": "/type eq 'anonymous'",
                                            "true": {
                                                "name": "Anonymous redirect to linking",
                                                "breakDialogExecution": true,
                                                "breakFilterEval": true,
                                                "redirectToIntent": "intent.account.linking"
                                            }
                                        }
                                    ]
                                }
                            ],
                            "suggestions": false
                        }
                    ]
                }
            ]
        }
    ]
}
It is a JSON object with a version and the text resources that you want to change with the same format as the aura-bot, as it is obtained from PoEditor with aura-locale-importer.
- If a text resource (
common:common.error.main) already existed, it will be replaced by the one in the changelog.
- If a text resource (
my:mi.es-es.locale.uno) does not exist, it will be added to the locales file.
Example of changes-locale-es-es.json
{
    "version": "1.0",
    "common:common.error.main": [
        "Ein unerwarteter Fehler ist aufgetreten. Bitte versuche es erneut"
    ],
    "common:common.goodbyes.main": [
        "Bis bald und vielen Dank für den Chat. Ich hoffe, ich konnte dir weiterhelfen.",
        "Bis bald und vielen Dank für den Chat. Ich hoffe, ich konnte dir weiterhelfen.",
        "Bis bald und vielen Dank für den Chat. Ich hoffe, ich konnte dir weiterhelfen."
    ],
    "mi:mi.es-es.locale.uno": [
        "Mi locale uno",
        "Mi locale 1",
        "Mi locale primero"
    ]
}
6 - Migrate logs
Migrate logs procedure
Guidelines to migrate logs previous to Tequila Aura Platform release.
Prerequirements
- Recommended:
kubectl installed in your local host.curl installed in your local host.jq installed in your local host.
Procedure
Get the credentials from the destination cluster
As we will use the common storage account created in releases after Tequila (included), we need to get its credentials of it from the new cluster, executing the following command:
kubectl -n aura-system get secret elasticsearch-es-secure-settings -o yaml
This will return a yaml with two keys with the credentials needed to access the storage account, as shown below:
  azure.client.migrate.account: c29tZXN0b3JhZ2VhY2NvdW50bmFtZQ==
  azure.client.migrate.key: YzI5dFpYTjBiM0poWjJWaFkyTnZkVzUwYTJWNWFXNWlZWE5sTmpRPQ==
Create manifest with secrets
Copy the base64 encoded values of each key and create a file with the following content, replacing the values with the ones copied:
apiVersion: v1
data:
  azure.client.default.account: c29tZXN0b3JhZ2VhY2NvdW50bmFtZQ==
kind: Secret
metadata:
  labels:
    app: elasticsearch
    stack: management
  name: eck-elasticsearch-azure-account
  namespace: aura-system
type: Opaque


---

apiVersion: v1
data:
  azure.client.default.key: YzI5dFpYTjBiM0poWjJWaFkyTnZkVzUwYTJWNWFXNWlZWE5sTmpRPQ==
kind: Secret
metadata:
  annotations:
  labels:
    app: elasticsearch
    stack: management
  name: eck-elasticsearch-azure-key
  namespace: aura-system
type: Opaque
Apply the manifest
Apply the manifest created in the previous step in the source cluster, executing the following command:
kubectl apply -f <manifest-file>
This will make an operator reconciliation needed, so the elastic-operator will restart the Elasticsearch cluster, so it has to wait until the whole cluster pods are restarted. We can check the reconciliation status checking the status field from the Elasticsearch object:
kubectl -n aura-system get elasticsearches.elasticsearch.k8s.elastic.co elasticsearch -o json |jq .status
Take the snapshot
After the previous step we have the source cluster ready to take the snapshot in the common storage account which is shared with the destination cluster. Now we can take the snapshot to restore it in the destination cluster later.
To do this we need to make a port-forward to the Elasticsearch pod/svc in the source cluster and, once we have the port-forward established, we can execute the following command to take the snapshot:
curl -XPUT "https://localhost:9200/_snapshot/aura_azure_backup/migration-elastic" -k -u 'elastic:XXXXXX' -d '{ "indices": "aurak8s-service*", "ignore_unavailable": "true", "include_global_state": "false", "metadata": { "taken_by": "aura" } }' -H 'Content-Type: application/json'
Check the snapshot status with the command:
curl "https://localhost:9200/_snapshot/aura_azure_backup/migration-elastic" -k -u 'elastic:XXXXXX' |jq '.snapshots[].state'
Once the snapshot is finished, put the repository in readonly mode as now the destination cluster will be the one using it:
curl -XPUT https://localhost:9200/_snapshot/aura_azure_backup -k -u 'elastic:XXXXXX' -d '{ "type": "azure", "settings": { "readonly": true, "container": "eck", "base_path": "elk", "chunk_size": "32m", "compress": true }}' -H 'Content-Type: application/json'
Restore the snapshot
Once the snapshot is taken, we can restore it in the destination cluster. To do this, make a port-forward to the Elasticsearch pod/svc in the destination cluster and once the port-forward is established, execute the following command to put the repository in readwrite mode:
curl -XPUT https://localhost:9200/_snapshot/aura_azure_backup -k -u 'elastic:XXXXXX' -d '{ "type": "azure", "settings": { "readonly": false, "container": "eck", "base_path": "elk", "chunk_size": "32m", "compress": true }}' -H 'Content-Type: application/json'
Now, we can restore the snapshot executing the following command:
curl -XPOST -H 'Content-Type: application/json' "https://localhost:9200/_snapshot/aura_azure_backup/migration-elastic/_restore" -k -u 'elastic:XXXXXX' -d '{
  "indices": "aurak8s-*",
  "rename_pattern": "(.+)",
  "rename_replacement": "$1-restored",
  "feature_states": [ "none" ]
  }'
This process will take a while. The cluster status will turn yellow during the restore. We can check the status with the command:
curl https://localhost:9200/_cluster/health -k -u 'elastic:XXXXXX' |jq
7 - Aura staging environments
Aura staging environments
The current documents describe:
- How channels should be integrated in the staging environments
- How Aura environments should be configured to be used by channels
Introduction
Staging environments refers to Aura environments to be used by the channels to integrate their own releases with the succeeding release of Aura.
The following picture provides a diagram to show how Kernel and Aura environments are connected.
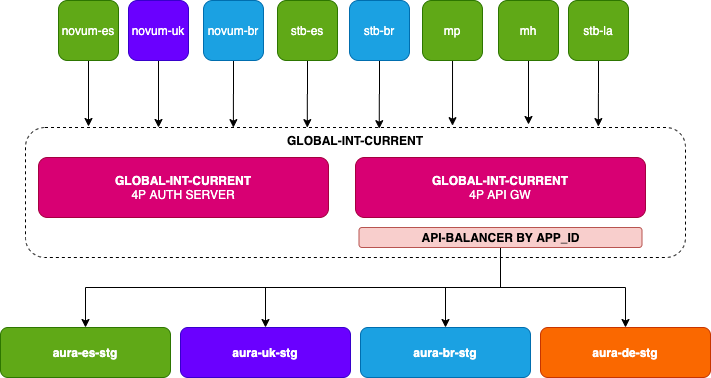
- The current document contains the information needed by the channels, excepting the passwords, to access all Aura integration environments from Kernel
global-int-current environment.
- Read the document Configuration of Aura environmenta to know how Aura environments must be configured to be used by the channels that want to integrate their own releases with the next Aura release.
Integration of channels to access to Aura environments
Integration for channels in Spain
- Aura environment name:
es-stg
- Direct Line token endpoint
$ curl -X GET https://svc-es-stg.auracognitive.com/aura-services/v1/token/wss --header 'Authorization: APIKEY <YOUR-API-KEY>'
- Kernel integration:
- In order to connect from
global-int-current to the corresponding aura-services API endpoint, each channel willing to connect to es-stg environment should request to the Kernel global-int-current support team to redirect their get-aura-id request to the aura-services endpoint of es-stg.
- Kernel auth endpoint: https://auth.global-int-current.baikalplatform.com/
- Get
aura-id endpoint: https://api.global-int-current.baikalplatform.com/aura-services/v1/users/aura-id
$ curl -X GET https://api.global-int-current.baikalplatform.com/aura-services/v1/users/aura-id --header 'Authorization: Bearer <user-access-token>'
Integration for channels in Brazil
- Aura environment name:
br-stg
- Direct Line token endpoint
$ curl -X GET https://svc-br-stg.auracognitive.com/aura-services/v1/token/wss --header 'Authorization: APIKEY <YOUR-API-KEY>'
$ curl -X GET https://api.global-int-current.baikalplatform.com/aura-services/v1/users/aura-id --header 'Authorization: Bearer <user-access-token>'
Integration for channels in UK
- Aura environment name:
uk-stg
- Direct Line token endpoint
$ curl -X GET https://svc-uk-stg.auracognitive.com/aura-services/v1/token/wss --header 'Authorization: APIKEY <YOUR-API-KEY>'
$ curl -X GET https://api.global-int-current.baikalplatform.com/aura-services/v1/users/aura-id --header 'Authorization: Bearer <user-access-token>'
Integration for channels in Germany
- Aura environment name:
de-stg
- DirectLine token endpoint
$ curl -X GET https://svc-de-stg.auracognitive.com/aura-services/v1/token/wss --header 'Authorization: APIKEY <YOUR-API-KEY>'
$ curl -X GET https://api.global-int-current.baikalplatform.com/aura-services/v1/users/aura-id --header 'Authorization: Bearer <user-access-token>'