This is the multi-page printable view of this section.
Click here to print.
Return to the regular view of this page.
Development tools
Creating Aura experiences is easier thanks to the innovative tools and resources our engineers have designed for use case developers.
Discover the available ones and when and how you can use them
Introduction
In both cases, certain tools are release-dependent, so you should select the appropriate one for your Aura Platform release.
The key tools at your disposal are listed below:
▶️ Get started with Aura minibot, in order to work in local environment for testing purposes
▶️ The NLP virtual machine is ready for the configuration of the NLP development environment
▶️ Discover Abacus 1.0.0., a tool for training, testing and certify an NLP model.
▶️ With Aura mocks server you can provide a mock for any service using aura-bot
1 - Aura minibot
Aura Minibot user guide
Guidelines for the installation and configuration of Aura minibot
⚠️ In Aura’s new architecture, Aura minibot works jointly with Aura minigroot
Introduction to Aura minibot
Aura minibot is a tool intended for testing purposes in local environment.
It is highly recommended to use Aura minibot to get familiar with aura-bot when developing use cases.
Pre-requirements
- Azure accounts (It can be a free one)
- Visual Studio Code (required for the minibot generated by a Docker image)
- Remote – Containers extension for Visual Studio Code (required for the minibot generated by a Docker image)
- Aura docker registry token (Contact your manager or APE team who will supply it for you)
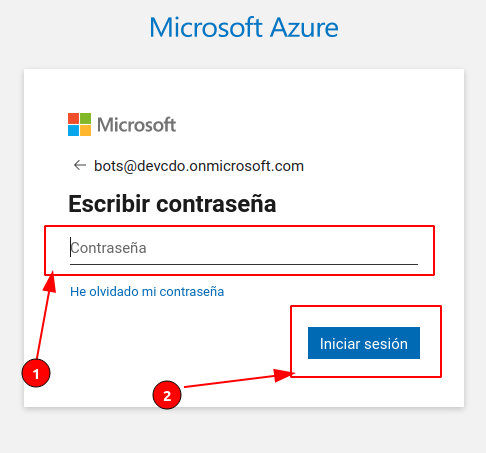
Register a bot in Azure
The current section explains the steps for the registration of a bot in Azure. Bear in mind that the Azure site and the steps to register a new resource change very often. If any questions arise, please contact APE Team, so they can aid with the registration.
-
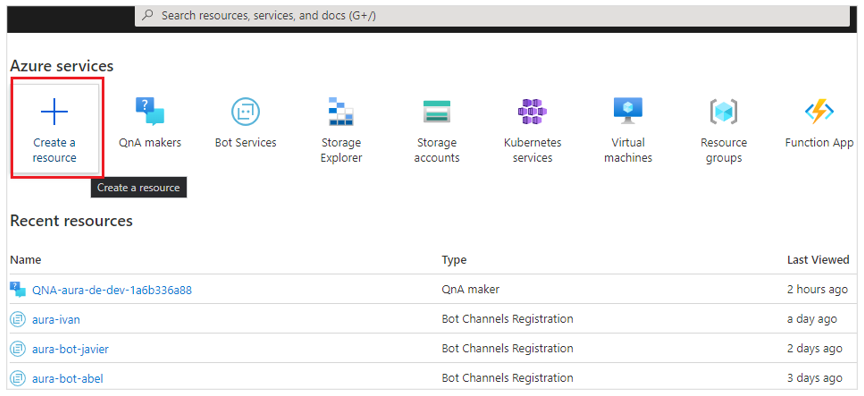
In the Azure portal, create a resource of Azure Bot type.
-
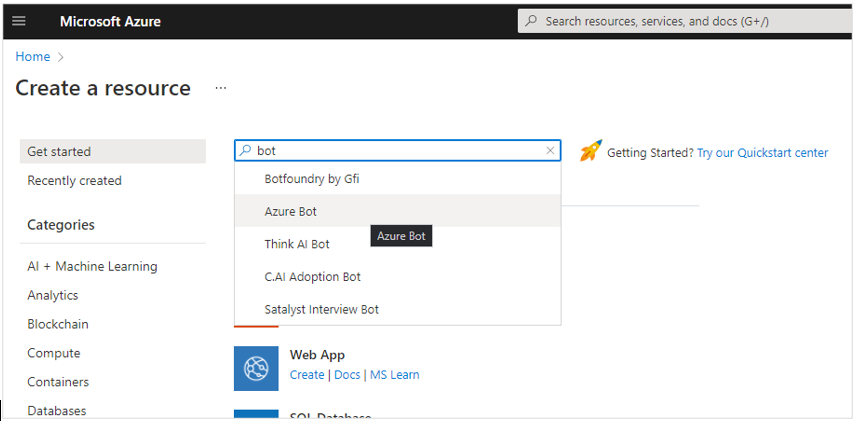
Type in the search box “bot” and click on “Azure Bot”, the click on “Create”.
-
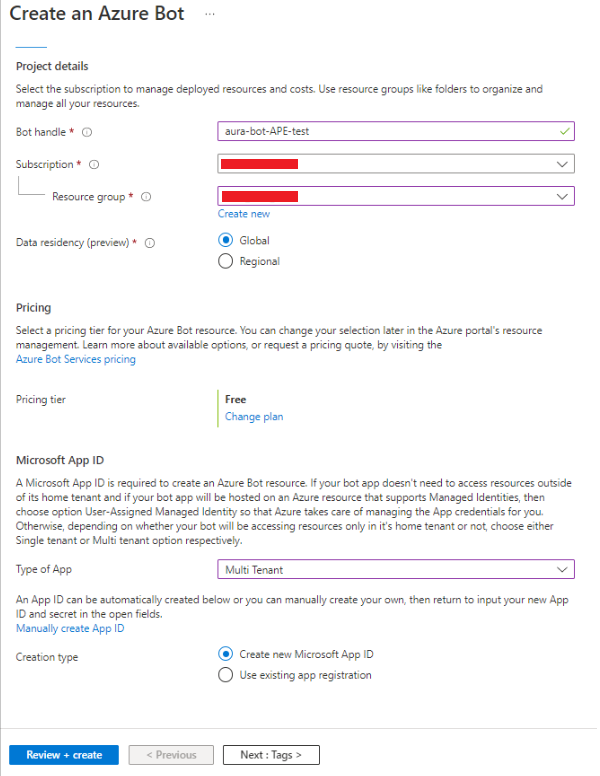
Fill in the form fields with the following values:
- Bot handle: unique identifier for your bot, for instance: aura-bot-ape
- Subscription: OB Subscription
- Resource Group: OB Resource Group
- Pricing tier: Free
- Type of App: Multi Tenant
- Creation type: Create new Microsoft App ID
-
Now click on “Review + create”
⚠️ Currently, with the addition of the aura-groot, it is needed to create 2 bots in Azure (root & skill).
-
The new Azure Bot resource will be validated, so the next step is to click on “Create” again, so this step will deploy our new resource. A new Microsoft App Id and password will be generated.
-
Click on “Go to Resource” to see the breakdown of options and configurations available for your bot.
-
Once the Azure Bot is created, it is required to get two parameters: Microsoft App ID and Microsoft App Password:
-
Microsoft App ID is located in Configuration. Copy it in a safe place.
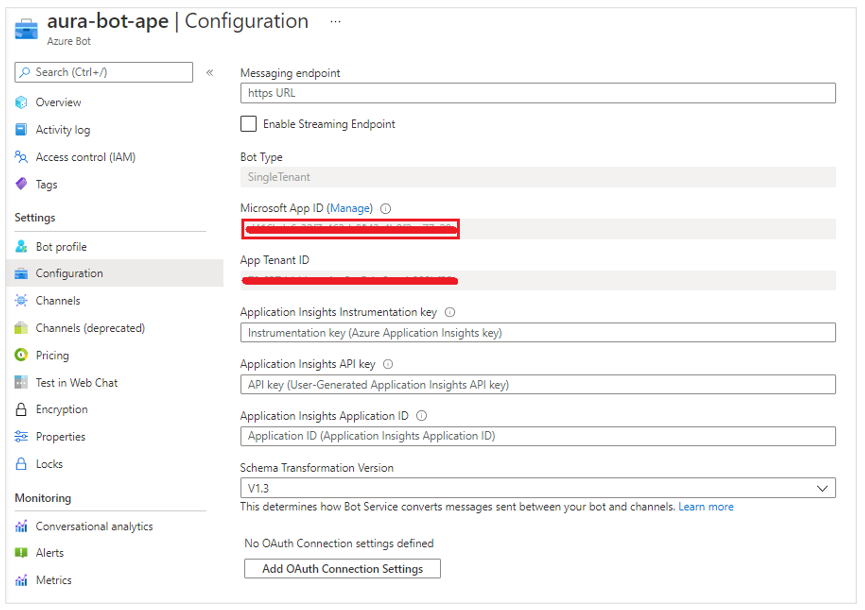
-
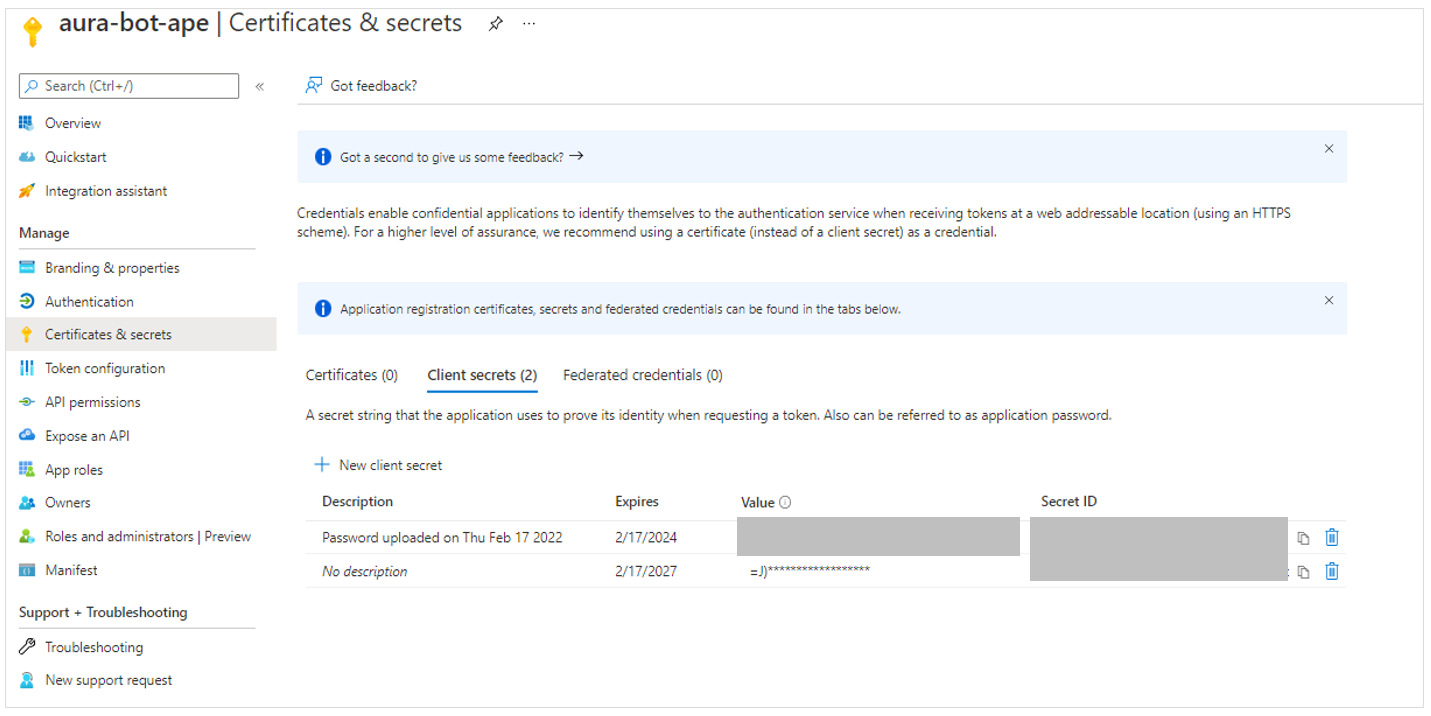
Get Microsoft App Password by clicking on “Manage”.
-
Copy it in a safe place, as you will need it for the bot identification and cannot be visualized afterwards, when requesting a token.
-
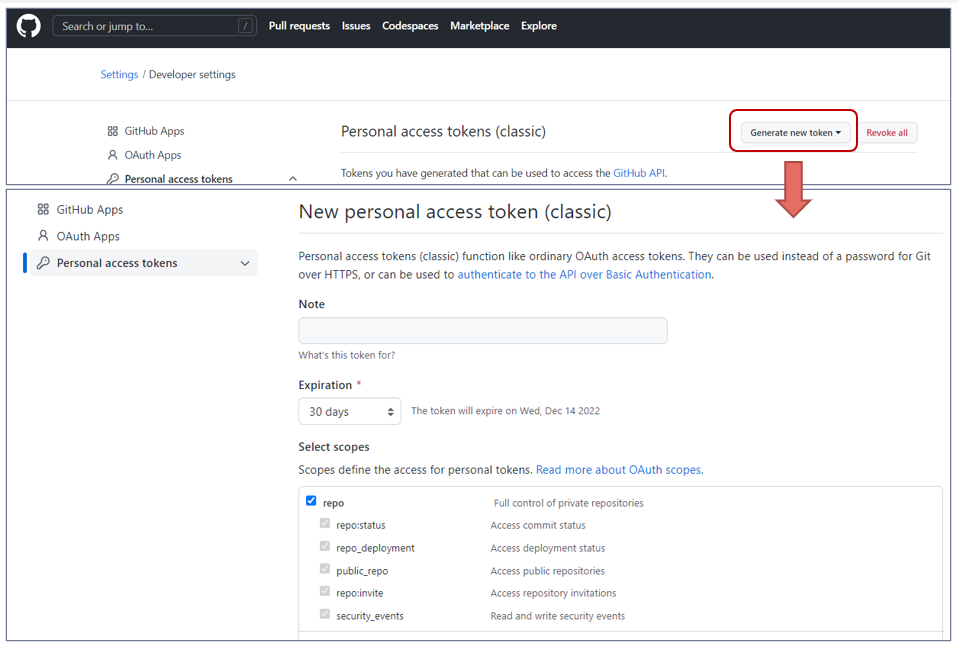
In case you have lost it, click on “New client secret” and set the expiration date.
The minibot is provided as a Docker image from Aura’s private registry.
From this docker image, follow the next steps for its installation and configuration.
Complementary, the minibot can also be generated through a .tgz file, if the docker cannot be used.
Set all the required environment variables
Firstly, you need to set some environment variables located in:
aura-mini-bot/config.env
In this file, there are the environment variables shared between aura-groot and aura-bot as skill. Also, there are variables for
the scripts to set Direct Line endpoint, so in Microsoft variables you should set the ones of the Azure bot that will be
configured in aura-groot.
You also have two files with variables for aura-groot and aura-bot as skill. These files are:
aura-mini-bot/config-groot.env
aura-mini-bot/config-bot.env
Bot credentials
Edit the following variables using the values you have in Azure portal for aura-groot and aura-bot:
AURA_MICROSOFT_APP_PASSWORD=<generated secret>
AURA_MICROSOFT_APP_ID=<Microsoft App Id>
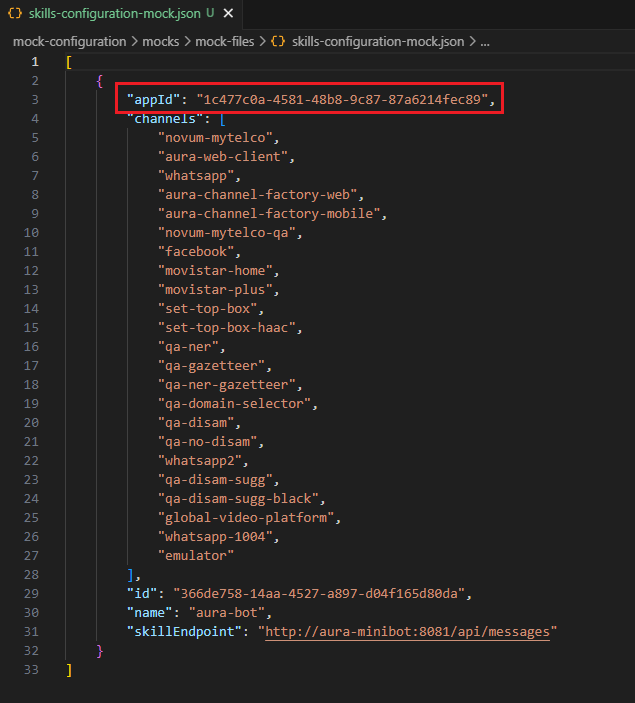
As now we have 2 bots, you should set these variables in both files, config-groot.env and config-bot.env. Also, you
should set the same AURA_MICROSOFT_APP_ID that you set in config-bot.env in the mocked skills configuration file
(mock-configuration/mocks/mock-files/skills-configuration-mock.json), in the appId field, to indicate aura-groot the appId of the skill it has to communicate with.
Access to the database
Minibot requires access to a MongoDB database to be able to store information related to the user session. Those variables can be found here:
AURA_MONGODB_BOT_DATABASE=aura-minibot
AURA_MONGODB_PASSWORD=pass
AURA_MONGODB_URI=mongodb://localhost:27017?authSource=admin
AURA_MONGODB_USERNAME=admin
By default, AURA_MONGODB_USERNAME and AURA_MONGODB_PASSWORD variables are set as “admin” and “pass” in the .env file. These values must match the <user_name> and <password_db> set in the next step.
Run a local database
If you do not have any mongoDB instance, download a Docker image and run docker for storing sessions locally:
docker pull mongo:4.4
docker run -d -p 27017-27019:27017-27019 --name mongodb mongo:4.4
The steps to modify the DB with the default user and password for the minibot are included here as an example, sorted by execution order:
- Enter the docker container:
docker exec -it mongodb bash
- Enter in Mongo shell
- Create the user in
admin DB
use admin
db.createUser({user:"<user_name>", pwd: "<password_db>", roles: [{role:"userAdmin", db:"admin"}]})
- Create the
aura-bot-es-dev DB
- Exit MongoDB console
- Exit docker container
Run Aura minibot on docker
Minibot is provided as a docker image from a private registry.
To access the private registry, request access to Aura Global (through the APE Team) and set login credentials on docker:
Get registry access
Use the following command:
docker login -u <user-id> -p <user-token> auraregistry.azurecr.io
With azcli:
az login
az acr login --name auraregistry
Pull minibot and minigroot images
Get the minigroot and minibot as skill specific images:
docker pull auraregistry.azurecr.io/aura/aura-mini-groot:<version>
docker pull auraregistry.azurecr.io/aura/aura-mini-bot:<version>
Get all available versions from registry
It is possible to get all available minibot and minigroot images using azcli (native or dockerized version) tool and following these steps:
-
Login in Azure:
az login
This message will appear:
To sign in, use a web browser to open the page https://microsoft.com/devicelogin and enter the code XXXX to authenticate.
-
Open the URI an insert the provided code.
-
To get the available minibot images from registry, the user must use this command.
az acr repository show-tags -n auraregistry --repository aura/aura-mini-bot
-
To get the available minigroot images from registry, the user must use this command.
az acr repository show-tags -n auraregistry --repository aura/aura-mini-groot
These commands will show an array of string with all available versions for each.
Get latest version
To get the latest minigroot and minibot versions, replace <version> by latest in the command of the section Pull minibot and minigroot images.
NOTE: using latest for the second or successive times does not update the image if there is a new latest image in the registry. In this scenario, to make sure the latest image is being retrieved and pulled, execute the following docker commands in that order:
docker compose stop

docker-compose rm -f

docker-compose pull

docker-compose up -d
Launch minibot
To work with the all-in-one solution, five files must be created: docker-compose.yml, config.env, config-groot.env, config-bot.env and ngrok.yml.
The initial scaffolding is located in the repo: https://github.com/Telefonica/aura-mini-bot (Contact your manager or APE team if you do not have access to it)
In this case, you can use the command:
Example of docker-compose.yml file
version: '3'

services:
  mongodb:
    image: mongo:4.2
    restart: unless-stopped
    env_file:
      - config.env
    ports:
      - "27017:27017"

  aura-minigroot:
    image: auraregistry.azurecr.io/aura/aura-mini-groot:<version>
    volumes:
      - ./mock-configuration/mocks/mock-files/skills-configuration-mock.json:/opt/aura-groot/aura-mini-groot/sources/files/mock-files/skills-configuration-mock.json
    env_file:
      - config.env
      - congif-groot.env
    restart: unless-stopped
    depends_on:
      - mongodb
    ports:
      - "8080:8080"

  aura-minibot:
    image: auraregistry.azurecr.io/aura/aura-mini-bot:<version>
    volumes:
      - ./packages:/tmp/dialogs
      - ./mock-configuration:/opt/aura-bot/aura-mini-bot/mock-configuration
    env_file:
      - config.env
      - config-bot.env
    restart: unless-stopped
    depends_on:
      - mongodb
    ports:
      - "8081:8081"

  azcli:
    image: mcr.microsoft.com/azure-cli:2.49.0
    depends_on:
      - ngrok
    env_file:
      - config.env
    command: >
      sh -c "
        az login --tenant $$AURA_MICROSOFT_TENANT &&
        az account set --subscription $$AURA_MICROSOFT_SUBSCRIPTION &&
        az bot update -n $$AURA_MICROSOFT_BOT_NAME -g $$AURA_MICROSOFT_RESOURCE_GROUP --endpoint $$(curl --silent http://ngrok:4040/api/tunnels | jq -r '.tunnels | map(.public_url) | .[]' | grep https)/api/messages
      "
  ngrok:
    image: ngrok/ngrok
    command:
      - "start"
      - "--all"
      - "--config"
      - "/etc/ngrok.yml"
    volumes:
      - ./ngrok.yml:/etc/ngrok.yml
    ports:
      - "4040:4040"
Example of config.env file
# Microsoft Azure
AURA_MICROSOFT_BOT_NAME=<your-aura-bot-name>
AURA_MICROSOFT_RESOURCE_GROUP=<your-azure-resource-group>
AURA_MICROSOFT_TENANT=<your-azure-tenant>
AURA_MICROSOFT_SUBSCRIPTION=<your-azure-subscription>

# MongoDB connection
AURA_MONGODB_BOT_DATABASE=aura-minibot
AURA_MONGODB_URI=mongodb://mongodb:27017?authSource=admin
AURA_MONGODB_USERNAME=admin
AURA_MONGODB_PASSWORD=pass
MONGO_INITDB_ROOT_USERNAME=admin
MONGO_INITDB_ROOT_PASSWORD=pass

# Npm Auth Token
NPM_TOKEN=<your-npm-auth-token>
# NPM_AUTH=<your-optional-local-npm-auth-config>
# NPM_AUTH_SCOPE=<your-optional-local-npm-packages-scope>

# LOCALES
AURA_DEFAULT_LOCALE=<your-locale>
AURA_DEFAULT_TIME_ZONE=<your-time-zone>

AURA_PHONE_COUNTRY_CODE=ES
AURA_SERVICE_ENVIRONMENT=DEV

AURA_HOST_SERVICE_URL=http://aura-minigroot:8080
AURA_KPI_STORE_MODE=file
Example of ngrok.yml file
version: 3
agent:
  authtoken: <your-auth-token>
  web_addr: 0.0.0.0:4040
tunnels:
  minigroot:
    proto: http
    addr: aura-minigroot:8080
Example of config-groot.env file
AURA_MICROSOFT_APP_ID=<your-groot-app-id>
AURA_MICROSOFT_APP_PASSWORD=<your-groot-app-password>
Example of config-bot.env file
AURA_MICROSOFT_APP_ID=<your-bot-app-id>
AURA_MICROSOFT_APP_PASSWORD=<your-bot-app-password>
NOTE: Set all <param> from ngrok.yml, config.env, config-groot.env, config-bot.env and docker-compose.yml to your needs.
The docker-compose.yml file starts MongoDB, azurecli, ngrok, minigroot and minibot containers and exposes minigroot, minibot, MongoDB and ngrok ports (8080, 8081, 27017 and 4040 respectively).
The environments can be started with the command:
docker-compose up -d
Work with Aura minibot and install new dialogs
To work with new dialogs on minibot, follow the steps below:
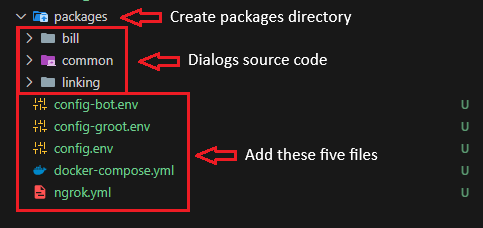
-
Place a copy of docker-compose.yml, config-bot.env, config-groot.env, config.env and ngrok.yml in the working directory and create a packages directory to contain the dialogs source code.
-
Start the environment from shell with the command:

-
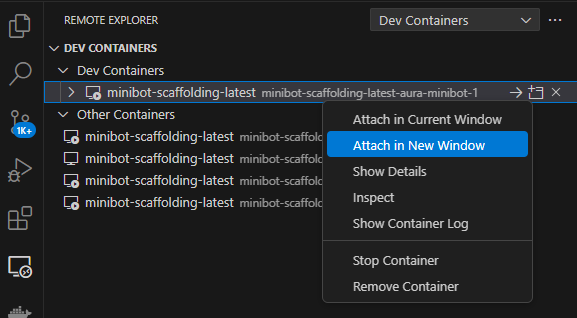
If VSCode is used, you can connect/attach to the aura-minibot container, so you can work as local minibot version.
-
Minibot with the new dialog is located at /opt/aura-bot/aura-mini-bot. The current dialog sources (TypeScript files) are located at /tmp/dialogs, so you can work as non-container version.
-
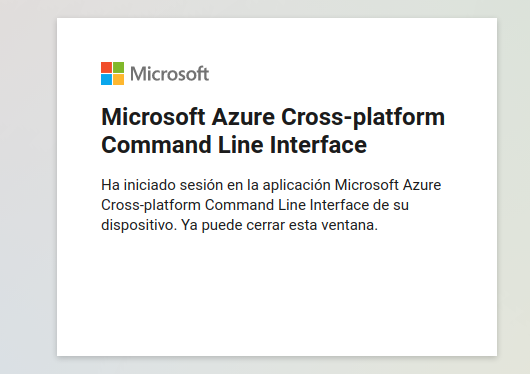
Azure endpoint must be updated. This can be made by simply right clicking on the azcli container. Then, click on Show Container Log.
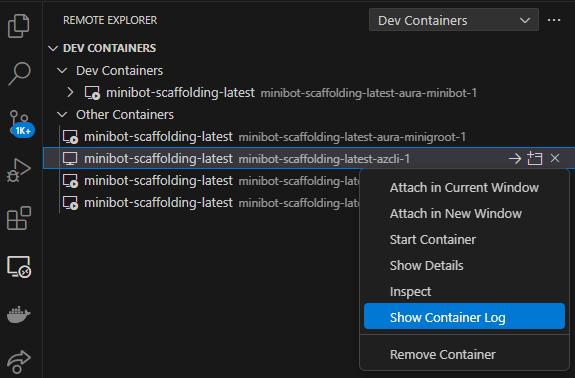
This will show in the integrated terminal a message with the URL that must be opened in a web browser and the code needed to authenticate in Azure.

-
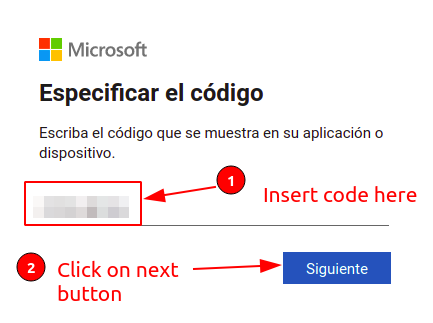
When the URL is opened, an insert code request will appear on web navigator.
-
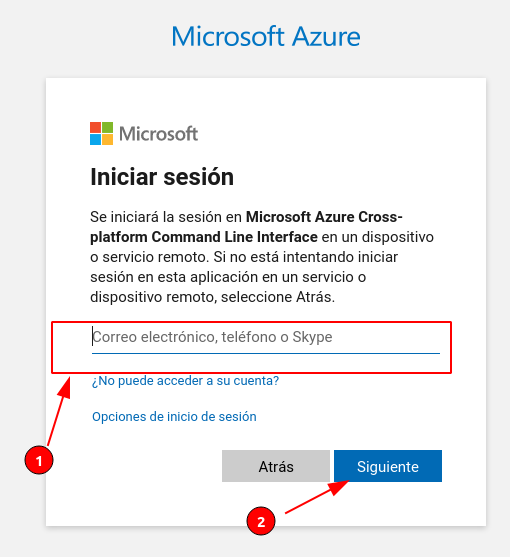
If no active session exists, Azure credentials must be inserted.
-
After credentials are set, a successful message will appear and bot endpoint will be updated.
Install Dialogs
At this stage, you can install a new dialog or an existing one, as well as update or remove dialogs.
Install a new dialog
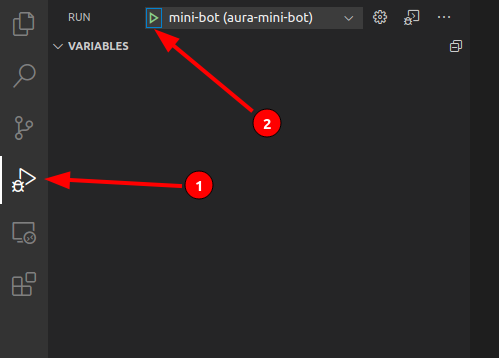
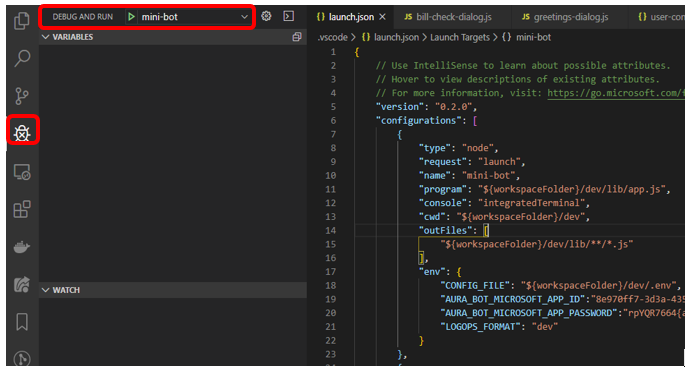
To install new dialogs on minibot, another run task is included. To use it, click on Run button (#1 on next image), select Install dialogs from dropdown (#2 on next image) and click on on start debugging (#3 on next image).

This action will build and pack the dialogs from its source code and insert them into the minibot, but this action will not start minibot.
Install an existing dialog
Installing one or more than one existing dialog can be useful for developers, as they can use them as a reference.
To install an existing dialog on the minibot container, we firstly need to add it to the minibot source code, inside the packages/ folder.
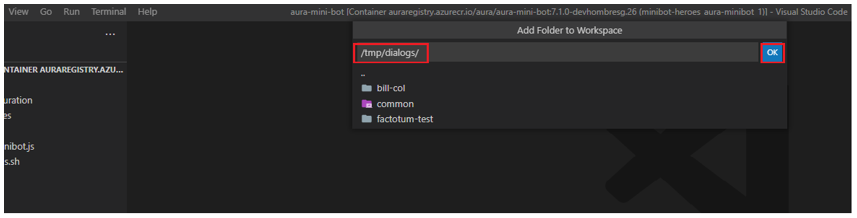
In the following example, we have added three dialog libraries: bill-col, common and factotum-test.
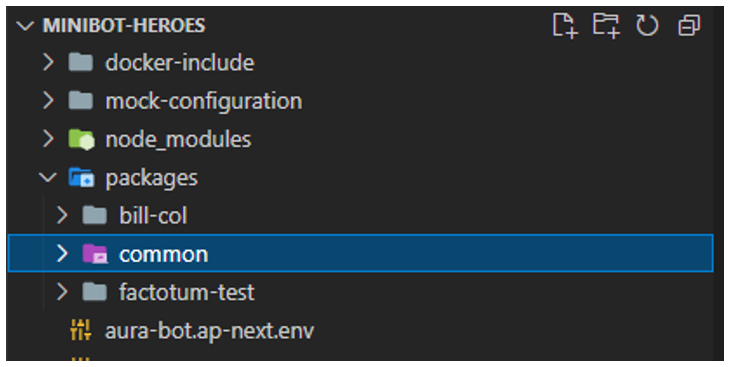
To add the dialogs to the minibot container, follow these steps:
- Click on “File” -> “Add Folder to Workspace”
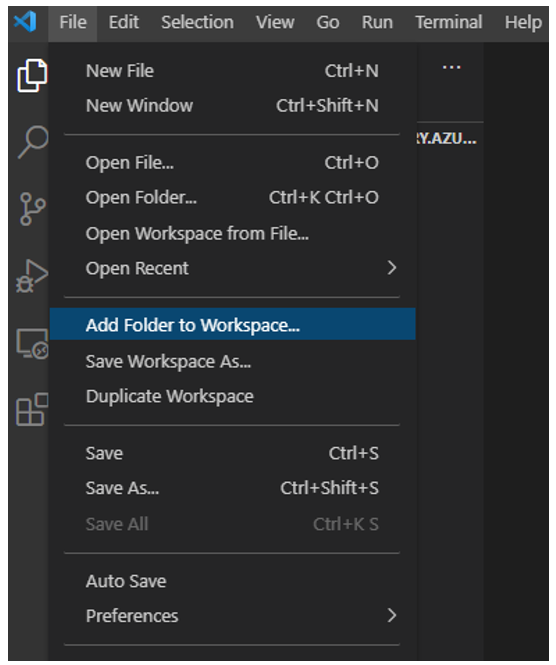
- In the “Add Folder to Workspace” input text bar, type in “/tmp/dialogs/”. A list of dialog libraries passed by volume to the container will be shown. Click “Ok” to add them to the minibot container.
- At this point, we will be able to see the list of dialogs passed by volume in our VS Code File Explorer.
- We can now proceed to install new dialogs, if required, as shown above.
Run Aura minibot
To get minibot running click on Run (#1 on next image) and then click on start debugging (#2 on next image). This action will not install new dialogs from its source (/tmp/dialogs).
This action will start minibot so it can be debugged as normally.
Update a single dialog
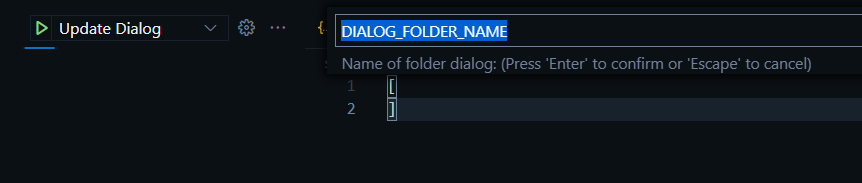
⚠️ Before you can update a single dialog, you must perform the task Install dialogs.
To update a dialog independently click on Update Dialog. The task will ask for the name of the dialog folder inside /tmp/dialogs.
Remove a Dialog
To delete a dialog, temporarily you can delete it from the file /opt/aura-bot/aura-mini-bot/sources/plugin-config.json
To permanently remove it you have to delete its folder inside /tmp/dialogs. Then run the Install Dialog or Update Dialog task.
Working with Mocks in Aura minibot
It is possible to use Mocks to simulate external HTTP services. This is done using a tool called Nock.
In order to use custom Mocks we must:
- Configure the environment variables that we are going to modify, which are usually the endpoints to the services to impersonate.
- Configure the data for Nock.
- If necessary, create a custom response file in JSON format.
To work with custom Mocks it is necessary to create this file and directory structure:
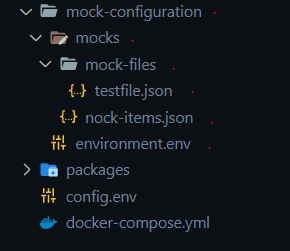
Once the container is generated, this folder will be linked to:
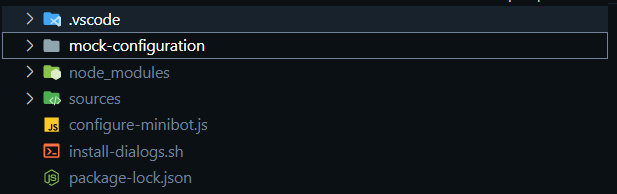
mock-configuration/environment.env
It contains the necessary environment variables. These environment variables will replace the ones configured in the libraries (dialogs).
mock-configuration/mocks/nock-items.json
This file contains the configurations for the Nock tool.
The general format is as follows:
       "name": "<NAME>",
       "var": "<ENVIRONMENT VARIABLE WITH ENDPOINT_>,
       "method": "<HTTP METHOD>",
       "regex": "<REGEX TO ACTIVATE>", (Optional. Mandatory if does not exist path),
       "path": <PATH TO ACTIVATE>, (Optional. Mandatory if does not exist regex)
       "reply": {
           "status": <HTTP STATUS>,
           "response": <HTTP RESPONSE> (Optional.  Mandatory if does not exist file),
           "file": <FILENAME> (Optional.  Mandatory if does not exist response),
       }
A general application example is shown below:
Example
[
    {
        "name": "Channels configuration",
        "var": "AURA_CHANNELS_CONFIGURATION_API_ENDPOINT",
        "method": "get",
        "regex":"\/channels",
        "reply": {
            "status": 200,
            "file": "channels-configuration-mock.json"
        }
    },
    {
        "name": "Skills configuration",
        "var": "AURA_CHANNELS_CONFIGURATION_API_ENDPOINT",
        "method": "get",
        "regex": "\/skills",
        "reply": {
            "status": 200,
            "file": "skills-configuration-mock.json"
        }
    },
    {
        "name": "Authorization",
        "var": "AURA_AUTHORIZATION_ENDPOINT",
        "method": "get",
        "regex":"^/.*",
        "reply": {
            "status": 200,
            "file": "authentication-mock.json"
        }
    },
    {
        "name": "FP Terms and conditions API GET",
        "var": "AURA_TERMS_AND_CONDITIONS_ENDPOINT",
        "method": "get",
        "regex": "\/v0",
        "reply": {
            "status": 404,
            "response": {}
        }
    },
    {
        "name": "FP Terms and conditions API POST",
        "var": "AURA_TERMS_AND_CONDITIONS_ENDPOINT",
        "method": "post",
        "regex": "\/v0",
        "reply": {
            "status": 200,
            "response": { "status": "accepted" }
        }
    }
]
mock-configuration/mocks/mock-files
If the configuration of one of the Nock entries requires a file for the response it must be contained in this directory.
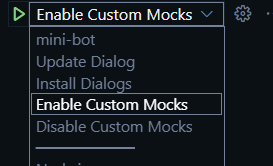
Enable Custom Mocks
To enable custom Mocks, run the task “Enable Custom Mocks”.
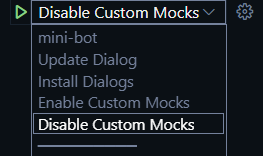
Disable Custom Mocks
To deactivate the custom Mocks and leave everything with the configuration you have the default dialogs you have to run the task “Disable Custom Mocks”.
Aura minibot start-up messages
The start-up messages of the minibot are the following ones:
Minibot start-up messages
/opt/aura-bot/aura-mini-bot/sources #  /usr/bin/env AURA_LOGGING_LEVEL=DEBUG AURA_LOGGING_FORMAT=dev 'NODE_OPTIONS= --require /root/.vscode-server/bin/dc96b837cf6bb4a
f9cd736aa3af08cf8279f7685/extensions/ms-vscode.js-debug/src/bootloader.js  --inspect-publish-uid=http' 'VSCODE_INSPECTOR_OPTIONS=:::{"inspectorIpc":"/tmp/node-cdp.285
-8c9b4a1b-1.sock","deferredMode":false,"waitForDebugger":"","execPath":"/usr/local/bin/node","onlyEntrypoint":false,"autoAttachMode":"always","mandatePortTracking":tr
ue,"fileCallback":"/tmp/node-debug-callback-0cff3d0edb5d6058"}' /usr/local/bin/node ./lib/index.js
Debugger attached.
DEBUG No existing CONFIG_FILE (undefined) found, using only process.env {
        module: 'ConfigurationManager',
        corr: 'aura-system',
        version: 'not-reachable',
        app: 'aura-bot',
        host: 'c77f96ee7285'
      }
DEBUG Environment configuration loaded {
        module: 'ConfigurationManager',
        corr: 'aura-system',
        version: '8.30.0',
        app: 'aura-bot',
        host: 'c77f96ee7285'
      }
DEBUG Starting HttpMonkeyPatcher {
        module: 'StartService',
        corr: 'aura-system',
        version: '8.30.0',
        app: 'aura-bot',
        host: 'c77f96ee7285'
      }
DEBUG HttpMonkeyPatcher starting {
        module: 'orchestrator',
        corr: 'aura-system',
        version: '8.30.0',
        app: 'aura-bot',
        host: 'c77f96ee7285'
      }
INFO  HttpMonkeyPatcher started. {
        module: 'orchestrator',
        corr: 'aura-system',
        version: '8.30.0',
        app: 'aura-bot',
        host: 'c77f96ee7285'
      }
DEBUG MiniBotServiceMock starting {
        module: 'orchestrator',
        corr: 'aura-system',
        version: '8.30.0',
        app: 'aura-bot',
        host: 'c77f96ee7285'
      }
INFO  MiniBotServiceMock started. {
        module: 'orchestrator',
        corr: 'aura-system',
        version: '8.30.0',
        app: 'aura-bot',
        host: 'c77f96ee7285'
      }
DEBUG AuraCurrentChannelsConfiguration starting {
        module: 'orchestrator',
        corr: 'aura-system',
        version: '8.30.0',
        app: 'aura-bot',
        host: 'c77f96ee7285'
      }
INFO  AuraCurrentChannelsConfiguration started. {
        module: 'orchestrator',
        corr: 'aura-system',
        version: '8.30.0',
        app: 'aura-bot',
        host: 'c77f96ee7285'
      }
DEBUG AuraChannelsConfiguration starting {
        module: 'orchestrator',
        corr: 'aura-system',
        version: '8.30.0',
        app: 'aura-bot',
        host: 'c77f96ee7285'
      }
INFO  AuraChannelsConfiguration started. {
        module: 'orchestrator',
        corr: 'aura-system',
        version: '8.30.0',
        app: 'aura-bot',
        host: 'c77f96ee7285'
      }
DEBUG Connector starting {
        module: 'orchestrator',
        corr: 'aura-system',
        version: '8.30.0',
        app: 'aura-bot',
        host: 'c77f96ee7285'
      }
DEBUG Setting connection with options {
        module: 'connector',
        configuration: { maxPoolSize: 60, ssl: false },
        corr: 'no-correlator',
        version: '8.30.0',
        app: 'aura-bot',
        host: 'c77f96ee7285'
      }
INFO  Connector started. {
        module: 'orchestrator',
        corr: 'aura-system',
        version: '8.30.0',
        app: 'aura-bot',
        host: 'c77f96ee7285'
      }
DEBUG KpiHandler starting {
        module: 'orchestrator',
        corr: 'aura-system',
        version: '8.30.0',
        app: 'aura-bot',
        host: 'c77f96ee7285'
      }
DEBUG KPIFileWriter started {
        module: 'kpi-entity-writer',
        corr: '',
        version: '8.30.0',
        app: 'aura-bot',
        host: 'c77f96ee7285'
      }
INFO  KpiHandler started. {
        module: 'orchestrator',
        corr: 'aura-system',
        version: '8.30.0',
        app: 'aura-bot',
        host: 'c77f96ee7285'
      }
DEBUG PluginManager starting {
        module: 'orchestrator',
        corr: 'aura-system',
        version: '8.30.0',
        app: 'aura-bot',
        host: 'c77f96ee7285'
      }
INFO  All plugins were loaded successfully {
        module: 'LoadManager',
        corr: 'aura-system',
        version: '8.30.0',
        app: 'aura-bot',
        host: 'c77f96ee7285'
      }
INFO  PluginManager started. {
        module: 'orchestrator',
        corr: 'aura-system',
        version: '8.30.0',
        app: 'aura-bot',
        host: 'c77f96ee7285'
      }
DEBUG LocaleManager starting {
        module: 'orchestrator',
        corr: 'aura-system',
        version: '8.30.0',
        app: 'aura-bot',
        host: 'c77f96ee7285'
      }
INFO  LocaleManager initialized {
        module: 'locale-manager',
        corr: 'aura-system',
        version: '8.30.0',
        app: 'aura-bot',
        host: 'c77f96ee7285'
      }
INFO  LocaleManager started. {
        module: 'orchestrator',
        corr: 'aura-system',
        version: '8.30.0',
        app: 'aura-bot',
        host: 'c77f96ee7285'
      }
DEBUG AuraCacheManagement starting {
        module: 'orchestrator',
        corr: 'aura-system',
        version: '8.30.0',
        app: 'aura-bot',
        host: 'c77f96ee7285'
      }
INFO  Module AuraCacheManagement has been started. {
        module: 'aura-cache-management',
        corr: 'aura-system',
        version: '8.30.0',
        app: 'aura-bot',
        host: 'c77f96ee7285'
      }
INFO  AuraCacheManagement started. {
        module: 'orchestrator',
        corr: 'aura-system',
        version: '8.30.0',
        app: 'aura-bot',
        host: 'c77f96ee7285'
      }
DEBUG ChannelDataValidator starting {
        module: 'orchestrator',
        corr: 'aura-system',
        version: '8.30.0',
        app: 'aura-bot',
        host: 'c77f96ee7285'
      }
INFO  Successfully loaded validator schema /opt/aura-bot/aura-mini-bot/node_modules/@telefonica/aura-models/resources/channel-data/3.1.0/request/channeldata-3.1.0-request.schema.json {
        module: 'channel-data-validator',
        corr: 'aura-system',
        version: '8.30.0',
        app: 'aura-bot',
        host: 'c77f96ee7285'
      }
INFO  Successfully loaded validator schema /opt/aura-bot/aura-mini-bot/node_modules/@telefonica/aura-models/resources/channel-data/3.1.0/response/channeldata-3.1.0-response.schema.json {
        module: 'channel-data-validator',
        corr: 'aura-system',
        version: '8.30.0',
        app: 'aura-bot',
        host: 'c77f96ee7285'
      }
INFO  ChannelDataValidator started. {
        module: 'orchestrator',
        corr: 'aura-system',
        version: '8.30.0',
        app: 'aura-bot',
        host: 'c77f96ee7285'
      }
DEBUG AuraSessionManager starting {
        module: 'orchestrator',
        corr: 'aura-system',
        version: '8.30.0',
        app: 'aura-bot',
        host: 'c77f96ee7285'
      }
DEBUG Index created: [object Object] {
        module: 'connector',
        corr: 'aura-system',
        version: '8.30.0',
        app: 'aura-bot',
        host: 'c77f96ee7285'
      }
DEBUG Index created: [object Object] {
        module: 'connector',
        corr: 'aura-system',
        version: '8.30.0',
        app: 'aura-bot',
        host: 'c77f96ee7285'
      }
INFO  AuraSessionManager started. {
        module: 'orchestrator',
        corr: 'aura-system',
        version: '8.30.0',
        app: 'aura-bot',
        host: 'c77f96ee7285'
      }
DEBUG FileManager starting {
        module: 'orchestrator',
        corr: 'aura-system',
        version: '8.30.0',
        app: 'aura-bot',
        host: 'c77f96ee7285'
      }
INFO  FileManager started. {
        module: 'orchestrator',
        corr: 'aura-system',
        version: '8.30.0',
        app: 'aura-bot',
        host: 'c77f96ee7285'
      }
DEBUG PrometheusRegex starting {
        module: 'orchestrator',
        corr: 'aura-system',
        version: '8.30.0',
        app: 'aura-bot',
        host: 'c77f96ee7285'
      }
INFO  PrometheusRegex started. {
        module: 'orchestrator',
        corr: 'aura-system',
        version: '8.30.0',
        app: 'aura-bot',
        host: 'c77f96ee7285'
      }
DEBUG UserProfileManager starting {
        module: 'orchestrator',
        corr: 'aura-system',
        version: '8.30.0',
        app: 'aura-bot',
        host: 'c77f96ee7285'
      }
INFO  UserProfileManager started. {
        module: 'orchestrator',
        corr: 'aura-system',
        version: '8.30.0',
        app: 'aura-bot',
        host: 'c77f96ee7285'
      }
DEBUG AuraBotServer starting {
        module: 'orchestrator',
        corr: 'aura-system',
        version: '8.30.0',
        app: 'aura-bot',
        host: 'c77f96ee7285'
      }
INFO  Middleware: BatchOutgoingMessageMiddleware loaded. {
        module: 'aura-bot-server',
        corr: 'aura-system',
        version: '8.30.0',
        app: 'aura-bot',
        host: 'c77f96ee7285'
      }
DEBUG speak processor rules wont be applied, AURA_MIDDLEWARE_SPEAK_PROCESSOR {
        module: 'SpeakMiddleware',
        corr: 'no-correlator',
        version: '8.30.0',
        app: 'aura-bot',
        host: 'c77f96ee7285'
      }
INFO  Middleware: SpeakMiddleware loaded. {
        module: 'aura-bot-server',
        corr: 'aura-system',
        version: '8.30.0',
        app: 'aura-bot',
        host: 'c77f96ee7285'
      }
INFO  'suggestionDbCache' has been created with options: [object Object] {
        module: 'aura-cache-management',
        corr: 'aura-system',
        version: '8.30.0',
        app: 'aura-bot',
        host: 'c77f96ee7285'
      }
DEBUG adding trigger conditions {
        module: 'RoutingMap',
        trigger: [ { intent: 'intent.internal.context-filters-send-resource' } ],
        corr: 'aura-system',
        version: '8.30.0',
        app: 'aura-bot',
        host: 'c77f96ee7285'
      }
DEBUG Route intent.internal.context-filters-send-resource related to context-filter:send-resource {
        module: 'RoutingMap',
        corr: 'aura-system',
        version: '8.30.0',
        app: 'aura-bot',
        host: 'c77f96ee7285'
      }
DEBUG adding trigger conditions {
        module: 'RoutingMap',
        trigger: [ { intent: 'intent.internal.context-filters-send-resource.v3' } ],
        corr: 'aura-system',
        version: '8.30.0',
        app: 'aura-bot',
        host: 'c77f96ee7285'
      }
DEBUG Route intent.internal.context-filters-send-resource.v3 related to context-filter:send-resource-v3 {
        module: 'RoutingMap',
        corr: 'aura-system',
        version: '8.30.0',
        app: 'aura-bot',
        host: 'c77f96ee7285'
      }
DEBUG adding trigger conditions {
        module: 'RoutingMap',
        trigger: [ { intent: 'intent.internal.unexpected.file' } ],
        corr: 'aura-system',
        version: '8.30.0',
        app: 'aura-bot',
        host: 'c77f96ee7285'
      }
DEBUG Route intent.internal.unexpected.file related to unexpected-file-core {
        module: 'RoutingMap',
        corr: 'aura-system',
        version: '8.30.0',
        app: 'aura-bot',
        host: 'c77f96ee7285'
      }
INFO  AuraBotServer started. {
        module: 'orchestrator',
        corr: 'aura-system',
        version: '8.30.0',
        app: 'aura-bot',
        host: 'c77f96ee7285'
      }
INFO  Server listening to 8081 {
        module: 'aura-bot-server',
        corr: 'aura-system',
        version: '8.30.0',
        app: 'aura-bot',
        host: 'c77f96ee7285'
      }
Once this step is done, developers will have their local Aura instance up and running.
Aura minigroot start-up messages
The start-up messages of the minigroot are the following ones:
Minigroot start-up messages
DEBUG Environment configuration loaded {
        module: 'configuration-manager',
        corr: 'aura-system',
        version: '1.23.0',
        app: 'aura-groot',
        host: '12c481794fce'
      }
DEBUG Starting HttpMonkeyPatcher {
        module: 'start-service',
        corr: 'aura-system',
        version: '1.23.0',
        app: 'aura-groot',
        host: '12c481794fce'
      }
DEBUG AuthenticationApiKey starting {
        module: 'orchestrator',
        corr: 'aura-system',
        version: '1.23.0',
        app: 'aura-groot',
        host: '12c481794fce'
      }
INFO  AuthenticationApiKey started. {
        module: 'orchestrator',
        corr: 'aura-system',
        version: '1.23.0',
        app: 'aura-groot',
        host: '12c481794fce'
      }
DEBUG MiniBotServiceMock starting {
        module: 'orchestrator',
        corr: 'aura-system',
        version: '1.23.0',
        app: 'aura-groot',
        host: '12c481794fce'
      }
INFO  MiniBotServiceMock started. {
        module: 'orchestrator',
        corr: 'aura-system',
        version: '1.23.0',
        app: 'aura-groot',
        host: '12c481794fce'
      }
DEBUG Connector starting {
        module: 'orchestrator',
        corr: 'aura-system',
        version: '1.23.0',
        app: 'aura-groot',
        host: '12c481794fce'
      }
DEBUG Setting connection with options {
        module: 'connector',
        configuration: { maxPoolSize: 60, ssl: false },
        corr: 'no-correlator',
        version: '1.23.0',
        app: 'aura-groot',
        host: '12c481794fce'
      }
INFO  Connector started. {
        module: 'orchestrator',
        corr: 'aura-system',
        version: '1.23.0',
        app: 'aura-groot',
        host: '12c481794fce'
      }
DEBUG LocaleManager starting {
        module: 'orchestrator',
        corr: 'aura-system',
        version: '1.23.0',
        app: 'aura-groot',
        host: '12c481794fce'
      }
INFO  LocaleManager initialized {
        module: 'locale-manager',
        corr: 'aura-system',
        version: '1.23.0',
        app: 'aura-groot',
        host: '12c481794fce'
      }
INFO  LocaleManager started. {
        module: 'orchestrator',
        corr: 'aura-system',
        version: '1.23.0',
        app: 'aura-groot',
        host: '12c481794fce'
      }
DEBUG AuraCurrentChannelsConfiguration starting {
        module: 'orchestrator',
        corr: 'aura-system',
        version: '1.23.0',
        app: 'aura-groot',
        host: '12c481794fce'
      }
INFO  AuraCurrentChannelsConfiguration started. {
        module: 'orchestrator',
        corr: 'aura-system',
        version: '1.23.0',
        app: 'aura-groot',
        host: '12c481794fce'
      }
DEBUG AuraSkillConfiguration starting {
        module: 'orchestrator',
        corr: 'aura-system',
        version: '1.23.0',
        app: 'aura-groot',
        host: '12c481794fce'
      }
INFO  1 skill have been loaded {
        module: 'aura-skill-configuration',
        skillsNames: [ 'aura-bot' ],
        corr: 'aura-system',
        version: '1.23.0',
        app: 'aura-groot',
        host: '12c481794fce'
      }
INFO  AuraSkillConfiguration started. {
        module: 'orchestrator',
        corr: 'aura-system',
        version: '1.23.0',
        app: 'aura-groot',
        host: '12c481794fce'
      }
DEBUG ChannelDataValidator starting {
        module: 'orchestrator',
        corr: 'aura-system',
        version: '1.23.0',
        app: 'aura-groot',
        host: '12c481794fce'
      }
INFO  Successfully loaded validator schema /opt/aura-groot/aura-mini-groot/node_modules/@telefonica/aura-models/resources/channel-data/3.1.0/request/channeldata-3.1.0-request.schema.json {
        module: 'channel-data-validator',
        corr: 'aura-system',
        version: '1.23.0',
        app: 'aura-groot',
        host: '12c481794fce'
      }
INFO  Successfully loaded validator schema /opt/aura-groot/aura-mini-groot/node_modules/@telefonica/aura-models/resources/channel-data/3.1.0/response/channeldata-3.1.0-response.schema.json {
        module: 'channel-data-validator',
        corr: 'aura-system',
        version: '1.23.0',
        app: 'aura-groot',
        host: '12c481794fce'
      }
INFO  ChannelDataValidator started. {
        module: 'orchestrator',
        corr: 'aura-system',
        version: '1.23.0',
        app: 'aura-groot',
        host: '12c481794fce'
      }
DEBUG KpiHandler starting {
        module: 'orchestrator',
        corr: 'aura-system',
        version: '1.23.0',
        app: 'aura-groot',
        host: '12c481794fce'
      }
DEBUG KPIFileWriter started {
        module: 'kpi-entity-writer',
        corr: '',
        version: '1.23.0',
        app: 'aura-groot',
        host: '12c481794fce'
      }
INFO  KpiHandler started. {
        module: 'orchestrator',
        corr: 'aura-system',
        version: '1.23.0',
        app: 'aura-groot',
        host: '12c481794fce'
      }
DEBUG PrometheusManager starting {
        module: 'orchestrator',
        corr: 'aura-system',
        version: '1.23.0',
        app: 'aura-groot',
        host: '12c481794fce'
      }
INFO  PrometheusManager started. {
        module: 'orchestrator',
        corr: 'aura-system',
        version: '1.23.0',
        app: 'aura-groot',
        host: '12c481794fce'
      }
DEBUG AuraGrootCache starting {
        module: 'orchestrator',
        corr: 'aura-system',
        version: '1.23.0',
        app: 'aura-groot',
        host: '12c481794fce'
      }
WARN  AuraGrootCache could not be started, no instance returned at init. {
        module: 'orchestrator',
        error: 'AuraGrootCache could not be started, no instance returned at init.',
        corr: 'aura-system',
        version: '1.23.0',
        app: 'aura-groot',
        host: '12c481794fce'
      }
DEBUG Server starting {
        module: 'orchestrator',
        corr: 'aura-system',
        version: '1.23.0',
        app: 'aura-groot',
        host: '12c481794fce'
      }
INFO  Skills have been updated {
        module: 'activity-handler',
        corr: 'aura-system',
        version: '1.23.0',
        app: 'aura-groot',
        host: '12c481794fce'
      }
DEBUG SkillsChannelMap {
        module: 'activity-handler',
        skillsChannelMap: {
          'novum-mytelco': '366de758-14aa-4527-a897-d04f165d80da',
          whatsapp: '366de758-14aa-4527-a897-d04f165d80da',
          'aura-channel-factory-web': '366de758-14aa-4527-a897-d04f165d80da',
          'aura-channel-factory-mobile': '366de758-14aa-4527-a897-d04f165d80da',
          'novum-mytelco-qa': '366de758-14aa-4527-a897-d04f165d80da',
          'movistar-plus': '366de758-14aa-4527-a897-d04f165d80da',
          'set-top-box': '366de758-14aa-4527-a897-d04f165d80da',
          'set-top-box-haac': '366de758-14aa-4527-a897-d04f165d80da',
          'qa-ner': '366de758-14aa-4527-a897-d04f165d80da',
          'qa-gazetteer': '366de758-14aa-4527-a897-d04f165d80da',
          'qa-ner-gazetteer': '366de758-14aa-4527-a897-d04f165d80da',
          'qa-domain-selector': '366de758-14aa-4527-a897-d04f165d80da',
          'qa-disam': '366de758-14aa-4527-a897-d04f165d80da',
          'qa-no-disam': '366de758-14aa-4527-a897-d04f165d80da',
          whatsapp2: '366de758-14aa-4527-a897-d04f165d80da',
          'qa-disam-sugg': '366de758-14aa-4527-a897-d04f165d80da',
          'qa-disam-sugg-black': '366de758-14aa-4527-a897-d04f165d80da',
          'global-video-platform': '366de758-14aa-4527-a897-d04f165d80da',
          'whatsapp-1004': '366de758-14aa-4527-a897-d04f165d80da',
          emulator: '366de758-14aa-4527-a897-d04f165d80da'
        },
        corr: 'aura-system',
        version: '1.23.0',
        app: 'aura-groot',
        host: '12c481794fce'
      }
INFO  Module: Server, loaded. {
        module: 'aura-groot-server',
        corr: 'aura-system',
        version: '1.23.0',
        app: 'aura-groot',
        host: '12c481794fce'
      }
INFO  Server started. {
        module: 'orchestrator',
        corr: 'aura-system',
        version: '1.23.0',
        app: 'aura-groot',
        host: '12c481794fce'
      }
DEBUG HttpMonkeyPatcher starting {
        module: 'orchestrator',
        corr: 'aura-system',
        version: '1.23.0',
        app: 'aura-groot',
        host: '12c481794fce'
      }
INFO  HttpMonkeyPatcher started. {
        module: 'orchestrator',
        corr: 'aura-system',
        version: '1.23.0',
        app: 'aura-groot',
        host: '12c481794fce'
      }
INFO  I Am Groot!!! {
        module: 'start-service',
        corr: 'aura-system',
        version: '1.23.0',
        app: 'aura-groot',
        host: '12c481794fce'
      }
INFO  Module: Server, listening to 8080 {
        module: 'aura-groot-server',
        corr: 'aura-system',
        version: '1.23.0',
        app: 'aura-groot',
        host: '12c481794fce'
      }
Test the bot
Now, the bot is ready to receive messages through Microsoft’s Direct Line 3.0 protocol.
POSTMAN can be used as a client to send messages to the bot and check the replies from the bot. To be able to do this task, please use a Microsoft POSTMAN collection for Direct Line.
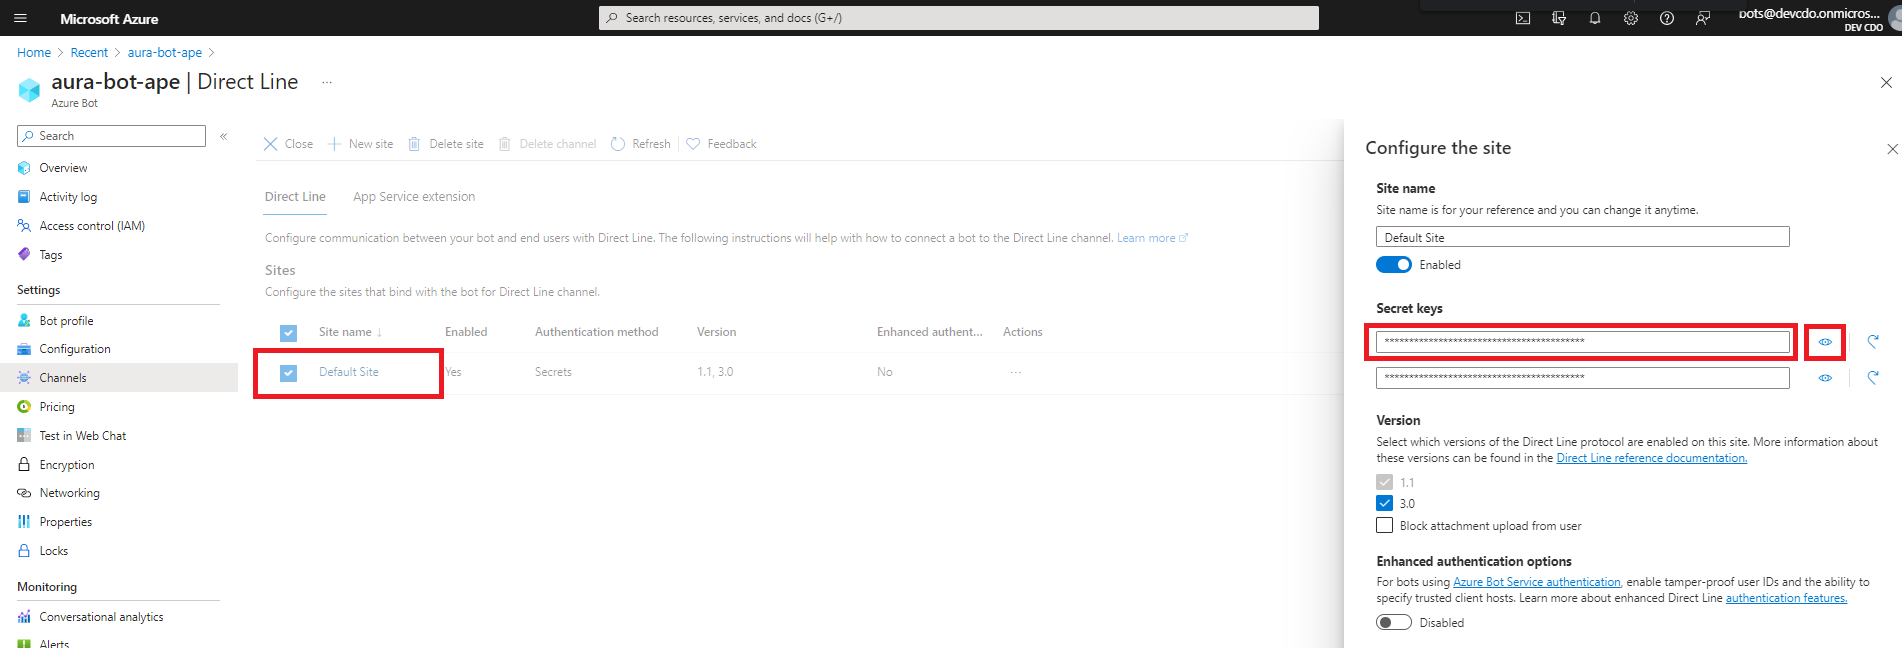
Create a Direct Line token
Create a Direct Line token to be able to talk with your bot. This can be done in the Azure portal: Firstly, go to the bot service resource, and then to Direct Line channel configuration.
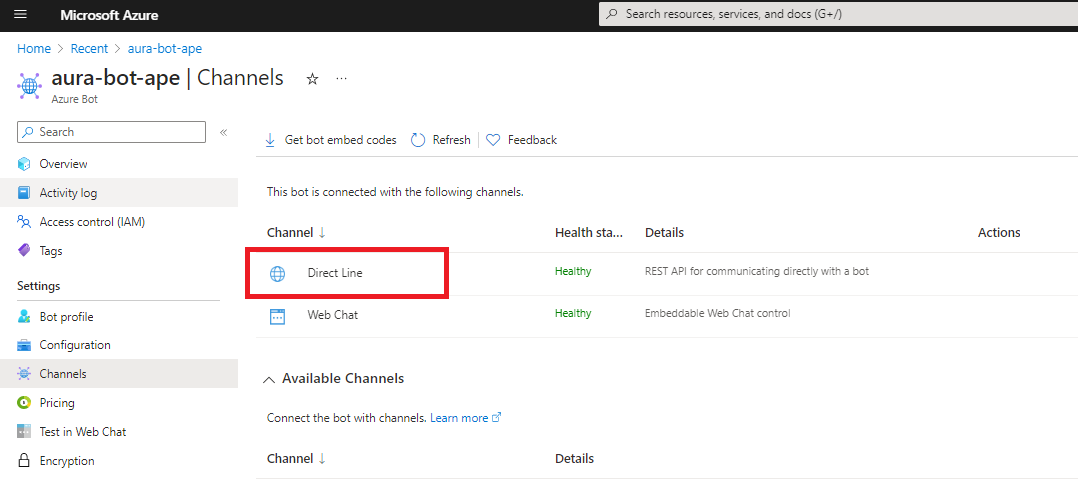
If you click on Direct Line, a new side window will open on the right hand side of the screen where you can see your bot keys. At this stage, click on the eye icon to view they key and copy it, so it can be used later from POSTMAN.
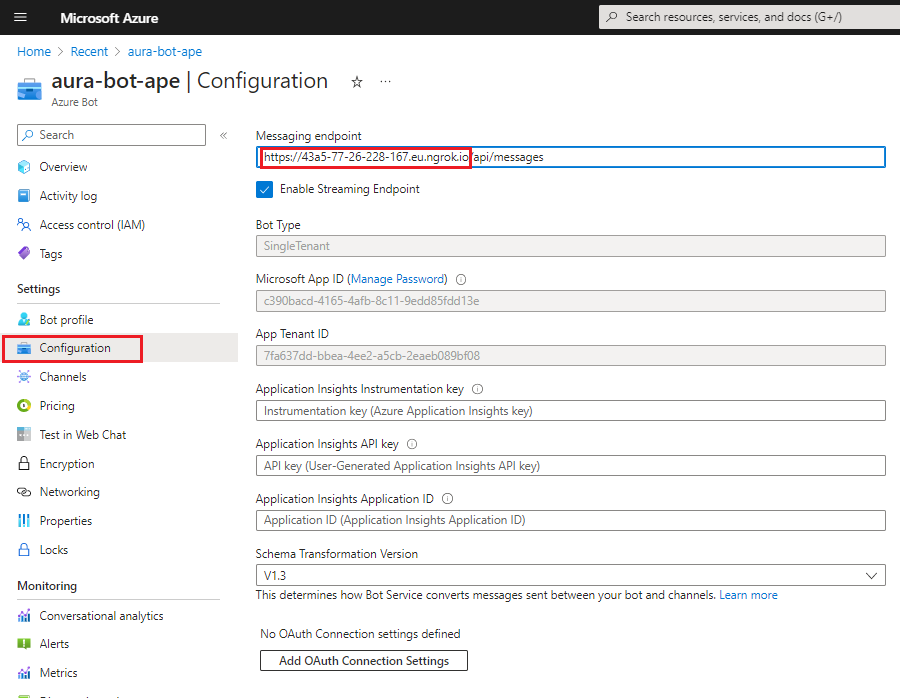
Publish your bot
The Aura instance is running locally in your machine.
Now, you should publish it, so it is available to the world. It can be deployed in Azure or similar clouds, but we recommend to use some applications that allow you to generate an external URL, such as ngrok or Localtunnel. You have to expose the 8080 port of your machine, which is the default port used by Aura.
_> ngrok http 8080
_> lt --port 8080
An URL like this is obtained:
https://adf65ab5.ngrok.io
https://localtunnel.github.io/www/
This is the URL you have to set in the Configuration section of your bot in Azure portal.
NOTE: This process is already done automatically if you use the all-in-one solution with docker-compose.
Test from POSTMAN
-
Once the POSTMAN collections provided by Microsoft are downloaded, store them in the same folder and import the folder from POSTMAN (File -> Import -> Import Folder).
-
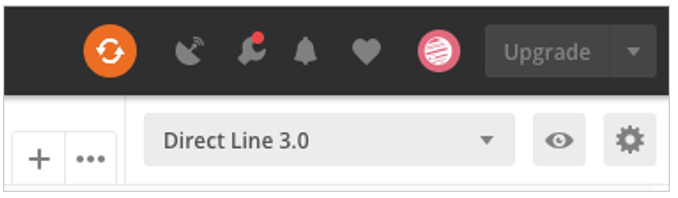
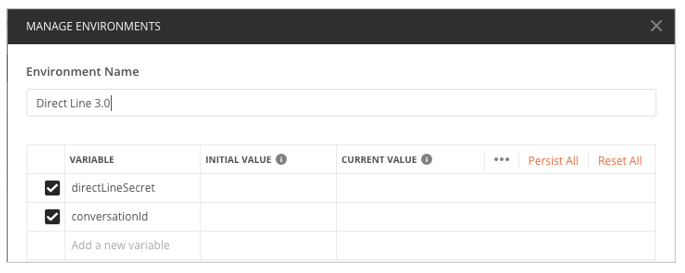
Set the DirectLine secret in the POSTMAN environment. Select the right environment file and then click on the Gears icon, both are located on top right.
-
Select the Direct Line 3.0 POSTMAN environment:
-
Enter the secret key value copied in previous steps inside the INITIAL VALUE and CURRENT VALUE of directLineSecret variable, so other requests can use it. This secret key is the responsible to tell Microsoft which bot has to reach once we send requests to DirectLine 3.0 endpoints.
- Once this information is filled, execute the requests step by step, as shown below:
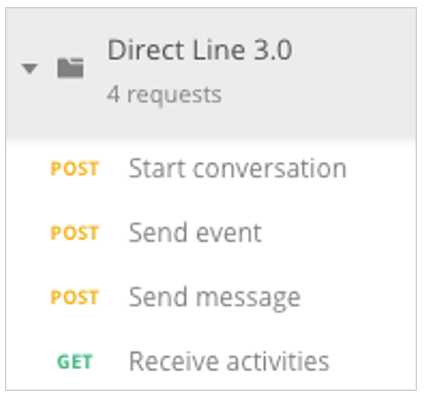
-
Start conversation response:
{
  "conversationId": "BZ3zYAXMr1VFzElZ369fbm-a",
  "token": "<token>.ew0KICAiYm90IjogImF1cmEtYm90LWxvY2FsLWFkdmwiLA0KICAic2l0ZSI6ICIwSEwtQjdCLUhqOCIsDQogICJjb252IjogIkJaM3pZQVhNcjFWRnpFbFozNjlmYm0tYSIsDQogICJuYmYiOiAxNTczNjUwMDkwLA0KICAiZXhwIjogMTU3MzY1MzY5MCwNCiAgImlzcyI6ICJodHRwczovL2RpcmVjdGxpbmUuYm90ZnJhbWV3b3JrLmNvbS8iLA0KICAiYXVkIjogImh0dHBzOi8vZGlyZWN0bGluZS5ib3RmcmFtZXdvcmsuY29tLyINCn0.GvmD7MI7fBw1mjtSD_bzD2xW9X3G7l-Pd64HvchADls1SuOmYvisR-PKcxGCoVkHN3g2KRsgFw6oyMf93jPT7E0ejM52j-etegl1nOLF2XUkM3TzM9vVig9qDhfAdQFxaxSeAV3zOKdCGbofH4PklscGKrmtEpnD2LpWmc-vHoMlx6gpBQaQaCtwykpEWceJ4cmd8ffkF3aCM1mnMyf-x2TZrH15URmPMPBdZ37y4-8pN_EGmNqLujOtuZgXbZG7s1tksk4LUhMuntRHLq6mwQrTvurd4fUdWOz7rO547RT9DymAQCfcuI0S_7buZN8Ii-4Dcwx0ByiGj932zhQXhA",
  "expires_in": 3600,
  "streamUrl": "wss://directline.botframework.com/v3/directline/conversations/BZ3zYAXMr1VFzElZ369fbm-a/stream?watermark=-&t=<token>.ew0KICAiYm90IjogImF1cmEtYm90LWxvY2FsLWFkdmwiLA0KICAic2l0ZSI6ICIwSEwtQjdCLUhqOCIsDQogICJjb252IjogIkJaM3pZQVhNcjFWRnpFbFozNjlmYm0tYSIsDQogICJuYmYiOiAxNTczNjUwMDkwLA0KICAiZXhwIjogMTU3MzY1MDE1MCwNCiAgImlzcyI6ICJodHRwczovL2RpcmVjdGxpbmUuYm90ZnJhbWV3b3JrLmNvbS8iLA0KICAiYXVkIjogImh0dHBzOi8vZGlyZWN0bGluZS5ib3RmcmFtZXdvcmsuY29tLyINCn0.Hcl15E483KyRlD5geEZSX2zWP5ihpnwQAl09Ah3aKLvL5Hl2kkiirllZppSZmxl8KZKb84BOav8MYlQCkrLtbQ5c5BA0s0DYH469-jNAryhQYIwDVwNdep_0OwZvRSnsgxJU4FOqx-0rpvY26W86HrXM4vhSrVYewcRLvm_F3e5dDGekfIDX3krvsqT4tykmI-RTaR20jeErDucoJvW5gLKfk1uduVnCllcNG6Vwn4zsm6hhPy7Q0Xcq9OfQlD17Bc8J3XPmJiv7vzG48ooNA7wr_E1ju2uElgRh5Iore7wjT3H4gQNVXmRDSNKmhACQv6KfU5CJLmtyELjfsRvyAQ",
  "referenceGrammarId": "55db166a-b049-c059-b26c-07296f680752"
}
The conversationId field is extracted automatically from this first request and is included in the rest of the requests.
-
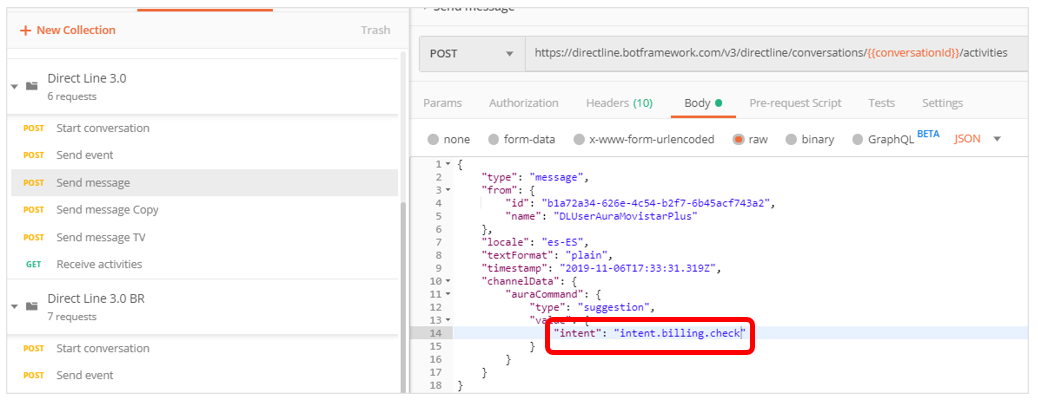
Send message sends an AuraCommand in order to avoid the NLP process, so the dialog is triggered without NLP.
You should edit the body request to be similar to the following one (remember to change the intent name to the one set in your library):
  {
    "type": "message",
    "from": {
        "id": "b1a72a34-626e-4c54-b2f7-6b45acf743a2"
    },
    "locale": "es-ES",
    "textFormat": "plain",
    "timestamp": "2019-11-06T17:33:31.319Z",
    "channelData": {
      "auraCommand": {
          "type": "suggestion",
          "value": {
              "intent": "intent.greetings-demo.greetings"
          }
      }
    }
}
Where:
from.id is the user who is going to access the bot. This information can be obtained from the file /sources/files/mock-files/authentication-mock.json, choosing an userAuraId.auraCommand.value.intent contains the intent (dialog) to be reached. This information can be obtained in the files located in dev/settings/dialog-config.xx-xx.json (where xx-xx is the locale referred to the country, i.e., es-gb) in the library repository or local development in case of a new one.
{
  "dialogs": [
    {
      "triggerConditions": [
        {
          "intent": "intent.greetings-demo.greetings"
        }
      ],
      "id": "greetings",
      "onlyIn": ["movistar-plus", "set-top-box"]
    }
  ],
  "name": "greetings-demo"
}
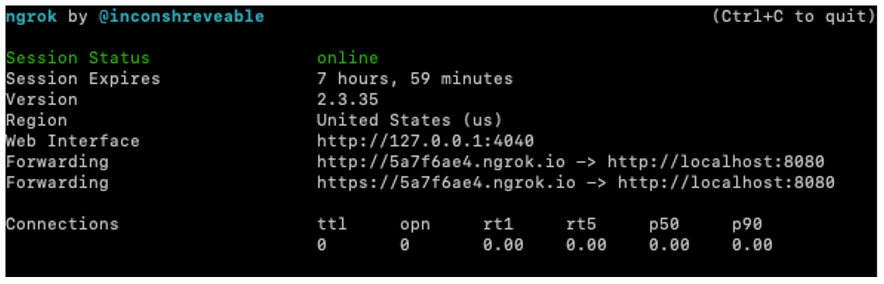
If everything worked fine, once the request is sent, it is shown in the ngrok console. Also, the dialog activation is shown on the bot console.
-
ngrok:
ngrok example
HTTP Requests
-------------
POST /api/messages 202 Accepted
Bot (consola Visual Studio Code):
INFO HTTP API request GET authorization-mock/ca9961f9-c6f0-3acd-5c72-ce2719f43ec9 {
domain: 'authorization-mock',
method: 'GET',
path: '/ca9961f9-c6f0-3acd-5c72-ce2719f43ec9',
corr: 'no-correlator',
module: 'HttpMonkeyPatcher',
version: '6.0.0',
app: 'aura-bot',
host: 'cc45bbf4b438'
}
DEBUG HTTP API response GET authorization-mock/ca9961f9-c6f0-3acd-5c72-ce2719f43ec9 200 {
domain: 'authorization-mock',
method: 'GET',
status: 200,
path: '/ca9961f9-c6f0-3acd-5c72-ce2719f43ec9',
drt: 4,
corr: 'no-correlator',
module: 'HttpMonkeyPatcher',
version: '6.0.0',
app: 'aura-bot',
host: 'cc45bbf4b438'
}
INFO HTTP API response GET authorization-mock/ca9961f9-c6f0-3acd-5c72-ce2719f43ec9 200 {
domain: 'authorization-mock',
method: 'GET',
status: 200,
path: '/ca9961f9-c6f0-3acd-5c72-ce2719f43ec9',
drt: 4,
corr: 'no-correlator',
module: 'HttpMonkeyPatcher',
version: '6.0.0',
app: 'aura-bot',
host: 'cc45bbf4b438'
}
DEBUG Starting recognizer AuraCommandRecognizer {
corr: '11efcaff-67fb-46cd-be7f-6a54f68fd926',
module: 'recognizer-middleware',
version: '6.0.0',
app: 'aura-bot',
host: 'cc45bbf4b438'
}
DEBUG Intent set {
corr: '11efcaff-67fb-46cd-be7f-6a54f68fd926',
intent: {
intents: { 'intent.common.greetings': [Object] },
entities: [],
text: '',
answers: undefined,
promptCheck: true,
utm: { source: 'channel_name', medium: 'text' }
},
module: 'aura-context-utils',
version: '6.0.0',
app: 'aura-bot',
host: 'cc45bbf4b438'
}
INFO AuraCommandRecognizer:6e204898-9fee-4006-a17e-7e6851fb8fca {
corr: '11efcaff-67fb-46cd-be7f-6a54f68fd926',
intent: '{"intent.common.greetings":{"score":1}}',
module: 'recognizer-middleware',
version: '6.0.0',
app: 'aura-bot',
host: 'cc45bbf4b438'
}
DEBUG End recognizer AuraCommandRecognizer. Result: {"intents":{"intent.common.greetings":{"score":1}},"entities":[],"text":"","promptCheck":true,"utm":{"source":"channel_name","medium":"text"}} {
corr: '11efcaff-67fb-46cd-be7f-6a54f68fd926',
module: 'recognizer-middleware',
version: '6.0.0',
app: 'aura-bot',
host: 'cc45bbf4b438'
}
DEBUG Finalize recognizers. Result: {"intents":{"intent.common.greetings":{"score":1}},"entities":[],"text":"","promptCheck":true,"utm":{"source":"channel_name","medium":"text"}} {
corr: '11efcaff-67fb-46cd-be7f-6a54f68fd926',
module: 'incoming-message-middleware',
version: '6.0.0',
app: 'aura-bot',
host: 'cc45bbf4b438'
}
DEBUG Break prompt {
topIntent: {
intent: 'intent.common.greetings',
score: 1,
entities: [],
type: 'suggestion'
},
corr: '11efcaff-67fb-46cd-be7f-6a54f68fd926',
module: 'incoming-message-middleware',
version: '6.0.0',
app: 'aura-bot',
host: 'cc45bbf4b438'
}
DEBUG Clear stack evaluation: Prompt Options: No Prompt detected. Score 1, min-score threshold: 0.95 {
corr: '11efcaff-67fb-46cd-be7f-6a54f68fd926',
module: 'aura-context-utils',
version: '6.0.0',
app: 'aura-bot',
host: 'cc45bbf4b438'
}
DEBUG Request received {
domain: '26eba81ecfb9.ngrok.io',
method: 'POST',
path: '/api/messages',
corr: '11efcaff-67fb-46cd-be7f-6a54f68fd926',
module: 'AuraBotServer',
version: '6.0.0',
app: 'aura-bot',
host: 'cc45bbf4b438'
}
DEBUG Running dialog with Message Activity. {
corr: '11efcaff-67fb-46cd-be7f-6a54f68fd926',
module: 'aura-bot',
version: '6.0.0',
app: 'aura-bot',
host: 'cc45bbf4b438'
}
INFO Recognize this intent pre-contextfilter {
intent: '{"intent":"intent.common.greetings","score":1,"entities":[],"type":"suggestion"}',
corr: '11efcaff-67fb-46cd-be7f-6a54f68fd926',
module: 'main',
version: '6.0.0',
app: 'aura-bot',
host: 'cc45bbf4b438'
}
DEBUG routing resolution {
recognizer: 'intent.common.greetings',
result: undefined,
corr: '11efcaff-67fb-46cd-be7f-6a54f68fd926',
module: 'RoutingMap',
version: '6.0.0',
app: 'aura-bot',
host: 'cc45bbf4b438'
}
INFO There is no dialog to handle this message {
corr: '11efcaff-67fb-46cd-be7f-6a54f68fd926',
module: 'main',
version: '6.0.0',
app: 'aura-bot',
host: 'cc45bbf4b438'
}
INFO Outgoing activity {
text: 'Vaya, parece que no soy capaz de entenderte. Inténtalo de nuevo',
corr: '11efcaff-67fb-46cd-be7f-6a54f68fd926',
module: 'outgoing-message-middleware',
version: '6.0.0',
app: 'aura-bot',
host: 'cc45bbf4b438'
}
DEBUG Finalize middlewares pipeline {
corr: '11efcaff-67fb-46cd-be7f-6a54f68fd926',
module: 'outgoing-message-middleware',
version: '6.0.0',
app: 'aura-bot',
host: 'cc45bbf4b438'
}
DEBUG Dialog undefined finished, NO suggestions. {
corr: '11efcaff-67fb-46cd-be7f-6a54f68fd926',
module: 'main',
version: '6.0.0',
app: 'aura-bot',
host: 'cc45bbf4b438'
}
INFO Response returned 200 POST /api/messages {
method: 'POST',
status: 200,
path: '/api/messages',
drt: 35,
corr: '11efcaff-67fb-46cd-be7f-6a54f68fd926',
module: 'AuraBotServer',
version: '6.0.0',
app: 'aura-bot',
host: 'cc45bbf4b438'
}
INFO HTTP API request POST login.microsoftonline.com/botframework.com/oauth2/v2.0/token {
domain: 'login.microsoftonline.com',
method: 'POST',
path: '/botframework.com/oauth2/v2.0/token',
corr: 'no-correlator',
module: 'HttpMonkeyPatcher',
version: '6.0.0',
app: 'aura-bot',
host: 'cc45bbf4b438'
}
DEBUG HTTP API response POST login.microsoftonline.com/botframework.com/oauth2/v2.0/token 200 {
domain: 'login.microsoftonline.com',
method: 'POST',
status: 200,
path: '/botframework.com/oauth2/v2.0/token',
drt: 1974,
body: '{"token_type":"Bearer","expires_in":86398,"ext_expires_in":86398,"access_token":"<token>"}',
corr: 'no-correlator',
module: 'HttpMonkeyPatcher',
version: '6.0.0',
app: 'aura-bot',
host: 'cc45bbf4b438'
}
INFO HTTP API response POST login.microsoftonline.com/botframework.com/oauth2/v2.0/token 200 {
domain: 'login.microsoftonline.com',
method: 'POST',
status: 200,
path: '/botframework.com/oauth2/v2.0/token',
drt: 1974,
corr: 'no-correlator',
module: 'HttpMonkeyPatcher',
version: '6.0.0',
app: 'aura-bot',
host: 'cc45bbf4b438'
}
INFO HTTP API request POST directline.botframework.com/v3/conversations/IiKY7bzb1Pd5VdtN4FZKmB-a/activities/IiKY7bzb1Pd5VdtN4FZKmB-a%7C0000000 {
domain: 'directline.botframework.com',
method: 'POST',
path: '/v3/conversations/IiKY7bzb1Pd5VdtN4FZKmB-a/activities/IiKY7bzb1Pd5VdtN4FZKmB-a%7C0000000',
corr: 'no-correlator',
module: 'HttpMonkeyPatcher',
version: '6.0.0',
app: 'aura-bot',
host: 'cc45bbf4b438'
}
DEBUG HTTP API response POST directline.botframework.com/v3/conversations/IiKY7bzb1Pd5VdtN4FZKmB-a/activities/IiKY7bzb1Pd5VdtN4FZKmB-a%7C0000000 200 {
domain: 'directline.botframework.com',
method: 'POST',
status: 200,
path: '/v3/conversations/IiKY7bzb1Pd5VdtN4FZKmB-a/activities/IiKY7bzb1Pd5VdtN4FZKmB-a%7C0000000',
drt: 185,
body: '{\r\n "id": "IiKY7bzb1Pd5VdtN4FZKmB-a|0000001"\r\n}',
corr: 'no-correlator',
module: 'HttpMonkeyPatcher',
version: '6.0.0',
app: 'aura-bot',
host: 'cc45bbf4b438'
}
INFO HTTP API response POST directline.botframework.com/v3/conversations/IiKY7bzb1Pd5VdtN4FZKmB-a/activities/IiKY7bzb1Pd5VdtN4FZKmB-a%7C0000000 200 {
domain: 'directline.botframework.com',
method: 'POST',
status: 200,
path: '/v3/conversations/IiKY7bzb1Pd5VdtN4FZKmB-a/activities/IiKY7bzb1Pd5VdtN4FZKmB-a%7C0000000',
drt: 185,
corr: 'no-correlator',
module: 'HttpMonkeyPatcher',
version: '6.0.0',
app: 'aura-bot',
host: 'cc45bbf4b438'
}
```
</details>
-
Inside POSTMAN, use “Receive activities” request to follow up all the messages sent to and from the bot.
Example
{
"activities": [
  {
    "type": "message",
    "id": "IiKY7bzb1Pd5VdtN4FZKmB-a|0000000",
    "timestamp": "2021-01-28T16:02:49.6587305Z",
    "serviceUrl": "https://directline.botframework.com/",
    "channelId": "directline",
    "from": {
      "id": "ca9961f9-c6f0-3acd-5c72-ce2719f43ec9"
    },
    "conversation": {
      "id": "IiKY7bzb1Pd5VdtN4FZKmB-a"
    },
    "textFormat": "plain",
    "locale": "es-ES",
    "channelData": {
      "auraCommand": {
        "type": "suggestion",
        "value": {
          "intent": "intent.common.greetings"
        }
      }
    }
  },
  {
    "type": "message",
    "id": "IiKY7bzb1Pd5VdtN4FZKmB-a|0000001",
    "timestamp": "2021-01-28T16:02:52.6086472Z",
    "channelId": "directline",
    "from": {
      "id": "bot-antonio",
      "name": "bot-antonio"
    },
    "conversation": {
      "id": "IiKY7bzb1Pd5VdtN4FZKmB-a"
    },
    "text": "Vaya, parece que no soy capaz de entenderte. Inténtalo de nuevo",
    "inputHint": "acceptingInput",
    "channelData": {
      "correlator": "11efcaff-67fb-46cd-be7f-6a54f68fd926"
    },
    "replyToId": "IiKY7bzb1Pd5VdtN4FZKmB-a|0000000"
  }
],
"watermark": "1"
}
Develop a new use case
Once the use case is developed following the guidelines included in the document Use cases development over Aura Bot, it is required to follow the step below:
- Run the command npm pack from the library root folder to generate a
.tgz with the library packed.
Now, the library is ready to be imported and used by the minibot.
Minibot set-up to import and run the library
-
Copy the path where the .tgz file is located (right click and copy path in VSCode):

-
Go to root/ folder in your minibot project and run:
npm install <path copied>`
-
Open the plugin-config.json file and set the name of the library inside the array as below (in the sample, the library’s name is test-app):
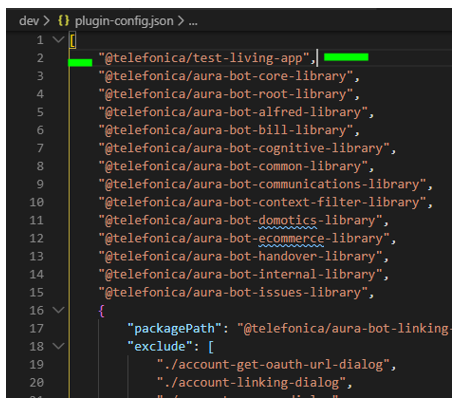
-
Add the dialogs in their libraries inside aura-mini-bot/sources/files/mock-files/channels-configuration-mock.json as well:
Example of channels-configuration-mock.json
    {
      "name": "novum-mytelco",
      "prefix": "nov",
      "channel_id": "xxxxxxx",
      "fpa_auth_scopes": "device-catalog:devices-read device-stock:stock-read",
      "fpa_auth_purposes": "customer-self-service detect-abnormal-usage device-recommendations-v3 sim-upgrade-suggestion aura-read-insight-events identify-customer bolt-on-suggestion",
      "batchMessages": true,
      "notifications_enabled": true,
      "notifications_insights_mitigation": true,
      "notification_configuration": {
        "notifications_event_types_enabled": [
          {
            "id": "unusual-data-usage",
            "enabled": true,
            "push_text": "notifications:notifications.unusual-data-usage.pushText",
            "action": "usage.anomaly",
            "subscription_filters": [
              "user_id",
              "phone_number"
            ]
          }
        ],
        "notification_callback": "https://ha42ojf7mb.execute-api.us-east-1.amazonaws.com/prod/callback/xxxxx"
      },
      "dialogLibraries": [
        {
          "name": "my-library",
          "dialogs": [
            {
              "id": "my-dialog",
              "triggerConditions": [
                {
                  "intent": "intent.my-intent"
                }
              ]
            }
          ]
  ]
NOTE: We can do a copy of the content inside of the file dialog-config.json located in our original library development.
-
Go to dev folder and run npm run makeup-local and wait until it finishes (it will notify us through the console):
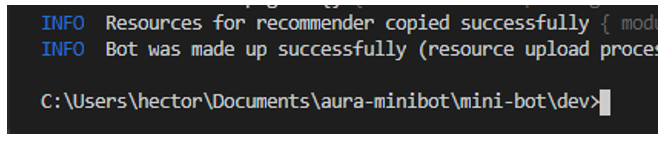
-
Now the library is ready to be used from the minibot. Run the minibot through VSCode debugger (using your launch.json file).
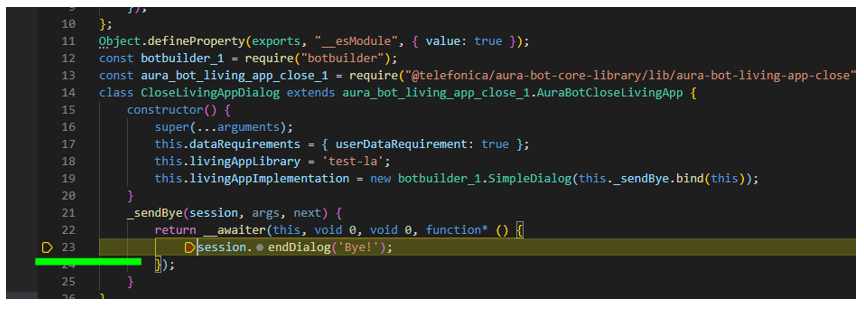
Debugging with Aura minibot
Right now, the best way to debug a dialog is from .js files located into node_modules once our packed library is installed. This is the way to avoid NPM Link dependency issues.
Breakpoints can be set in those dialog files. Once our breakpoint is reached, when we send the request from POSTMAN, the minibot will stop and it will show the debug options in VSCode:
Global use cases debugging example (personalized data)
In the following example it is shown how to debug an existing dialog with personalized data using the intent intent.billing.check. The steps to debug it from scratch are the following:
- Set the channel configuration and enable the dialog in that channel.
-
Go to channels-configuration-mock.json located into the folder:
aura-mini-bot/sources/files/mock-files
-
Once there, check that the dialog is enabled inside the dialogLibraries property of the desired channel:
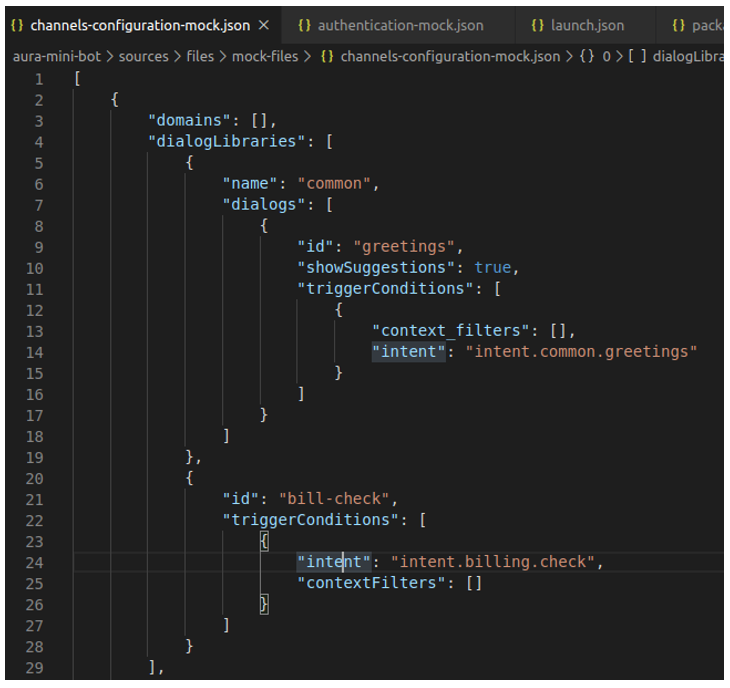
We use the intent.billing.check name to activate the dialog through POSTMAN in future steps. Let’s see now a screenshot of the full channel configuration for this example:

From the code above, the id property must be copied to a safe place, because it will be used in the next step.
-
Go to aura-mini-bot/sources/files/mock-files/authentication-mock.json file located into aura-mini-bot/sources/files/mock-files/ folder.
Paste the previous value copied (id) into the id property and check that the name and prefix property fit with the channel information.
The id property is the responsible to link the user to that channel (remember that a user has to be registered on a channel).
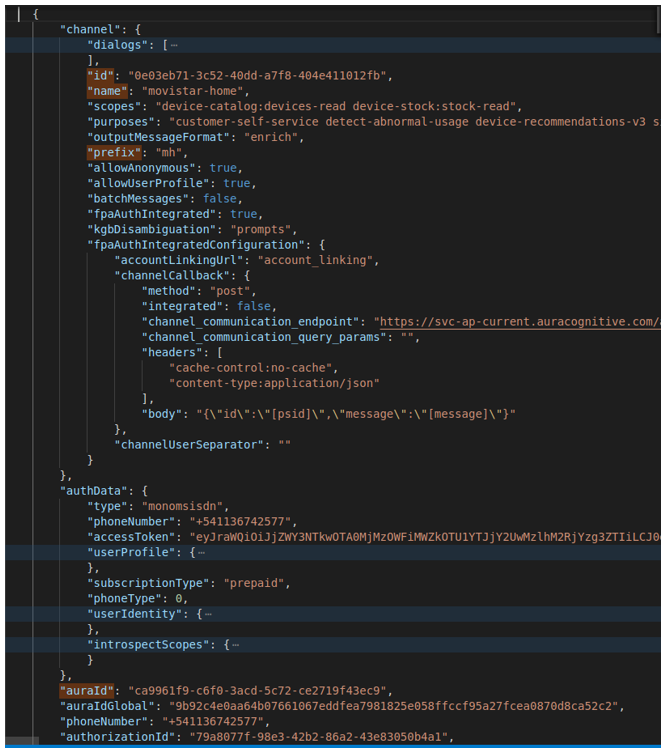
Now we have all we need. Pay attention to auraId property, as it will be used on POSTMAN to send messages to Aura.
-
Go to the root node_modules folder and open the bill-check-dialog.js file in order to set the desired breakpoints:
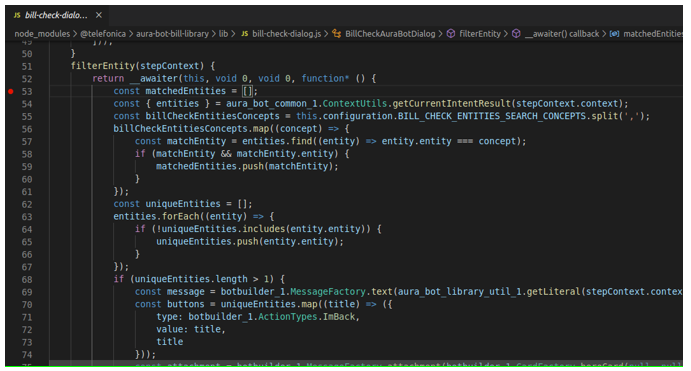
Go to debug module in VSCode and run the minibot in debug mode.
-
Go to POSTMAN and send the request to start conversation. In addition, send a request with an aura command to reach bill-check dialog:
-
We should be able to see our minibot stops in our breakpoints set in previous steps:
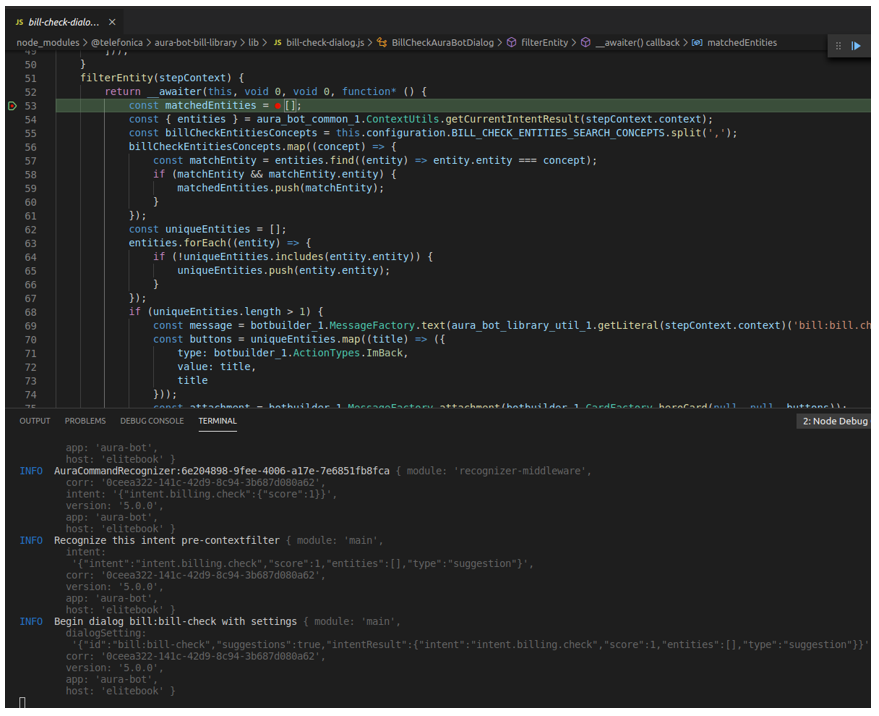
As we can see in the console, we have reached the intent.billing.check as a Final recognizer result. It can be noticed that the auraData object includes the information from the authentication-mock.json file mentioned before.
Run Aura minibot against a remote environment
In cases where it is necessary or desired to test use cases against a remote test environment, the following steps should be performed.
Get the environment variables
Using the kubeconfig file that your manager or DevOps Team should provide you with, run the following commands from a Unix terminal which will generate an .env file:
  $ export KUBECONFIG=<path-to-file>
  $ (kubectl -n aura-<environment> get cm aura-bot -o json | jq -r ".data|to_entries|map(\"\(.key)=\(.value|tostring)\")|.[]" ; kubectl -n aura-<environment> get secret aura-bot -o json | jq -r ".data|to_entries|map(\"\(.key)=\(.value|tostring|@base64d)\")|.[]" ) > aura-<environment>.env
NOTE: Set all 3 of <environment> params to your needs.
NOTE: In case the command does not find jq, you must install the library by executing the following:
  $ apt-get update
  $ apt-get install jq
Modify environment file
In order for the minibot to work correctly against a remote environment, the following variables must be added at the beginning of the .env file:
  # REMOTE ENV
  AURA_ACTIVATE_MINI_BOT=false
  AURA_LOGGING_LEVEL=DEBUG
  AURA_LOGGING_FORMAT=dev
Then, we will proceed to modify the following variables:
  AURA_CHANNELS_CONFIGURATION_API_ENDPOINT=http://wiremock:8080
  AURA_COGNITIVE_ENDPOINT=http://host.docker.internal:7000/auracognitive/v3
  AURA_MONGODB_URI=mongodb://host.docker.internal:27017
And comment or delete the subsequent ones:
  # AURA_LOGGING_LEVEL=INFO
  # AURA_MICROSOFT_APP_ID=********
  # AURA_MICROSOFT_APP_PASSWORD=********
Create new docker-compose
For convenience, we will create a new docker-compose file to be able to use the minibot locally and remotely without making modifications each time. This file will be added along with the previous docker-compose.yml file.
docker-compose-remote.yml
version: '3'

services:
  wiremock:
    image: wiremock/wiremock:2.33.2
    volumes:
      - ./mock-configuration/mocks/mock-files:/home/wiremock/__files:ro
      - ./mappings:/home/wiremock/mappings:ro
    restart: unless-stopped
    expose:
      - "8080"
    ports:
      - "4041:8080"

  mongodb:
    image: mongo:4.2
    restart: unless-stopped
    env_file:
      - config.env
    ports:
      - "27017:27017"

  aura-minigroot:
    image: auraregistry.azurecr.io/aura/aura-mini-groot:<version>
    volumes:
      - ./mock-configuration/mocks/mock-files:/opt/aura-groot/aura-mini-groot/sources/files/mock-files/
    env_file:
      - config.env
      - remote-config.env
      - config-bot.env
    restart: unless-stopped
    depends_on:
      - mongodb
    ports:
      - "8080:8080"
    entrypoint: sh -c "sh -c \"$${@}\""
    command: >
      sh -c "
        set -e
        echo $$(echo $$(nslookup host.docker.internal | grep -o 192.*) aura-bridge-outbound) >> /etc/hosts
        /opt/aura-groot/aura-mini-groot/sources/docker-entrypoint-mini-groot.sh
        sh || exit 0
      "

  aura-minibot:
    image: auraregistry.azurecr.io/aura/aura-mini-bot:<version>
    volumes:
      - ./packages:/tmp/dialogs
      - ./mock-configuration:/opt/aura-bot/aura-mini-bot/mock-configuration
      - mock-files:/opt/aura-bot/aura-mini-bot/sources/files/mock-files
    env_file:
      - config.env
      - remote-config.env
      - config-bot.env
    restart: unless-stopped
    depends_on:
      - mongodb
    ports:
      - "8081:8081"

  azcli:
    image: mcr.microsoft.com/azure-cli:2.49.0
    depends_on:
      - ngrok
    env_file:
      - config.env
    command: >
      sh -c "
        az login --tenant $$AURA_MICROSOFT_TENANT &&
        az account set --subscription $$AURA_MICROSOFT_SUBSCRIPTION &&
        az bot update -n $$AURA_MICROSOFT_BOT_NAME -g $$AURA_MICROSOFT_RESOURCE_GROUP --endpoint $$(curl --silent http://ngrok:4040/api/tunnels | jq -r '.tunnels | map(.public_url) | .[]' | grep https)/api/messages
      "
  ngrok:
    image: ngrok/ngrok
    command:
      - "start"
      - "--all"
      - "--config"
      - "/etc/ngrok.yml"
    volumes:
      - ./ngrok.yml:/etc/ngrok.yml
    ports:
      - "4040:4040"

volumes:
  mock-files:
NOTE: Set <version> to your needs.
Mappings for the Channels API
In order to get the configuration of locally installed use cases, and skills, create a mappings folder in the working directory and add these three files:
channels.json
  {
    "request": {
      "method": "GET",
      "urlPattern": "(.*)\/channels(.*)"
    },
    "response": {
      "status": 200,
      "bodyFileName": "channels-configuration-mock.json",
      "headers": {
        "Content-Type": "application/json"
      }
    }
  }
skills.json
{
  "request": {
    "method": "GET",
    "urlPattern": "(.*)\/skills(.*)"
  },
  "response": {
    "status": 200,
    "bodyFileName": "skills-configuration-remote-mock.json",
    "headers": {
      "Content-Type": "application/json"
    }
  }
}
This configuration will use the docker volume created in the docker-compose to be able to serve through the WireMock container the files located in /sources/files/mock-files/.
Start the minibot containers
You must use the following command to raise the containers with the new compose file:
$ docker-compose -f ./docker-compose-remote.yml up -d
You should also use the following command to shut down the correct containers:
$ docker-compose -f ./docker-compose-remote.yml down
Docker scaffolding
Below, you can find the complete folder and file structure with links to download them, so you can start using minibot in docker right away:
https://github.com/Telefonica/aura-mini-bot
2 - Aura NLP Virtual Machine
Aura NLP Virtual Machine user guide
Guidelines for the installation of Aura NLP Virtual Machine, required for the configuration of the NLP development environment
Installation and operation guidelines
Aura Platform Team has generated a Virtual Machine that allows the configuration of the Aura NLP development environment following a semi-automatic process.
Follow the steps explained below to install and operate it:
-
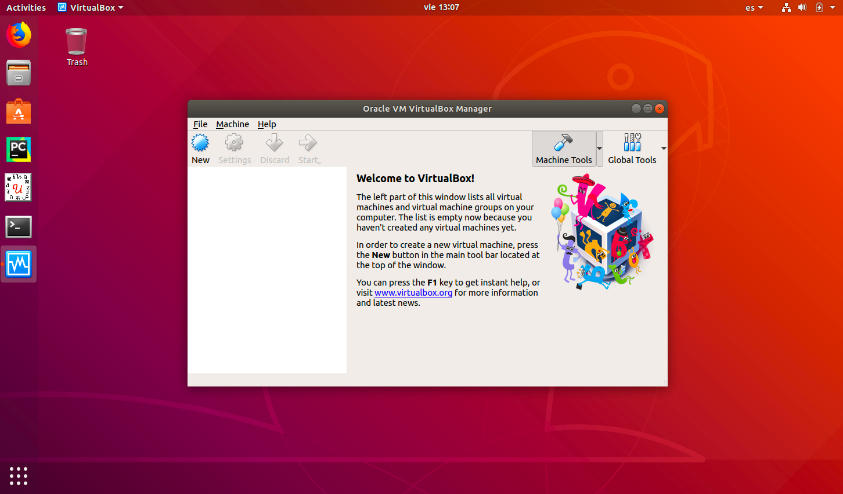
Install VirtualBox (or other software).
-
Import OVA formatted files that contain all the technical requirements for the installation.
-
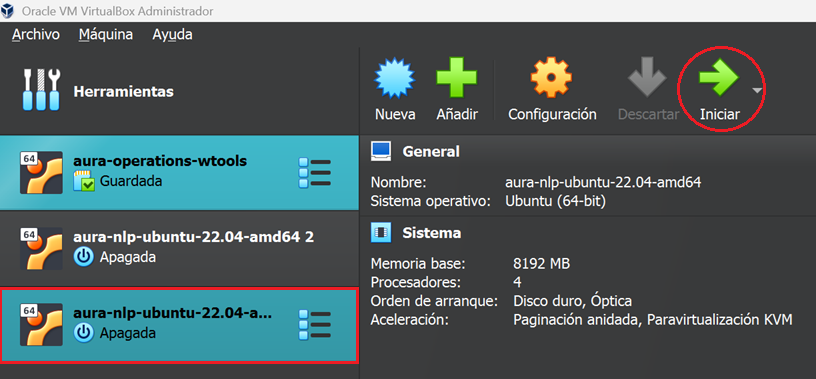
Once the VirtualBox is installed, follow these steps:
3.1. Select “File” -> “Import Appliance”
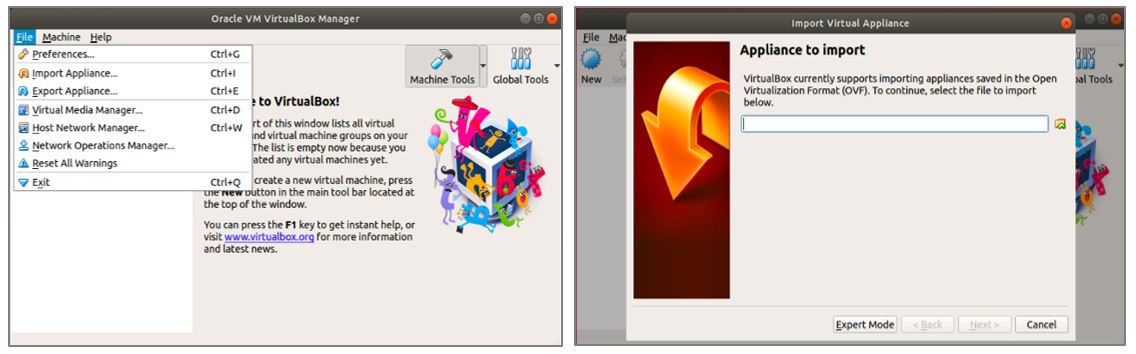
3.2. Access Aura NLP Virtual Machine for your release in the Sharepoint L-CDO repository and select the corresponding aura-nlpdata.ova file for importing it.
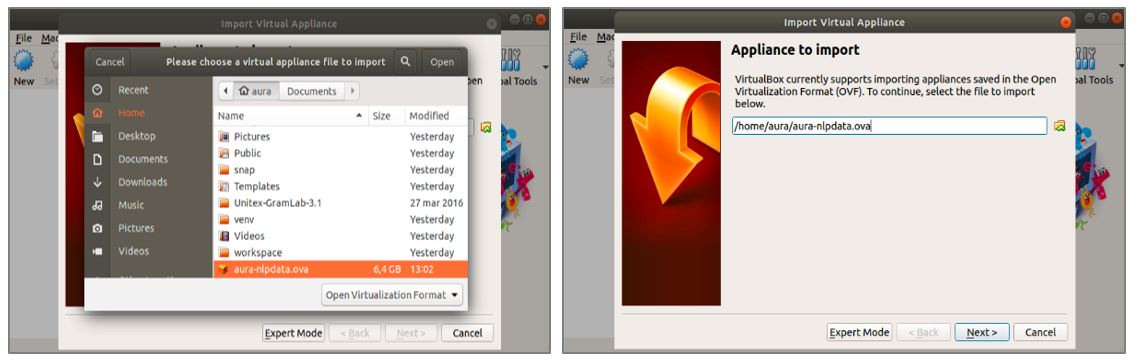
3.3. Click on “Next >” button and, afterwards, select the “Import” button.
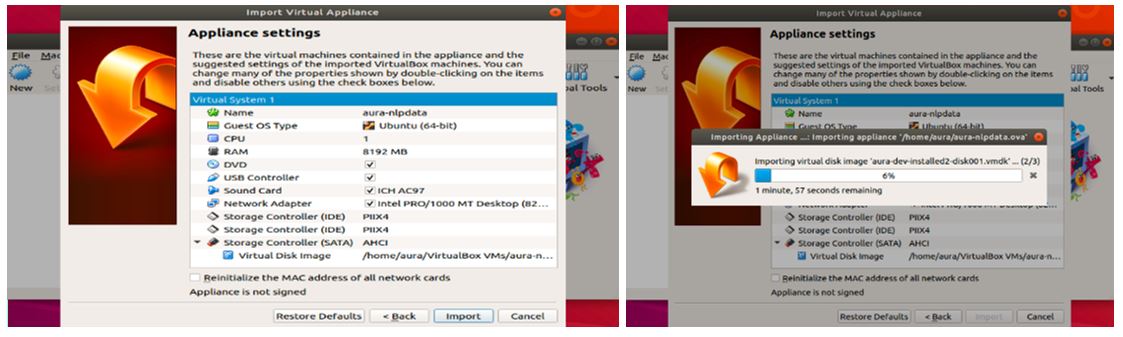
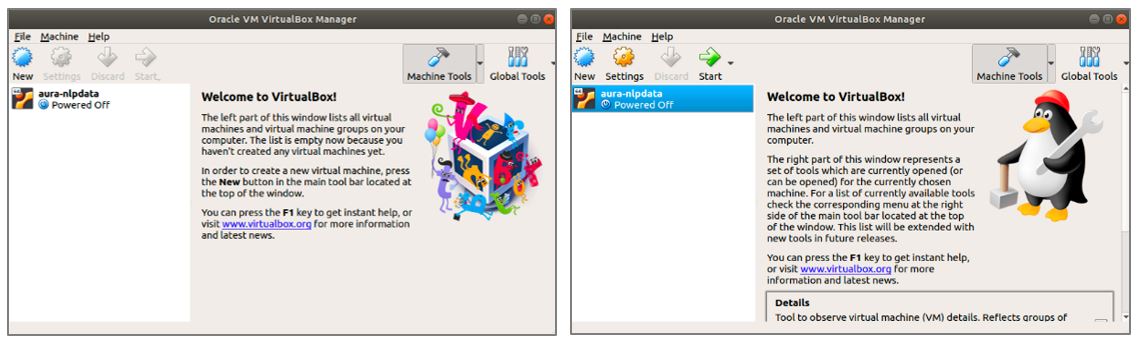
3.4. When the importation process has finished, in the main view of VirtualBox the new Virtual Machine is shown.
Click over the new virtual machine and then press “Start”.
-
Ask the APE Team for the user and password to access.

-
Generate a new SSH key to operate the Virtual Machine
In order to operate with the NLP Virtual Machine, it is required to generate a new SSH (Secure Shell Protocol) key.
For this purpose, follow the steps described in the section Generate a new SSH key and add it to the ssh-agent.
Be aware of the time update, as if the Virtual Machine is paused, the time is not updated and it can lead to errors with certificates.
Generate a new SSH key and add it to the ssh-agent
In order to operate with the NLP Virtual Machine, certain configuration is needed to allow users to access GitHub NLP repositories.
You can access and write data in repositories on GitHub using SSH (Secure Shell Protocol). When you connect via SSH, you authenticate using a private key file on your local virtual machine.
SSH configuration guidelines
Follow the steps explained below to configure the SSH keys:
-
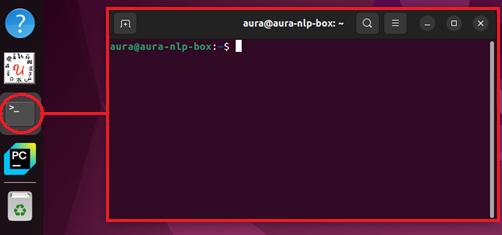
Open VirtualBox and run the NLP Virtual Machine by clicking in the “Start” button.
-
After login into the VM (if you do not remember the password, ask APE team), open the terminal.
-
In the terminal, type in the command: ssh-keygen -t ed25519 -b 4096 -C your-email@telefonica.com, replacing your-email by your corporate e-mail. This command generates a new pair of SSH keys using the ed25519 algorithm. After introducing the command, press “enter” as shown in the following image.
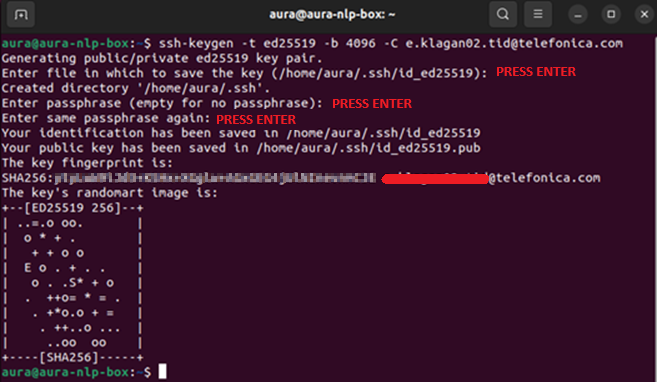
-
Now that we have our SSH key pair generated, introduce the following command: ssh-add ~/.ssh/id_ed25519. This command adds the private key id_ed25519 to the SSH agent, allowing SSH connections to use that key without requiring the password each time we need to access the repositories.

-
The next step is to display the content of the id_ed25519.pub file, which contains the public SSH key. To do this, type in the following command: cat ~/.ssh/id_ed25519.pub. We need to copy the displayed key to add it to GitHub in the following steps. Copy everything except your email address, displayed at the end of the string.

-
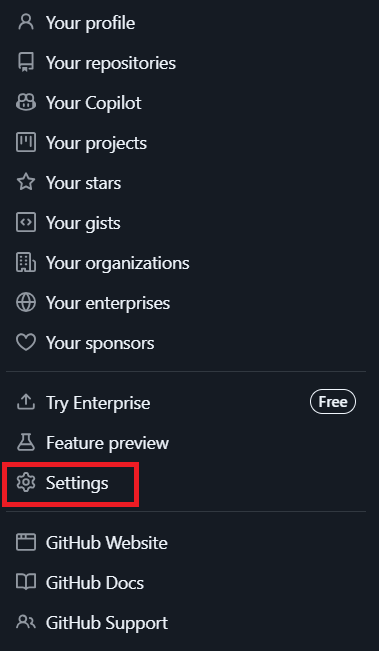
Open GitHub in a web browser and log in.
-
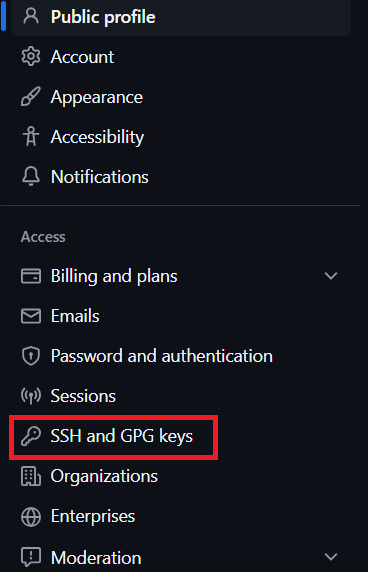
In the top-right corner, click on your profile image, and select “Settings”.
-
In the new page, on the left-hand side bar, click on “SSH and GPG keys”, and then click on “New SSH key” button (in the top right corner).
-
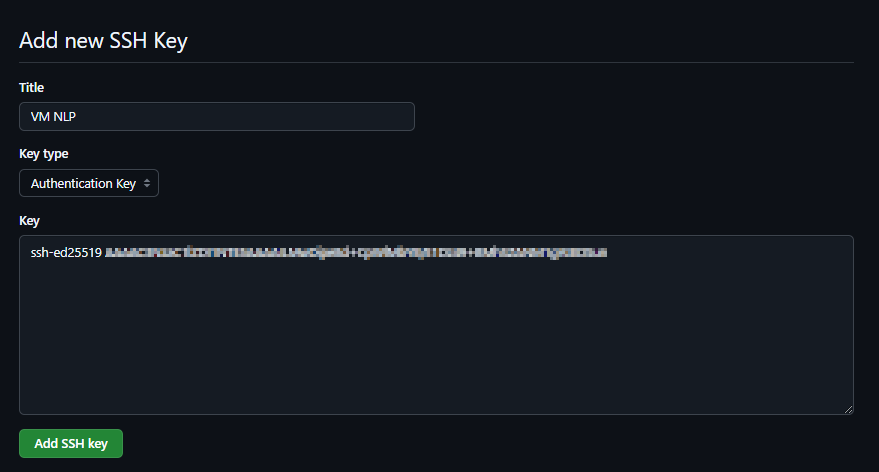
Now, add a title for the SSH key, for example, “VM NLP”. The key type should be Authentication Key, and in the key field, add the key copied from the terminal in step 5. Finally, click on “Add SSH key” button.
-
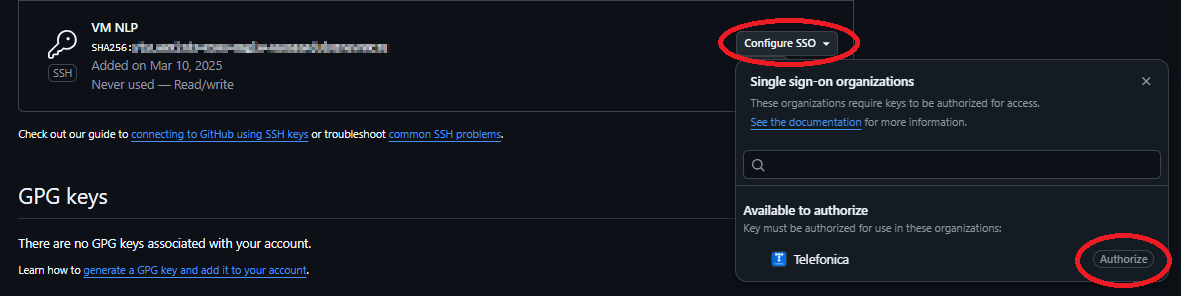
In the list of SSH keys shown after clicking “Add SSH Key” in the previous step, identify the recently created SSH key and, on the right-hand side, click on the “authorize” button, as shown in the following image. GitHub will prompt you to verify with your password in order to authorize the Telefónica organization.
-
Now that we have our SSH keys set up, we can proceed with cloning the repositories we need to work with. Remember that to clone the repositories from the VM, we must click on “SSH” to clone via SSH and copy the URL.

3 - Abacus 1.0.0.
Abacus 1.0.0. user guide
Learn how to use Abacus, the tool for the training, testing and certification of the NLP model in Aura through an agile and efficient process
What’s Abacus?
Abacus is a web tool that eases the management of understanding models in Aura. Using Abacus, you can get a higher efficiency and autonomy, leading to a more agile certification of your NLP trainings.
Linguists or NLP experts can use Abacus to train, test and certify a full NLP understanding model in a specific channel and verify that Aura is able to understand properly.
With Abacus, you can certify your NLP model in four steps:
- Upload my NLP training
- Train & test the full understanding model
- Live mode: Iterate and test
Check your accuracy and iterate your model
- Publish your model
Publish your branch in Github transparently
Limitations of Abacus version 1.0.0.
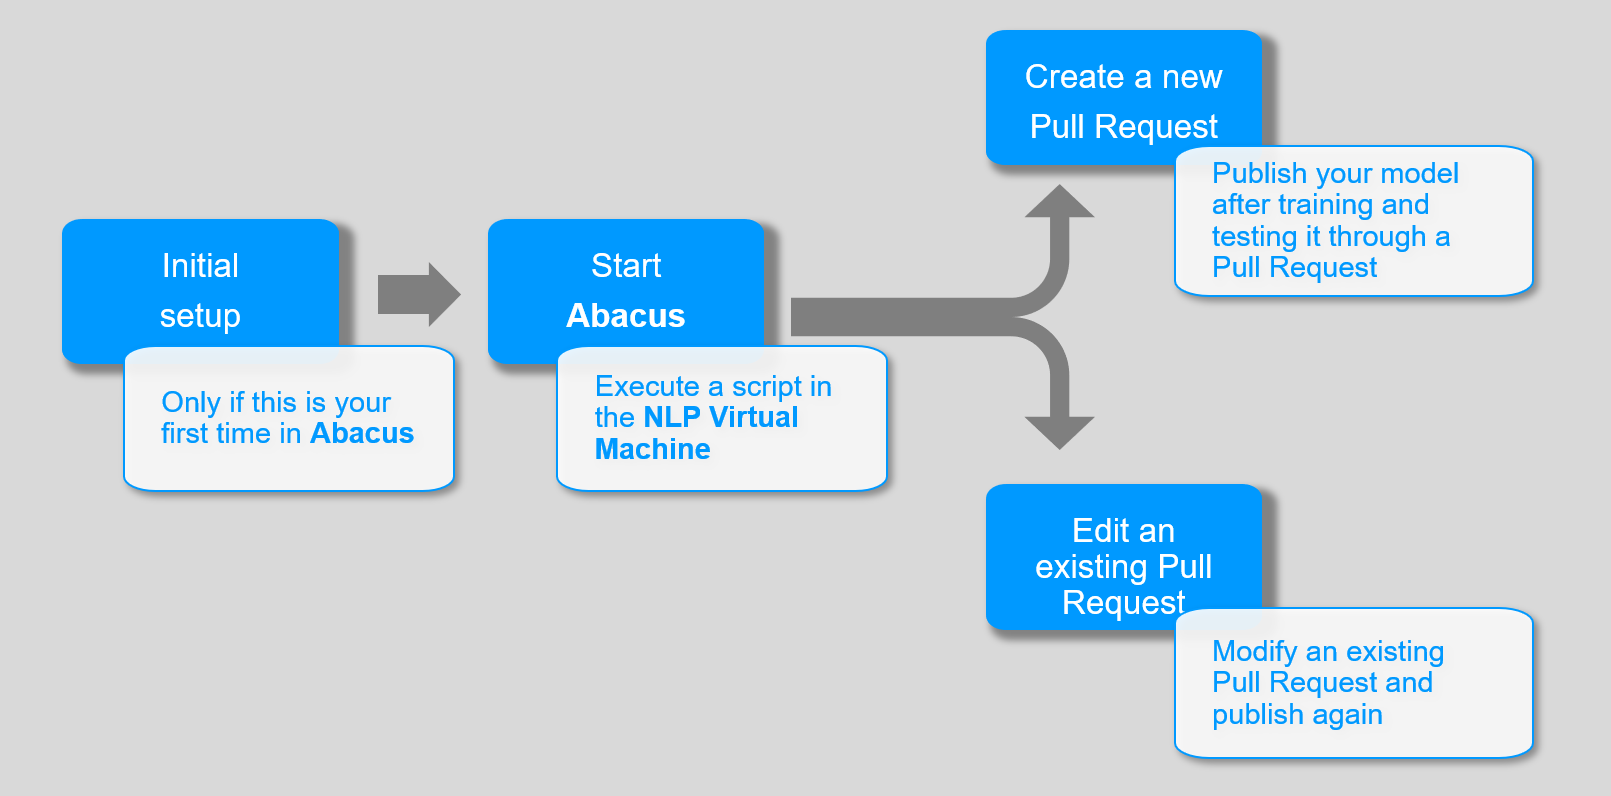
Abacus journey map
The following image shows the main steps in your process for using Abacus. Access the guidelines for each step in the following documents:
3.1 - Set-up Abacus
Abacus 1.0.0. initial set-up
Using Abacus for the first time? Follow these guidelines for its set-up.
⚠️ This process must be done only once, the firt time you open Abacus.
Prerequisites for using Abacus
Check that you fulfil these requisites before Abacus set-up.
-
You have the NLP Virtual Machine installed and working, with your aura-nlpdata working branch generated.
-
The understanding model is already defined and configured.
-
You have generated the specific training files and E2E test files required for each stage of your NLP pipeline.
-
You have already filled the variables required for training in the configuration file build_local_variables.sh.
Steps for Abacus set-up
-
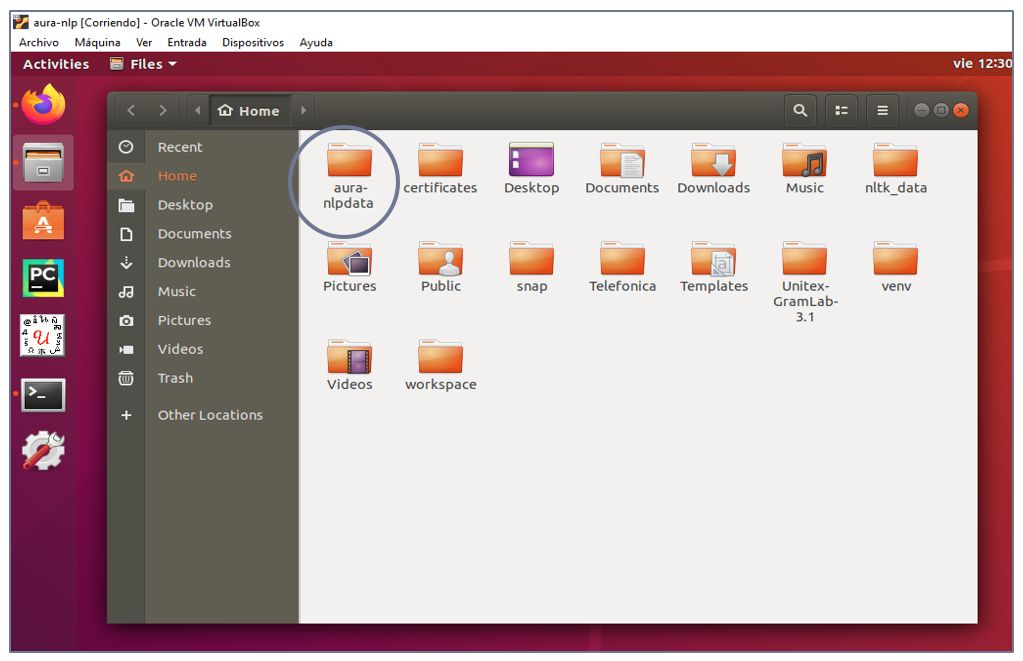
Access the NLP Virtual Machine.
-
Enter your local working project, henceforth {Root_project}, whose name should be:
aura-nlpdata-[country-code]
-
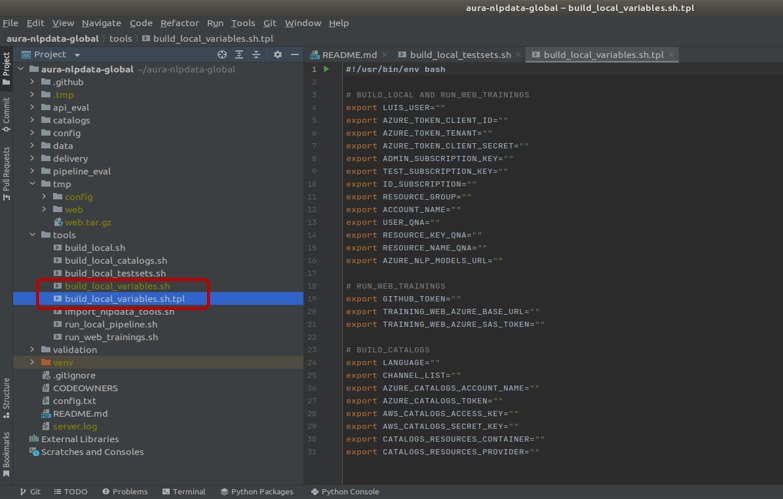
Copy the local variables configuration template:
"${Root_project}/tools/build_local_variables.sh.tpl"
and rename as:
"${Root_project}/tools/build_local_variables.sh"
cd ${Root_project}/tools
cp build_local_variables.sh.tpl build_local_variables.sh
-
Access the file build_local_variables.sh in the tools/ folder.
-
Fill in the variables inside the “run_web_trainings” section:
-
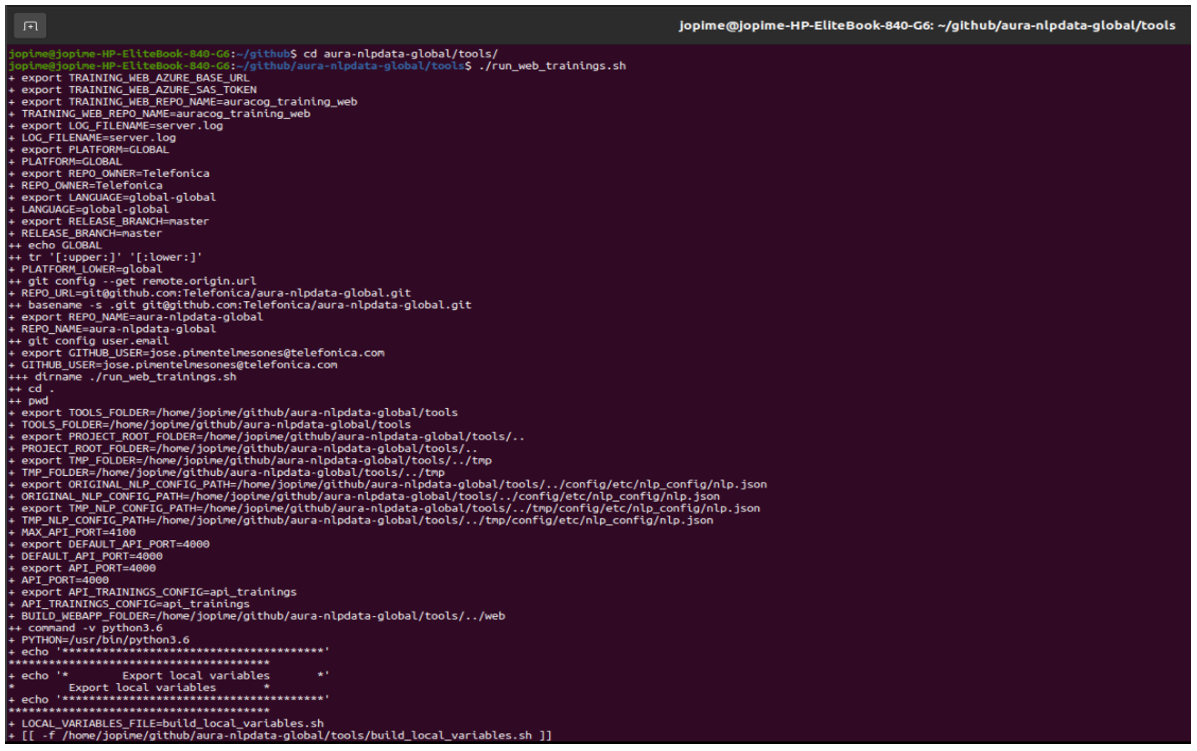
Run the script file:
${Root_project}/tools/run_web_trainings.sh
-
When the script is finished, Abacus is opened automatically.
3.2 - Use Abacus
Guidelines for the use of Abacus 1.0.0.
After the Abacus set-up, learn how to use the tool with our guidelines.
Open Abacus
-
Open the NLP Virtual Machine.
-
Execute the following commands in the console:
cd ${Root_project}/tools
./run_web_trainings.sh
-
Abacus is now opened.
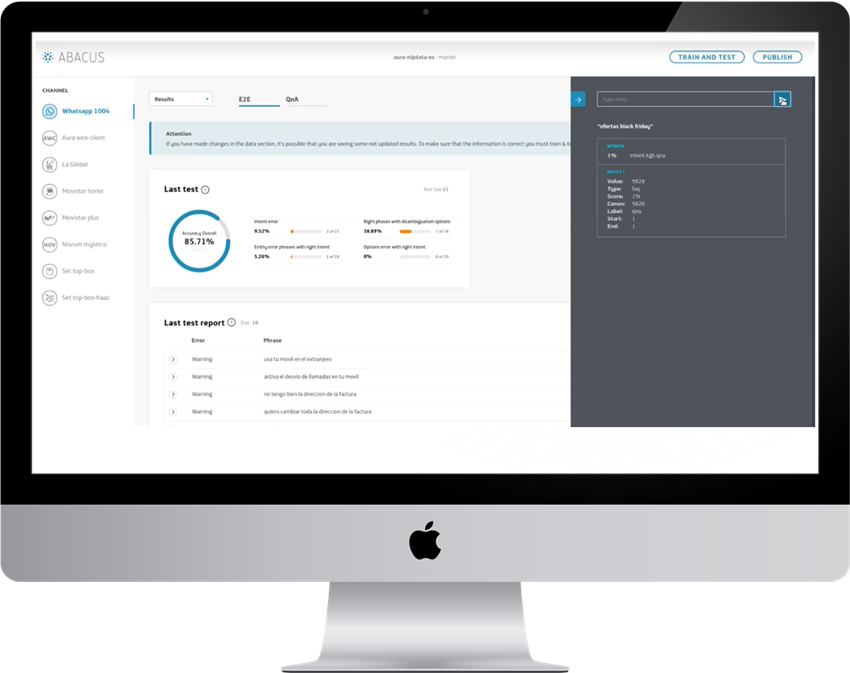
Discover Abacus main screen

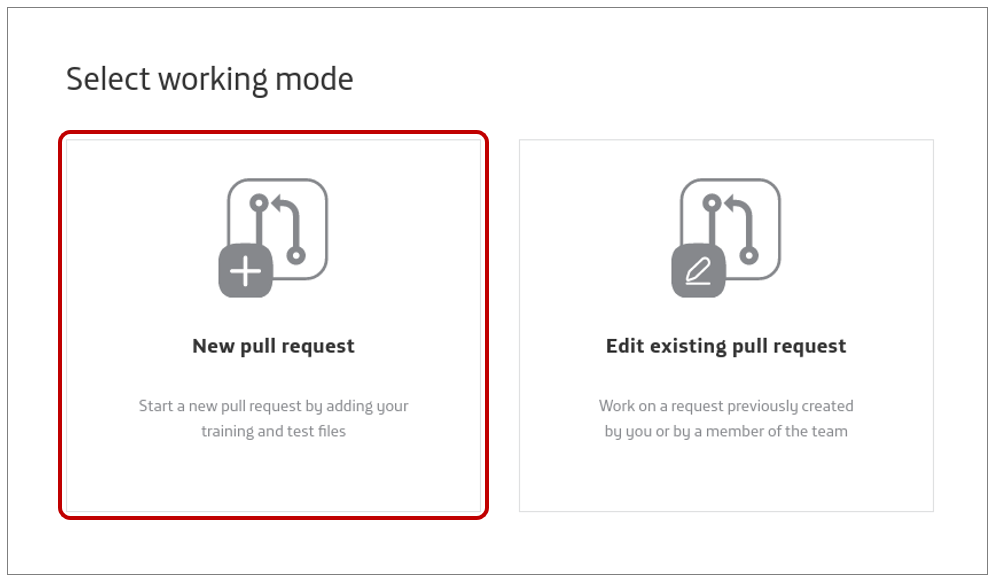
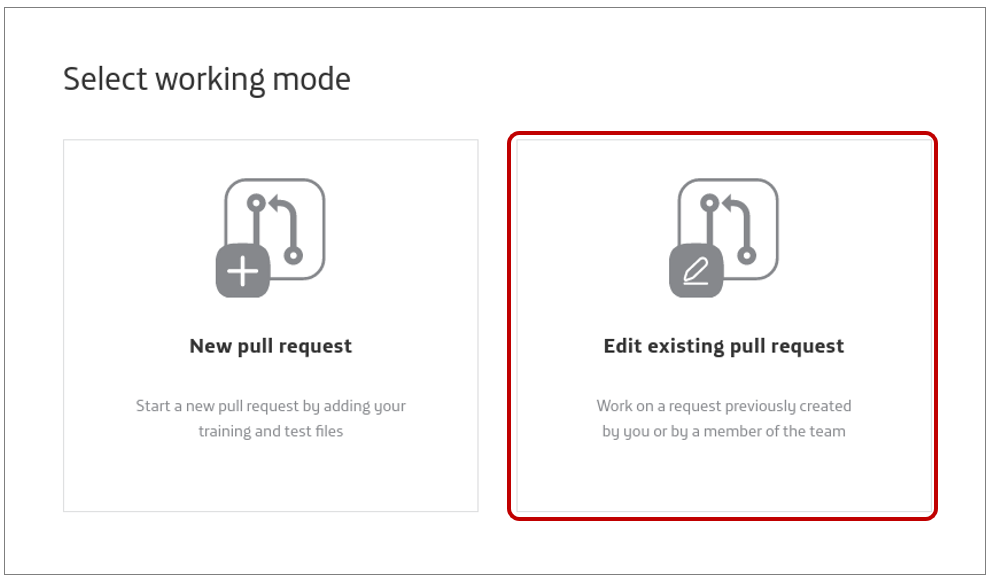
Create a new Pull Request
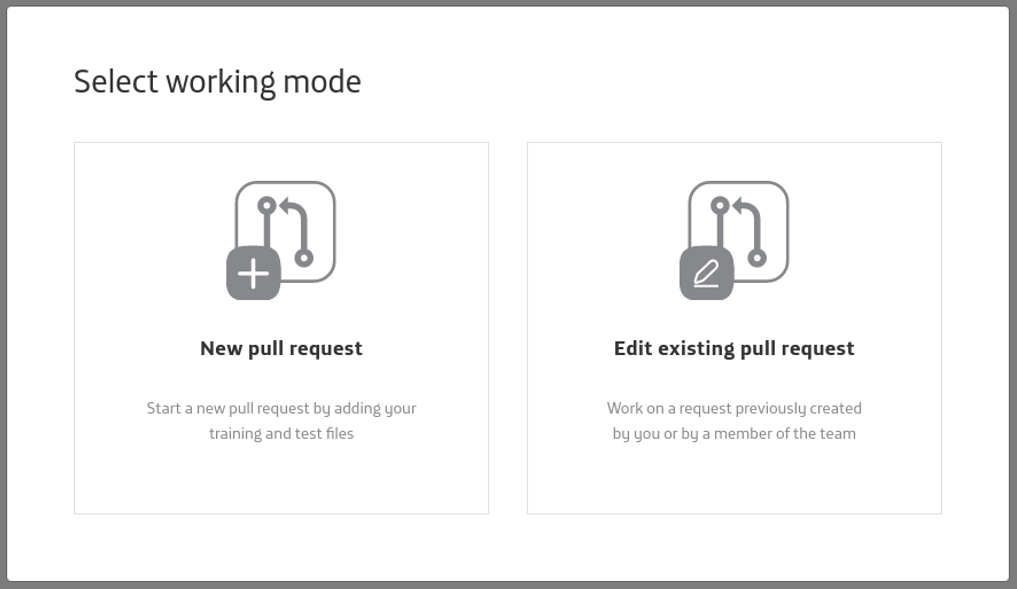
-
Enter Abacus and select “New Pull Request” as your working mode.
-
In the main interface, select the channel where your understanding model is.
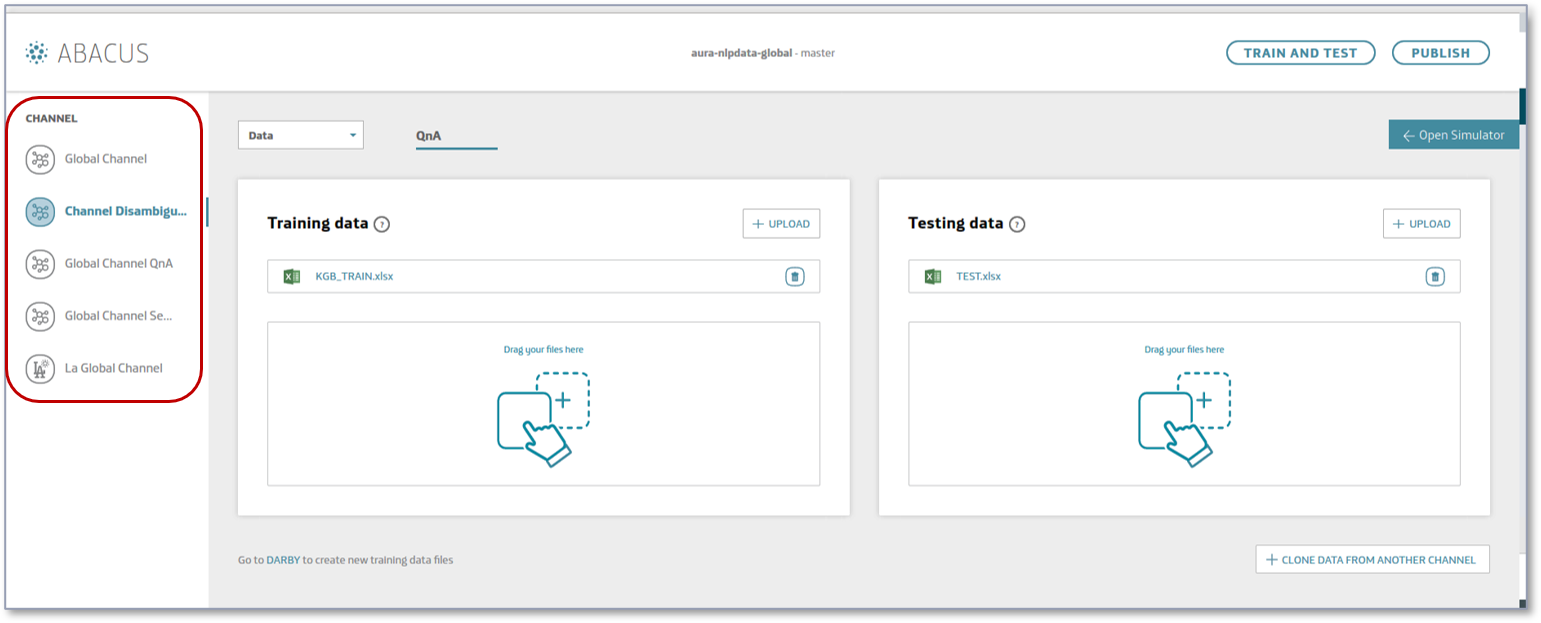
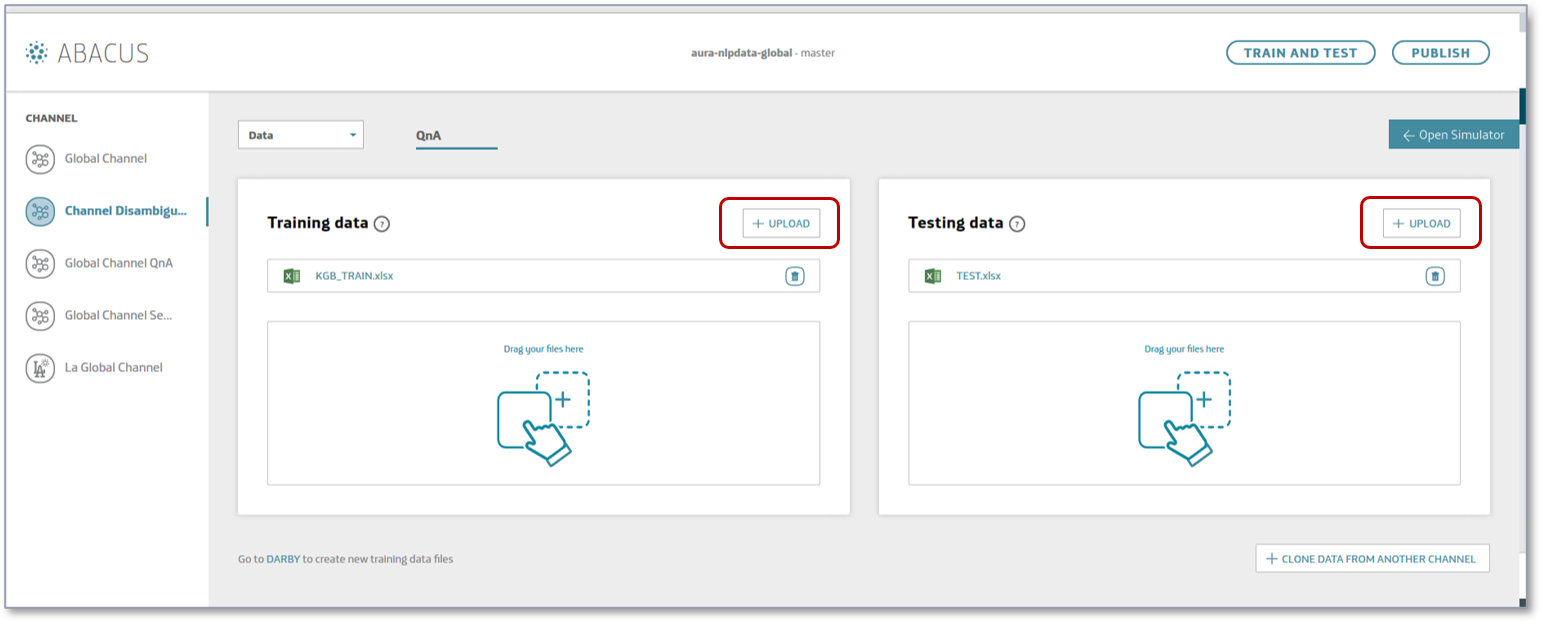
-
Train your understanding model.
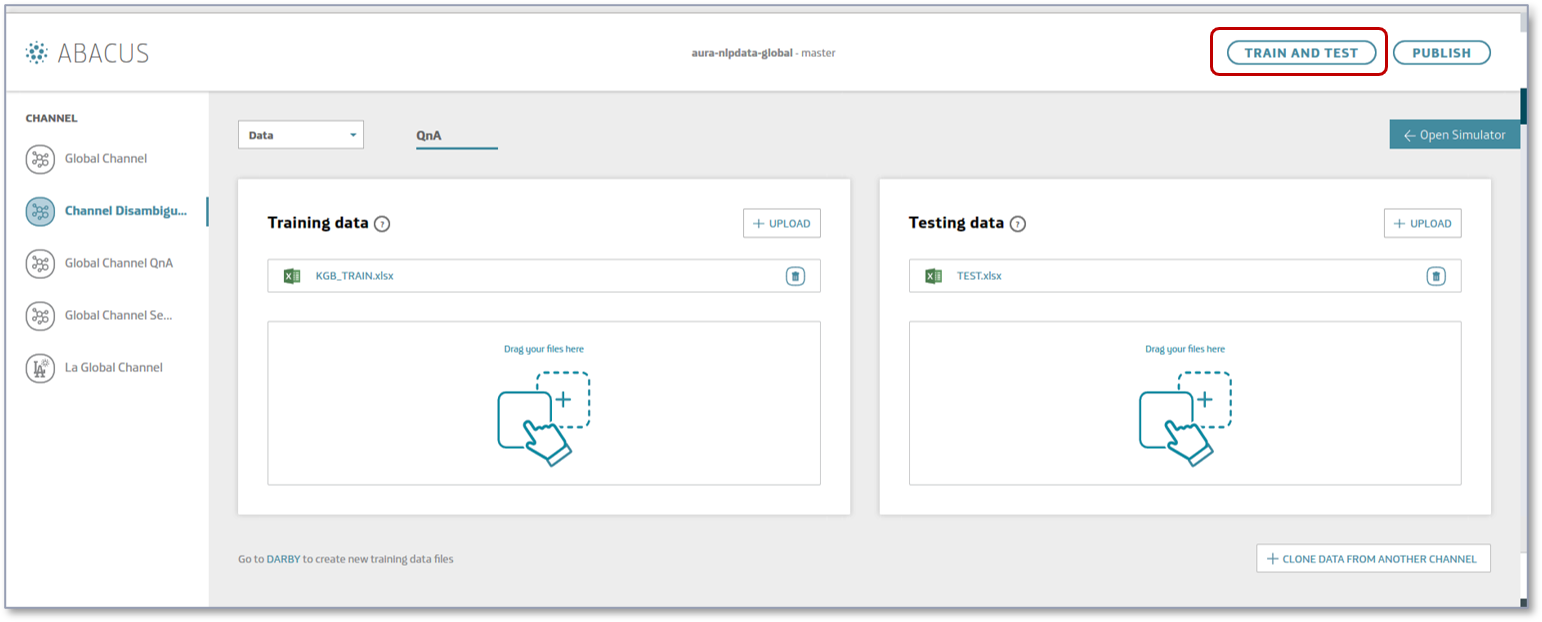
-
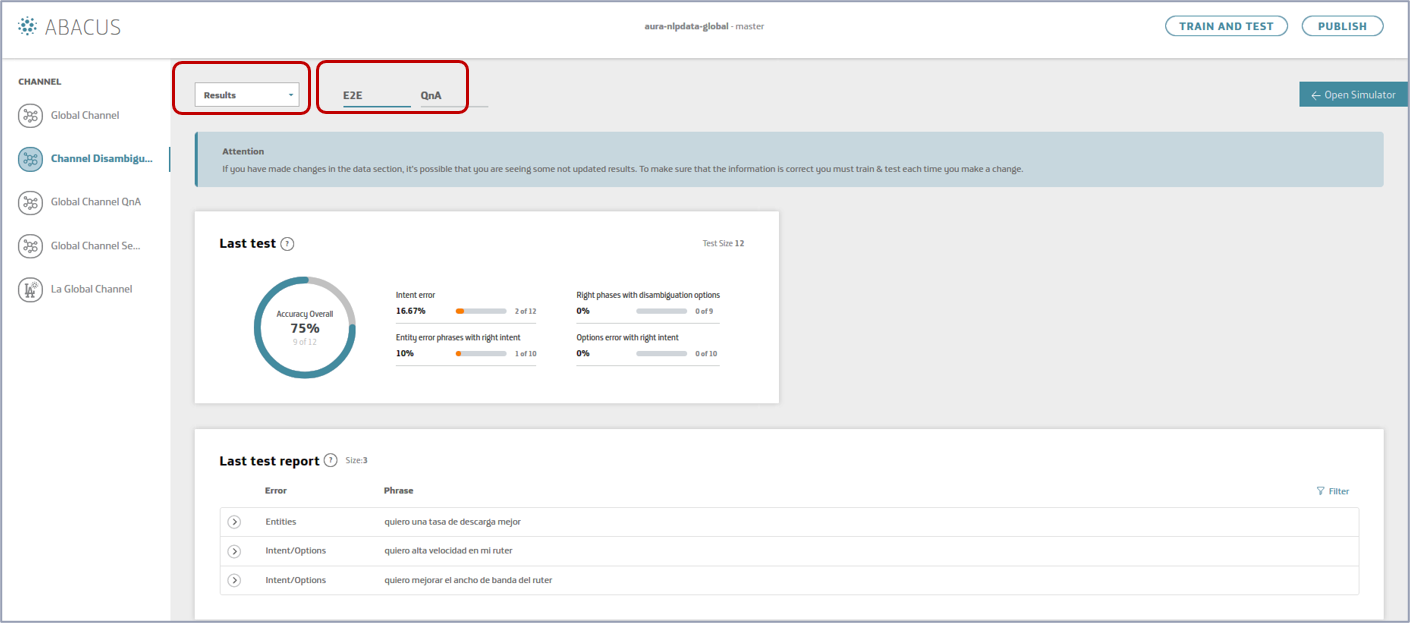
When the training is finished, select “Results” in the drop-down menu and access to the results of the accuracy tests.
- End-to-end tests (accuracy of the overall NLP model)
-
Evaluate the accuracy of your model:
-
Check in “last test” the overall accuracy related to the last test performed in the tool.
-
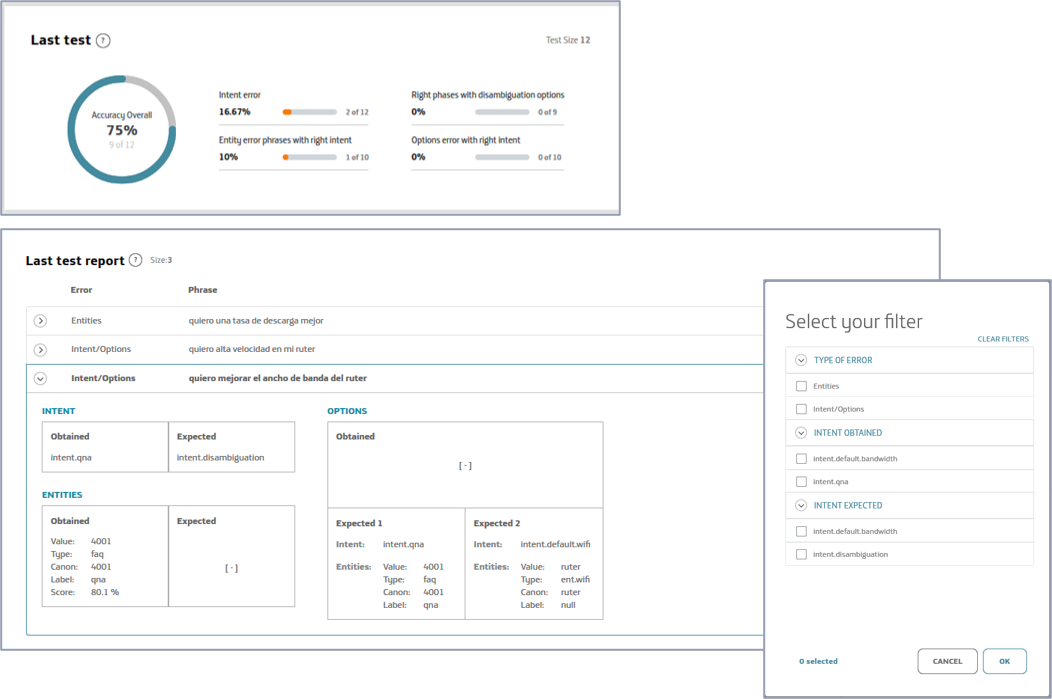
Click on each specific error in “last test report” to access to detailed information.
-
Use the filters to visualize errors per type, intent obtained or intent expected.
-
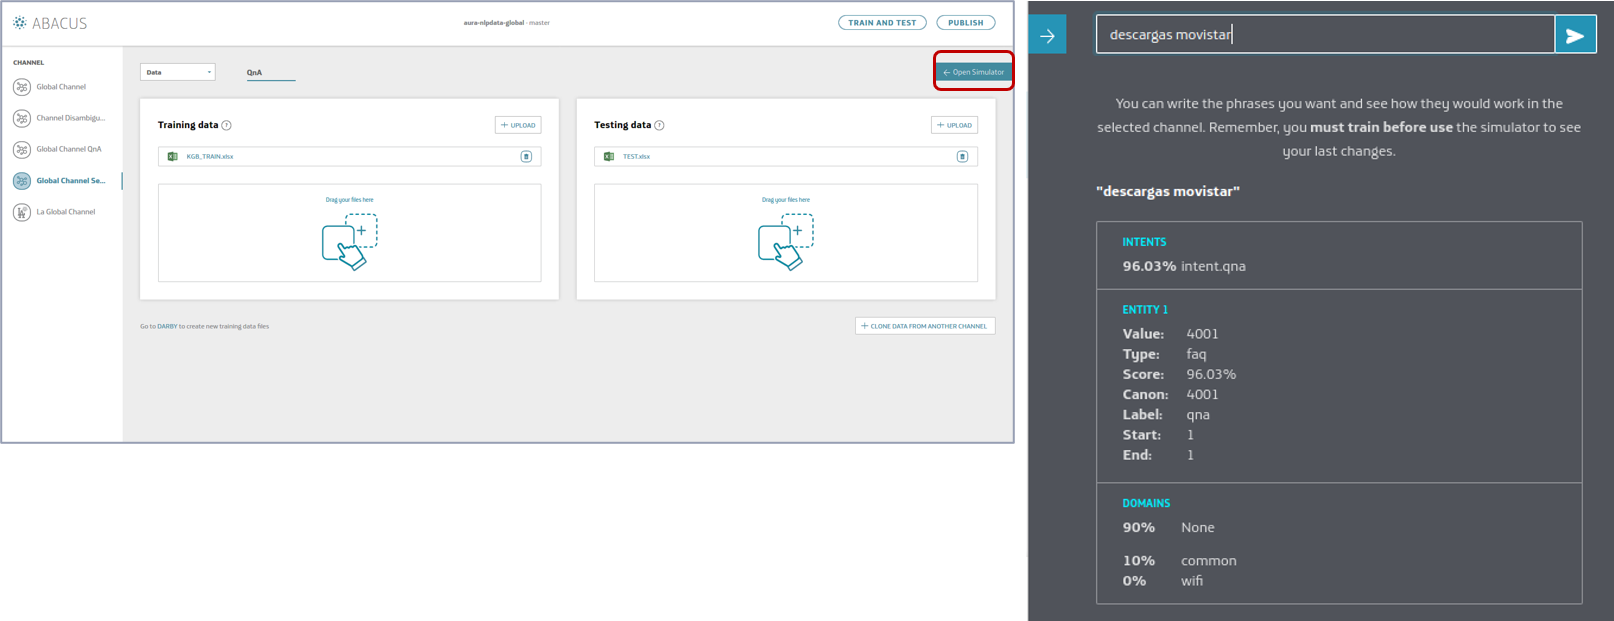
Test your NLP model locally (Abacus simulator).
Once your model is trained, you can use the Simulator to launch and test your pipeline locally and make a real-time evaluation of accuracy in the recognition of a specific statement.
- Open the simulator.
- Type a phrase.
- Check how your model recognizes it.
-
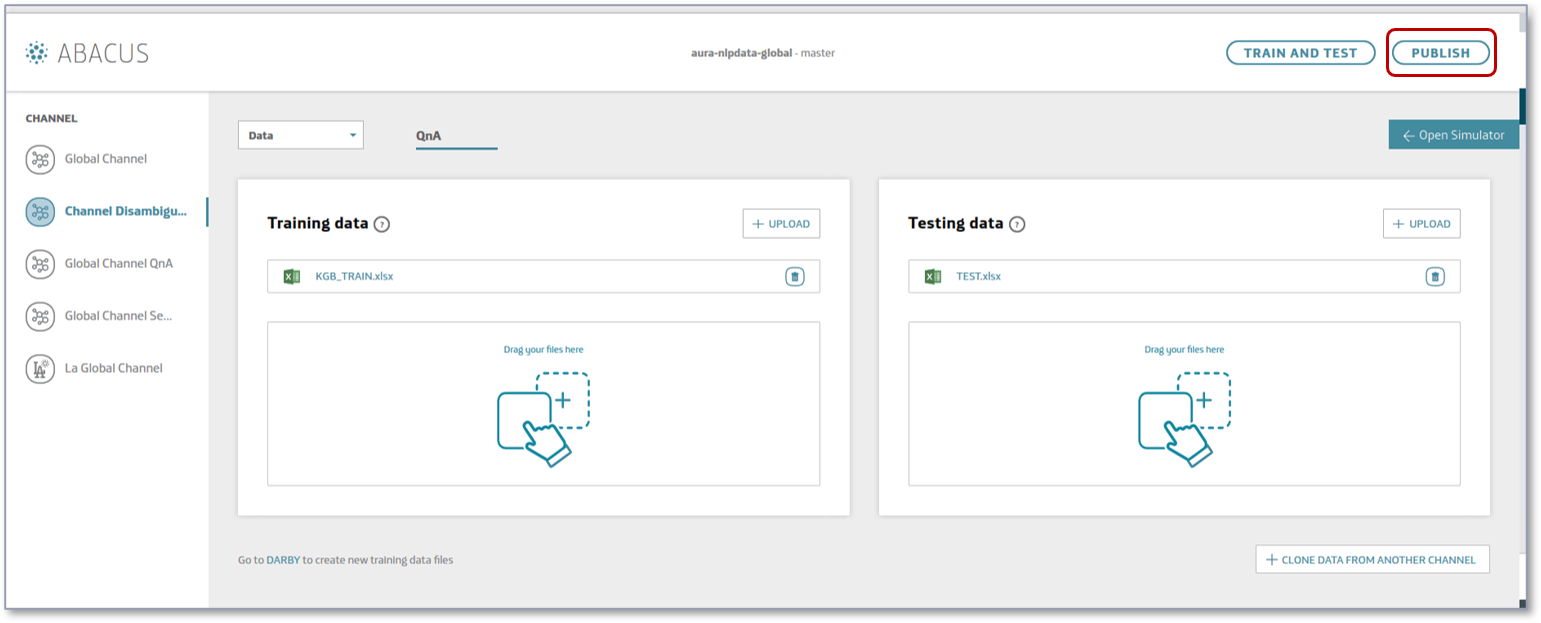
When the accuracy is satisfactory, publish your model:
-
Press the “PUBLISH” button.
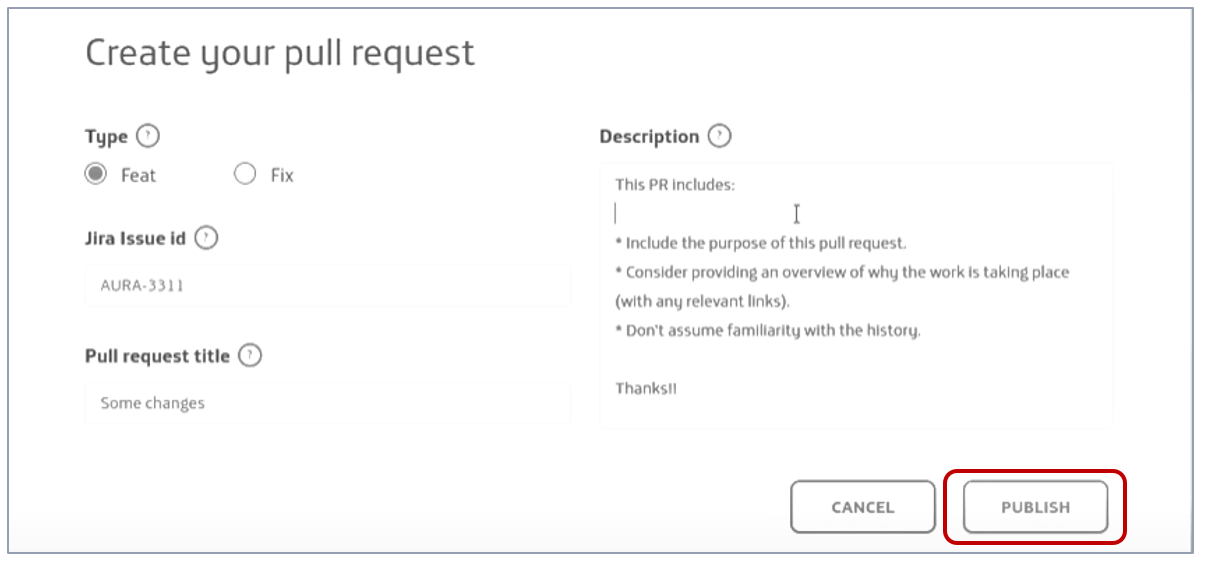
-
Create your Pull Request inserting the type, related JIRA issue, title and description and publish it.
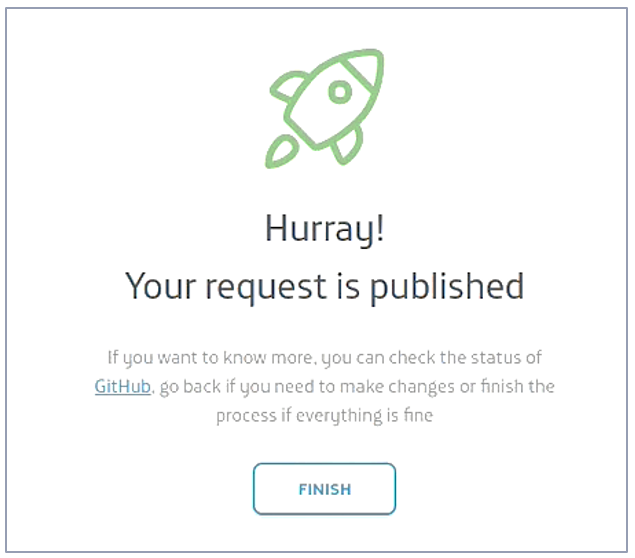
-
If everything goes right, your PR is published. You can also see the details in Github.
Edit an existing Pull Request
-
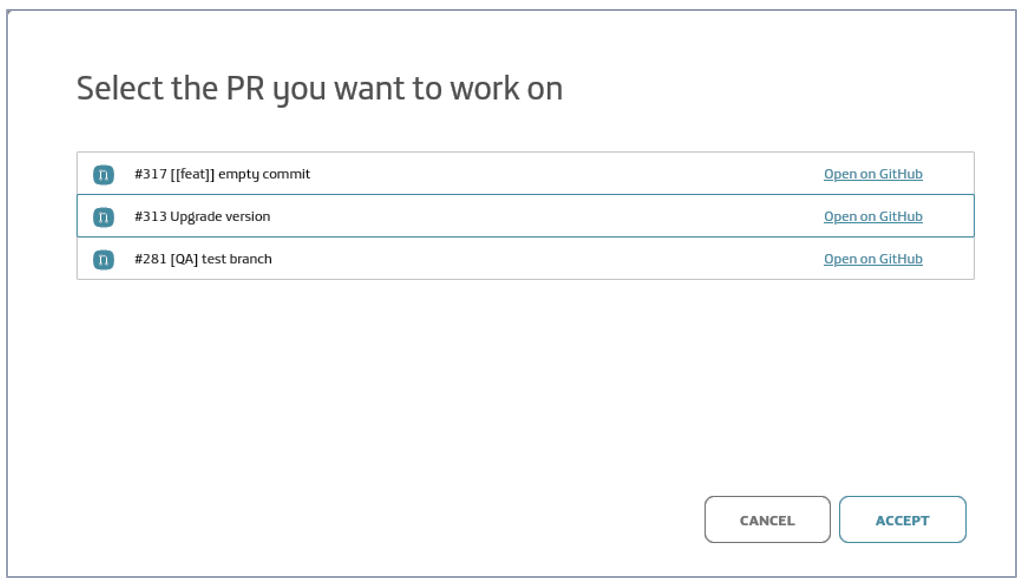
Enter Abacus and select “Edit existing Pull Request” as your working mode.
-
Select your intended Pull Request. You can open it from Abacus or from GitHub to see its details.
-
Now, you can work over it as explained in Create a new Pull Request section, from step 2 onwards.
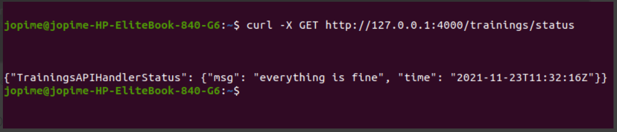
When Abacus is started, the API is available in:
http://127.0.0.1:4000 (*)
(*) The port is variable, with values in the range: 4000 - 4100
The API documentation is included in Aura NLP API definition.
Abacus troubleshooting
Logs files
All the operations carried out with Abacus are recorded in the logs file:
${Root_project}/server.log
-
If an error occurs, Abacus will show this message:
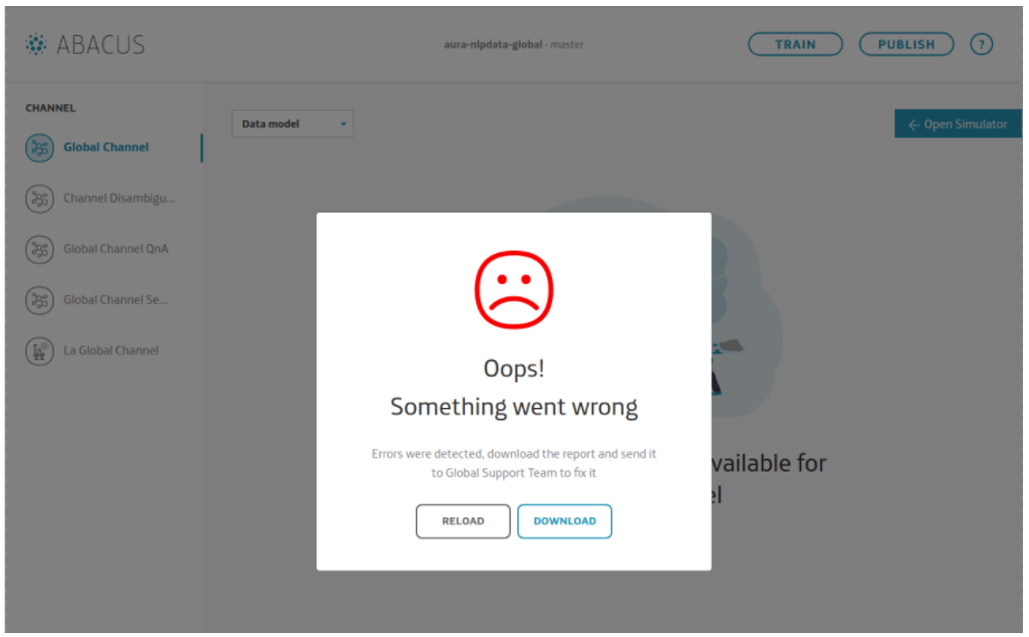
-
Clicking on “Download”, you can access to the log report and check the error for fixing it.
-
If, the problem persists, contact the Global Support Team and provide them with the report.
-
When it is solved, press “Reload”, to continue using Abacus.
Git conflicts
If the remote branch has changes that have not been updated in the local working branch, Github detects this situation as a conflict when publishing, and is not able to recognize which are the correct changes.
The following pop up will appear after clicking on “publish”.
Clicking on “Download”, you will get the file ${Root_project}/server.log, where you can check the errors that have occurred and try to solve them.
!  [rejected]    <<working-branch>>  ->  <<working-branch>> (fetch first)
error: failed to push some refs to 'git@github.com:Telefonica/aura-nlpdata-global.git'
Conflicts in server.log must be resolved locally using the editor:
-
Open a terminal in code editor. Make sure the branch in terminal is the correct working branch.
-
Move changes from the remote branch to local:
git pull origin <<working-branch>>

-
A message with a list of files with conflicts is shown.
-
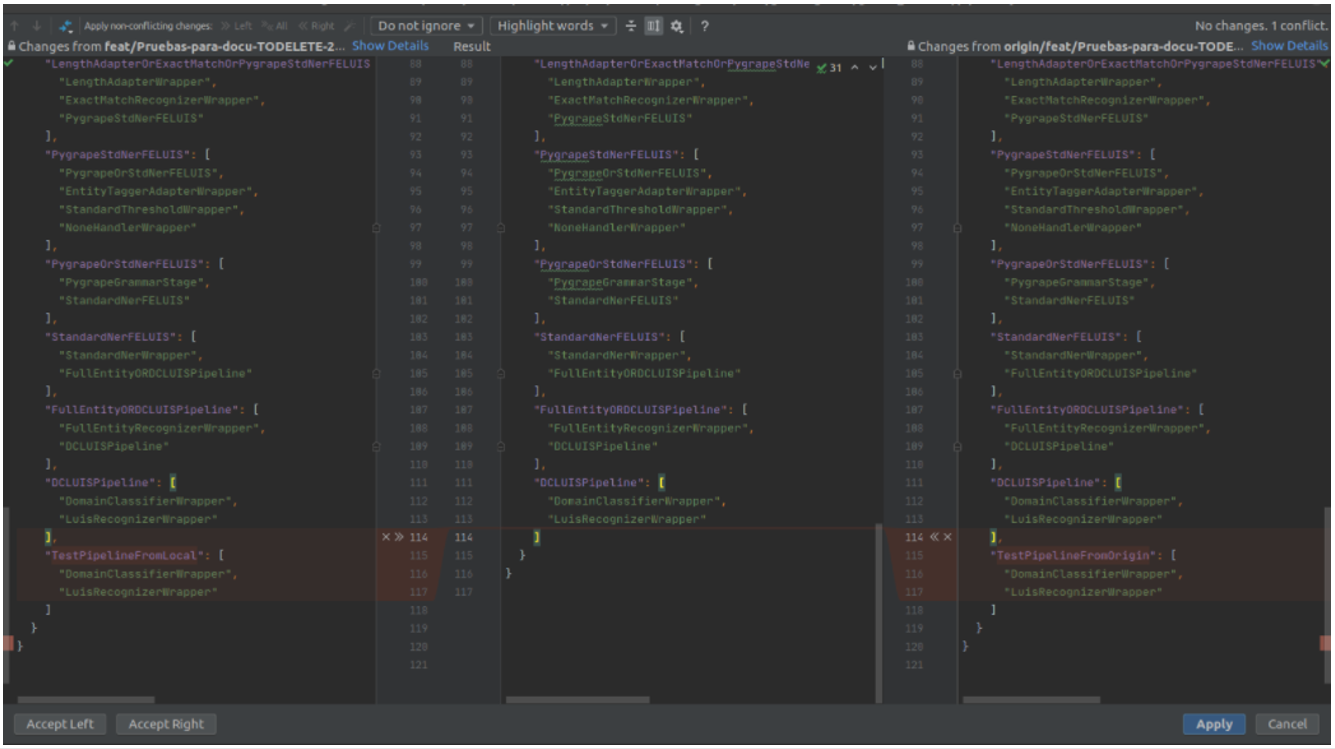
Open each file and right-click to access the conflicts resolver.
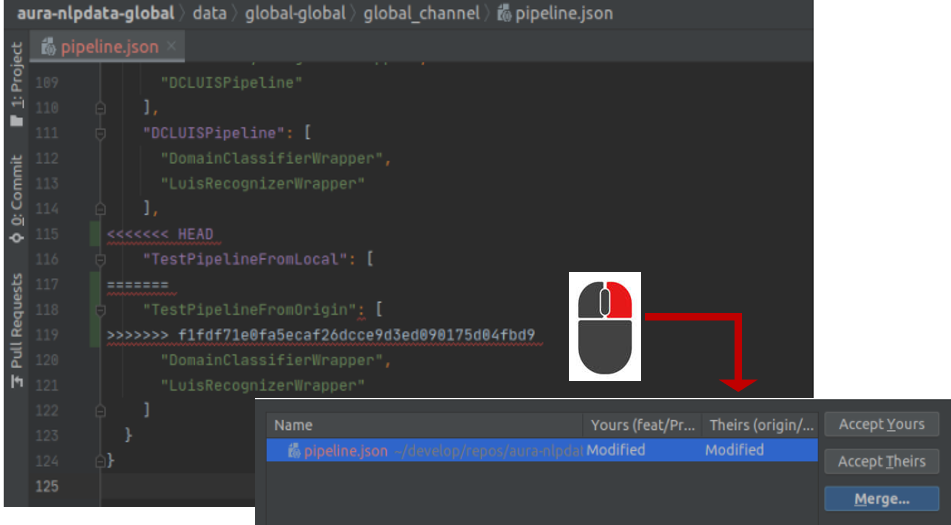
-
Resolve the conflict. You can include texts from the local branch (left) or from the remote one (right) or discard both and copy what is needed.
-
Once conflicts are resolved, launch the following command to review the status of the local branch and check that all the conflicts are fixed in the response message:
git status
-
When all the conflicts are resolved, commit changes:
git commit –m "[[feat]] resolve conflicts: <<description of changes>>"
-
Push to update changes to the remote branch:
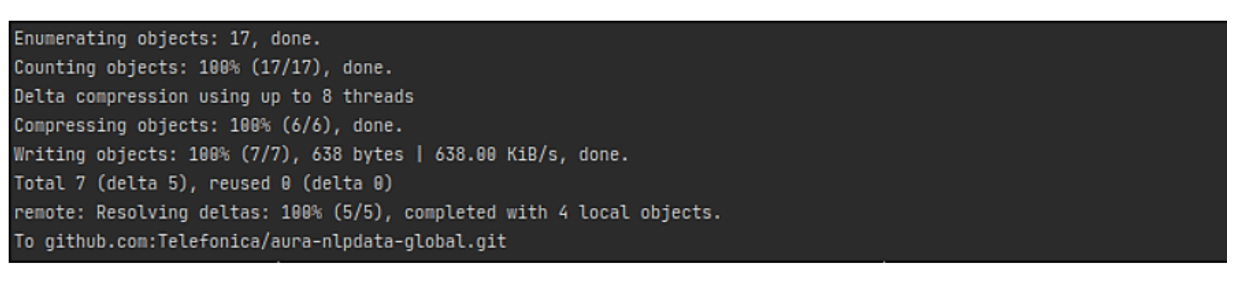
git push origin <<working-branch>>
-
A message with all the details will appear.
-
If everything is solved, now restart the web server and continue with the existing Pull Request.
4 - Aura Mocks Server
Aura Mocks server
Description of Aura Mocks Server, a tool to provide a mock for any of the services that use Aura Bot or that are used by Aura Bot, and guidelines for working with it
Introduction
Aura Mocks Server is a server that provides a mock for any of the services that use aura-bot or that are used by aura-bot.
This component defines rest services that allow aura-bot system to run without the need for any other external system to provide these services.
Aura Mocks Server is composed by different plugins, which provide functionality to the tool and can work independently.
The current documentation includes:
This project is in development phase, so the necessary services will be completed over time.
4.1 - Installation
Aura Mocks server installation
Guidelines for the installation, testing and deployment of Aura Mocks Server
Introduction
These instructions will allow you to get a copy of the project running on your local machine for development and testing purposes.
The following pre-requirements are needed:
- nodeJS installed version: 12 or higher
$ node --version
Installation
Run tests
This project uses tslint to validate the coding style.
Code style tests
These tests perform the validation coding rules defined in aura using the tslint tool.
You can validate the code using:
$ npm run lint
Deployment
This project uses Jenkins to generate the docker image in the azure registry.
You can download the image using pull:
docker pull auraregistry.azurecr.io/aura/aura-mocks-server:<VERSION>
Build local docker image
To build docker image execute:
$ docker build -f ./delivery/docker/Dockerfile -t auraregistry.azurecr.io/aura-mocks-server .
Run server
To start mock server:
$ docker run -d -p 3000:3000 auraregistry.azurecr.io/aura-mocks-server
This starts a server listening on port 3000
Deploy
To deploy in performance environments, there is a convinient deployment yaml in aurak8s repository at tools/mocks/deployment.yml so you just need to run kubectl apply -f tools/mocks/deployment.yml.
Developer notes
The folder structure used for development is:
src
├── api             // Statics API code
├── modules         // Modules code (jsonserver)
├── scripts         // Scripts
└── shared          // Shared code between APIs and modules.
    ├── common
    └── services
Versioning
We use [SemVer] (http://semver.org/) for versioning.
For all available versions, look at the tags in this repository.
4.2 - Plugins
Aura mocks server plugins
aura-mocks-server plugins are components that provide different functionalities to this component
Introduction
aura-mocks-server is composed of plugins, which provide functionality to the tool. Plugins work independently, the same way as a service in a microservices oriented architecture: isolated, self-contained and without affecting other existing functionality in the system.
Discover in the current documents detailed information regarding aura-mocks-server plugins:
Global plugins catalog
The available global plugins of aura-mocks-server are included in the Github global plugins repository.
Aura Platform Team is progressively documenting each plugin within the current documents. Check the already documented ones in the left sidebar index.
Types of plugins
There are different types of plugins:
-
Api. REST services that perform specific tasks not associated with the communication with a channel.
-
Client. These plugins define clients that can be used to communicate with a channel. These clients are normally used by processor plugins.
-
Processor. Plugins in charge of communicating with a channel, transforming the message received from a source channel to a destination channel.
-
Service. Utility plugins to be used by the rest of plugins.
Plugins management
As indicated in the previous section, aura-mocks-server uses the library@architect/architect for the management of plugins, so it is the architect library that is responsible for managing the dependencies injection in each module.
To create the architect application, aura-mocks-server uses the PluginManager module (located in the modules/plugin-manager folder). This module starts as the rest of modules at the aura-mocks-server start-up.
The PluginManager performs the following tasks:
- It starts the architect application with the plugins defined in
plugin-config.json file, located at the root of the aura-mocks-server component.
- It adds the core modules to the IOC context. See the section modules added by aura-mocks-server.
- It stores the information of each module defined in the plugins.
An example to define aura-mocks-server-example-service plugin of the previous section is shown below:
/* file: plugin-config.json */
[
    "./lib/plugins/aura-mocks-server-example-service",
]
Currently, the plugins are in the src/plugins folder of aura-mocks-server, but in the future these plugins should be independent libraries and could be charged by library name (for example: @telefonica/aura-mocks-server-example-service).
Apart from the aura-mocks-server core environment variables, each plugin can define its own specific variables.
Plugin basic structure
Currently, aura-mocks-server uses @architect/architect library for plugins management.
A basic plugin must define at least:
- A
package.json file defining the library, like any other JavaScript library, with a plugin section defining which modules it consumes and supplies.
- A source code file that defines the modules that it supplies (
index.ts for example).
The structure of this basic plugin is as follows:
aura-mocks-server-example-service
├── index.ts
└── package.json
A couple of examples with the content of each file are included below:
/* file: index.ts */
import { PluginType, registerPlugin } from '@telefonica/xxxx-server-common';
import { v4 as uuidv4 } from 'uuid';
import { Services } from './example-consume-services';

export = registerPlugin([
    {
        type: PluginType.Service,       // Plugin service type
        name: 'exampleService',         // Name of the plugin service
        instance: {                     // [provides] Instance that provides the module
            getUniqueId() {
                return uuidv4();
            }
        },
        services: Services              // [consumes] Needed modules are added here
    }
]);
/* file: package.json */
{
    "name": "@telefonica/aura-mocks-server-example-service",
    "version": "1.0.0",
    "main": "index.js",
    "private": true,
    "plugin": {
        "consumes": [
            "configurationManager"
        ],
        "provides": [
            "exampleService"
        ]
    }
}
The modules specified in the plugin.consumes field define the services that are needed by this plugin. The modules specified in the plugin.provides field define the modules that this plugin offers.
Plugins modules
aura-mocks-server currently adds three modules that can be used by the different plugins. To use them, it is only necessary to add the package.json dependencies on plugin.consumes (like any other module/component).
- configurationManager: Module with the aura-mocks-server configuration information.
- auramocks-serverCache: Module to manage the aura-mocks-server cache.
- prometheus: Service for metrics management.
A plugin can provide one or more plugin modules and each plugin module can be of a different type. Each type of module is intended to add a specific functionality to aura-mocks-server.
The existing types are defined in PluginType, which are described in the following sections.
export enum PluginType {
    Api = 'Api',
    Client = 'Client',
    Processor = 'Processor',
    Service = 'Service'
}
4.2.1 - administration-api plugin
aura-mocks-administration-api plugin
Plugin that returns Aura Mocks Server data.
Description
The aura-mocks-administration-api plugin returns data info from Aura Mocks Server, such as app, cache or plugins.
Find more information in the Github repository:
https://github.com/Telefonica/aura-mocks-server/tree/master/src/plugins/aura-mocks-administration-api
This is part of aura-mocks-server project.
Administration Endpoints API
| Enpoint |
Method |
Group |
description |
| /administration/heapStatistics |
GET |
App |
Get heap statistics |
| /administration/heapSnapshot |
GET |
App |
Get heap snapshot |
| /administration/cache |
GET |
Cache |
Get cache |
| /administration/cache/stats |
GET |
Cache |
Get cache stats |
| /administration/plugins |
GET |
Plugins |
Get plugins |
GET: /administration/heapStatistics
Return Aura Mocks Server data info.
{
    "aura-mocks-server-1.0.0": {...}
}
GET: /administration/heapSnapshot
Generate and upload snapshot to Azure Storage.
GET: /administration/cache
Return cache data info.
{
    "info": {
        "Server": {...},
        "Clients": {...},
        "Memory": {...},
        "Persistence": {...},
        "Stats": {...},
        "Replication": {...},
        "CPU": {...},
        "Modules": {...},
        "Errorstats": {...},
        "Cluster": {...},
        "Keyspace": {...}
    }
}
GET: /administration/cache/stats
Return cache stats data.
GET: /administration/plugins
Return plugins data info.
[
    {
        "name": "redisStorageService",
        "pkg": "@telefonica/aura-redis-service",
        "version": "1.0.0",
        "package": "aura-mocks-redis-service",
        "consumes": [
            "configurationManager"
        ],
        "provides": [
            "redisStorageService"
        ]
    }
]
4.2.2 - async-callback-api plugin
aura-mocks-async-callback-api plugin
Plugin that mocks asynchronous notification message
Description
The aura-mocks-async-callback-api plugin simulates aura-bridge asynchronous notification message for asynchronous API requests, both internal, such as file-manager or external, such as technical-problems-api in Kernel. It also adds several useful endpoints for the QA team and performance testing.
Find more information in the Github repository:
https://github.com/Telefonica/aura-mocks-server/tree/master/src/plugins/aura-mocks-async-callback-api
This is part of aura-mocks-server project.
Endpoints API
| Enpoint |
Method |
Group |
description |
| /async-callback/notifications |
GET |
Async Callback |
Get notifications |
| /async-callback/notifications |
DELETE |
Async Callback |
Delete notifications |
| /async-callback/notifications |
POST |
Async Callback |
Send notification |
GET: /async-callback/notifications
Get message by messageCorrelator. The query param messageCorrelator is mandatory.
DELETE: /async-callback/notifications
Delete message by messageCorrelator. The query param messageCorrelator is mandatory.
POST: /async-callback/notifications
Add new asynchronous notification message
{
    "payload": {...},
    "creation_date": "2019-08-08T15:19:48.259Z",
    "user_id": "9a47b037-825f-4ae7-bf55-6290efd5d036"
}
4.2.3 - auraline-api plugin
aura-mocks-auraline-api plugin
Plugin that mocks Auraline.
Description
The aura-mocks-auraline-api plugin simulates aura-bridge for aura-bot Auraline callbacks and adds several useful endpoints for the QA Team and performance testing.
Find more information in the Github repository:
https://github.com/Telefonica/aura-mocks-server/tree/master/src/plugins/aura-mocks-auraline-api
This is part of aura-mocks-server project.
Endpoints API
| Enpoint |
Method |
Group |
description |
| /auraline/v1/activities |
GET |
Auraline |
Get activities |
| /auraline/v1/activities |
DELETE |
Auraline |
Delete activities |
| /auraline/v1/conversations/:conversationId/activities/:activityId |
POST |
Auraline |
Add activities |
| /auraline/v1/conversations/:conversationId/activities |
DELETE |
Auraline |
Delete activities |
GET: /auraline/v1/activities
Return activities by conversationId.
Query params:
| Name |
Type |
Description |
Mandatory |
| conversationId |
string |
Conversation id |
True |
| retries |
integer |
Number of retries |
False |
| timeBetweenRetries |
integer |
ms between retries |
False |
DELETE: /auraline/v1/activities
Delete activities by conversationId.
Query params:
| Name |
Type |
Description |
Mandatory |
| conversationId |
string |
Conversation id |
True |
POST: /auraline/v1/conversations/:conversationId/activities/:activityId
Push new Auraline activity for conversationId
DELETE: /auraline/v1/conversations/:conversationId/activities
Delete Auraline activities by conversationId
4.2.4 - bot-api plugin
aura-mocks-bot-api plugin
Plugin that mocks aura-bot
Description
The aura-mocks-bot-api plugin simulates Directline requests for aura-groot with several useful endpoints for the QA team and performance testing.
Find more information in the Github repository:
https://github.com/Telefonica/aura-mocks-server/tree/master/src/plugins/aura-mocks-bot-api
This is part of aura-mocks-server project.
Endpoints API
| Enpoint |
Method |
Group |
description |
| /api/messages |
POST |
bot |
Send messages: send messages. Optional param reply=true to send response with Directline format to aura-bridge |
| /api/messages |
GET |
bot |
Get messages |
| /api/messages |
DELETE |
bot |
Delete messages |
GET: /api/messages
Get message by to. The query param to is mandatory.
DELETE: /api/messages
Delete message by to. The query param to is mandatory.
POST: /api/messages
Add new aura-bot message.
{
    "type": "message",
    "id": "IiKY7bzb1Pd5VdtN4FZKmB-a|0000000",
    "timestamp": "2021-01-28T16:02:49.6587305Z",
    "serviceUrl": "https://directline.botframework.com/",
    "channelId": "directline",
    "from": {
    "id": "ca9961f9-c6f0-3acd-5c72-ce2719f43ec9"
    },
    "conversation": {
    "id": "IiKY7bzb1Pd5VdtN4FZKmB-a"
    },
    "textFormat": "plain",
    "locale": "es-ES",
    "channelData": {
    "auraCommand": {
        "type": "suggestion",
        "value": {
        "intent": "intent.common.greetings"
        }
    }
}
4.2.5 - data-store-api plugin
aura-mocks-data-store-api plugin
Plugin that mocks data-store
Description
The aura-mocks-data-store-api plugin simulates an API to manage documents in a generic way with several useful endpoints for the QA team and performance testing.
Find more information in the Github repository:
https://github.com/Telefonica/aura-mocks-server/tree/master/src/plugins/aura-mocks-data-store-api
This is part of aura-mocks-server project.
Endpoints API
Defines an API to manage documents in a generic way.
| Enpoint |
Method |
Group |
description |
| /data-store/sorted/:collection |
POST |
Data Store |
Save document |
| /data-store/sorted/:collection |
GET |
Data Store |
Find documents |
| /data-store/sorted/:collection/:id |
GET |
Data Store |
Get document in collection by id |
GET: /data-store/sorted/:collection
Get message by timestamp. The query param timestamp is mandatory.
DELETE: /data-store/sorted/:collection
Delete message by timestamp. The query param timestamp is mandatory.
POST: /data-store/sorted/:collection
Add new collection document.
4.2.6 - dynamic-settings-service plugin
aura-mocks-dynamic-settings-service plugin
Description of the aura-mocks-dynamic-settings-service plugin
Description
The aura-mocks-dynamic-settings-service plugin is responsible for loading profile configurations from an Azure account or locally to be used afterwards.
An attempt is made to collect data from the specified Azure Storage account and container. If nothing is found, a default file is collected locally from path src/plugins/aura-mocks-dynamic-settings-service/dynamic-settings-default.json. The active cron performs this check periodically.
Find more information in the Github repository:
https://github.com/Telefonica/aura-mocks-server/tree/master/src/plugins/aura-mocks-dynamic-settings-service
This is part of aura-mocks-server project.
Variables
| name |
type |
description |
mandatory |
| AURA_MOCKS_DYNAMIC_SETTINGS_SERVICE_CRON |
string |
Cron expression for dynamic settings loading |
no |
| AURA_MOCKS_DYNAMIC_SETTINGS_SERVICE_RESOURCE_CONTAINER |
string |
Container where dynamic settings file is stored |
no |
| AURA_MOCKS_DYNAMIC_SETTINGS_SERVICE_RESOURCE_PATH |
string |
Path to JSON configuration file used by dynamic settings service |
no |
Example of dynamic settings file
{
    "type": "Local",
    "plugins": [
        {
            "name": "auraMocksGenesysApi",
            "settings": {
                "pushProviders": [
                    {
                        "name": "default",
                        "pushUrl": "https://svc-ap-current.auracognitive.com/aura-services/v1/genesys/messages?apikey=123456",
                        "headers": {
                            "genesys-callback": "http://perf-mock.aura-mocks.svc"
                        }
                    }
                ],
                "profiles": [
                    {
                        "name": "default",
                        "configuration": {
                            "chat": {
                                "updateAliasForEachRequest": true,
                                "autoMessages": [
                                    {
                                        "from": {
                                            "nickname": "system",
                                            "type": "External"
                                        },
                                        "type": "ParticipantJoined",
                                        "timeout": 1
                                    }
                                ]
                            }
                        }
                    }
                ]
            }
        }
    ]
}
4.2.7 - genesys-api plugin
aura-mocks-genesys-api plugin
Plugin that mocks the behavior of Genesys, the call-center service used by Telefónica OBs.
Description
The aura-mocks-genesys-api plugin contains the services used by aura-bot and aura-bridge to work without real Genesys services.
These services are mainly:
Find more information in the Github repository:
https://github.com/Telefonica/aura-mocks-server/tree/master/src/plugins/aura-mocks-genesys-api
This is part of aura-mocks-server project.
Genesys API
Chat API Version 2
Genesys documentation: https://docs.genesys.com/Documentation/GMS/latest/API/ChatAPIv2
Currently, the mock for Genesys has the following endpoints implemented:
| Enpoint |
Method |
Group |
description |
| /genesys/2/chat/{serviceName} |
POST |
Chat |
Request Chat |
| /genesys/2/chat/{serviceName}/{chatId}/send |
POST |
Chat |
Send Message |
| /genesys/2/chat/{serviceName}/{chatId}/disconnect |
POST |
Chat |
Disconnect |
| /genesys/2/chat/{serviceName}/{chatId}/pushUrl |
POST |
Chat |
PushUrl |
Start a new chat
Steps
- Perform a
POST request to /Genesys/2/Chat/{ServiceName}
- When a new chat is created using the
POST request to “/Genesys/2/Chat/{ServiceName}”, the system uses the settings indicated in the profile parameter or uses the default profile configuration if this parameter is not informed (see Profiles mock API
- Send messages to chat using the endpoint
/genesys/2/chat/{serviceName}/{chatId}/send
You can change at any time the value of Pushurl using the endpoint /genesys/2/chat/{serviceName}/{chatId}/pushUrl
Sessions Mock API
To help in testing tasks, the mocks exposes a series of services associated with the sessions it manages and the profiles that can be used to start a conversation.
Sessions are identified by the chatId, so once a chat is created, you can check the session using /genesys/2/mock/sessions/{chatId}.
Endpoins
| Enpoint |
Method |
Group |
description |
| /genesys/2/mock/sessions |
GET |
Session |
Get chat mock sessions |
| /genesys/2/mock/sessions/{chatId} |
GET |
Session |
Get session by chatId |
| /genesys/2/mock/sessions/stats |
GET |
Session |
Get session stats |
| /genesys/2/mock/sessions/keys |
GET |
Session |
Get session keys |
| /genesys/2/mock/sessions |
DELETE |
Session |
Remove session |
Profiles Mock API
The profiles allow you to configure a different execution environment to the default environment, in order to receive answers in another address (Pushurl) and execute automatic actions when starting a new chat.
What are the profiles for?
When a new chat is created using the POST request /genesys/2/chat/{serviceName}, a profile is used to configure mainly two parameters:
pushUrl: It indicates the address where PUSH notifications will be sent.autoMessages: Messages that will be executed automatically at the beginning of the conversation and using the waiting time indicated for each message.
See default profile settings
An example of configuration for the “default” profile is shown below:
// Post result to "/genesys/2/mock/profiles"
[
    {
        "profile": "default",
        "settings": {
            "chat": {
                "pushUrl": "https://svc-ap-current.auracognitive.com/aura-services/v1/genesys/messages",
                "autoMessages": [
                    {
                        "from": {
                            "nickname": "system",
                            "type": "External"
                        },
                        "type": "ParticipantJoined",
                        "timeout": 1
                    },
                    {
                        "from": {
                            "type": "External"
                        },
                        "type": "Message",
                        "timeout": 1,
                        "text": "You have approximately 15 minutes to be attended"
                    },
                    {
                        "from": {
                            "type": "External"
                        },
                        "type": "Message",
                        "timeout": 1,
                        "text": "Soon one of our agents will attend you personally"
                    },
                    {
                        "from": {
                            "nickname": "agent1",
                            "type": "Agent"
                        },
                        "type": "ParticipantJoined",
                        "timeout": 1
                    },
                    {
                        "from": {
                            "type": "Agent"
                        },
                        "type": "Message",
                        "timeout": 1,
                        "text": "Hello, I am an Agent, how can I help you?"
                    }
                ]
            }
        }
    }
]
In the default configuration, once a new chat is created, the following messages will be executed:
- A second after starting the chat, the “system” (external) user will join conversation.
- After that, “system” will send a message “You have approximately 15 minutes to be attended” (1 second after the previous message).
- “system” will send a message “Soon one of our agents will attend you personally” (1 second after).
- “agent1” (Agent) user will join conversation (1 second after).
- “agent1” will send a message “Hello, I am an Agent, how can I help you?” (1 second after).
Endpoints
| Enpoint |
Method |
Group |
description |
| /genesys/2/mock/profiles |
GET |
Profile |
Get profiles |
| /genesys/2/mock/profiles/{profile} |
GET |
Profile |
Get profile by name |
| /genesys/2/mock/profiles/default |
POST |
Profile |
Set profile by name |
| /genesys/2/mock/profiles/reset |
GET |
Profile |
Reset profiles |
| /genesys/2/mock/chat/{serviceName}/{chatId}/send |
POST |
MockChat |
Send message directly to the session, with optional timeout |
Chat Mock API
You can send any type of event in chat using the service /genesys/2/mock/chat/{serviceName}/{chatId}/send. The format is similar to “autoMessages” for a profile.
The postman linked to this documentation contains an example of all types of events that can be sent to chat.
Postman
4.2.8 - json-server-api plugin
aura-mocks-json-server-api plugin
Module that mocks the behavior of any of the REST APIs called by aura-bot
Description
aura-mocks-json-server-api is a tool using express that allows you to generate REST services with predefined responses from a Javascript file that can be easily modified.
Find more information in the Github repository:
https://github.com/Telefonica/aura-mocks-server/tree/master/src/plugins/aura-mocks-json-server-api
This is part of aura-mocks-server project.
Create a simple “hello” response
You must create a file to store the information of your new response mocks in data/db/module (for our example, greetings.js):
data
├── db
│   ├── module
│   │   ├── greetings.js
Add to greetings.js the response to the request GET /greetings/hello:
module.exports = {
  "configuration": {
    "name": "greetings",
    "basePath": "/greetings"
  },
  "routes": {
    "/hello": {
      "GET": {
        "examples": {
          "default": {
            "status": 200,
            "body": {
              "response": "Hello from mock"
            }
          }
        }
      }
    }
  }
};
Now, you can make a call to:
<URL_MOCK_SERVER>/greetings/hello
That should answer with a:
{
    "response": "Hello from mock"
}
Creating a more complex answer
For example, to create a POST service /aura-services/v1/users/:id, where the user is dynamic:
 "routes": {
    "/aura-services/v1/users/:id": {
      "GET": {
        "configuration": {
          "getExampleKey": (req, res) => { return req.params && req.params.id ? req.params.id : 'default'; }
        },
        "examples": {
          "default": {
            "status": 200,
            "body": {
              "auraIdGlobal": "929285cb270001356476db33a4e31ce86402948213097e81717b50e549054cf2",
              "auraId": "fb7926db-0283-41ef-a02f-541946090c92",
              "userId": "85826044177A204DDEBCCEA98CE9439C3C770E03",
              "channelId": "60f0ffda-e58a-4a96-aad9-d42be70b7b42",
              "authorizationId": "",
              "phoneNumber": "",
              "idTokenHint": null
            }
          },
          "fb7926db-0283-41ef-a02f-541946090c92": {
            "status": 200,
            "body": {
              "auraIdGlobal": "929285cb270001356476db33a4e31ce86402948213097e81717b50e549054cf2",
              "auraId": "fb7926db-0283-41ef-a02f-541946090c92",
              "userId": "85826044177A204DDEBCCEA98CE9439C3C770E03",
              "channelId": "60f0ffda-e58a-4a96-aad9-d42be70b7b42",
              "authorizationId": "",
              "phoneNumber": "",
              "idTokenHint": null
            }
          }
        }
      }
    }
  }
How to get requests and responses automatically
The main idea is to obtain and generate all the requests in an automated way from the data sent and received by the aura-bot platform itself. In this way, there is no need to generate by hand each of the services required by the bot.
To obtain these requests, it is possible to use a sniffer and filter by the domains used by the aura-bot platform itself or use the aura-bot platform to record in a file all the requests and responses made (chosen option).
To use aura-bot platform as a request/response generator, you can temporarily modify the code as follows:
http-monkey-patcher.ts
line 1
import * as fs from 'fs';
before line 90
const requestResponse = {};
after line 122
parsedOptions.port = args[0].port;
after line 200: request.once ‘finish’
(requestResponse as any).request = {
    type: 'request',
    domain: host,
    port: parsedOptions.port,
    method: parsedOptions.method,
    path: parsedOptions.path,
    corr: this.getCorrelatorFromRequest(request) || CorrelatorUtil.noCorrelator,
    headers: request.getHeaders(),
    body: requestBody
};
after line 250: response.once ’end
(requestResponse as any).response = {
    type: 'response',
    domain: host,
    method: parsedOptions.method,
    status: response.statusCode,
    path: parsedOptions.path,
    body: responseBody,
    drt: duration,
    corr
};

fs.appendFile('/tmp/request-response-data.txt', `${JSON.stringify(requestResponse)}\n\n`, () => { });
To import the data obtained, check the documentation for json-server-import script
aura-mocks-json-server-api plugin scripts
Import requests/response to aura-mocks-server database
script: json-server-import.js
To import the information obtained previously, the script src/scripts/json-server-import.ts is used.
This script allows you to load the request / response information into the mock server database.
npm run jsonserver:import --file=/tmp/hello-greeting.txt
The previous sentence will load the requests, overwriting existing ones.
You can also debug the script code:
npm run jsonserver:import:debug --file=/tmp/hello-greeting.txt
How it works
The script will load in the JSON server database information of each request associated with the example named default. (All loaded requests are loaded as “samples” by default).
Examples are each of the responses that a request can return. You can create examples with a different identifier to default using the getExampleKey function (in configuration object) for that request:
...
  "routes": {
    "/aura-services/v1/users/:id": {
      "GET": {
        "configuration": {
          "getExampleKey": (req, res) => { return req.params && req.params.id ? req.params.id : 'default'; }
        },
...
In the previous configuration, the json-server-import script will get the example identifier using the id parameter obtained from the request URL itself. Thus, the request /aura-services/v1/users/e7c26f93-bf15-419b-8893-2728afad3b6c will create the example:
...
        "examples": {
          "e7c26f93-bf15-419b-8893-2728afad3b6c": {
            "status": 200,
            "body": {
              "auraIdGlobal": "5c7ba5d26fa2945b3b9b29b64d6822edd914dd0d82cf28eae5287dd2a28b7768",
              "auraId": "e7c26f93-bf15-419b-8893-2728afad3b6c",
              "userId": "17c1ee02-0140-11ea-a69e-362b8e000000",
              "channelId": "45494a5b-835a-4fff-a813-b3d2be529dbe",
              "authorizationId": "",
              "phoneNumber": "phone_number",
              "idTokenHint": null
            }
          }
        }
...
Show routes in aura-mocks-server database
script: json-server-routes.js
This script will show the routes stored in the JSON server database and the examples that each route contains.
npm run jsonserver:routes
aura-mocks-json-server-api plugin database
/v3/domain_classifier/default_query
Currently, the mocks service for apigw url /auracognitive/v3/domain_classifier/default_query is ready to respond to the following POST queries:
| Intent |
Channel |
Phrase (spanish) |
| intent.common.goodbyes |
mp |
hasta pronto |
| intent.common.greetings |
mp |
hola |
| intent.common.help |
mp |
ayuda |
| intent.common.swearwords |
mp |
joder |
| intent.common.thankyous |
mp |
gracias |
| intent.tv.content_get_info |
mp |
peliculas de fox |
| intent.tv.display |
mp |
quiero ver cuatro |
| intent.tv.none |
mp |
aabb |
| intent.tv.question_time_loc |
mp |
hora del partido del barcelona |
| intent.tv.search |
mp |
busca masterchef |
| intent.tv.search |
mp |
busca telediario |
| intent.tv.search_similar |
mp |
similar a telediario |
/aura-services/v1/users/:id
| User (auraId) |
Channel Name |
channelId |
| fb7926db-0283-41ef-a02f-541946090c92 |
mp |
60f0ffda-e58a-4a96-aad9-d42be70b7b42 |
4.2.9 - openai-api plugin
aura-mocks-openai-api plugin
Description of the aura-mocks-openai-api plugin that mocks some of the services defined in the Azure OpenAI Service, used mainly by the Aura Gateway API service.
Description
The aura-mocks-openai-api plugin contains the services used by aura-gateway-api to work without real OpenAI services.
Find more information in the Github repository:
https://github.com/Telefonica/aura-mocks-server/tree/master/src/plugins/aura-mocks-openai-api
Currently, the plugin mocks the following services:
This is part of aura-mocks-server project.
aura-mocks-openai-api API
Endpoints description
Currently, the mock for OpenAI has the following endpoints implemented:
| Enpoint |
Method |
Group |
description |
| /openai/deployments/:deployment_id/chat/completions |
POST |
Chat |
Create chat completions |
Create chat completions
The endpoint /openai/deployments/:deployment_id/chat/completions is used to create a new chat completion. It is a POST request that receives the following query parameters:
| Parameter |
Type |
Description |
| api-version |
string |
version of the API to be used |
The response can be modified using the content field of the request body.
Using a specific response
The content field of the request body can be used to return a specific response:
{
    "messages": [
        {
            "role": "user",
            "content": "error_400_content_filter"
        }
    ]
}
Using retries profile
The content field of the request body can be used to return responses based on a profile. The retries profile allows to return different responses for each retry. Example:
{
    "messages": [
        {
            "role": "user",
            "content": "user2|retries:status-500&status-200"
        }
    ]
}
In the example above, the retries profile will return the first response with status 500 and then the second response with status 200.
Defined responses
The following table shows the different mock responses that can be used:
| Mock response |
Description |
| error_400_content_filter |
Returns a 400 error with content filter error |
| error_401_incorrect_api_key |
Returns a 401 error with incorrect APIKey |
| error_429_exceeded_quota |
Returns a 429 error with exceeded quota |
| error_429_rate_limit_reached |
Returns a 429 error with rate limit reached |
| error_500_server_error |
Returns a 500 error with server error |
| error_503_engine_overloaded |
Returns a 503 error with engine overloaded |
| missing_response |
Returns a 200 response with an empty response body |
| success_length |
Returns a 200 success response |
| success_stop |
Returns a 200 success response with finish_reason stop |
The “error_429_exceeded_quota” and “error_429_rate_limit_reached” responses will have the “Retry-After” header set to 5 seconds.
4.2.10 - plugin-manager-service plugin
aura-mocks-plugin-manager-service plugin
Description of the aura-mocks-plugin-manager-service plugin
Description
The aura-mocks-plugin-manager-service plugin is responsible for registering the different plugins of project.
Find more information in the Github repository:
https://github.com/Telefonica/aura-mocks-server/tree/master/src/plugins/aura-mocks-plugin-manager-service
This is part of aura-mocks-server project.
4.2.11 - profiles-response-service plugin
aura-mocks-profiles-response-service plugin
Description and guidelines for working with the aura-mocks-profiles-response-service plugin
Introduction
The aura-mocks-profiles-response-service plugin provides the rest of the plugins a specific utility to employ profiles and perform different behaviors, depending on the information received in requests and the configuration by type.
Find more information in the Github repository:
https://github.com/Telefonica/aura-mocks-server/tree/master/src/plugins/aura-mocks-profiles-response-service
How to use
To use it, you must:
- Import services with injected plugins.
- Use Dynamic settings plugin to fetch the profile.
- Use
profileService to fetch the profile settings.
    import { services } from './services';
    const profiles: ProfileSettings[] = services.dynamicSettings?.getSettingsForPlugin('nameOfProfile')?.profiles;
    const profileSettings: ProfileSettings = services.profileService.getProfile(profile, profiles);
Methods
getData
    /**
     * Get data of profile.
     *
     * @param {string} value Message identifier
     * @returns {ProfileData} Profile data
     */
    public getData(value: string): ProfileData {
Example
const profileData: ProfileData = services.profileService?.getData(profile);
isProfile
    /**
     * Determine whether the service contains a correct profile.
     *
     * @param {string} value Value to test
     * @param {ProfileSettings[]} profiles Profile list
     * @returns {boolean} Is profile?
     */
    public isProfile(value: string, profiles: ProfileSettings[]): boolean {
getProfile
    /**
     * Get profile from value.
     *
     * @param {string} value Value to test
     * @param {ProfileSettings[]} profiles Profile list
     * @returns {ProfileSettings|undefined} Profile settings
     */
    public getProfile(value: string, profiles: ProfileSettings[]): ProfileSettings | undefined {
Example
services.profileService.getProfile(profile, profiles);
executeProfile
    /**
     * Executes given profile.
     *
     * @param {ProfileSettings} profile Settings of channel.
     * @param {object[]} savedMessages Messages stored in cache.
     * @param {object} message Message sent by the bridge.
     * @param {ResponseMessage} response Default response.
     * @param {ProfileData} profileData Profile data
     * @returns {ResponseResult} Response result.
     */
    public executeProfile(
        profile: ProfileSettings,
        savedMessages: any[],
        message: any,
        response: ResponseMessage,
        profileData: ProfileData
    ): ResponseResult {
Example
services.profileService.executeProfile(profileSettings, messages, message, {} as any, profileData);
executeProfileRetries
    /**
     * Executes profile retries.
     *
     * @param {ProfileSettings} profile Settings of channel.
     * @param {object[]} savedMessages Messages stored in cache.
     * @param {object} message Message sent by the bridge.
     * @param {ResponseMessage} response Default response.
     * @param {ProfileData} profileData Profile data
     * @returns {ResponseResult} Response result.
     */
    private executeProfileRetries(
        profile: ProfileSettings,
        savedMessages: any[],
        message: any,
        response: ResponseMessage,
        profileData: ProfileData
    ): ResponseResult {
Example
this.executeProfileRetries(profile, [{text: 'hola'}], 'hola', response, profileData);
executeProfileTokenExpired
    /**
     * Execute `tokenExpired` profile.
     * Emulate the `token expired` response from 4P.
     *
     * @param {any} message Message sent by the bridge.
     * @returns {ResponseResult} Response result.
     */
    private executeProfileTokenExpired(message: any): ResponseResult {
getNamespaceAndProfile
    /**
     * Get namespace and profile from value.
     * Example: '12345|namespace:aura-ap-next|retries:wa-1015&4p-200' => { namespace: 'aura', profile: '12345|retries:wa-1015&4p-200' }
     *
     * @param {string} value Value to test
     * @returns {{ namespace: string, profile: string }} Namespace and profile
     */
    public getNamespaceAndProfile(value: string): { namespace: string, profile: string } {
Example
const { namespace, profile } = services.profileService.getNamespaceAndProfile(id);
4.2.12 - redis-service plugin
aura-mocks-redis-service plugin
Module that connect plugins to Redis database
Description
aura-mocks-redis-service plugin is a tool using aura-redis-handler that allows the connection of plugins to Redis database.
Find more information in the Github repository:
https://github.com/Telefonica/aura-mocks-server/tree/master/src/plugins/aura-mocks-redis-service
This is part of aura-mocks-server project.
Methods
delete
Delete element by key from Redis.
| Property |
Type |
Description |
| pattern |
string |
Unique key for Redis |
| corr |
string |
Unique correlator |
Example:
await redisService.delete('test-key', 'test-correlator');
get
Get element by key from Redis.
| Property |
Type |
Description |
| pattern |
string |
Unique key for Redis |
| corr |
string |
Unique correlator |
Example:
await redisService.get('test-key', 'test-correlator');
info
Return info from Redis.
| Property |
Type |
Description |
| sections |
string[]/undefined |
Array with sections |
| corr |
string |
Unique correlator |
Example:
await redisService.info(['section_1'], 'test-correlator');
lPush
Put an element at the beginning of a Redis list.
| Property |
Type |
Description |
| pattern |
string |
Unique key for Redis |
| value |
string |
Data to save |
| corr |
string |
Unique correlator |
Example:
await redisService.lPush('test-key', 'data', 'test-correlator');
rPush
Put an element at the end of a Redis list.
| Property |
Type |
Description |
| pattern |
string |
Unique key for Redis |
| value |
string |
Data to save |
| corr |
string |
Unique correlator |
Example:
await redisService.rPush('test-key', 'data', 'test-correlator');
lRange
Get elements by key and range from Redis list.
| Property |
Type |
Description |
| pattern |
string |
Unique key for Redis |
| from |
number |
Start index |
| to |
number |
End index |
| corr |
string |
Unique correlator |
Example:
await redisService.lRange('test-key', 0, 10, 'test-correlator');
set
Add data by key to Redis.
| Property |
Type |
Description |
| pattern |
string |
Unique key for Redis |
| value |
string |
Data to save |
| corr |
string |
Unique correlator |
Example:
await redisService.set('test-key', 'data', 'test-correlator');
sAdd
Add element to the set of Redis.
| Property |
Type |
Description |
| pattern |
string |
Unique key for Redis |
| value |
string |
Data to save |
| corr |
string |
Unique correlator |
Example:
await redisService.sAdd('test-key', 'data', 'test-correlator');
sInter
Get elements by key Redis.
| Property |
Type |
Description |
| pattern |
string |
Unique key for Redis |
| corr |
string |
Unique correlator |
Example:
await redisService.sInter('test-key', 'data', 'test-correlator');
sRem
Remove element from the set of Redis.
| Property |
Type |
Description |
| pattern |
string |
Unique key for Redis |
| value |
string |
Value to search |
| corr |
string |
Unique correlator |
Example:
await redisService.sRem('test-key', 'data', 'test-correlator');
zAdd
Add element to the sorted set.
| Property |
Type |
Description |
| pattern |
string |
Unique key for Redis |
| score |
number |
Index of the element |
| value |
string |
Value to add |
| corr |
string |
Unique correlator |
Example:
await redisService.zAdd('test-key', 'data', 'test-correlator');
zRevRange
Get elements by key and range.
| Property |
Type |
Description |
| pattern |
string |
Unique key for Redis |
| from |
string/number |
Start index |
| to |
string/number |
End index |
| corr |
string |
Unique correlator |
Example:
await redisService.zRevRange('test-key', 0, 10, 'test-correlator');
withLock
Lock Redis key and execute function.
| Property |
Type |
Description |
| fn |
function |
Callback |
| key |
string |
Key to lock |
| corr |
string |
Unique correlator |
Example:
await redisService.withLock(await () => true, 'test-key', 'test-correlator');
4.2.13 - send-feedback-api plugin
aura-mocks-send-feedback-api plugin
Plugin that mocks feedback sent by *aura-bridge
Description
The aura-mocks-send-feedback-api plugin simulates the server that is responsible for receiving the different requests from the aurapush-sendfeedback-service plugin of *aura-bridge component. These requests may involve the sending of statues, errors o messages.
Find more information in the Github repository:
https://github.com/Telefonica/aura-mocks-server/tree/master/src/plugins/aura-mocks-send-feedback-api
This is part of aura-mocks-server project.
Endpoints API
| Enpoint |
Method |
Group |
description |
| /feedback/statuses/update |
PUT |
Send Feedback |
Update statuses |
| /feedback/errors/update |
PUT |
Send Feedback |
Update errors |
| /feedback/messages/update |
PUT |
Send Feedback |
Update messages |
| /feedback/messages |
DELETE |
Send Feedback |
Delete cache |
| /feedback/messages/:messageId |
GET |
Send Feedback |
Get message feedback by MessageId |
| /feedback/messages |
GET |
Send Feedback |
Get all message feedback |
PUT: /feedback/statuses/update
Update statuses by messageId, so messageId is mandatory.
PUT: /feedback/errors/update
Update errors by messageId, so messageId is mandatory.
PUT: /feedback/messages/update
Update messages by messageId, so messageId is mandatory.
DELETE: /feedback/messages/
Delete feedback message by messageId. The query param messageId is mandatory.
GET: /feedback/messages/
Get all messages feedback by MessageId. The query messageId value is mandatory.
GET: /feedback/messages/:messageId
Get message feedback by MessageId. The property in body messageId is mandatory.
4.2.14 - sms-soap-service plugin
aura-mocks-sms-soap-service plugin
Description of the aura-mocks-sms-soap-service plugin
Description
The aura-mocks-sms-soap-service** plugin is responsible for providing a mock SOAP service with access to a test bot dialog: sms-soap-service-dialog.
Find more information in the Github repository:
https://github.com/Telefonica/aura-mocks-server/tree/master/src/plugins/aura-mocks-sms-soap-service
This is part of aura-mocks-server project.
Endpoints API
| Enpoint |
Method |
Group |
description |
| /sms |
GET |
soap |
Soap Service with operation: sendSMS |
Variables
| name |
type |
description |
mandatory |
| AURA_MOCKS_SOAP_ACTIVE |
string |
Flag to indicate if SOAP service is active. By default: false. |
false |
| AURA_MOCKS_SOAP_SERVER_URI |
string |
URI for SOAP service used to define wsdl. By default: http://localhost:3000. |
false |
4.2.15 - storage-file-manager plugin
aura-mocks-storage-file-manager plugin
Description of the aura-mocks-storage-file-manager plugin
Description
The aura-mocks-storage-file-manager plugin is responsible for providing access to the aura-storage-file-manager utility to upload and download files from an Azure Storage account.
Find more information in the Github repository:
https://github.com/Telefonica/aura-mocks-server/tree/master/src/plugins/aura-mocks-storage-file-manager
This is part of aura-mocks-server project.
Variables
| name |
type |
description |
mandatory |
| AURA_MOCKS_MICROSOFT_AZURE_STORAGE_ACCESS_KEY |
string |
Azure storage access key |
yes |
| AURA_MOCKS_MICROSOFT_AZURE_STORAGE_ACCOUNT |
string |
Azure storage account |
yes |
| AURA_MOCKS_AZURE_STORAGE_CONTAINER |
string |
Container where mocks resources are stored. By default: aura-mocks-server |
no |
4.2.16 - store-activities-api plugin
aura-mocks-store-activities-api plugin
Plugin that mocks sending activities* of aura-bot*
Description
The aura-mocks-store-activities-api plugin simulates sending activities messages with several useful endpoints for the QA team and performance testing.
Find more information in the Github repository:
https://github.com/Telefonica/aura-mocks-server/tree/master/src/plugins/aura-mocks-store-activities-api
This is part of aura-mocks-server project.
Endpoints API
| Enpoint |
Method |
Group |
description |
| /activities |
GET |
bot |
Get messages |
| /v3/conversations/:conversationId/activities/:activityId |
POST |
bot |
Delete messages |
GET: /activities
Get message by activityCorrelator. The query param activityCorrelator is mandatory.
POST: /v3/conversations/:conversationId/activities/:activityId
Add activities.
POST: /api/messages
Add new activity message.
    {
        "type": "Receive_Message",
        "activity": {
            "type": "message",
            "id": "DF8d619NDYp3ywW1ew9QFK-fr|0000003",
            "timestamp": "2022-05-23T14:59:52.0129204Z",
            "channelId": "directline",
            "from": {
                "id": "BOT-aura-ap-next",
                "name": "BOT-aura-ap-next"
            },
            "conversation": {
                "id": "DF8d619NDYp3ywW1ew9QFK-fr"
            },
            "attachmentLayout": "list",
            "text": "Fiquei com dúvida. Veja se uma dessas respostas pode ajudar:",
            "speak": "Fiquei com dúvida. Veja se uma dessas respostas pode ajudar:",
            "inputHint": "expectingInput",
            "attachments": [
                {
                    "contentType": "application/vnd.microsoft.card.hero",
                    "content": {
                        "buttons": [
                            {
                                "type": "imBack",
                                "title": "Canonic phrase for intent:intent.bundle.get_name_by_type",
                                "value": "Canonic phrase for intent:intent.bundle.get_name_by_type"
                            },
                            {
                                "type": "imBack",
                                "title": "Canonic phrase for intent:intent.common.greetings",
                                "value": "Canonic phrase for intent:intent.common.greetings"
                            },
                            {
                                "type": "imBack",
                                "title": "¿Cómo puedo acceder a Mi Movistar?",
                                "value": "¿Cómo puedo acceder a Mi Movistar?"
                            }
                        ]
                    }
                }
            ],
            "channelData": {
                "hasMoreMessages": false,
                "correlator": "6ed5ed79-cd88-415e-9135-654417fef9b6"
            },
            "replyToId": "DF8d619NDYp3ywW1ew9QFK-fr|0000002"
        }
    }
4.2.17 - whatsapp-api plugin
aura-mocks-whatsapp-api plugin
Plugin that mocks WhatsApp.
Description
The aura-mocks-whatsapp-api plugin simulates aura-bridge for aura-bot WhatsApp callbacks and adds several useful endpoints for the QA team and performance testing.
Find more information in the Github repository:
https://github.com/Telefonica/aura-mocks-server/tree/master/src/plugins/aura-mocks-whatsapp-api
This is part of aura-mocks-server project.
Endpoints API
| Enpoint |
Method |
Group |
description |
| /whatsapp/messages |
GET |
Whatsapp |
Get messages |
| /whatsapp/messages |
POST |
Whatsapp |
Add new message |
| /whatsapp/messages |
DELETE |
Whatsapp |
Delete messages |
| /whatsapp/messages/:id |
PUT |
Whatsapp |
Add new read message |
| /whatsapp/read-messages |
GET |
Whatsapp |
Get read messages |
| /whatsapp/read-messages |
POST |
Whatsapp |
Add new read message |
| /whatsapp/read-messages |
DELETE |
Whatsapp |
Delete readmessages |
| /whatsapp/no-notification/messages |
POST |
Whatsapp |
Add new message |
| /whatsapp/no-notification/messages/:id |
PUT |
Whatsapp |
Add new read message |
| /whatsapp/4p/:error/messages |
POST |
Whatsapp |
Add new message and return error |
| /whatsapp/4p/:error/messages/:id |
PUT |
Whatsapp |
Add new read message |
| /whatsapp/:error/messages |
POST |
Whatsapp |
Add new message and return error |
| /whatsapp/:error/messages/:id |
PUT |
Whatsapp |
Add new read message |
GET: /whatsapp/messages
Get messages from WhatsApp. The query param to is mandatory.
POST: /whatsapp/messages
Add new message for WhatsApp.
{
    "to": "34666666660",
    "text": "Testing POST /whatsapp/messages"
}
DELETE: /whatsapp/messages
Delete messages from WhatsApp. The query param to is mandatory.
PUT: /whatsapp/messages/:id
Add new read message for WhatsApp.
{
    "to": "34666666660",
    "text": "Testing PUT /whatsapp/messages/:id"
}
GET: /whatsapp/read-messages
Get read messages from WhatsApp. The query param to is mandatory.
POST: /whatsapp/read-messages
Add new read message for WhatsApp.
{
    "to": "34666666660",
    "text": "Testing POST /whatsapp/read-messages"
}
DELETE: /whatsapp/read-messages
Delete read messages from WhatsApp. The query param to is mandatory.
POST: /whatsapp/no-notification/messages
Add new message for WhatsApp.
{
    "to": "34666666660",
    "text": "Testing POST /whatsapp/no-notification/messages"
}
PUT: /whatsapp/no-notification/messages/:id
Add new read message for WhatsApp.
{
    "to": "34666666660",
    "text": "Testing PUT /whatsapp/no-notification/messages/:id"
}
POST: /whatsapp/4p/:error/messages
Add new message and return status code error.
{
    "to": "34666666660",
    "text": "Testing POST /whatsapp/4p/:error/messages"
}
PUT: /whatsapp/4p/:error/messages/:id
Add new read message for WhatsApp.
{
    "to": "34666666660",
    "text": "Testing PUT /whatsapp/4p/:error/messages/:id"
}
POST: /whatsapp/:error/messages
Add new message and return status code error and error message.
{
    "to": "34666666660",
    "text": "Testing POST /whatsapp/:error/messages"
}
PUT: /whatsapp/:error/messages/:id
Add new read message for WhatsApp.
{
    "to": "34666666660",
    "text": "Testing PUT /whatsapp/:error/messages/:id"
}